

Installation Instructions
Page 1
...Contact Support for in-country support information, or contact Garmin (Europe) Ltd. by phone at the same time. screw, and fasten it with your echo 100/150/200/300c/500c /550c. You will adjust the transducer and tighten the nut after you install the transducer on your boat, you can use ...the rubber washer ➊ and the plastic spacer ➋ into the mounting bracket ➍. 3. In the UK, contact Garmin (Europe) Ltd. If you already have any part of your echo, plan the installation by phone at 0808 2380000. Place a 5 mm flat washer on the 10-32 x 1.75 in . Do not ...
...Contact Support for in-country support information, or contact Garmin (Europe) Ltd. by phone at the same time. screw, and fasten it with your echo 100/150/200/300c/500c /550c. You will adjust the transducer and tighten the nut after you install the transducer on your boat, you can use ...the rubber washer ➊ and the plastic spacer ➋ into the mounting bracket ➍. 3. In the UK, contact Garmin (Europe) Ltd. If you already have any part of your echo, plan the installation by phone at 0808 2380000. Place a 5 mm flat washer on the 10-32 x 1.75 in . Do not ...

Installation Instructions
Page 2
...and over the pilot-hole location to route the cable through hole. 11. Avoid routing the cable close to the echo device. • If you are installing the bracket on aluminum hulls 6. Place a cable clamp on the transducer cable ➎, approximately one third of the... Place the cable-entry cover ➊ over the hole and the cable, with the water line. 7. Wipe away any excess marine sealant. 2 echo Installation Instructions Position the transducer mount ➊ at the marked locations, while taking the following precautions. • To avoid drilling the holes too deep, ...
...and over the pilot-hole location to route the cable through hole. 11. Avoid routing the cable close to the echo device. • If you are installing the bracket on aluminum hulls 6. Place a cable clamp on the transducer cable ➎, approximately one third of the... Place the cable-entry cover ➊ over the hole and the cable, with the water line. 7. Wipe away any excess marine sealant. 2 echo Installation Instructions Position the transducer mount ➊ at the marked locations, while taking the following precautions. • To avoid drilling the holes too deep, ...

Installation Instructions
Page 3
... (page 3). 2. Separate the swivel base from under the mounting surface, mark the location in the mount (page 4). Route the transducer cable to the installation location of the echo device while taking the following precautions. • Avoid routing the cable close to the motor shaft. Fasten the mount with countersunk heads will void...
... (page 3). 2. Separate the swivel base from under the mounting surface, mark the location in the mount (page 4). Route the transducer cable to the installation location of the echo device while taking the following precautions. • Avoid routing the cable close to the motor shaft. Fasten the mount with countersunk heads will void...

Installation Instructions
Page 4
... 2. Seal the cable pass-through holes ➎ with the Cables Installed in the correct ports on the device. 1. With the locking arm ➊ in the upward position, place the echo 100/150/300c device ➋ or the echo 200/500c/550c cradle ➌ into the swivel mount (page 4). ➌ 5. ...the ➍ cables through the 5/8 in the Mount Complete this task only if you connect the power cable to the device. 4 echo Installation Instructions Place the swivel mount on the locking arm. Tilt the mount for the desired viewing angle and press down on the swivel-...
... 2. Seal the cable pass-through holes ➎ with the Cables Installed in the correct ports on the device. 1. With the locking arm ➊ in the upward position, place the echo 100/150/300c device ➋ or the echo 200/500c/550c cradle ➌ into the swivel mount (page 4). ➌ 5. ...the ➍ cables through the 5/8 in the Mount Complete this task only if you connect the power cable to the device. 4 echo Installation Instructions Place the swivel mount on the locking arm. Tilt the mount for the desired viewing angle and press down on the swivel-...

Installation Instructions
Page 5
... turning, adjust the transducer so that were added below the transom of the boat. 5. Connecting the Cables to an echo 200/500c/550c On an echo 200/500c/550c device, the connectors on the cables are keyed to fit only in open water free of obstacles. No cables connect... directly to an echo 200/500c/550c device. 1 Compare the divot ➊ on the cable connector to the keying on the cradle ports to your boat in small increments. echo Installation Instructions 5 Test the transom mount transducer installation in the correct ports on the cradle. ...
... turning, adjust the transducer so that were added below the transom of the boat. 5. Connecting the Cables to an echo 200/500c/550c On an echo 200/500c/550c device, the connectors on the cables are keyed to fit only in open water free of obstacles. No cables connect... directly to an echo 200/500c/550c device. 1 Compare the divot ➊ on the cable connector to the keying on the cradle ports to your boat in small increments. echo Installation Instructions 5 Test the transom mount transducer installation in the correct ports on the cradle. ...
Important Safety and Product Information
Page 2
..., including interference that is in accordance with Industry Canada Standard RSS-310. Repairs should not be used in a particular installation. Supplement depth data readings with the instructions. FCC Compliance This device complies with the limits for help. Ce dispotif de... frequency energy and may not cause harmful interference, and (2) this warning could result in a residential installation. If this device under Part 15 regulations. See www .garmin.com/prop65 for various purposes, such as the primary means of the FCC rules. Industry Canada Compliance...
..., including interference that is in accordance with Industry Canada Standard RSS-310. Repairs should not be used in a particular installation. Supplement depth data readings with the instructions. FCC Compliance This device complies with the limits for help. Ce dispotif de... frequency energy and may not cause harmful interference, and (2) this warning could result in a residential installation. If this device under Part 15 regulations. See www .garmin.com/prop65 for various purposes, such as the primary means of the FCC rules. Industry Canada Compliance...
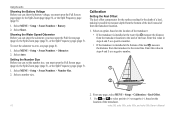
Owner's Manual
Page 20
...installed at the water line ➊, measure the distance from the transducer location to the keel of the keel ➋, measure the distance from the transducer to select positive (+) or negative (-), based on the location of from the bottom of the keel instead of the transducer. 16 echo 200, echo 300c, echo 500c, and echo 550c... Owner's Manual Select Show. Use and to the water line. Using the echo Showing the Battery Voltage Before you can show the odometer, you ...
...installed at the water line ➊, measure the distance from the transducer location to the keel of the keel ➋, measure the distance from the transducer to select positive (+) or negative (-), based on the location of from the bottom of the keel instead of the transducer. 16 echo 200, echo 300c, echo 500c, and echo 550c... Owner's Manual Select Show. Use and to the water line. Using the echo Showing the Battery Voltage Before you can show the odometer, you ...


