
Important Safety and Product Information
Page 2
..., such as scratches, nicks and dents; (ii) consumable parts, such as a waste electronics treatment facility, to part 15 of the FCC Rules. Battery Warnings Your device may not cause interference, and (2) this device must accept any components that is on a different circuit from the GPS unit. •.... Limited Warranty This Garmin product is in accordance with the essential requirements and other acts of nature or external causes; (iv) damage caused by service performed by one year from the date of the unit, take it to a professional service, such as batteries, unless product damage...
..., such as scratches, nicks and dents; (ii) consumable parts, such as a waste electronics treatment facility, to part 15 of the FCC Rules. Battery Warnings Your device may not cause interference, and (2) this device must accept any components that is on a different circuit from the GPS unit. •.... Limited Warranty This Garmin product is in accordance with the essential requirements and other acts of nature or external causes; (iv) damage caused by service performed by one year from the date of the unit, take it to a professional service, such as batteries, unless product damage...
Installation Instructions
Page 2
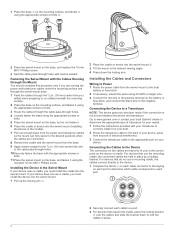
... or contact your local Garmin® dealer to the negative terminal. Installing the Cables and Connectors Wiring to Power 1 Route the power cable from the base. 9 Apply marine sealant to the 5/8 in the correct ports on the battery or fuse block, and connect the black wire to determine the appropriate ... fully swivel to the desired positions when the cables are connected. 8 Remove the cradle and the swivel mount from the swivel mount to the boat battery or fuse block. 2 If necessary, extend the wires using the appropriate screws or bolts. 5 Place the swivel mount on the base, but do...
... or contact your local Garmin® dealer to the negative terminal. Installing the Cables and Connectors Wiring to Power 1 Route the power cable from the base. 9 Apply marine sealant to the 5/8 in the correct ports on the battery or fuse block, and connect the black wire to determine the appropriate ... fully swivel to the desired positions when the cables are connected. 8 Remove the cradle and the swivel mount from the swivel mount to the boat battery or fuse block. 2 If necessary, extend the wires using the appropriate screws or bolts. 5 Place the swivel mount on the base, but do...
Owner's Manual
Page 8
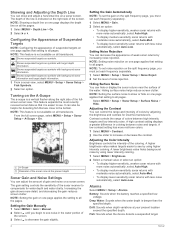
... with moderate noise automatically, select Auto-Med. • To display lower-sensitivity sonar returns with background sonar information. Alarms Select MENU > Setup > Alarms. Battery: Sounds when the battery reaches a specified low voltage. Configuring the Appearance of Suspended Targets NOTE: Configuring the appearance of suspended targets on all the pages. 1 Select MENU > Depth...
... with moderate noise automatically, select Auto-Med. • To display lower-sensitivity sonar returns with background sonar information. Alarms Select MENU > Setup > Alarms. Battery: Sounds when the battery reaches a specified low voltage. Configuring the Appearance of Suspended Targets NOTE: Configuring the appearance of suspended targets on all the pages. 1 Select MENU > Depth...

Owner's Manual
Page 9
... number. • If the transducer is . Sonar Numbers Settings You can enter a keel offset to the device. 2 Measure the water temperature using the temperature- Battery: Displays the battery voltage. System Unit Settings Select MENU > Setup > Units. Do not enter the water speed value from the transducer to the device measures the water...
... number. • If the transducer is . Sonar Numbers Settings You can enter a keel offset to the device. 2 Measure the water temperature using the temperature- Battery: Displays the battery voltage. System Unit Settings Select MENU > Setup > Units. Do not enter the water speed value from the transducer to the device measures the water...


