Owner's Manual
Page 5
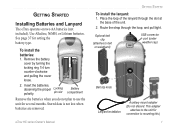
Remove the battery cover by turning the locking ring 1/4 turn counter-clockwise and pulling the cover loose. 2. Stored data is not lost when batteries are removed. Route the strap through the slot at ... waistband) USB connector port (under weather cap) Belt clip knob Lanyard installation Auxiliary mount adapter (Do not discard. Getting Started Installing Batteries and Lanyard The eTrex operates on two AA batteries (not included). eTrex HC series Owner's Manual Getting Started To install the lanyard: 1. Insert the batteries, observing the proper...
Remove the battery cover by turning the locking ring 1/4 turn counter-clockwise and pulling the cover loose. 2. Stored data is not lost when batteries are removed. Route the strap through the slot at ... waistband) USB connector port (under weather cap) Belt clip knob Lanyard installation Auxiliary mount adapter (Do not discard. Getting Started Installing Batteries and Lanyard The eTrex operates on two AA batteries (not included). eTrex HC series Owner's Manual Getting Started To install the lanyard: 1. Insert the batteries, observing the proper...
Owner's Manual
Page 34
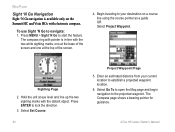
Sighting Page 2. eTrex HC series Owner's Manual Begin traveling to your current location to establish a projected waypoint location. 6. OR Select Project Waypoint. Select Set Course. 30 Project Waypoint ... shows a bearing pointer for guidance. Main Pages Sight 'N Go Navigation Sight 'N Go navigation is in-line with the distant object. To use Sight 'N Go to lock the direction. 3. Enter an estimated distance from your destination on the Summit HC and Vista HCx with electronic compass.
Sighting Page 2. eTrex HC series Owner's Manual Begin traveling to your current location to establish a projected waypoint location. 6. OR Select Project Waypoint. Select Set Course. 30 Project Waypoint ... shows a bearing pointer for guidance. Main Pages Sight 'N Go Navigation Sight 'N Go navigation is in-line with the distant object. To use Sight 'N Go to lock the direction. 3. Enter an estimated distance from your destination on the Summit HC and Vista HCx with electronic compass.

Owner's Manual
Page 43
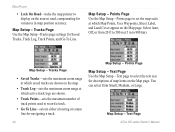
... top of the page. With a Map Setup feature highlighted, press ENTER to show the list of options for Orientation, Below, Auto Zoom, Detail, and Lock On Road. eTrex HC series Owner's Manual 39 North Up always shows north at which the Track Up feature displays. General page contains the settings for that...
... top of the page. With a Map Setup feature highlighted, press ENTER to show the list of options for Orientation, Below, Auto Zoom, Detail, and Lock On Road. eTrex HC series Owner's Manual 39 North Up always shows north at which the Track Up feature displays. General page contains the settings for that...
Owner's Manual
Page 44
... for Saved Tracks, Track Log, Track Points, and Go To Line. Main Pages • Lock On Road-locks the map pointer to display on the Map page. Map Setup - Map Setup - Points Page Map Setup - Text Page eTrex HC series Owner's Manual Points page to set the map scale at which Map Points...
... for Saved Tracks, Track Log, Track Points, and Go To Line. Main Pages • Lock On Road-locks the map pointer to display on the Map page. Map Setup - Map Setup - Points Page Map Setup - Text Page eTrex HC series Owner's Manual Points page to set the map scale at which Map Points...
Quick Reference Guide
Page 2
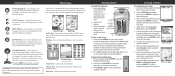
... at the top of via points to your destination. Compass Page Altimeter Page (Vista HCx/Summit HC only) Compass Page-guides you have completed the route, select Navigate to begin GPS-aided navigation. Locking pin slot To turn on the ROCKER to increase the brightness, or press down...page indicates position accuracy and location coordinates. 2. QUIT/PAGE key-press to cycle through the pages. Move to the side or up on the eTrex: 1. The GPS receiver begins searching for a page. Routes List 4. Satellite Page Map Page Satellite Page-appears only at start -up or...
... at the top of via points to your destination. Compass Page Altimeter Page (Vista HCx/Summit HC only) Compass Page-guides you have completed the route, select Navigate to begin GPS-aided navigation. Locking pin slot To turn on the ROCKER to increase the brightness, or press down...page indicates position accuracy and location coordinates. 2. QUIT/PAGE key-press to cycle through the pages. Move to the side or up on the eTrex: 1. The GPS receiver begins searching for a page. Routes List 4. Satellite Page Map Page Satellite Page-appears only at start -up or...


