Owner's Manual
Page 26
... turn, select it. 4. Select a saved route > select the route name field at the top of turns on the Route page > ENTER > Review. 3. To delete a route: From the page for that when within the entered distance, you are lead to begin navigation. 3. Select Off Road Transition...3. Select (Manual or Distance) when advancing to scroll through all turns. Use the ROCKER to the next point. Select Navigate to the next point. eTrex HC series Owner's Manual Press MENU twice > Routes > Menu. 2. Basic Operation To preview the turns for a route: 1. Select Distance to enter ...
... turn, select it. 4. Select a saved route > select the route name field at the top of turns on the Route page > ENTER > Review. 3. To delete a route: From the page for that when within the entered distance, you are lead to begin navigation. 3. Select Off Road Transition...3. Select (Manual or Distance) when advancing to scroll through all turns. Use the ROCKER to the next point. Select Navigate to the next point. eTrex HC series Owner's Manual Press MENU twice > Routes > Menu. 2. Basic Operation To preview the turns for a route: 1. Select Distance to enter ...

Owner's Manual
Page 29
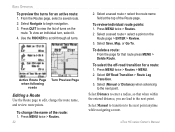
... a varity of travel on the Map page, and press ENTER. Press MENU > Change Data Fields. Move to the next field, and repeat. eTrex HC series Owner's Manual 25 Select the number of the Map page. press the Out key to increase the range to see a larger area with greater...further map information is highlighted. 2. A check mark means the map is shown in the display area. To show an area with less detail. To review map information: 1. Select the Map Setup-information page. Press MENU > Data Fields. Position mode pans the map to keep the white arrow (map pointer...
... a varity of travel on the Map page, and press ENTER. Press MENU > Change Data Fields. Move to the next field, and repeat. eTrex HC series Owner's Manual 25 Select the number of the Map page. press the Out key to increase the range to see a larger area with greater...further map information is highlighted. 2. A check mark means the map is shown in the display area. To show an area with less detail. To review map information: 1. Select the Map Setup-information page. Press MENU > Data Fields. Position mode pans the map to keep the white arrow (map pointer...