
Owner s Manual
Page 3
... the Handheld Device 3 Enabling the Independent BarkLimiter Feature from the Dog Collar Device 4 Bark Odometer 4 Using the Light 4 Device Information 4 Handheld Device Specifications 4 Dog Collar Device Specifications 4 Sport PRO Battery Replacement Instructions 4 Sport PRO Handheld Device Components 4 Replacing the Handheld Device Battery 4 Sport PRO Dog Collar Device Components 5 Replacing the Dog Collar Device Battery 5 Registering Your Device 5 Getting More Information 5 Getting the Owner...
... the Handheld Device 3 Enabling the Independent BarkLimiter Feature from the Dog Collar Device 4 Bark Odometer 4 Using the Light 4 Device Information 4 Handheld Device Specifications 4 Dog Collar Device Specifications 4 Sport PRO Battery Replacement Instructions 4 Sport PRO Handheld Device Components 4 Replacing the Handheld Device Battery 4 Sport PRO Dog Collar Device Components 5 Replacing the Dog Collar Device Battery 5 Registering Your Device 5 Getting More Information 5 Getting the Owner...
Owner s Manual
Page 8
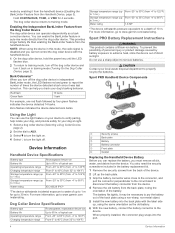
...;F) From -20° to www.garmin.com/waterrating. For more information, go to 35°C (from the handheld device. of 10 m. You also need the security screwdriver included in training mode (Turning On the Dog Collar Device, page 2). Sport PRO Battery Replacement Instructions WARNING This product contains a lithium-ion battery. Sport PRO Handheld Device Components Using the...
...;F) From -20° to www.garmin.com/waterrating. For more information, go to 35°C (from the handheld device. of 10 m. You also need the security screwdriver included in training mode (Turning On the Dog Collar Device, page 2). Sport PRO Battery Replacement Instructions WARNING This product contains a lithium-ion battery. Sport PRO Handheld Device Components Using the...
Owner s Manual
Page 9
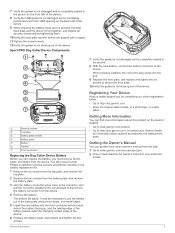
... out of the device. Registering Your Device Help us better support you by completing our online registration today. • Go to http://buy.garmin.com, or contact your preferred format. 5 It may be necessary to pry the battery out of the back plate using a non-sharp,...the battery facing up, and the leading edge of the battery placed under the charging contact ledge of the device. 6 Replace the battery plate, and replace and tighten the two screws. Sport PRO Dog Collar Device Components Security screws À Top plate Á Battery plate screws  Battery plate à Battery Ä...
... out of the device. Registering Your Device Help us better support you by completing our online registration today. • Go to http://buy.garmin.com, or contact your preferred format. 5 It may be necessary to pry the battery out of the back plate using a non-sharp,...the battery facing up, and the leading edge of the battery placed under the charging contact ledge of the device. 6 Replace the battery plate, and replace and tighten the two screws. Sport PRO Dog Collar Device Components Security screws À Top plate Á Battery plate screws  Battery plate à Battery Ä...

Owner s Manual
Page 10
... 5 B bark correction 3, 4 bark odometer 4 battery charging 1 replacing 4, 5 C charging collar 1 handheld 1 collar attaching strap 1 charging 1 contact points 1, 2 fitting 2 light 4 pairing 2 contact points 1, 2 D device, registration 5 dog status 3 training 2 training basics 3 training intensity levels 3 dog collar device 1, 2 I intensity level automatic 3 changing 3 choosing 3 K keys 1 P pairing, collar 2 power key 1, 2 product registration 5 R registering the device 5 replacing the battery 4 S specifications 4 T training stimulation 3 tone...
... 5 B bark correction 3, 4 bark odometer 4 battery charging 1 replacing 4, 5 C charging collar 1 handheld 1 collar attaching strap 1 charging 1 contact points 1, 2 fitting 2 light 4 pairing 2 contact points 1, 2 D device, registration 5 dog status 3 training 2 training basics 3 training intensity levels 3 dog collar device 1, 2 I intensity level automatic 3 changing 3 choosing 3 K keys 1 P pairing, collar 2 power key 1, 2 product registration 5 R registering the device 5 replacing the battery 4 S specifications 4 T training stimulation 3 tone...


