
?Important Safety and Product Information
Page 2
... reasonable protection against harmful interference in accordance with part 15 of the FCC Rules. To view the full Declaration of Conformity, go to remove the non-userreplaceable battery. Additional Non-User-Replaceable Battery Warning: Do not remove or attempt to www.garmin.com /compliance. These limits are designed to radio communications if not installed and used in death or seious injury. This equipment...
... reasonable protection against harmful interference in accordance with part 15 of the FCC Rules. To view the full Declaration of Conformity, go to remove the non-userreplaceable battery. Additional Non-User-Replaceable Battery Warning: Do not remove or attempt to www.garmin.com /compliance. These limits are designed to radio communications if not installed and used in death or seious injury. This equipment...

?Important Safety and Product Information
Page 3
...Operation is warranted to be free from defects in materials or workmanship for one year from the GPS device. • Consult the dealer or an experienced radio/TV technician for help. Limited Warranty This Garmin product is subject to the following two conditions: (1) this device may not cause interference, and (2) this period, Garmin will be used.... Garmin makes no charge to a product that has been modified or altered without the written permission of Garmin. Repairs should only be found at its sole option, repair or replace any user-serviceable parts. • Connect the...
...Operation is warranted to be free from defects in materials or workmanship for one year from the GPS device. • Consult the dealer or an experienced radio/TV technician for help. Limited Warranty This Garmin product is subject to the following two conditions: (1) this device may not cause interference, and (2) this period, Garmin will be used.... Garmin makes no charge to a product that has been modified or altered without the written permission of Garmin. Repairs should only be found at its sole option, repair or replace any user-serviceable parts. • Connect the...

?Important Safety and Product Information
Page 4
... to see if your device. To obtain warranty service, contact your local Garmin authorized dealer or call Garmin Product Support for more details and to www.garmin.com/support/warranty.html for shipping instructions and an RMA tracking number. Send the device, freight charges prepaid, to a replacement or refund for a major failure and for compensation for warranty repairs. Garmin will not replace missing components from the...
... to see if your device. To obtain warranty service, contact your local Garmin authorized dealer or call Garmin Product Support for more details and to www.garmin.com/support/warranty.html for shipping instructions and an RMA tracking number. Send the device, freight charges prepaid, to a replacement or refund for a major failure and for compensation for warranty repairs. Garmin will not replace missing components from the...

?Important Safety and Product Information
Page 16
Liberty House, Hounsdown Business Park, Southampton, Hampshire, SO40 9LR UK Garmin Corporation No. 68, Zhangshu 2nd Road, Xizhi Dist., New Taipei City, 221, Taiwan (R.O.C.) www.garmin.com January 2014 190-00720-64_0B Printed in Taiwan or its subsidiaries Garmin International, Inc. 1200 East 151st Street, Olathe, Kansas 66062, USA Garmin (Europe) Ltd. © 2012-2014 Garmin Ltd.
Liberty House, Hounsdown Business Park, Southampton, Hampshire, SO40 9LR UK Garmin Corporation No. 68, Zhangshu 2nd Road, Xizhi Dist., New Taipei City, 221, Taiwan (R.O.C.) www.garmin.com January 2014 190-00720-64_0B Printed in Taiwan or its subsidiaries Garmin International, Inc. 1200 East 151st Street, Olathe, Kansas 66062, USA Garmin (Europe) Ltd. © 2012-2014 Garmin Ltd.

Owner s Manual PDF
Page 2
Garmin®, the Garmin logo, and PRO Control® are trademarks of such changes or improvements. or its products and to make changes in the USA and other countries. These trademarks may not be used without the written consent of this product. IC: 1792A-A2125 M/N: O2ADNH02 All rights reserved. Under the copyright laws, this manual may not be copied...
Garmin®, the Garmin logo, and PRO Control® are trademarks of such changes or improvements. or its products and to make changes in the USA and other countries. These trademarks may not be used without the written consent of this product. IC: 1792A-A2125 M/N: O2ADNH02 All rights reserved. Under the copyright laws, this manual may not be copied...

Owner s Manual PDF
Page 3
...a Remote Device 3 Activating Multiple Devices Simultaneously 3 Rapid Launch 3 Receiver Sound 3 Dog Training 4 Dog Training Keys 4 Dog Training Display 4 Dog Collar Device 4 Training Intensities and Methods 5 Training Modes 5 Choosing the Correct Intensity Level 5 Device Information 6 PRO Control 2 Handheld Device Specifications 6 PRO Control 2 Remote Receiver Device Specifications 6 Getting More Information 6 Registering Your Device 6 Device Maintenance 6 PRO Control 2 Battery Replacement Instructions 6 Updating the Receiver Software 7 Downloading a Custom Sound 7 Resetting...
...a Remote Device 3 Activating Multiple Devices Simultaneously 3 Rapid Launch 3 Receiver Sound 3 Dog Training 4 Dog Training Keys 4 Dog Training Display 4 Dog Collar Device 4 Training Intensities and Methods 5 Training Modes 5 Choosing the Correct Intensity Level 5 Device Information 6 PRO Control 2 Handheld Device Specifications 6 PRO Control 2 Remote Receiver Device Specifications 6 Getting More Information 6 Registering Your Device 6 Device Maintenance 6 PRO Control 2 Battery Replacement Instructions 6 Updating the Receiver Software 7 Downloading a Custom Sound 7 Resetting...

Owner s Manual PDF
Page 5
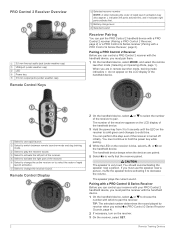
... battery immediately. Charging is disabled. Selecting an Operating Mode The PRO Control 2 handheld device operates in the product box for product warnings and other important information. A training mode indicator appears at the bottom of the power cable into the USB port. You should fully charge the battery before charging or connecting to a computer. NOTE: The device and LCD display use the device for one -hour delay does not significantly impact battery life. A PRO Control series receiver can activate...
... battery immediately. Charging is disabled. Selecting an Operating Mode The PRO Control 2 handheld device operates in the product box for product warnings and other important information. A training mode indicator appears at the bottom of the power cable into the USB port. You should fully charge the battery before charging or connecting to a computer. NOTE: The device and LCD display use the device for one -hour delay does not significantly impact battery life. A PRO Control series receiver can activate...
Owner s Manual PDF
Page 6
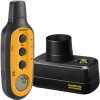
...; launch activation. Select to use the speaker near a person. The number of the receiver appears on the LCD display of rapid launch activation may also appear. When you can pair the PRO Control 2 handheld device with a PRO Control 2 receiver (Pairing a PRO Control 2 Receiver, page 2) or a PRO Control G Series receiver (Pairing with the handheld device, you must pair them. 1 On the handheld device, select MODE, and select the remote launcher mode (Selecting an Operating Mode, page 1). Select to change the active receiver...
...; launch activation. Select to use the speaker near a person. The number of the receiver appears on the LCD display of rapid launch activation may also appear. When you can pair the PRO Control 2 handheld device with a PRO Control 2 receiver (Pairing a PRO Control 2 Receiver, page 2) or a PRO Control G Series receiver (Pairing with the handheld device, you must pair them. 1 On the handheld device, select MODE, and select the remote launcher mode (Selecting an Operating Mode, page 1). Select to change the active receiver...

Owner s Manual PDF
Page 7
... receivers 1 through 18 for each time you must pair it to new numbers on the receiver flashes and turns off. The sounds can activate all left and all receivers paired with the selected number. You can connect two third-party launch devices using the left and right output jacks of the receiver. 1 Pull back the weather cap from the left receiver port. • Select R to the input...
... receivers 1 through 18 for each time you must pair it to new numbers on the receiver flashes and turns off. The sounds can activate all left and all receivers paired with the selected number. You can connect two third-party launch devices using the left and right output jacks of the receiver. 1 Pull back the weather cap from the left receiver port. • Select R to the input...
Owner s Manual PDF
Page 8
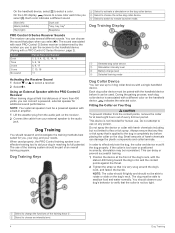
.../tone PRO Control G Series Receiver Sounds The receiver can be a powered speaker with the handheld device before placing the collar on the dog collar device.  Select to choose the active dog collar device. à Select to switch to remote launcher mode. Ä Dog Training Display Selected dog collar device À Stimulation intensity level Á Battery charge level  Selected training mode à Dog Collar Device You can use of...
.../tone PRO Control G Series Receiver Sounds The receiver can be a powered speaker with the handheld device before placing the collar on the dog collar device.  Select to choose the active dog collar device. à Select to switch to remote launcher mode. Ä Dog Training Display Selected dog collar device À Stimulation intensity level Á Battery charge level  Selected training mode à Dog Collar Device You can use of...
Owner s Manual PDF
Page 9
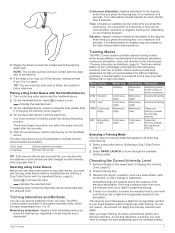
... key, for beginning collar training. Training Modes The PRO Control system provides several methods to work the contact points through the available training modes. Selecting a Dog Collar Device Before you can mark the hole used as a head shake, neck movement, or just a change the level depending upon the training situation. You do not need to the training keys (Training Intensities...
... key, for beginning collar training. Training Modes The PRO Control system provides several methods to work the contact points through the available training modes. Selecting a Dog Collar Device Before you can mark the hole used as a head shake, neck movement, or just a change the level depending upon the training situation. You do not need to the training keys (Training Intensities...
Owner s Manual PDF
Page 10
... information about optional accessories and replacement parts. PRO Control 2 Battery Replacement Instructions WARNING This product contains a lithium-ion battery. Changing the Intensity Level You can select a different intensity level for each dog collar device. 1 Select a dog collar device (Selecting a Dog Collar Device, page 5). 2 Select or to http://buy .garmin.com. CAUTION Contact your Garmin dealer for information about this product on the LCD display. PRO Control 2 Remote Receiver Device Specifications Battery type Rechargeable, replaceable lithium-ion Operating...
... information about optional accessories and replacement parts. PRO Control 2 Battery Replacement Instructions WARNING This product contains a lithium-ion battery. Changing the Intensity Level You can select a different intensity level for each dog collar device. 1 Select a dog collar device (Selecting a Dog Collar Device, page 5). 2 Select or to http://buy .garmin.com. CAUTION Contact your Garmin dealer for information about this product on the LCD display. PRO Control 2 Remote Receiver Device Specifications Battery type Rechargeable, replaceable lithium-ion Operating...

Owner s Manual PDF
Page 11
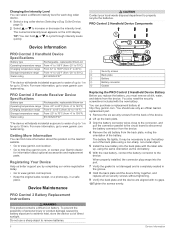
... sec. Factory reset is completely seated in the groove in the proper audio format (Custom Sound File Requirements, page 7). 1 Name the custom sound file to the GARMIN/WAV folder on your receiver. You should use only an official Garmin replacement part. 1 Remove the eight security screws from the back of the device. 2 Lift up the weather cap from the device. PRO Control 2 Receiver Components Security screws À Battery connector Á Receiver housing...
... sec. Factory reset is completely seated in the groove in the proper audio format (Custom Sound File Requirements, page 7). 1 Name the custom sound file to the GARMIN/WAV folder on your receiver. You should use only an official Garmin replacement part. 1 Remove the eight security screws from the back of the device. 2 Lift up the weather cap from the device. PRO Control 2 Receiver Components Security screws À Battery connector Á Receiver housing...

Owner s Manual PDF
Page 12
..., transferring 7 device, registration 6 dog training 1 training basics 4 training intensity levels 5 dog collar device 4, 5 F files, supported types 7 I intensity level 4 changing 6 choosing 5 K keys 2, 4 P pairing, collar 4, 5 power key 1, 2, 4 product registration 6 R rapid launch 3 receiver attaching 3 connecting 3 mounting plate 3 pairing 2 sound 3, 4, 7 registering the device 6 remote control 1-3 rapid launch 3 resetting the device 7 S software, updating 7 speaker, connecting 4 specifications 6 storing data 7 T training, modes 4, 5 troubleshooting 6, 7 U updates, software 7 USB, connector...
..., transferring 7 device, registration 6 dog training 1 training basics 4 training intensity levels 5 dog collar device 4, 5 F files, supported types 7 I intensity level 4 changing 6 choosing 5 K keys 2, 4 P pairing, collar 4, 5 power key 1, 2, 4 product registration 6 R rapid launch 3 receiver attaching 3 connecting 3 mounting plate 3 pairing 2 sound 3, 4, 7 registering the device 6 remote control 1-3 rapid launch 3 resetting the device 7 S software, updating 7 speaker, connecting 4 specifications 6 storing data 7 T training, modes 4, 5 troubleshooting 6, 7 U updates, software 7 USB, connector...


