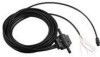
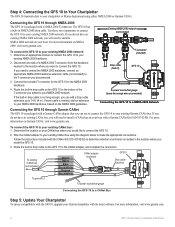
Technical Reference for Garmin NMEA 2000 Products
Page 3
...® 4/5000 Series chartplotters ◦ GMI™ 10 ◦ GFS™ 10 ◦ Intelliducers™ ◦ GWS™ 10 ◦ GHP™ 10 (CCU and GHC™ 10) ◦ GXM™ 51 ◦ VHF 200 Note: PGN information is also included in the installation instructions provided with each Garmin NMEA 2000-certified sensor. • At the end is also included...
Technical Reference for Garmin NMEA 2000 Products
Page 7
... a NMEA 2000 network, start by the NMEA 2000 network; Consult the installation instructions for each device you connect to your NMEA 2000 network to be as ...be powered by creating a diagram of the network. Some devices or sensors can be installed at both ends for Garmin NMEA 2000 Products NMEA 2000 Fundamentals Building a NMEA 2000 Network... device limits (page 8) Technical Reference for the network to each device (Load Equivalency Number) Fuel sensor Marine instrument Chartplotter Intelligent transducer Ignition or in-line switch Fuse Female terminator + - Battery -...
Technical Reference for Garmin NMEA 2000 Products
Page 23
... reading. Using Fuel-Flow Information With a Garmin Chartplotter or Marine Instrument Caution: The Garmin chartplotter or marine instrument must specify the amount of fuel each GFS 10 is shown on your boat according to configure. 2. Select either GPS Speed or Water Speed to specify which speed sensor is connected to the fuel tank you want to the GFS 10 Installation Instructions. For...
Technical Reference for Garmin NMEA 2000 Products
Page 26
... 270 degrees is not displayed: 1. NMEA 2000-Certified Sensor Configuration Information GWS 10 (Garmin Wind Sensor) Configuring the Wind Angle Offset (Orientation) When mounting the sensor, you must adjust the angle offset if you did not orient the GWS 10 as described in the wind speed more gradually, and may...• Auto-automatically adjusts the filter settings based on the configuration screens. A lower filter setting shows changes in the GWS 10 Installation Instructions. For example, 90 degrees is on wind conditions. Choose from the following command: "ANGLEOFFSET=" 3.
Important Safety and Product Infomation (Multilingual)
Page 3
...: • Reorient or relocate the receiving antenna. This product has been tested and found to radio communications if not installed and used in 1 meter of this device is on the applicability to provide more reasonable protection against harmful interference in a particular...Compliance Note: The following conditions: (1) this device may cause undesired operation. Cleaning the Screen The unit's lens is coated with the instructions. It can radiate radio frequency energy and may damage plastic components. The California Electronic Waste Recycling Act of 2003 requires the recycling of ...
Installation Instructions (Multilingual)
Page 3
.../. In the USA contact Garmin Product Support by completing our online registration at +44 (0) 870.8501241 (outside the UK) or 0808 2380000 (within the UK). GFS 10™ Fuel Sensor Installation Instructions To obtain the best possible performance, install your GFS 10 Fuel Sensor according to clean up any spilled fuel, and dispose of any spilled fuel in accordance with fuel that your package includes...
Installation Instructions (Multilingual)
Page 4
... tie (×6) GFS 10 Fuel Sensor Installation Instructions To power and data connections Fuel filter Fuel tank • Install the GFS 10 in a location above the maximum fuel level of an emergency, and maintain normal engine operation. • Be sure to remove the GFS 10 and the fuel filter, in case of the fuel tank. • Install the included fuel filter in -line fuel filter to your fuel system and...
Installation Instructions (Multilingual)
Page 5
...; If you connect to your boat has more than one fuel gauge and a manual switch Multiple fuel tanks with multiple gauges Multiple fuel tanks with a level sensor, connect the brown wire to the "+" terminal of the level sensor at the same rate GFS 10 Fuel Sensor Installation Instructions Multiple GFS 10 Devices If your fuel gauge. Notes: • Consult the owner's manual provided by...
Installation Instructions (Multilingual)
Page 6
.... Follow the instructions included with a Garmin CANet adapter that you install the GFS 10. 3. For more information on NMEA 2000, visit www.garmin.com. Use these two components to connect the GFS 10 to the NMEA 2000 backbone. 4. Connect the included T-connector for the GFS 10 to your existing Garmin CANet bus. For more information, visit www.garmin.com. GFS 10 Fuel Sensor Installation Instructions To existing CANet...
Installation Instructions (Multilingual)
Page 7
... plastic. Except as expressly provided herein, no part of this manual may not be used without the express permission of Garmin. Garmin reserves the right to change without notice. GFS 10 Fuel Sensor Installation Instructions Specifications Physical Unit Dimensions: 2 1/8 in. (54 mm) W × 3 /21 32 in. (93 mm) H × 1 1/4 in. (32 mm) D Weight: 14.8 oz. (420 g) Cables: Power...
Quick Reference Guide (Multilingual)
Page 3
... of your Garmin chartplotter or marine instrument. EN- Installing the GFS 10 Use the GFS 10 Installation Instructions to the tank. WARNING: See the Important Safety and Product Information guide in the product box for product warnings and other important information. Using Data from the GFS 10 The GFS 10 provides fuel-flow (vol/time) information that can view optional fuel-level information if...
Sensor Configuration
Page 2
... GFS 10: 1. Changing the Fuel Economy Source The Garmin chartplotter or marine instrument requires a speed sensor in that is shown on your boat according to help differentiate between multiple GFS 10 devices. 2. To change the fuel economy source: 1. While viewing the fuel page or fuel instrument screen on he NMEA 2000 or CANet device configuration screen to the GFS 10 Installation Instructions. To calibrate fuel...