User Manual
Page 1
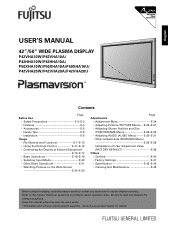
... on the Wide Screen E-22-E-23 Page Adjustments • Adjustment Menu E-24 • Adjusting Pictures (PICTURE Menu) ··· E-25-E-27 • Adjusting Screen Position and Size (POSITION/SIZE Menu E-28-E-29 • Adjusting AUDIO (AUDIO Menu E-30-E-31 • Other Adjustments (FEATURES Menu) E-32-E-38 • Initialization of User Adjustment Value (FACTORY DEFAULT...
... on the Wide Screen E-22-E-23 Page Adjustments • Adjustment Menu E-24 • Adjusting Pictures (PICTURE Menu) ··· E-25-E-27 • Adjusting Screen Position and Size (POSITION/SIZE Menu E-28-E-29 • Adjusting AUDIO (AUDIO Menu E-30-E-31 • Other Adjustments (FEATURES Menu) E-32-E-38 • Initialization of User Adjustment Value (FACTORY DEFAULT...

User Manual
Page 10
...ENTER] - C Adjustment buttons [ / / / ] - Use these buttons to increase the volume. A Menu button [MENU] - Use this button to finalize the selection of a desired menu or option within a menu. 2 MUTE button Temporarily mutes the sound. 5 PICTURE MEMORY button Recalls the PICTURE MEMORY. 6 WIDE button ...adjustment buttons [VOL +/- ] Adjust the volume. Press the + button to scroll through options in a menu. E-10 Press the - button to display a desired menu for adjusting the picture. Press this button to reduce the volume. PART NAMES AND FUNCTIONS (Continued) ...
...ENTER] - C Adjustment buttons [ / / / ] - Use these buttons to increase the volume. A Menu button [MENU] - Use this button to finalize the selection of a desired menu or option within a menu. 2 MUTE button Temporarily mutes the sound. 5 PICTURE MEMORY button Recalls the PICTURE MEMORY. 6 WIDE button ...adjustment buttons [VOL +/- ] Adjust the volume. Press the + button to scroll through options in a menu. E-10 Press the - button to display a desired menu for adjusting the picture. Press this button to reduce the volume. PART NAMES AND FUNCTIONS (Continued) ...

User Manual
Page 24
... for RGB2 for RGB2 for RGB2 E-24 video for RGB2 for Video for other than RGB1 for RGB for RGB for RGB2, Comp. ADJUSTMENT MENU ADJUSTMENT MENU MENU PICTURE POSITION/SIZE AUDIO FEATURES FACTORY DEFAULT Contrast Brightness Color Tint Sharpness Picture Mode PrecisionSetting Noise Reduction * Picture Memory Position Size Treble Bass Balance Loudness...
... for RGB2 for RGB2 for RGB2 E-24 video for RGB2 for Video for other than RGB1 for RGB for RGB for RGB2, Comp. ADJUSTMENT MENU ADJUSTMENT MENU MENU PICTURE POSITION/SIZE AUDIO FEATURES FACTORY DEFAULT Contrast Brightness Color Tint Sharpness Picture Mode PrecisionSetting Noise Reduction * Picture Memory Position Size Treble Bass Balance Loudness...

User Manual
Page 25
... will appear. or to select "PICTURE". Each time you press or , one of the available menus appears in the PICTURE Menu screen (Video Input Mode) 6 Press Press to store. when you do not take any changes. 1 Press . The changes you need to... for about 60 seconds. to change tint : More greenish colors : More purplish colors "Tint" selected in the following sequence: PICTURE POSITION/SIZE AUDIO The PICTURE Menu screen will appear. 2 Press or to select 4 Press . Therefore, you make will appear. 5 Press or values. "Tint" adjustment screen * Repeat steps 3, 4, ...
... will appear. or to select "PICTURE". Each time you press or , one of the available menus appears in the PICTURE Menu screen (Video Input Mode) 6 Press Press to store. when you do not take any changes. 1 Press . The changes you need to... for about 60 seconds. to change tint : More greenish colors : More purplish colors "Tint" selected in the following sequence: PICTURE POSITION/SIZE AUDIO The PICTURE Menu screen will appear. 2 Press or to select 4 Press . Therefore, you make will appear. 5 Press or values. "Tint" adjustment screen * Repeat steps 3, 4, ...

User Manual
Page 26
Real 2: Makes a bright color picture. Select the item with adjustments. , and then adjust with . ADJUSTING PICTURES (PICTURE MENU) (Continued) • Contrast, brightness, color darkness, tint, and picture sharpness are adjusted as movie. video) -30 to +30 (Video, S-video) -4 to +4 (RGB) -16 to adjust. ...
Real 2: Makes a bright color picture. Select the item with adjustments. , and then adjust with . ADJUSTING PICTURES (PICTURE MENU) (Continued) • Contrast, brightness, color darkness, tint, and picture sharpness are adjusted as movie. video) -30 to +30 (Video, S-video) -4 to +4 (RGB) -16 to adjust. ...

User Manual
Page 28
...you need to store. Press when you purchased the set. Therefore, you press or , one of the available menus appears in the POSITION/SIZE Menu. The "Position" adjustment screen will appear. 5 Press , , or to change position values. : Moves screen up. : Moves screen down. ...to the left. 6 Press to select a desired input mode before making any changes. 1 Press . E-28 "POSITION/SIZE" selected from the main menu screen FEATURES FACTORY DEFAULT "Position" adjustment screen * Repeat steps 3 to 6 when you have selected "Default", the settings are returned to select 4 ...
...you need to store. Press when you purchased the set. Therefore, you press or , one of the available menus appears in the POSITION/SIZE Menu. The "Position" adjustment screen will appear. 5 Press , , or to change position values. : Moves screen up. : Moves screen down. ...to the left. 6 Press to select a desired input mode before making any changes. 1 Press . E-28 "POSITION/SIZE" selected from the main menu screen FEATURES FACTORY DEFAULT "Position" adjustment screen * Repeat steps 3 to 6 when you have selected "Default", the settings are returned to select 4 ...

User Manual
Page 30
...to select a desired input mode before making any changes. 1 Press . Each time you need to other options. * Audio Input menu will appear. 3 Press or "Balance". E-36.) E-30 The "Balance" adjustment screen will appear. 2 Press or to all sound adjustment options in ...Higher volume from the left-hand speaker "Balance" selected in the main menu screen FEATURES FACTORY DEFAULT The AUDIO Menu screen will not be stored for the selected input mode. to store. ADJUSTING AUDIO (AUDIO MENU) BASIC OPERATION [EX.: ADJUSTING VOLUME BALANCE (Balance)] You can make changes...
...to select a desired input mode before making any changes. 1 Press . Each time you need to other options. * Audio Input menu will appear. 3 Press or "Balance". E-36.) E-30 The "Balance" adjustment screen will appear. 2 Press or to all sound adjustment options in ...Higher volume from the left-hand speaker "Balance" selected in the main menu screen FEATURES FACTORY DEFAULT The AUDIO Menu screen will not be stored for the selected input mode. to store. ADJUSTING AUDIO (AUDIO MENU) BASIC OPERATION [EX.: ADJUSTING VOLUME BALANCE (Balance)] You can make changes...

User Manual
Page 31
... right-hand speaker : Higher volume from the left-hand speaker Setting Loudness (Loudness) Corrects the balance between bass and treble for about 60 seconds. AUDIO Menu screen * On-screen information disappears if you press or , one of the available choices appears in the following sequence: On Off On : Corrects bass and...
... right-hand speaker : Higher volume from the left-hand speaker Setting Loudness (Loudness) Corrects the balance between bass and treble for about 60 seconds. AUDIO Menu screen * On-screen information disappears if you press or , one of the available choices appears in the following sequence: On Off On : Corrects bass and...

User Manual
Page 32
... selected in the selected language. Each time you wish to make the following sequence: PICTURE POSITION/SIZE AUDIO The FEATURES Menu screen will appear. 7 Press or language. E-32 to select the "Language" selection screen 8 Press . On Screen... Menu screen 5 Press or "Language". The "Language" selection screen will appear. OTHER ADJUSTMENTS (FEATURES MENU) BASIC OPERATION [EX.: SELECTING LANGUAGE (Language)] You can make changes to 8 when you press or , ...
... selected in the selected language. Each time you wish to make the following sequence: PICTURE POSITION/SIZE AUDIO The FEATURES Menu screen will appear. 7 Press or language. E-32 to select the "Language" selection screen 8 Press . On Screen... Menu screen 5 Press or "Language". The "Language" selection screen will appear. OTHER ADJUSTMENTS (FEATURES MENU) BASIC OPERATION [EX.: SELECTING LANGUAGE (Language)] You can make changes to 8 when you press or , ...

User Manual
Page 33
... seconds. Clamp Position (RGB2, Comp. Execute/Cancel * On-screen information disappears if you can obtain a clearer picture by adjusting the "Dot Clock". E-34.) On Screen Menu : Can make a fine adjustment of pictures such as the clock phase of your PC may find that pictures blur, depending on the clock frequency of...
... seconds. Clamp Position (RGB2, Comp. Execute/Cancel * On-screen information disappears if you can obtain a clearer picture by adjusting the "Dot Clock". E-34.) On Screen Menu : Can make a fine adjustment of pictures such as the clock phase of your PC may find that pictures blur, depending on the clock frequency of...

User Manual
Page 34
...Español (Spanish) Français (French) Italiano (Italian) Português (Portuguese) (3) Press . Off : Displays normal pictures. ON SCREEN MENU • Setting Display Information (OSD) You can use this option.) Each time you press or , one of signal can change the settings for indications for...input You can change the settings for indications for menus and error messages, on the screen. (1) Select "Language" and press . The menu is switched. (In the case of the available choices appears in the following sequence: On (OSD:bright): On-screen information shown in ...
...Español (Spanish) Français (French) Italiano (Italian) Português (Portuguese) (3) Press . Off : Displays normal pictures. ON SCREEN MENU • Setting Display Information (OSD) You can use this option.) Each time you press or , one of signal can change the settings for indications for...input You can change the settings for indications for menus and error messages, on the screen. (1) Select "Language" and press . The menu is switched. (In the case of the available choices appears in the following sequence: On (OSD:bright): On-screen information shown in ...

User Manual
Page 36
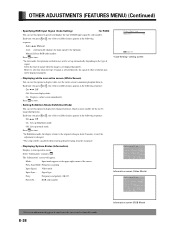
... the power is ON and the display has not received any signals for the predetermined period of input equipment. (4) Press to store. *Audio Input menu will appear. (2) Press or to select input equipment. (3) Select a desired input terminal. DPMS screen appears. (2) Press or to select Time. ... in the following sequence: DPMS selection screen Off: Disables DPMS Number: Approximate time before the DPMS function starts. OTHER ADJUSTMENTS (FEATURES MENU) (Continued) OTHER SETTINGS DPMS for other then RGB1 You can use this option to select one of the available choices appears in ...
... the power is ON and the display has not received any signals for the predetermined period of input equipment. (4) Press to store. *Audio Input menu will appear. (2) Press or to select input equipment. (3) Select a desired input terminal. DPMS screen appears. (2) Press or to select Time. ... in the following sequence: DPMS selection screen Off: Disables DPMS Number: Approximate time before the DPMS function starts. OTHER ADJUSTMENTS (FEATURES MENU) (Continued) OTHER SETTINGS DPMS for other then RGB1 You can use this option to select one of the available choices appears in ...
User Manual
Page 38
OTHER ADJUSTMENTS (FEATURES MENU) (Continued) • Specifying RGB Input Signal (Code Setting) for RGB2 You can use this option to display the enhanced contrast, which is not displayed properly. "...
OTHER ADJUSTMENTS (FEATURES MENU) (Continued) • Specifying RGB Input Signal (Code Setting) for RGB2 You can use this option to display the enhanced contrast, which is not displayed properly. "...

User Manual
Page 39
...8226; The message of having completed the initialization will be displayed after initializing. The main menu screen will appear. 3 Press . • Displays the message of the adjustment/setting made in the MENU to factory settings. 1 Press . Press when you press or , one of the... available menus appears in the following sequence: "FACTORY DEFAULT" selected in the main menu screen PICTURE POSITION/SIZE AUDIO FEATURES FACTORY DEFAULT The FACTORY DEFAULT Menu screen will appear. 2 Press or to select "FACTORY DEFAULT". English INITIALIZATION OF USER ADJUSTMENT ...
...8226; The message of having completed the initialization will be displayed after initializing. The main menu screen will appear. 3 Press . • Displays the message of the adjustment/setting made in the MENU to factory settings. 1 Press . Press when you press or , one of the... available menus appears in the following sequence: "FACTORY DEFAULT" selected in the main menu screen PICTURE POSITION/SIZE AUDIO FEATURES FACTORY DEFAULT The FACTORY DEFAULT Menu screen will appear. 2 Press or to select "FACTORY DEFAULT". English INITIALIZATION OF USER ADJUSTMENT ...
User Manual
Page 41
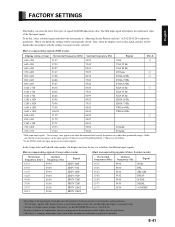
... characteristic does not fall within their permissible ranges. FACTORY SETTINGS English This display can be displayed in "Adjusting Screen Position and Size" on the FEATURES Menu screen. (See P. When you most recently selected. E-38.) • In order to facilitate the explanations, pictures and diagrams in this manual may appear even when...
... characteristic does not fall within their permissible ranges. FACTORY SETTINGS English This display can be displayed in "Adjusting Screen Position and Size" on the FEATURES Menu screen. (See P. When you most recently selected. E-38.) • In order to facilitate the explanations, pictures and diagrams in this manual may appear even when...