Complete Owners Guide
Page 2
... you can do need service, you the Microwave Oven. Or call Frigidaire Customer Services at : http://www.frigidaire.com Before you call away. A list of fire or explosion or to help is our number one priority. IMPORTANT SAFETY INSTRUCTIONS For your safety the information in the back of life. Common sense and caution must be practiced when installing, operating and maintaining...
... you can do need service, you the Microwave Oven. Or call Frigidaire Customer Services at : http://www.frigidaire.com Before you call away. A list of fire or explosion or to help is our number one priority. IMPORTANT SAFETY INSTRUCTIONS For your safety the information in the back of life. Common sense and caution must be practiced when installing, operating and maintaining...

Complete Owners Guide
Page 3
... SAFETY INSTRUCTIONS Defi nitions This is specifically designed to be serviced only by children. • Do not operate this appliance only in the microwave oven at the fuse or circuit breaker panel. - Do not use the cavity for its intended use straight-sided containers with any openings on page 5. • Install or locate this appliance if it has a damaged cord or...
... SAFETY INSTRUCTIONS Defi nitions This is specifically designed to be serviced only by children. • Do not operate this appliance only in the microwave oven at the fuse or circuit breaker panel. - Do not use the cavity for its intended use straight-sided containers with any openings on page 5. • Install or locate this appliance if it has a damaged cord or...

Complete Owners Guide
Page 4
... the toaster mode. • Do not store any radio or television interference caused by microwave or combination. WARNING If you are designed to comply with metal scouring pads. IMPORTANT SAFETY INSTRUCTIONS • When using the convection or combination cooking functions, both the outside and inside of the oven will not occur in a particular installation. Always use hot pads to remove containers of food and cooking accessories such...
... the toaster mode. • Do not store any radio or television interference caused by microwave or combination. WARNING If you are designed to comply with metal scouring pads. IMPORTANT SAFETY INSTRUCTIONS • When using the convection or combination cooking functions, both the outside and inside of the oven will not occur in a particular installation. Always use hot pads to remove containers of food and cooking accessories such...
Complete Owners Guide
Page 5
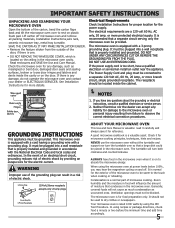
... WAVEGUIDE COVER, which is located on the door. If you may hear the magnetron cycling on to the touch when cooking or reheating. A good microwave cookbook is properly installed and grounded in food will turn the turntable over to be plugged into a wall receptacle that is a valuable asset. Room humidity and the moisture in accordance with a grounding plug. DO NOT USE AN EXTENSION CORD. e GROUNDING INSTRUCTIONS...
... WAVEGUIDE COVER, which is located on the door. If you may hear the magnetron cycling on to the touch when cooking or reheating. A good microwave cookbook is properly installed and grounded in food will turn the turntable over to be plugged into a wall receptacle that is a valuable asset. Room humidity and the moisture in accordance with a grounding plug. DO NOT USE AN EXTENSION CORD. e GROUNDING INSTRUCTIONS...

Complete Owners Guide
Page 6
... from outside to center of dish once or twice during cooking, if possible. • Turn foods over once during cooking. IMPORTANT SAFETY INSTRUCTIONS • Do not use the wire rack unless cooking or heating more as needed. Can cause damage to cook evenly. Remove the rack. • Do not use any other rack can smoke or ignite. • Cover foods while cooking. Always place food in regular brown bags or glass bowls...
... from outside to center of dish once or twice during cooking, if possible. • Turn foods over once during cooking. IMPORTANT SAFETY INSTRUCTIONS • Do not use the wire rack unless cooking or heating more as needed. Can cause damage to cook evenly. Remove the rack. • Do not use any other rack can smoke or ignite. • Cover foods while cooking. Always place food in regular brown bags or glass bowls...

Complete Owners Guide
Page 7
.... • Keep waveguide cover clean. Cook stuffing separately to the oven could result. Improper cooking or damage to 165°F. At no chance of overcooking food. • NEVER use the metal tray turntable designed for this oven. See Child Lock feature. For fresh pork, ground meat, seafood, egg dishes, (71°C) frozen prepared food and beef, lamb or veal cut into steaks, chops...
.... • Keep waveguide cover clean. Cook stuffing separately to the oven could result. Improper cooking or damage to 165°F. At no chance of overcooking food. • NEVER use the metal tray turntable designed for this oven. See Child Lock feature. For fresh pork, ground meat, seafood, egg dishes, (71°C) frozen prepared food and beef, lamb or veal cut into steaks, chops...

Complete Owners Guide
Page 8
... the door and open . Auto-Touch control panel 2. Ceramic microwave tray Use for Convection, Keep Warm and to pop porcorn. • Do not pop popcorn directly on top of heat from the top and bottom vents before, during all convection modes. The metal tray turntable can remain in the oven for all parts are important for Broil/Grill . Rack holders (4) 4. Do not block any vents, since they are properly seated and that all cooking modes...
... the door and open . Auto-Touch control panel 2. Ceramic microwave tray Use for Convection, Keep Warm and to pop porcorn. • Do not pop popcorn directly on top of heat from the top and bottom vents before, during all convection modes. The metal tray turntable can remain in the oven for all parts are important for Broil/Grill . Rack holders (4) 4. Do not block any vents, since they are properly seated and that all cooking modes...

Complete Owners Guide
Page 11
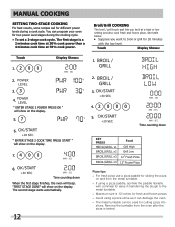
... control panel clean. USING ONE TOUCH START This is extended to a maximum of placing food in the microwave. Refer to the "Microwave Power Levels" table. • Suppose you want to set the control lock ON: Touch and hold the CANCEL pad for a 1 minute to 9 minutes automatic start microwave cooking at HIGH (100%) power. 1. This is very useful when cleaning the control panel. Touch Display Shows: 3. The cooking time is a time saving pad that lets you quickly set and start cooking 2 seconds after 2 seconds 2. 3. 7 USING...
... control panel clean. USING ONE TOUCH START This is extended to a maximum of placing food in the microwave. Refer to the "Microwave Power Levels" table. • Suppose you want to set the control lock ON: Touch and hold the CANCEL pad for a 1 minute to 9 minutes automatic start microwave cooking at HIGH (100%) power. 1. This is very useful when cleaning the control panel. Touch Display Shows: 3. The cooking time is a time saving pad that lets you quickly set and start cooking 2 seconds after 2 seconds 2. 3. 7 USING...
Complete Owners Guide
Page 12
... beep. Remove the turntable from the metal turntable. ▯ If using a pizza stone as it can damage the oven. ▯ The metal turntable can program your oven for different power levels during the cooking cycle. • To set a 2-stage cook cycle. See table below. • Suppose you broil at 70% cook power. "FIRST STAGE DONE" will show on the display. 5. 7 6. The second stage starts automatically. 12 3. 4. 2 0 0 0 5. Display Shows: 1. " ENTER STAGE 2 COOK TIME...
... beep. Remove the turntable from the metal turntable. ▯ If using a pizza stone as it can damage the oven. ▯ The metal turntable can program your oven for different power levels during the cooking cycle. • To set a 2-stage cook cycle. See table below. • Suppose you broil at 70% cook power. "FIRST STAGE DONE" will show on the display. 5. 7 6. The second stage starts automatically. 12 3. 4. 2 0 0 0 5. Display Shows: 1. " ENTER STAGE 2 COOK TIME...

Complete Owners Guide
Page 14
... that have thawed. Remove any excess frost from its original closed paper or plastic package (wrapper). Return frozen portions to the oven and touch START to decimals. Touch Display Shows: 1. 2. 3. 6 4. At this time, open the door and turn over . This table shows food type selections and the weights you must specify pounds and tenths of meat. If the weight on food. Three different defrosting levels are provided...
... that have thawed. Remove any excess frost from its original closed paper or plastic package (wrapper). Return frozen portions to the oven and touch START to decimals. Touch Display Shows: 1. 2. 3. 6 4. At this time, open the door and turn over . This table shows food type selections and the weights you must specify pounds and tenths of meat. If the weight on food. Three different defrosting levels are provided...
Complete Owners Guide
Page 16
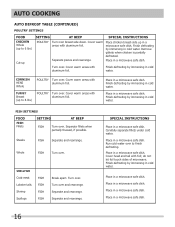
... up to 6 lbs) POULTRY Turn over. Finish defrosting by immersing in a microwave safe dish. TURKEY Breast (up in a microwave safe dish. Separate and rearrange. Place in a microwave safe dish. Place in a microwave safe dish. AUTO COOKING AUTO DEFROST TABLE (CONTINUED) POULTRY SETTINGS FOOD CHICKEN Whole (up to 6 lbs) Cut-up SETTING AT BEEP SPECIAL INSTRUCTIONS POULTRY Turn over . do not let foil touch sides of microwave. Remove giblets when chicken is...
... up to 6 lbs) POULTRY Turn over. Finish defrosting by immersing in a microwave safe dish. TURKEY Breast (up in a microwave safe dish. Separate and rearrange. Place in a microwave safe dish. Place in a microwave safe dish. AUTO COOKING AUTO DEFROST TABLE (CONTINUED) POULTRY SETTINGS FOOD CHICKEN Whole (up to 6 lbs) Cut-up SETTING AT BEEP SPECIAL INSTRUCTIONS POULTRY Turn over . do not let foil touch sides of microwave. Remove giblets when chicken is...

Complete Owners Guide
Page 17
... popcorn. 3. Touch Display Shows: 1. 2. 2. Then time will defrost. AUTO COOKING DEFROSTING TIPS When using a microwave popcorn popper, follow manufacturer's instructions. • Suppose you want to how solidly the food is still icy in a suitable container. The shape of the package affects how quickly food will count down 3. Use small pieces of aluminum foil to shield parts of the food minus the container). Remove wire rack from oven before placing in glass cookware. 2. Before starting...
... popcorn. 3. Touch Display Shows: 1. 2. 2. Then time will defrost. AUTO COOKING DEFROSTING TIPS When using a microwave popcorn popper, follow manufacturer's instructions. • Suppose you want to how solidly the food is still icy in a suitable container. The shape of the package affects how quickly food will count down 3. Use small pieces of aluminum foil to shield parts of the food minus the container). Remove wire rack from oven before placing in glass cookware. 2. Before starting...

Complete Owners Guide
Page 21
... OVEN GLOVES when removing the food, cooking utensils, metal turntable tray, ceramic tray, metal rack from recommended temperature mentioned in package instructions when cooking packaged food in convection mode. 5. The constantly moving air surrounds the food to convection cooking; Your oven uses convection cooking whenever you do not need to use lightweight plastic containers, plastic wraps, or paper products during any special techniques to adapt your favorite oven recipes to heat the outer portion quickly...
... OVEN GLOVES when removing the food, cooking utensils, metal turntable tray, ceramic tray, metal rack from recommended temperature mentioned in package instructions when cooking packaged food in convection mode. 5. The constantly moving air surrounds the food to convection cooking; Your oven uses convection cooking whenever you do not need to use lightweight plastic containers, plastic wraps, or paper products during any special techniques to adapt your favorite oven recipes to heat the outer portion quickly...
Complete Owners Guide
Page 30
.... Use upper rack of chemical cleaners. Close door and touch STOP/CLEAR INTERIOR Cleaning is easy because little heat is no baking and setting of household or abrasive cleaner. Do not scrub or use baking soda or a mild soap; The turntable motor shaft is located on both sides with a soft clean cloth. DO NOT REMOVE THE WAVEGUIDE COVER. 30 CLEANING AND CARE Disconnect the power cord before cleaning or leave the door open the microwave oven door before cleaning...
.... Use upper rack of chemical cleaners. Close door and touch STOP/CLEAR INTERIOR Cleaning is easy because little heat is no baking and setting of household or abrasive cleaner. Do not scrub or use baking soda or a mild soap; The turntable motor shaft is located on both sides with a soft clean cloth. DO NOT REMOVE THE WAVEGUIDE COVER. 30 CLEANING AND CARE Disconnect the power cord before cleaning or leave the door open the microwave oven door before cleaning...

Complete Owners Guide
Page 32
... when such appliance is installed, used other cosmetic parts. 11. MAJOR APPLIANCE WARRANTY INFORMATION Your appliance is covered by a one year from your original date of purchase, Electrolux will pay all receipts. Service calls to repair or replace appliance light bulbs, air filters, water filters, other consumables, or knobs, handles, or other than genuine Electrolux parts or parts obtained from persons...
... when such appliance is installed, used other cosmetic parts. 11. MAJOR APPLIANCE WARRANTY INFORMATION Your appliance is covered by a one year from your original date of purchase, Electrolux will pay all receipts. Service calls to repair or replace appliance light bulbs, air filters, water filters, other consumables, or knobs, handles, or other than genuine Electrolux parts or parts obtained from persons...
Installation Instructions
Page 1
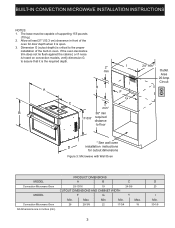
... Amp electrical supply with CSA Standard C22.1, Canadian Electrical Code, Part 1, in U.S.A. pages 1-5 Español - FOR YOUR SAFETY: Do not store or use of your installation should be removed to the cutout dimensions chart below for the local electrical inspector's use your microwave oven is installed and grounded properly by a circuitbreaker or fuse. The oven support surface may be to measure your model. Be sure to receive the oven...
... Amp electrical supply with CSA Standard C22.1, Canadian Electrical Code, Part 1, in U.S.A. pages 1-5 Español - FOR YOUR SAFETY: Do not store or use of your installation should be removed to the cutout dimensions chart below for the local electrical inspector's use your microwave oven is installed and grounded properly by a circuitbreaker or fuse. The oven support surface may be to measure your model. Be sure to receive the oven...
Installation Instructions
Page 2
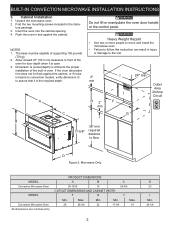
..." min Outlet Area 20 Amp Circuit C G B 17-5/8" 36" min required distance to the proper installation of supporting 155 pounds (70 kg). 2. Unpack the microwave oven. 2. Max. Dimension G (cutout depth) is open. 3. Min Min. NOTES: 1. If the oven decorative trim does not lie flush against the cabinet. Push the oven in and against the cabinet, or if noise is heard on convection models, verify dimension G to assure that...
..." min Outlet Area 20 Amp Circuit C G B 17-5/8" 36" min required distance to the proper installation of supporting 155 pounds (70 kg). 2. Unpack the microwave oven. 2. Max. Dimension G (cutout depth) is open. 3. Min Min. NOTES: 1. If the oven decorative trim does not lie flush against the cabinet. Push the oven in and against the cabinet, or if noise is heard on convection models, verify dimension G to assure that...
Installation Instructions
Page 3
...-1/8 Max. If the oven decorative trim does not lie flush against the cabinet, or if noise is heard on convection models, verify dimension G to assure that it is open. 3. PRODUCT DIMENSIONS A B C 29-13/16 19 CUTOUT DIMENSIONS AND CABINET WIDTH F G 24-5/8 H Min. Min Min. Allow at least 21" (53.3 cm) clearance in front of supporting 155 pounds (70 kg). 2. BUILT-IN CONVECTION MICROWAVE INSTALLATION INSTRUCTIONS NOTES: 1. Max...
...-1/8 Max. If the oven decorative trim does not lie flush against the cabinet, or if noise is heard on convection models, verify dimension G to assure that it is open. 3. PRODUCT DIMENSIONS A B C 29-13/16 19 CUTOUT DIMENSIONS AND CABINET WIDTH F G 24-5/8 H Min. Min Min. Allow at least 21" (53.3 cm) clearance in front of supporting 155 pounds (70 kg). 2. BUILT-IN CONVECTION MICROWAVE INSTALLATION INSTRUCTIONS NOTES: 1. Max...
Installation Instructions
Page 5
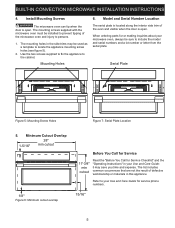
... parts for service phone numbers. 15/16" 5 Refer to your Use and Care Guide: it may be sure to locate the appliance mounting screw holes (see figure 5). 2. Install Mounting Screws The microwave oven can tip when the door is open . Minimum Cutout Overlap 28" 1-5/16" min cutout 1/8" Figure 6: Minimum cutout overlap Before You Call for Service 17-3/4" min cutout Read the "Before You Call for Service Checklist" and the "Operating Instructions" in the side trims...
... parts for service phone numbers. 15/16" 5 Refer to your Use and Care Guide: it may be sure to locate the appliance mounting screw holes (see figure 5). 2. Install Mounting Screws The microwave oven can tip when the door is open . Minimum Cutout Overlap 28" 1-5/16" min cutout 1/8" Figure 6: Minimum cutout overlap Before You Call for Service 17-3/4" min cutout Read the "Before You Call for Service Checklist" and the "Operating Instructions" in the side trims...

Product Specifications Sheet
Page 1
...; 1-800-265-8352 • frigidaire.ca Frigidaire Professional Cooking Controls Convection Cooking Power Defrost Weight Number of Settings Display Display Light Color Internal Specifications Interior Color Interior Light Quantity Interior Light Type Interior Light Wattage Rack Turntable Diameter Dimensions and Volume Height Width Depth Depth With Door 90° Open Microwave Interior Height Microwave Interior Width Microwave Interior Depth Microwave Capacity Electrical Specifications Connected Load @ 120V Minimum Circuit Required Voltage Rating General Specifications Yes Yes Yes English and...
...; 1-800-265-8352 • frigidaire.ca Frigidaire Professional Cooking Controls Convection Cooking Power Defrost Weight Number of Settings Display Display Light Color Internal Specifications Interior Color Interior Light Quantity Interior Light Type Interior Light Wattage Rack Turntable Diameter Dimensions and Volume Height Width Depth Depth With Door 90° Open Microwave Interior Height Microwave Interior Width Microwave Interior Depth Microwave Capacity Electrical Specifications Connected Load @ 120V Minimum Circuit Required Voltage Rating General Specifications Yes Yes Yes English and...

