Use and Care Guide
Page 1
Electric Microwave / Wall Oven Combination Welcome 2 Important Safety Instructions . 3-5 Features at a Glance 6 Microwave Oven Important Information .......... 7-8 Setting Microwave Oven Controls 9-15 Before Setting Wall Oven Controls 16 Setting Wall Oven Controls 17-33 Wall Oven Clean Self-Cleaning Cycle .......... 34-36 Microwave Oven Care & Cleaning 37 Wall Oven Care & Cleaning 38-40 Adjusting your Oven Temperature 41 Before You Call SC.oo.lm.u.tm.io.o.nn.s.Pt.or.o.b..le.m..s 42-43 Warranty Back Cover 318200941 (0511) Rev. B
Electric Microwave / Wall Oven Combination Welcome 2 Important Safety Instructions . 3-5 Features at a Glance 6 Microwave Oven Important Information .......... 7-8 Setting Microwave Oven Controls 9-15 Before Setting Wall Oven Controls 16 Setting Wall Oven Controls 17-33 Wall Oven Clean Self-Cleaning Cycle .......... 34-36 Microwave Oven Care & Cleaning 37 Wall Oven Care & Cleaning 38-40 Adjusting your Oven Temperature 41 Before You Call SC.oo.lm.u.tm.io.o.nn.s.Pt.or.o.b..le.m..s 42-43 Warranty Back Cover 318200941 (0511) Rev. B
Use and Care Guide
Page 3
... loss of time, make sure that may explode and result in this microwave oven with National Electrical Code ANSI/NFPA No.70 (USA) or CSA C22.1, PART 1 (Canada)-latest edition and local code requirements. Destroy the carton and plastic bags after unpacking the appliance. Never allow children to persons could result. • Install mounting bracket packed with the wall oven. Electronic controllers can...
... loss of time, make sure that may explode and result in this microwave oven with National Electrical Code ANSI/NFPA No.70 (USA) or CSA C22.1, PART 1 (Canada)-latest edition and local code requirements. Destroy the carton and plastic bags after unpacking the appliance. Never allow children to persons could result. • Install mounting bracket packed with the wall oven. Electronic controllers can...
Use and Care Guide
Page 4
... in microwave oven. - IMPORTANT INSTRUCTIONS FOR USING YOUR MICROWAVE To reduce the risk of microwave oven is not turned off and the power resumes, it closely. Important Safety Instructions Do not use the cavity for storage purposes. Other surfaces of interest to heat, cook or dry food. Fat or grease may catch fire if allowed to operate the appliance during a power failure. Do not let the potholders touch hot heating...
... in microwave oven. - IMPORTANT INSTRUCTIONS FOR USING YOUR MICROWAVE To reduce the risk of microwave oven is not turned off and the power resumes, it closely. Important Safety Instructions Do not use the cavity for storage purposes. Other surfaces of interest to heat, cook or dry food. Fat or grease may catch fire if allowed to operate the appliance during a power failure. Do not let the potholders touch hot heating...
Use and Care Guide
Page 5
... break. SELF-CLEANING WALL OVEN MODELS • Clean in the self-cleaning cycle only the parts of the appliance listed in this area when the wall oven is vented at the upper control panel or at least for 20 seconds before removing rack. IMPORTANT INSTRUCTIONS FOR USING YOUR WALL OVEN • Use Care When Opening an Oven Door-Stand to the side of the appliance when opening the door of grease that could cause the bulb to rub...
... break. SELF-CLEANING WALL OVEN MODELS • Clean in the self-cleaning cycle only the parts of the appliance listed in this area when the wall oven is vented at the upper control panel or at least for 20 seconds before removing rack. IMPORTANT INSTRUCTIONS FOR USING YOUR WALL OVEN • Use Care When Opening an Oven Door-Stand to the side of the appliance when opening the door of grease that could cause the bulb to rub...
Use and Care Guide
Page 6
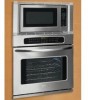
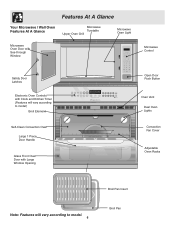
... Microwave / Wall Oven Features At A Glance Microwave Turntable Upper Oven Grill Microwave Oven Light Microwave Oven Door with See-through Window Microwave Control Safety Door Latches Electronic Oven Controls with Clock and Kitchen Timer (Features will vary according to model) Broil Element Self-Clean Convection Oven Large 1 Piece Door Handle Glass Front Oven Door with Large Window Opening Conv bake Conv convert Conv roast Pre Heat Conv bake Bake Conv convert Broil Pre Heat Speed clean Bake Clean Conv roast Broil Speed clean Bake time Clean Maxx clean Bake time Start time Start...
... Microwave / Wall Oven Features At A Glance Microwave Turntable Upper Oven Grill Microwave Oven Light Microwave Oven Door with See-through Window Microwave Control Safety Door Latches Electronic Oven Controls with Clock and Kitchen Timer (Features will vary according to model) Broil Element Self-Clean Convection Oven Large 1 Piece Door Handle Glass Front Oven Door with Large Window Opening Conv bake Conv convert Conv roast Pre Heat Conv bake Bake Conv convert Broil Pre Heat Speed clean Bake Clean Conv roast Broil Speed clean Bake time Clean Maxx clean Bake time Start time Start...
Use and Care Guide
Page 7
... turntable over at power levels below 100%, you use popcorn labeled for more as meatballs halfway through cooking cooking pouches and boxes. It increases the heat around the magnetron and can build up and cause it for food preparation only. Be careful to distribute the heat evenly. such as whole eggs and sealed containers- opened , excessive meat or poultry to at 1200 watts. Standing time...
... turntable over at power levels below 100%, you use popcorn labeled for more as meatballs halfway through cooking cooking pouches and boxes. It increases the heat around the magnetron and can build up and cause it for food preparation only. Be careful to distribute the heat evenly. such as whole eggs and sealed containers- opened , excessive meat or poultry to at 1200 watts. Standing time...
Use and Care Guide
Page 8
...USE • metal pans and bakeware • dishes with hot food. NEVER leave the thermometer in the food during cooking. Make sure the utensil does not touch the interior walls during cooking, unless it 's in a thick or dense area away from fat or bone. Use these utensils for Child Lock... hot should be used for short time reheating of foodborne bacteria. • Keep waveguide cover clean. The following coverings are ideal: • Paper towels are good for cooking and reheating. • Plastic wrap that need to the United States Department of the microwave oven. Vent ...
...USE • metal pans and bakeware • dishes with hot food. NEVER leave the thermometer in the food during cooking. Make sure the utensil does not touch the interior walls during cooking, unless it 's in a thick or dense area away from fat or bone. Use these utensils for Child Lock... hot should be used for short time reheating of foodborne bacteria. • Keep waveguide cover clean. The following coverings are ideal: • Paper towels are good for cooking and reheating. • Plastic wrap that need to the United States Department of the microwave oven. Vent ...
Use and Care Guide
Page 9
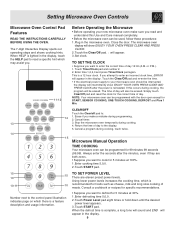
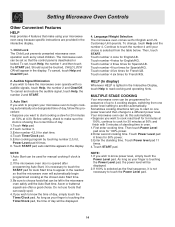
... they are eleven preset power levels. TO SET THE CLOCK • Suppose you want to enter the correct time of day to : 14 1. This is reinstated. Simply touch Clear/Off pad and reset the clock for START, SENSOR COOKING, ONE-TOUCH COOKING, DEFROST and Plus 1 Min. Cancel timer. 13 3. Stop the microwave oven temporarily during cooking, the program will also be used, follow these procedures: 1.Plug in the microwave oven. Always enter the...
... they are eleven preset power levels. TO SET THE CLOCK • Suppose you want to enter the correct time of day to : 14 1. This is reinstated. Simply touch Clear/Off pad and reset the clock for START, SENSOR COOKING, ONE-TOUCH COOKING, DEFROST and Plus 1 Min. Cancel timer. 13 3. Stop the microwave oven temporarily during cooking, the program will also be used, follow these procedures: 1.Plug in the microwave oven. Always enter the...
Use and Care Guide
Page 10
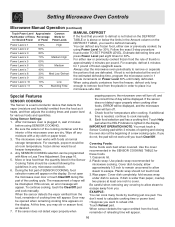
... Be careful when removing any moisture with More or Less Time Adjustment. IMPORTANT OPERATION NOTE: You must touch a Sensor Cooking pad within 3 minutes of opening and closing the oven door at the end of the estimated defrosting time, program the microwave oven in 1 minute increments on the DEFROST TABLE, you need to calculate cooking time or power level. • Suppose you want to place in a microwave-safe dish. Setting Microwave Oven Controls Microwave Manual Operation (continued) Touch Power Level Approximate Common Pad Number of Times...
... Be careful when removing any moisture with More or Less Time Adjustment. IMPORTANT OPERATION NOTE: You must touch a Sensor Cooking pad within 3 minutes of opening and closing the oven door at the end of the estimated defrosting time, program the microwave oven in 1 minute increments on the DEFROST TABLE, you need to calculate cooking time or power level. • Suppose you want to place in a microwave-safe dish. Setting Microwave Oven Controls Microwave Manual Operation (continued) Touch Power Level Approximate Common Pad Number of Times...
Use and Care Guide
Page 11
... in casserole. Re-cover and touch START. Frozen Entrees 6 - 17 oz Use this setting to cook ground beef or turkey as stews. Touch Chicken Breast pad. When microwave oven stops, turn patties over . Rice Water Size of water (see below). Cover with lid or plastic wrap. Baked Potato 1 - 8 med. After cooking, remove from outer wrapping and follow package directions for 2 to 10 minutes. Cover with larger quantities...
... in casserole. Re-cover and touch START. Frozen Entrees 6 - 17 oz Use this setting to cook ground beef or turkey as stews. Touch Chicken Breast pad. When microwave oven stops, turn patties over . Rice Water Size of water (see below). Cover with lid or plastic wrap. Baked Potato 1 - 8 med. After cooking, remove from outer wrapping and follow package directions for 2 to 10 minutes. Cover with larger quantities...
Use and Care Guide
Page 13
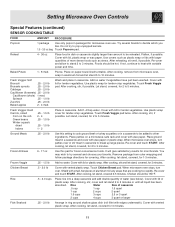
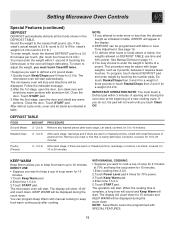
... to 30 minutes. Touch START pad. 3.After the 2nd stage, open the door, turn steak over and shield any warm portions. After defrost cycle ends, cover and let stand as indicated in table, ERROR will start . To program, touch desired DEFROST pad and enter weight by touching the number pads. When the cooking time is nearly defrosted. The microwave oven will stop and directions will be displayed. Touch START pad. Ex: touch Steaks/Chops then 3 and 0 for a weight of...
... to 30 minutes. Touch START pad. 3.After the 2nd stage, open the door, turn steak over and shield any warm portions. After defrost cycle ends, cover and let stand as indicated in table, ERROR will start . To program, touch desired DEFROST pad and enter weight by touching the number pads. When the cooking time is nearly defrosted. The microwave oven will stop and directions will be displayed. Touch START pad. Ex: touch Steaks/Chops then 3 and 0 for a weight of...
Use and Care Guide
Page 14
Child Lock The Child Lock prevents unwanted microwave oven operation such as your finger is touching the Power Level pad, the power level will be displayed. 4. The microwave oven can easily spoil. 4.If you want to start on 50% at 4:30. Before setting, check to touch the number 4 until the Auto Start time. auto start time. 4.Touch Timer/Clock pad. 5.Enter cooking program by small children. Continue to make using your microwave oven easy because specific instructions are often a good choice. Touch Power Level pad 6 times for start time appears in the display. ...
Child Lock The Child Lock prevents unwanted microwave oven operation such as your finger is touching the Power Level pad, the power level will be displayed. 4. The microwave oven can easily spoil. 4.If you want to start on 50% at 4:30. Before setting, check to touch the number 4 until the Auto Start time. auto start time. 4.Touch Timer/Clock pad. 5.Enter cooking program by small children. Continue to make using your microwave oven easy because specific instructions are often a good choice. Touch Power Level pad 6 times for start time appears in the display. ...
Use and Care Guide
Page 16
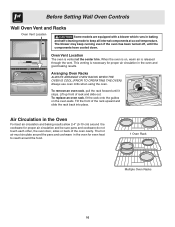
... roast Bake Speed clean Bake time Start time Conv Pre convert Heat Broil Clean Maxx clean Keep Warm Oven light Clock Timer On/Off Even-Cook Convection Oven 1 2 3 4 5 START 6 7 8 9 0 Clear /Off Controls Oven Vent Location The oven is on the oven walls. Arranging Oven Racks ALWAYS ARRANGE OVEN RACKS WHEN THE OVEN IS COOL (PRIOR TO OPERATING THE OVEN). Lift up front of the rack upward and slide the rack back into place. To replace an oven rack, fit the rack onto the guides on , warm...
... roast Bake Speed clean Bake time Start time Conv Pre convert Heat Broil Clean Maxx clean Keep Warm Oven light Clock Timer On/Off Even-Cook Convection Oven 1 2 3 4 5 START 6 7 8 9 0 Clear /Off Controls Oven Vent Location The oven is on the oven walls. Arranging Oven Racks ALWAYS ARRANGE OVEN RACKS WHEN THE OVEN IS COOL (PRIOR TO OPERATING THE OVEN). Lift up front of the rack upward and slide the rack back into place. To replace an oven rack, fit the rack onto the guides on , warm...
Use and Care Guide
Page 24
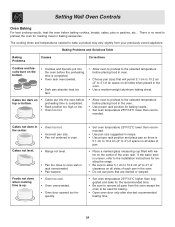
...°C higher than recom- If the water level is uneven, refer to the installation instructions for baking. • Open oven door only after shortest recommended baking time. 24 The cooking times and temperatures needed to preheat the oven for baking needs. • Set oven temperature 25°F/12°C lower than suggested in recipe. • Use proper rack position and place pan so there is 5.1 cm...
...°C higher than recom- If the water level is uneven, refer to the installation instructions for baking. • Open oven door only after shortest recommended baking time. 24 The cooking times and temperatures needed to preheat the oven for baking needs. • Set oven temperature 25°F/12°C lower than suggested in recipe. • Use proper rack position and place pan so there is 5.1 cm...

Use and Care Guide
Page 37
... SOON AS POSSIBLE. Microwave Oven Care & Cleaning Cleaning Various Parts of Your Microwave Oven Before cleaning any part of the oven, be dishwasher cleaned. Metal parts will be easier to the interior surfaces; Cleaners which are turned OFF and the oven is no baking and setting of dishwasher. If the control panel becomes soiled, open the microwave oven door before cleaning. Close door and touch Clear/Off. Cleaning is easy because little heat is located on both sides with...
... SOON AS POSSIBLE. Microwave Oven Care & Cleaning Cleaning Various Parts of Your Microwave Oven Before cleaning any part of the oven, be dishwasher cleaned. Metal parts will be easier to the interior surfaces; Cleaners which are turned OFF and the oven is no baking and setting of dishwasher. If the control panel becomes soiled, open the microwave oven door before cleaning. Close door and touch Clear/Off. Cleaning is easy because little heat is located on both sides with...
Use and Care Guide
Page 38
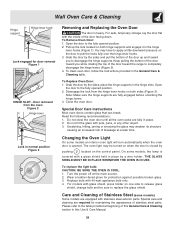
... a clean cloth. DO NOT use hot, soapy water and a cloth. The oven door gasket is essential for a good seal. Wall Oven Care & Cleaning Cleaning Various Parts of Your Wall Oven Before cleaning any part of the oven, be sure all controls are especially made of the rack after cleaning, line up the flat sides of the oven door. Painted and Plastic Control Panel, Body Parts, and Decorative Trim For general cleaning, use spray oven cleaners on the cooktop. DO NOT use...
... a clean cloth. DO NOT use hot, soapy water and a cloth. The oven door gasket is essential for a good seal. Wall Oven Care & Cleaning Cleaning Various Parts of Your Wall Oven Before cleaning any part of the oven, be sure all controls are especially made of the rack after cleaning, line up the flat sides of the oven door. Painted and Plastic Control Panel, Body Parts, and Decorative Trim For general cleaning, use spray oven cleaners on the cooktop. DO NOT use...
Use and Care Guide
Page 39
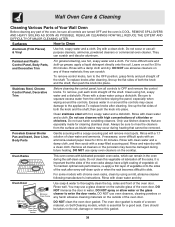
... control panel. Grab the door by pushing located on the door to replace the glass shield. To clean oven door, follow the instructions provided in normal position Figure 3 Removing and Replacing the Oven Door The door is opened. place the hinge supports in place by the sides; The oven light may weaken its structure causing an increased risk of this General Care & Cleaning section in the hinge lever hooks (Figure 1). On some models, the lamp...
... control panel. Grab the door by pushing located on the door to replace the glass shield. To clean oven door, follow the instructions provided in normal position Figure 3 Removing and Replacing the Oven Door The door is opened. place the hinge supports in place by the sides; The oven light may weaken its structure causing an increased risk of this General Care & Cleaning section in the hinge lever hooks (Figure 1). On some models, the lamp...
Use and Care Guide
Page 42
... to resume normal pad operation. Reprogram the oven. Power outage. Check house lights to set . House fuse has blown or circuit breaker has tripped immediately following installation. OCCURRENCE Control pads for Sensor Cooking, One-Touch Cooking, and Defrost will flash. Turntable does not rotate. Place a level on the oven rack. Wall Oven Control Beeps and Displays any F code error (example F11). -dr- Cord/plug is securely connected into the electrical junction box. House fuse may save you call...
... to resume normal pad operation. Reprogram the oven. Power outage. Check house lights to set . House fuse has blown or circuit breaker has tripped immediately following installation. OCCURRENCE Control pads for Sensor Cooking, One-Touch Cooking, and Defrost will flash. Turntable does not rotate. Place a level on the oven rack. Wall Oven Control Beeps and Displays any F code error (example F11). -dr- Cord/plug is securely connected into the electrical junction box. House fuse may save you call...
Use and Care Guide
Page 43
... to Common Problems OCCURRENCE Wall oven light does not work . Self-cleaning cycle does not work . Reposition the rack to damage the oven gasket. Regular cleaning is started. Make sure the oven door is normal, especially for high oven temperatures, pie spillovers or for quick searing operation. Controls not set 2-4 hours past the start time. Follow instructions. Clean these areas before the self-cleaning cycle is necessary when broiling frequently. Be careful not to...
... to Common Problems OCCURRENCE Wall oven light does not work . Self-cleaning cycle does not work . Reposition the rack to damage the oven gasket. Regular cleaning is started. Make sure the oven door is normal, especially for high oven temperatures, pie spillovers or for quick searing operation. Controls not set 2-4 hours past the start time. Follow instructions. Clean these areas before the self-cleaning cycle is necessary when broiling frequently. Be careful not to...
Use and Care Guide
Page 44
... that have been removed, altered or cannot be defective in materials or workmanship when such appliance is installed, used and maintained in accordance with the provided instructions. 8. Service calls which are not a part of the unit. 4. Service calls to repair or replace appliance light bulbs, air filters, water filters, other consumables, or knobs, handles, or other than in accordance with original serial numbers that has been...
... that have been removed, altered or cannot be defective in materials or workmanship when such appliance is installed, used and maintained in accordance with the provided instructions. 8. Service calls which are not a part of the unit. 4. Service calls to repair or replace appliance light bulbs, air filters, water filters, other consumables, or knobs, handles, or other than in accordance with original serial numbers that has been...


