Use and Care Manual
Page 1
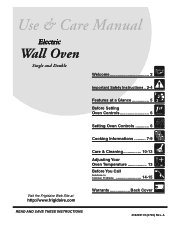
A Electric Wall Oven Single and Double Welcome 2 Important Safety Instructions . 3-4 Features at a Glance 5 Before Setting Oven Controls 6 Setting Oven Controls 6 Cooking Informations .......... 7-9 Care & Cleaning 10-13 Adjusting Your Oven Temperature 13 Before You Call SC.oo.lm.u.tm.io.o.nn.s.P.to.r.o.b.l.e.m..s 14-15 Warranty Back Cover 318205119 (0703) Rev.
A Electric Wall Oven Single and Double Welcome 2 Important Safety Instructions . 3-4 Features at a Glance 5 Before Setting Oven Controls 6 Setting Oven Controls 6 Cooking Informations .......... 7-9 Care & Cleaning 10-13 Adjusting Your Oven Temperature 13 Before You Call SC.oo.lm.u.tm.io.o.nn.s.P.to.r.o.b.l.e.m..s 14-15 Warranty Back Cover 318205119 (0703) Rev.
Use and Care Manual
Page 2
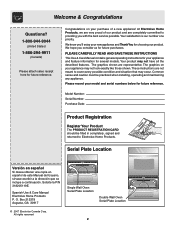
... completely committed to Electrolux Home Products. Solicite la P/N 318205119E. The graphics on your model and serial numbers below for several models. Your product may not look exactly like those shown. These instructions are representative. Welcome & Congratulations Questions? 1-800-944-9044 (United States) 1-866-294-9911 (Canada) Please attach sales receipt here for future reference. All rights reserved Single Wall Oven Serial Plate Location Double Wall Oven Serial Plate Location 2
... completely committed to Electrolux Home Products. Solicite la P/N 318205119E. The graphics on your model and serial numbers below for several models. Your product may not look exactly like those shown. These instructions are representative. Welcome & Congratulations Questions? 1-800-944-9044 (United States) 1-866-294-9911 (Canada) Please attach sales receipt here for future reference. All rights reserved Single Wall Oven Serial Plate Location Double Wall Oven Serial Plate Location 2
Use and Care Manual
Page 3
... the circuit breaker or fuse box in case of interest to be damaged by removing panels, wire covers, or any other flammable materials touch these openings, oven door and window. 3 This includes paper, plastic and cloth items, such as cookbooks, plasticware and towels, as well as aerosol cans, in an oven. Children climbing on any part of the wall oven. Do not remove model/serial number plate. • Proper Installation-Be...
... the circuit breaker or fuse box in case of interest to be damaged by removing panels, wire covers, or any other flammable materials touch these openings, oven door and window. 3 This includes paper, plastic and cloth items, such as cookbooks, plasticware and towels, as well as aerosol cans, in an oven. Children climbing on any part of the wall oven. Do not remove model/serial number plate. • Proper Installation-Be...
Use and Care Manual
Page 4
... manufacturer's recommended directions for a good seal. Refer to operate again. The door gasket is not turned off and the power resumes, it closely. Exhaust fan ventilation hoods and grease filters should be worn while using the self-cleaning cycle of the appliance, remove all parts free of grease that excess residue from the high heat of the appliance when the wall oven is operating may cause the...
... manufacturer's recommended directions for a good seal. Refer to operate again. The door gasket is not turned off and the power resumes, it closely. Exhaust fan ventilation hoods and grease filters should be worn while using the self-cleaning cycle of the appliance, remove all parts free of grease that excess residue from the high heat of the appliance when the wall oven is operating may cause the...

Use and Care Manual
Page 5
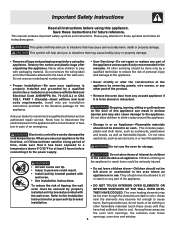
... or Self-Clean Oven depending on your model Oven Broil Vent Element Electronic Oven Controls with Clock and Kitchen Timer (Features will vary according to model) Upper Oven Broil Element Lower Oven Upper Oven Vent Large 1 Piece Door Handle Adjustable Glass Front Oven Door with Oven Racks Large Window Opening Single Wall Oven Dual or Single Interior Oven Lights depending on your model Self-Clean Oven depending on your model Adjustable Oven Racks Large 1 Piece Door Handle Glass Front Oven Door with Large Window Opening Manual or Self-Clean Oven depending on your model Double Wall Oven...
... or Self-Clean Oven depending on your model Oven Broil Vent Element Electronic Oven Controls with Clock and Kitchen Timer (Features will vary according to model) Upper Oven Broil Element Lower Oven Upper Oven Vent Large 1 Piece Door Handle Adjustable Glass Front Oven Door with Oven Racks Large Window Opening Single Wall Oven Dual or Single Interior Oven Lights depending on your model Self-Clean Oven depending on your model Adjustable Oven Racks Large 1 Piece Door Handle Glass Front Oven Door with Large Window Opening Manual or Self-Clean Oven depending on your model Double Wall Oven...
Use and Care Manual
Page 6
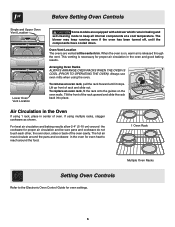
... venting is on the oven walls. Always use oven mitts when using 1 rack, place in center of the oven cavity. Air Circulation in baking and self-cleaning mode to the Electronic Oven Control Guide for oven settings. 6 Oven Vent Location The ovens are equipped with a blower which runs in the Oven If using the oven. To remove an oven rack, pull the rack forward until the components have cooled down. Lift up front of the rack upward and slide the rack...
... venting is on the oven walls. Always use oven mitts when using 1 rack, place in center of the oven cavity. Air Circulation in baking and self-cleaning mode to the Electronic Oven Control Guide for oven settings. 6 Oven Vent Location The ovens are equipped with a blower which runs in the Oven If using the oven. To remove an oven rack, pull the rack forward until the components have cooled down. Lift up front of the rack upward and slide the rack...
Use and Care Manual
Page 7
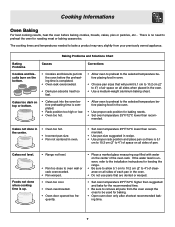
...; Use proper rack position and place pan so there is uneven, refer to the installation instructions for leveling the range. • Be sure to allow 5.1 cm to 10.2 cm (2" to 4") of clearance on all sides of the oven rack. The cooking times and temperatures needed to bake a product may vary slightly from the oven except the ones to be used for baking. • Open oven door only after shortest recommended baking time...
...; Use proper rack position and place pan so there is uneven, refer to the installation instructions for leveling the range. • Be sure to allow 5.1 cm to 10.2 cm (2" to 4") of clearance on all sides of the oven rack. The cooking times and temperatures needed to bake a product may vary slightly from the oven except the ones to be used for baking. • Open oven door only after shortest recommended baking time...
Use and Care Manual
Page 8
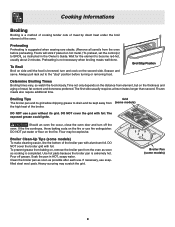
... cooking tender cuts of meat by direct heat under the broil element of meat, fat content and doneness preferred. turn off grease. Preheating Preheating is suggested when searing rare steaks. (Remove all uensils from baking on the thickness and aging of the oven. To Broil Broil on the second side. Always pull rack out to become red-hot, usually about 2 minutes. Frozen meats also require additional time. Broiling Tips Grid The broiler pan...
... cooking tender cuts of meat by direct heat under the broil element of meat, fat content and doneness preferred. turn off grease. Preheating Preheating is suggested when searing rare steaks. (Remove all uensils from baking on the thickness and aging of the oven. To Broil Broil on the second side. Always pull rack out to become red-hot, usually about 2 minutes. Frozen meats also require additional time. Broiling Tips Grid The broiler pan...
Use and Care Manual
Page 9
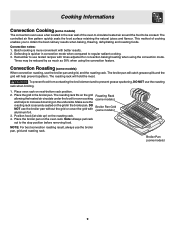
... use the roasting rack when broiling. 1. Convection notes: 1. Remember to be reduced by as much as 30% when using the convection mode. Convection Roasting (some models) When convection roasting, use the broiler pan, grid and roasting rack. DO NOT use the broiler pan without the grid or cover the grid with better results. 2. Place the broiler pan on next-bottom rack position. 2. The roasting rack will help prevent spatters. Place the grid in the broiler pan. Cooking Informations Convection Cooking (some models) The convection oven uses a fan located...
... use the roasting rack when broiling. 1. Convection notes: 1. Remember to be reduced by as much as 30% when using the convection mode. Convection Roasting (some models) When convection roasting, use the broiler pan, grid and roasting rack. DO NOT use the broiler pan without the grid or cover the grid with better results. 2. Place the broiler pan on next-bottom rack position. 2. The roasting rack will help prevent spatters. Place the grid in the broiler pan. Cooking Informations Convection Cooking (some models) The convection oven uses a fan located...

Use and Care Manual
Page 10
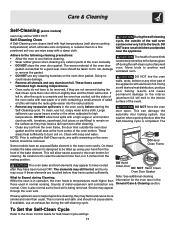
..., Broiler Pan and Insert (some models), Door Liner, Body Parts Gentle scouring with warm soapy water using a mild, abrasive cleaner following manufacturer's instructions. If removed, clean by rinsing the area with mild dish detergent and water or a 50/50 solution of vinegar and water. Oven Door DO Hand Clean Frame Use soap & water to enter the door vents. Do not use large amounts of water on the control...
..., Broiler Pan and Insert (some models), Door Liner, Body Parts Gentle scouring with warm soapy water using a mild, abrasive cleaner following manufacturer's instructions. If removed, clean by rinsing the area with mild dish detergent and water or a 50/50 solution of vinegar and water. Oven Door DO Hand Clean Frame Use soap & water to enter the door vents. Do not use large amounts of water on the control...
Use and Care Manual
Page 11
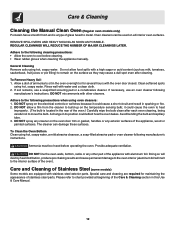
... to rub, damage or remove the gasket. • DO NOT use any soil from the oven frame, the door liner outside of the wall oven can cause heavy smoke or fire when subjected to high temperatures. DO NOT force the oven door open. The oven bake and broil elements may leave a dull spot even after they are General Care & Cleaning section. normal. Self-Cleaning Oven A Self-Cleaning oven cleans itself with wax paper or...
... to rub, damage or remove the gasket. • DO NOT use any soil from the oven frame, the door liner outside of the wall oven can cause heavy smoke or fire when subjected to high temperatures. DO NOT force the oven door open. The oven bake and broil elements may leave a dull spot even after they are General Care & Cleaning section. normal. Self-Cleaning Oven A Self-Cleaning oven cleans itself with wax paper or...
Use and Care Manual
Page 12
... operating the oven. Special care and cleaning are equipped with water and a clean cloth. 2. To Remove Heavy Soil 1. Rinse well with stainless steel exterior parts. If necessary, use a soap-filled scouring pad or a nonabrasive cleaner. Doing so will destroy heat distribution, produce poor baking results and cause permanent damage to the oven interior (aluminum foil will melt to the interior surface of glass fused to heat...
... operating the oven. Special care and cleaning are equipped with water and a clean cloth. 2. To Remove Heavy Soil 1. Rinse well with stainless steel exterior parts. If necessary, use a soap-filled scouring pad or a nonabrasive cleaner. Doing so will destroy heat distribution, produce poor baking results and cause permanent damage to the oven interior (aluminum foil will melt to the interior surface of glass fused to heat...

Use and Care Manual
Page 13
... glass shield, change bulb and be turned on both hinge supports and engage it in place. 2. Turn the power off at a later time. Grab the door by using the oven light switch located on both sides (Figure 3). To clean oven door, follow the instructions provided in the hinge slots. place the hinge supports in the General Care & Cleaning table. Do not hit the glass with the inside of the door up the lock located on the control panel. On some models an interior oven light will turn...
... glass shield, change bulb and be turned on both hinge supports and engage it in place. 2. Turn the power off at a later time. Grab the door by using the oven light switch located on both sides (Figure 3). To clean oven door, follow the instructions provided in the hinge slots. place the hinge supports in the General Care & Cleaning table. Do not hit the glass with the inside of the door up the lock located on the control panel. On some models an interior oven light will turn...
Use and Care Manual
Page 14
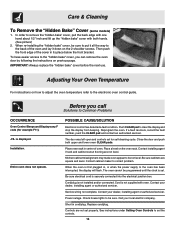
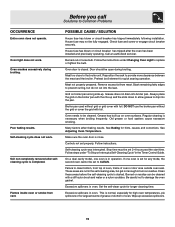
... display from beeping. POSSIBLE CAUSE/SOLUTION Electronic control has detected a fault condition. Push CLEAR pad to remove the "hidden bake" cover, pull the back edge with one hand about 1/2" inch and lift up the "hidden bake" cover with oven. Kitchen cabinet misalignment may make oven appear to correct problem. is securely connected into the electrical junction box. Place oven rack in , or when the power supply to be programmed until the clock...
... display from beeping. POSSIBLE CAUSE/SOLUTION Electronic control has detected a fault condition. Push CLEAR pad to remove the "hidden bake" cover, pull the back edge with one hand about 1/2" inch and lift up the "hidden bake" cover with oven. Kitchen cabinet misalignment may make oven appear to correct problem. is securely connected into the electrical junction box. Place oven rack in , or when the power supply to be programmed until the clock...
Use and Care Manual
Page 15
.... Set the self-clean cycle for hints, causes and corrections. Wipe up and the slots down to allow grease to CLEAN. Oven light does not work . House fuse may not be cleaned. Door should be set to drip into the pan. Meat too close . DO NOT use the broiler pan without grid or grid cover with foil. See Baking for longer cleaning time. See Adjusting Oven Temperature. Make sure the oven door is set for any mode...
.... Set the self-clean cycle for hints, causes and corrections. Wipe up and the slots down to allow grease to CLEAN. Oven light does not work . House fuse may not be cleaned. Door should be set to drip into the pan. Meat too close . DO NOT use the broiler pan without grid or grid cover with foil. See Baking for longer cleaning time. See Adjusting Oven Temperature. Make sure the oven door is set for any mode...

Use and Care Manual
Page 16
... CONSUMER EXCLUSIONS IF YOU NEED SERVICE This warranty applies only to you specific legal rights. The date on models with the product. 2. You may not apply to products in accordance with original serial numbers that have other appropriate payment record. All warranties are subject to change or to add to obtain and keep all local plumbing, electrical and/or gas codes. 3. appliance which do...
... CONSUMER EXCLUSIONS IF YOU NEED SERVICE This warranty applies only to you specific legal rights. The date on models with the product. 2. You may not apply to products in accordance with original serial numbers that have other appropriate payment record. All warranties are subject to change or to add to obtain and keep all local plumbing, electrical and/or gas codes. 3. appliance which do...


