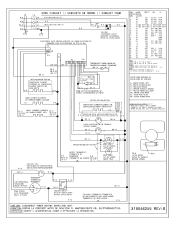
Wiring Schematic
Page 1
...DOOR SWITCH/INTERRUPTOR DE PUERTA/INTERRUPTEUR DE PORTE OPTION/OPCION/OPTION COLOR CODE/CODIGOS DE COLOR/CODE DE COULEUR G.-GREEN/VERDE/VERT W.-WHITE/BLANCO/BLANC R.-RED/ROJO/ROUGE O.-ORANGE/NARANJA/ORANGE Y.-YELLOW/AMARILLO/JAUNE BR.- ELEMENT° DE ASADO * QUAND UTILISE AVEC 4000 W. ELEMENT GRILLAGE BR -14 BR -14 • • LATCH MOTOR/MOTOR...150 EXL-150 3321 / / MICROWAVE OUTLET ENCHUFDE MICROONDAS PRISE DE MICRO-ONDES 10 18 11 16 12 12 13 16 200 SEW-1 3122 200 SEW-1 3122 250 3252 250 3252 ELECTRONIC OVEN CONTROL/CONTROL DE HORNO ELECTRONICO/ 14 20 150 EXL-150...
...DOOR SWITCH/INTERRUPTOR DE PUERTA/INTERRUPTEUR DE PORTE OPTION/OPCION/OPTION COLOR CODE/CODIGOS DE COLOR/CODE DE COULEUR G.-GREEN/VERDE/VERT W.-WHITE/BLANCO/BLANC R.-RED/ROJO/ROUGE O.-ORANGE/NARANJA/ORANGE Y.-YELLOW/AMARILLO/JAUNE BR.- ELEMENT° DE ASADO * QUAND UTILISE AVEC 4000 W. ELEMENT GRILLAGE BR -14 BR -14 • • LATCH MOTOR/MOTOR...150 EXL-150 3321 / / MICROWAVE OUTLET ENCHUFDE MICROONDAS PRISE DE MICRO-ONDES 10 18 11 16 12 12 13 16 200 SEW-1 3122 200 SEW-1 3122 250 3252 250 3252 ELECTRONIC OVEN CONTROL/CONTROL DE HORNO ELECTRONICO/ 14 20 150 EXL-150...
Installation Instructions
Page 1
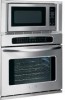
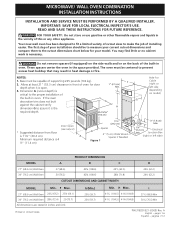
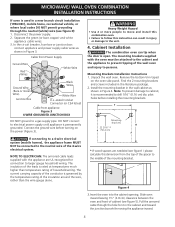
... liquids in front of your installation should be centered to the cutout dimensions chart below for your model. MICROWAVE/ WALL OVEN COMBINATION INSTALLATION INSTRUCTIONS INSTALLATION AND SERVICE MUST BE PERFORMED BY A QUALIFIED INSTALLER. IMPORTANT: SAVE FOR LOCAL ELECTRICAL INSPECTOR'S USE. Printed in heat damage or fire. A English - Your new wall oven has been designed to fit a limited variety of cutout sizes to the proper installation of supporting 225 pounds (102 kg). 2. FOR...
... liquids in front of your installation should be centered to the cutout dimensions chart below for your model. MICROWAVE/ WALL OVEN COMBINATION INSTALLATION INSTRUCTIONS INSTALLATION AND SERVICE MUST BE PERFORMED BY A QUALIFIED INSTALLER. IMPORTANT: SAVE FOR LOCAL ELECTRICAL INSPECTOR'S USE. Printed in heat damage or fire. A English - Your new wall oven has been designed to fit a limited variety of cutout sizes to the proper installation of supporting 225 pounds (102 kg). 2. FOR...

Installation Instructions
Page 2
... the line (time-delay fuse or circuit breaker is located on the side trim). The electrical power to the wall oven. 1. Read all governing codes and ordinances. 4. THIS COMBINATION OVEN IS NOT APPROVED FOR STACKABLE OR SIDE-BY-SIDE INSTALLATION. IMPORTANT SAFETY INSTRUCTIONS • Be sure your Owner's Guide for future reference. Do not discard oven removal tools found in serious injury or death. 3. A 3-wire or 4-wire single phase 120...
... the line (time-delay fuse or circuit breaker is located on the side trim). The electrical power to the wall oven. 1. Read all governing codes and ordinances. 4. THIS COMBINATION OVEN IS NOT APPROVED FOR STACKABLE OR SIDE-BY-SIDE INSTALLATION. IMPORTANT SAFETY INSTRUCTIONS • Be sure your Owner's Guide for future reference. Do not discard oven removal tools found in serious injury or death. 3. A 3-wire or 4-wire single phase 120...
Installation Instructions
Page 3
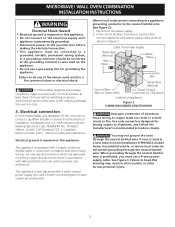
MICROWAVE/ WALL OVEN COMBINATION INSTALLATION INSTRUCTIONS Electrical Shock Hazard • Electrical ground is required on this appliance. • Do not connect to the electrical supply until appliance is manufactured with a white neutral power supply wire and a frame connected green or bare copper grounding wire. This appliance is permanently grounded. • Disconnect power to the junction box before switching on power. Disconnect the power supply. 2. You may not...
MICROWAVE/ WALL OVEN COMBINATION INSTALLATION INSTRUCTIONS Electrical Shock Hazard • Electrical ground is required on this appliance. • Do not connect to the electrical supply until appliance is manufactured with a white neutral power supply wire and a frame connected green or bare copper grounding wire. This appliance is permanently grounded. • Disconnect power to the junction box before switching on power. Disconnect the power supply. 2. You may not...
Installation Instructions
Page 4
... oven and front of the 4-wire electrical system. MICROWAVE/ WALL OVEN COMBINATION INSTALLATION INSTRUCTIONS If oven is open. Separate the green (or bare copper) and white appliance cable wires. 3. In the circuit breaker, fuse box or junction box: connect appliance and power supply cable wires as shown in the cabinet and toward the junction box while moving the appliance inward. 4 DO NOT connect to the unit. 4. The mounting brackets...
... oven and front of the 4-wire electrical system. MICROWAVE/ WALL OVEN COMBINATION INSTALLATION INSTRUCTIONS If oven is open. Separate the green (or bare copper) and white appliance cable wires. 3. In the circuit breaker, fuse box or junction box: connect appliance and power supply cable wires as shown in the cabinet and toward the junction box while moving the appliance inward. 4 DO NOT connect to the unit. 4. The mounting brackets...
Installation Instructions
Page 5
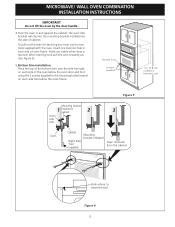
... 5 Mounting bracket 1 installed in and against the cabinet; MICROWAVE/ WALL OVEN COMBINATION INSTALLATION INSTRUCTIONS IMPORTANT Do not lift the oven by the door handle. 4.Push the oven in cabinet 2 3 Oven side trim Oven Cabinet Right Side Tool supplied Mounting bracket released Oven removed from the cabinet Hole where to insert the tool Figure 6 5 Holes are visible when door is opened. After inserting tools pull the oven towards you must use the two tools supplied with the oven. the oven side bracket...
... 5 Mounting bracket 1 installed in and against the cabinet; MICROWAVE/ WALL OVEN COMBINATION INSTALLATION INSTRUCTIONS IMPORTANT Do not lift the oven by the door handle. 4.Push the oven in cabinet 2 3 Oven side trim Oven Cabinet Right Side Tool supplied Mounting bracket released Oven removed from the cabinet Hole where to insert the tool Figure 6 5 Holes are visible when door is opened. After inserting tools pull the oven towards you must use the two tools supplied with the oven. the oven side bracket...

Installation Instructions
Page 6
MICROWAVE/ WALL OVEN COMBINATION INSTALLATION INSTRUCTIONS 6. Leveling the Wall Oven 1. Turn on the power to the oven (Refer to include the model and serial numbers and a lot number or letter from the serial plate on your Use & Care Guide.) 3. When ordering parts for or making inquires about your oven, always be sure to your oven. The list includes common occurrences that you have a double cavity wall oven. Install an oven rack in the center of defective workmanship or materials in this...
MICROWAVE/ WALL OVEN COMBINATION INSTALLATION INSTRUCTIONS 6. Leveling the Wall Oven 1. Turn on the power to the oven (Refer to include the model and serial numbers and a lot number or letter from the serial plate on your Use & Care Guide.) 3. When ordering parts for or making inquires about your oven, always be sure to your oven. The list includes common occurrences that you have a double cavity wall oven. Install an oven rack in the center of defective workmanship or materials in this...


