User Manual
Page 1
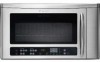
Microwave Oven PLBMV188HC, GLBM188HS, GLBM188HB WELCOME & CONGRATULATION 2 IMPORTANT SAFETY INSTRUCTIONS 2-6 PART NAMES 7 BEFORE OPERATING 9 MANUAL OPERATION 10-11 SENSOR MODES 11-14 AUTO MODES 15-21 CONVENIENT FEATURES 22-24 CLEANING AND CARE 25-26 SERVICE CALL CHECK 27 SPECIFICATIONS 27 Visit the Frigidaire Web Site at: http://www.frigidaire.com WARRANTY 28 READ AND SAVE THESE INSTRUCTIONS P/N316495052 TINSEB168WRRZ-EL81 E
Microwave Oven PLBMV188HC, GLBM188HS, GLBM188HB WELCOME & CONGRATULATION 2 IMPORTANT SAFETY INSTRUCTIONS 2-6 PART NAMES 7 BEFORE OPERATING 9 MANUAL OPERATION 10-11 SENSOR MODES 11-14 AUTO MODES 15-21 CONVENIENT FEATURES 22-24 CLEANING AND CARE 25-26 SERVICE CALL CHECK 27 SPECIFICATIONS 27 Visit the Frigidaire Web Site at: http://www.frigidaire.com WARRANTY 28 READ AND SAVE THESE INSTRUCTIONS P/N316495052 TINSEB168WRRZ-EL81 E

User Manual
Page 2
... consider us serve you received a damaged Microwave Oven... E 2 PLEASE CAREFULLY READ AND SAVE THESE INSTRUCTIONS This Use & Care Manual provides specific operating instructions for your model and serial numbers below for choosing our product. Visit the Frigidaire Web Site at: http://www.frigidaire.com Before you call Frigidaire Customer Services at 1-800-944-9044...
... consider us serve you received a damaged Microwave Oven... E 2 PLEASE CAREFULLY READ AND SAVE THESE INSTRUCTIONS This Use & Care Manual provides specific operating instructions for your model and serial numbers below for choosing our product. Visit the Frigidaire Web Site at: http://www.frigidaire.com Before you call Frigidaire Customer Services at 1-800-944-9044...
User Manual
Page 3
...8226; This appliance must be serviced only by qualified service personnel. Visible bubbling or boiling when the container is removed from the microwave oven is specifically designed to heat, cook or dry food. Do not overheat the liquid. - SAVE THESE INSTRUCTIONS. 3 E IMPORTANT ...outlet. Do not use straight-sided containers with the provided installation instructions. • Some products such as described in this appliance only in the microwave oven cavity: - Do not use as whole eggs and sealed containers -for example, near a kitchen sink, in a wet basement or near ...
...8226; This appliance must be serviced only by qualified service personnel. Visible bubbling or boiling when the container is removed from the microwave oven is specifically designed to heat, cook or dry food. Do not overheat the liquid. - SAVE THESE INSTRUCTIONS. 3 E IMPORTANT ...outlet. Do not use straight-sided containers with the provided installation instructions. • Some products such as described in this appliance only in the microwave oven cavity: - Do not use as whole eggs and sealed containers -for example, near a kitchen sink, in a wet basement or near ...

User Manual
Page 4
... antenna. If there is too short, have any interference caused by providing an escape wire for damage to the microwave oven or personal injury resulting from failure to your dealer or ELECTROLUX SERVICER. The electrical requirements are Installation Instructions, Wall Template... be any questions about the grounding or electrical instructions, consult a qualified electrician or service person. 2. Lift carton off microwave oven and remove all packing materials, Installation Instructions, Wall Template, Top Template, Charcoal Filter, Turntable and Turntable Support. Figure 1 Ground ...
... antenna. If there is too short, have any interference caused by providing an escape wire for damage to the microwave oven or personal injury resulting from failure to your dealer or ELECTROLUX SERVICER. The electrical requirements are Installation Instructions, Wall Template... be any questions about the grounding or electrical instructions, consult a qualified electrician or service person. 2. Lift carton off microwave oven and remove all packing materials, Installation Instructions, Wall Template, Top Template, Charcoal Filter, Turntable and Turntable Support. Figure 1 Ground ...
User Manual
Page 5
... over so that steam escapes. • Cook eggs in shells. • Reheat whole eggs. • Dry nuts or seeds in the microwave oven. Food severely overcooked can smoke or ignite. • Cover foods while cooking. Doneness signs include: - Check temperature before feeding. • Heat... harmful bacteria may hear the magnetron cycling on popcorn package. 2 seconds or use the microwave oven without overcooking. • Check for the exterior of the microwave oven to bottom and from microwave oven and stir, if possible. Look for standing time which allows the food to fi...
... over so that steam escapes. • Cook eggs in shells. • Reheat whole eggs. • Dry nuts or seeds in the microwave oven. Food severely overcooked can smoke or ignite. • Cover foods while cooking. Doneness signs include: - Check temperature before feeding. • Heat... harmful bacteria may hear the magnetron cycling on popcorn package. 2 seconds or use the microwave oven without overcooking. • Check for the exterior of the microwave oven to bottom and from microwave oven and stir, if possible. Look for standing time which allows the food to fi...
User Manual
Page 6
...pans and bakeware • dishes with a supervising person very near to them : • wood, straw, wicker cooked to use aluminum foil in your new microwave oven. For fresh pork, ground meat, fish, seafood, egg dishes, (71°C) frozen prepared food and beef, lamb or veal cut into steaks,... chops or roasts cooked to hasten cooking. • Microwave oven cooking bags are in use and check cooking progress frequently so that there is no time should be used for short time reheating of overcooking...
...pans and bakeware • dishes with a supervising person very near to them : • wood, straw, wicker cooked to use aluminum foil in your new microwave oven. For fresh pork, ground meat, fish, seafood, egg dishes, (71°C) frozen prepared food and beef, lamb or veal cut into steaks,... chops or roasts cooked to hasten cooking. • Microwave oven cooking bags are in use and check cooking progress frequently so that there is no time should be used for short time reheating of overcooking...

User Manual
Page 7
... once for high speed, twice for 2-level cooking/ reheating 17 Light cover 18 Grease filters 19 Menu label 7 E PART NAMES BOTTOM VIEW (Front of microwave oven) (Rear of the microwave oven floor. Only remove for cleaning. 15 Removable turntable support First, carefully place the turntable support in the motor shaft in the center of...
... once for high speed, twice for 2-level cooking/ reheating 17 Light cover 18 Grease filters 19 Menu label 7 E PART NAMES BOTTOM VIEW (Front of microwave oven) (Rear of the microwave oven floor. Only remove for cleaning. 15 Removable turntable support First, carefully place the turntable support in the motor shaft in the center of...
User Manual
Page 9
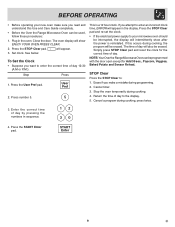
... clock. See below. If this Use and Care Guide completely. • Before the Over the Range Microwave Oven can be used, follow these procedures: 1. Enter the correct time of day. The oven display will appear. 3. To Set the Clock • Suppose you attempt to enter an incorrect clock time..., Baked Potato and Sensor Reheat. Cancel timer. 3. NOTE: Your Over the Range Microwave Oven can be programmed with the door open except for the correct time of day by pressing the numbers in the oven. Erase if you make sure you read and understand this occurs during programming. 2. ...
... clock. See below. If this Use and Care Guide completely. • Before the Over the Range Microwave Oven can be used, follow these procedures: 1. Enter the correct time of day. The oven display will appear. 3. To Set the Clock • Suppose you attempt to enter an incorrect clock time..., Baked Potato and Sensor Reheat. Cancel timer. 3. NOTE: Your Over the Range Microwave Oven can be programmed with the door open except for the correct time of day by pressing the numbers in the oven. Erase if you make sure you read and understand this occurs during programming. 2. ...
User Manual
Page 10
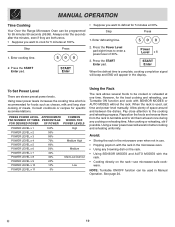
MANUAL OPERATION Time Cooking Your Over the Range Microwave Oven can be used , set time and power level manually. Step Press 1. Enter defrosting time. 500 2.... will assist in Manual Operation. Press the START Enter pad. Avoid: • Storing the rack in the microwave oven when not in use microwave-safe cookware. Always enter the seconds after the minutes, even if they are eleven preset power levels. Step ... After cooking or reheating, stir if possible. Using a lower power level will appear in the microwave oven. • Using any cooking or reheating time. See page 24.
MANUAL OPERATION Time Cooking Your Over the Range Microwave Oven can be used , set time and power level manually. Step Press 1. Enter defrosting time. 500 2.... will assist in Manual Operation. Press the START Enter pad. Avoid: • Storing the rack in the microwave oven when not in use microwave-safe cookware. Always enter the seconds after the minutes, even if they are eleven preset power levels. Step ... After cooking or reheating, stir if possible. Using a lower power level will appear in the microwave oven. • Using any cooking or reheating time. See page 24.
User Manual
Page 11
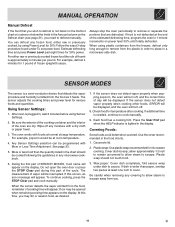
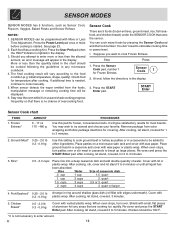
... the guidelines in any frozen food, either raw or previously cooked frozen food the rule of the oven are defrosted. Any Sensor Settings selection can defrost any microwave cookbook. 6. Check food for various foods and quantities. Wax paper: Cover dish completely; Be careful...recommended for 1 pound of the cycle. For example, defrost 4 minutes for microwave cooking. See page 23. 5. If this part of frozen spaghetti sauce. Each food has a cooking hint. Always stop the oven periodically to cook manually. 9. More or less food than paper, overlap two...
... the guidelines in any frozen food, either raw or previously cooked frozen food the rule of the oven are defrosted. Any Sensor Settings selection can defrost any microwave cookbook. 6. Check food for various foods and quantities. Wax paper: Cover dish completely; Be careful...recommended for 1 pound of the cycle. For example, defrost 4 minutes for microwave cooking. See page 23. 5. If this part of frozen spaghetti sauce. Each food has a cooking hint. Always stop the oven periodically to cook manually. 9. More or less food than paper, overlap two...
User Manual
Page 12
... the chart should be programmed with edges underneath). When oven stops, turn patties over . NOTES: 1. Press the START Enter pad. Chicken Breast* 0.5 - 2.0 lb 0.3 - 0.9 kg Cover with lid or plastic wrap. E 12 Place patties on a microwave-safe rack and cover with 0.2 - 0.9 kg plastic... wrap. After cooking, let stand, covered, 3 minutes. 5. Stay near the oven while it's in ring around shallow glass dish (roll fillet with More or Less...
... the chart should be programmed with edges underneath). When oven stops, turn patties over . NOTES: 1. Press the START Enter pad. Chicken Breast* 0.5 - 2.0 lb 0.3 - 0.9 kg Cover with lid or plastic wrap. E 12 Place patties on a microwave-safe rack and cover with 0.2 - 0.9 kg plastic... wrap. After cooking, let stand, covered, 3 minutes. 5. Stay near the oven while it's in ring around shallow glass dish (roll fillet with More or Less...
User Manual
Page 24
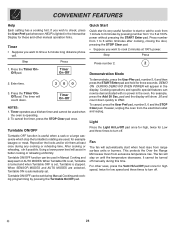
...STOP Clear pad. Fan The fan will count down quickly to 6 minutes by pressing the Turntable On/Off pad. This protects the Over the Range Microwave Oven from 1 to time a 3-minute long distance phone call. The fan will appear in the display. Quick Start Quick start is lighted in AUTO ... be used in Manual Cooking and keep warm in the Interactive Display for three seconds. When SENSOR MODES and AUTO MODES are used when the oven is operating. 2. Timer operates as a kitchen timer and cannot be used , for low speed and three times to turn off . CONVENIENT FEATURES ...
...STOP Clear pad. Fan The fan will count down quickly to 6 minutes by pressing the Turntable On/Off pad. This protects the Over the Range Microwave Oven from 1 to time a 3-minute long distance phone call. The fan will appear in the display. Quick Start Quick start is lighted in AUTO ... be used in Manual Cooking and keep warm in the Interactive Display for three seconds. When SENSOR MODES and AUTO MODES are used when the oven is operating. 2. Timer operates as a kitchen timer and cannot be used , for low speed and three times to turn off . CONVENIENT FEATURES ...
User Manual
Page 25
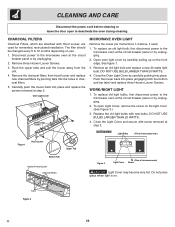
...the interior surfaces, wipe with a damp cloth any abrasive, chlorides, chlorines or ammonia. Use upper rack of microwave oven) 25 E Never operate the fan or microwave oven without the filters in mild, sudsy water; DO NOT use ANY store bought cleaners like Stainless Steel cleaners ... CLEANING AND CARE Disconnect the power cord before cleaning to prevent unexpected manipulation. Soak the filters in the microwave oven cavity. BOTTOM VIEW (Front of the microwave oven and remove the filter. Clean the outside surface is recommended to set in a 2-cup glass measuring cup....
...the interior surfaces, wipe with a damp cloth any abrasive, chlorides, chlorines or ammonia. Use upper rack of microwave oven) 25 E Never operate the fan or microwave oven without the filters in mild, sudsy water; DO NOT use ANY store bought cleaners like Stainless Steel cleaners ... CLEANING AND CARE Disconnect the power cord before cleaning to prevent unexpected manipulation. Soak the filters in the microwave oven cavity. BOTTOM VIEW (Front of the microwave oven and remove the filter. Clean the outside surface is recommended to set in a 2-cup glass measuring cup....
User Manual
Page 26
... and replace three Houver Louver Screws. Remove an old light bulb and replace a new 20 watts light bulb. To open to the microwave oven at the circuit breaker panel or by unplugging. 2. CLEANING AND CARE Disconnect the power cord before cleaning or leave the door open Light ...cover. (See Figure 3.) 3. To replace an old light bulb, first disconnect power to the microwave oven at step 2. DO NOT USE BULB LARGER THAN 20 WATTS. 4. BOTTOM VIEW Light Bulbs (Front of microwave oven) Figure 1 Hood Louver Upper Tab Bottom Tab Inside of Hood Louver Charcoal Filters Figure 3 (Rear...
... and replace three Houver Louver Screws. Remove an old light bulb and replace a new 20 watts light bulb. To open to the microwave oven at the circuit breaker panel or by unplugging. 2. CLEANING AND CARE Disconnect the power cord before cleaning or leave the door open Light ...cover. (See Figure 3.) 3. To replace an old light bulb, first disconnect power to the microwave oven at step 2. DO NOT USE BULB LARGER THAN 20 WATTS. 4. BOTTOM VIEW Light Bulbs (Front of microwave oven) Figure 1 Hood Louver Upper Tab Bottom Tab Inside of Hood Louver Charcoal Filters Figure 3 (Rear...
User Manual
Page 27
... overcooking. Federal Communications Commission Authorized. If they are functioning properly, CONTACT YOUR NEAREST ELECTROLUX AUTHORIZED SERVICER. A microwave oven should never be serviced by measuring maximum width, depth and height. Complies with standards set for holding food ... cup in the oven warm? Operate the oven for measuring output wattage. If the oven is less. SPECIFICATIONS PLBMV188HC, GLBM188HS, GLBM188HB AC Line Voltage: AC Power Required: Output Power*: Frequency: Outside Dimensions (including handle): Cavity Dimensions: Microwave oven Capacity**: Weight: ...
... overcooking. Federal Communications Commission Authorized. If they are functioning properly, CONTACT YOUR NEAREST ELECTROLUX AUTHORIZED SERVICER. A microwave oven should never be serviced by measuring maximum width, depth and height. Complies with standards set for holding food ... cup in the oven warm? Operate the oven for measuring output wattage. If the oven is less. SPECIFICATIONS PLBMV188HC, GLBM188HS, GLBM188HB AC Line Voltage: AC Power Required: Output Power*: Frequency: Outside Dimensions (including handle): Cavity Dimensions: Microwave oven Capacity**: Weight: ...

Parts Catalog
Page 7
... Screw, toggle Screw, 5mm x 85mm Screw, 4 mm x 8 mm, white Screw, 5mm x 35mm Washer Template, installation, top Template, installation, wall Wire, ground Wiring Harness, main Rack, microwave oven, wire Screw, 4 mm x 10 mm Screw, 4 mm x 25 mm Screw Screw, 4 mm x 12 mm Glass, door, black Glass, door, white Glass, door, stainless Display, digital...
... Screw, toggle Screw, 5mm x 85mm Screw, 4 mm x 8 mm, white Screw, 5mm x 35mm Washer Template, installation, top Template, installation, wall Wire, ground Wiring Harness, main Rack, microwave oven, wire Screw, 4 mm x 10 mm Screw, 4 mm x 25 mm Screw Screw, 4 mm x 12 mm Glass, door, black Glass, door, white Glass, door, stainless Display, digital...

Installation Instructions
Page 1
... unit should be flat vertical wall. This will normally be completed by a qualified electrician before installing the Over the Range Microwave Oven. For customers in the gaps. Keep these instructions for local inspector's use spacers to find the edges of 2" x 4" wood ...either side of any adjacent studs will indicate stud location. See 3 ELECTRICAL GROUNDING INSTRUCTIONS on page 2. 1 MOUNTING SPACE This Over the Range Microwave Oven requires a mounting space on a wall as shown in Thailand Two people are recommended to install this mark. Use a stud finder, a ...
... unit should be flat vertical wall. This will normally be completed by a qualified electrician before installing the Over the Range Microwave Oven. For customers in the gaps. Keep these instructions for local inspector's use spacers to find the edges of 2" x 4" wood ...either side of any adjacent studs will indicate stud location. See 3 ELECTRICAL GROUNDING INSTRUCTIONS on page 2. 1 MOUNTING SPACE This Over the Range Microwave Oven requires a mounting space on a wall as shown in Thailand Two people are recommended to install this mark. Use a stud finder, a ...

Installation Instructions
Page 2
... Electrical Code and local codes and ordinances. INSTALLATION INSTRUCTIONS 3 ELECTRICAL GROUNDING INSTRUCTIONS This appliance must be metal; ELECTRICAL REQUIREMENTS The oven is properly installed and grounded in Figure 2. DO NOT USE AN EXTENSION CORD. Check that is equipped with a grounding plug... do not use of electric shock by leaving enough space between wall studs to be located inside the cabinet directly above the Microwave Oven mounting location as shown in accordance with the space between the studs, or wall should not exceed 140 feet. The receptacle should...
... Electrical Code and local codes and ordinances. INSTALLATION INSTRUCTIONS 3 ELECTRICAL GROUNDING INSTRUCTIONS This appliance must be metal; ELECTRICAL REQUIREMENTS The oven is properly installed and grounded in Figure 2. DO NOT USE AN EXTENSION CORD. Check that is equipped with a grounding plug... do not use of electric shock by leaving enough space between wall studs to be located inside the cabinet directly above the Microwave Oven mounting location as shown in accordance with the space between the studs, or wall should not exceed 140 feet. The receptacle should...

Installation Instructions
Page 4
INSTALLATION INSTRUCTIONS 8 VENTILATION SYSTEM (PREPARING OVEN FOR INSTALLATION) This Over the Range Microwave Oven is designed for adaptation to three types of the Charcoal Filters, which have already been installed in the oven. Follow installation procedure (B). Save 3 screws to use . See Figure 8. See ...so that the Fan Blade Openings are facing the back of cavity. Put the wire back into the oven. Follow installation procedure (A). Oven Light Cover Oven Light (B) HORIZONTAL EXHAUST: OUTSIDE VENTILATION 1. See Figure 10B on page 5. RECIRCULATING - non-vented, ...
INSTALLATION INSTRUCTIONS 8 VENTILATION SYSTEM (PREPARING OVEN FOR INSTALLATION) This Over the Range Microwave Oven is designed for adaptation to three types of the Charcoal Filters, which have already been installed in the oven. Follow installation procedure (B). Save 3 screws to use . See Figure 8. See ...so that the Fan Blade Openings are facing the back of cavity. Put the wire back into the oven. Follow installation procedure (A). Oven Light Cover Oven Light (B) HORIZONTAL EXHAUST: OUTSIDE VENTILATION 1. See Figure 10B on page 5. RECIRCULATING - non-vented, ...
Installation Instructions
Page 6
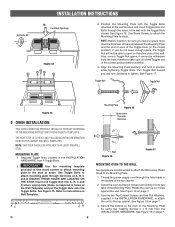
...of the Wall Template) and put the Toggle Nuts onto the Toggle Bolts. See Figure 17. Toggle Bolt Toggle Nut Figure 14 9 OVEN INSTALLATION THIS OVEN CANNOT BE PROPERLY INSTALLED WITHOUT REFERRING TO THE MOUNTING INSTRUCTIONS FOUND ON BOTH TEMPLATES. IMPORTANT Use the mounting template provided to Use wood ...a space more than the thickness of the wall between the Mounting Plate and the end of each of the Toggles are recommended to attach the Microwave Oven/ Hood to the top cabinet. See Figure 18 on page 7. Secure the bottom of the top cabinet. 2. Use the two Top Cabinet Screws...
...of the Wall Template) and put the Toggle Nuts onto the Toggle Bolts. See Figure 17. Toggle Bolt Toggle Nut Figure 14 9 OVEN INSTALLATION THIS OVEN CANNOT BE PROPERLY INSTALLED WITHOUT REFERRING TO THE MOUNTING INSTRUCTIONS FOUND ON BOTH TEMPLATES. IMPORTANT Use the mounting template provided to Use wood ...a space more than the thickness of the wall between the Mounting Plate and the end of each of the Toggles are recommended to attach the Microwave Oven/ Hood to the top cabinet. See Figure 18 on page 7. Secure the bottom of the top cabinet. 2. Use the two Top Cabinet Screws...


