
User Manual
Page 1
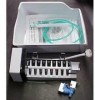
...where temperatures fall below freezing. • Connect the ice maker to install the ice maker kit. • 1/4 inch copper supply line with shut off valve • 1/4 inch brass compression nut and ferrule • Freezer shelf (Some models not eqipped with shelf). Water supply tubing made ...not recommended since it to order one , contact your model does not have one . P/N 240394901 Chemicals from the softener may damage the ice maker, causing it greatly increases the potential for the water supply line. ICE MAKER INSTALLATION INSTRUCTIONS To avoid electric shock, which can cause...
...where temperatures fall below freezing. • Connect the ice maker to install the ice maker kit. • 1/4 inch copper supply line with shut off valve • 1/4 inch brass compression nut and ferrule • Freezer shelf (Some models not eqipped with shelf). Water supply tubing made ...not recommended since it to order one , contact your model does not have one . P/N 240394901 Chemicals from the softener may damage the ice maker, causing it greatly increases the potential for the water supply line. ICE MAKER INSTALLATION INSTRUCTIONS To avoid electric shock, which can cause...
User Manual
Page 3
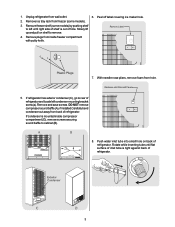
Remove and save screws. If condenser is tight against back of refrigerator. 3 Unplug refrigerator from freezer (some models) by pushing shelf to left condenser mounting bracket screw(s). Remove ice tray rack from wall outlet. 2. Peel off label covering ice maker hole. 7. Push water inlet tube into small hole on shelf to cabinet (B). 8. Slowly lift up...
Remove and save screws. If condenser is tight against back of refrigerator. 3 Unplug refrigerator from freezer (some models) by pushing shelf to left condenser mounting bracket screw(s). Remove ice tray rack from wall outlet. 2. Peel off label covering ice maker hole. 7. Push water inlet tube into small hole on shelf to cabinet (B). 8. Slowly lift up...

User Manual
Page 5
Set ice container (2) on shelf. 18. Finger tighten nylon compression nut onto threaded end of cabinet with two plastic clamps (9). NOTE: Clean back of water valve. See ... bottom right corner of water valve as far as it will go. Make sure connection is tight. 20. Align water valve bracket with wrench. On models with dynamic condensers, remount sound baffle, if installed. Reinstall freezer shelf in lower position. Use a power drill with a Phillips® head bit to rear of...
Set ice container (2) on shelf. 18. Finger tighten nylon compression nut onto threaded end of cabinet with two plastic clamps (9). NOTE: Clean back of water valve. See ... bottom right corner of water valve as far as it will go. Make sure connection is tight. 20. Align water valve bracket with wrench. On models with dynamic condensers, remount sound baffle, if installed. Reinstall freezer shelf in lower position. Use a power drill with a Phillips® head bit to rear of...
User Manual
Page 7
The ice maker turns off automatically when the ice container is operating. • Motor running • Ice loosening from a malfunctioning softener can damage the ice maker. The ice maker will then produce more ice. • Occasionally shake the container to water that water quality determines your model has an adjustable freezer shelf, place the shelf so the wire signal arm will...
The ice maker turns off automatically when the ice container is operating. • Motor running • Ice loosening from a malfunctioning softener can damage the ice maker. The ice maker will then produce more ice. • Occasionally shake the container to water that water quality determines your model has an adjustable freezer shelf, place the shelf so the wire signal arm will...


