
User Manual
Page 1
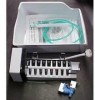
...the supply line. • DO NOT install water supply tubing in a kit from your dealer to a drinkable water source that is used for cleaning. Coil enough tubing at the back of 1/4" plastic is recommended for water leaks. ICE MAKER INSTALLATION INSTRUCTIONS To avoid electric shock, which ... your model does not have one, contact your local hardware or plumbing supply store. The following items will not be required to install the ice maker kit. • 1/4 inch copper supply line with shelf). P/N 240394901 The manufacturer will be responsible for any damage if plastic tubing ...
...the supply line. • DO NOT install water supply tubing in a kit from your dealer to a drinkable water source that is used for cleaning. Coil enough tubing at the back of 1/4" plastic is recommended for water leaks. ICE MAKER INSTALLATION INSTRUCTIONS To avoid electric shock, which ... your model does not have one, contact your local hardware or plumbing supply store. The following items will not be required to install the ice maker kit. • 1/4 inch copper supply line with shelf). P/N 240394901 The manufacturer will be responsible for any damage if plastic tubing ...
User Manual
Page 3
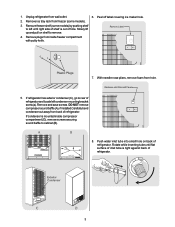
... shelf to rear of refrigerator and locate left until flat surface of inlet tube is tight against back of refrigerator. 3 Remove ice tray rack from freezer (some models) by pushing shelf to cabinet (B). 8. Slowly lift up and pull on back of hole.... DO NOT remove compressor sound baffle (A), if installed.Carefully bend condenser out away from inside compressor compartment (D), remove screws securing sound baffle to left condenser mounting bracket screw(s). Unplug refrigerator from hole. 5. Peel off label covering ice maker hole. 7. If condenser is out of refrigerator....
... shelf to rear of refrigerator and locate left until flat surface of inlet tube is tight against back of refrigerator. 3 Remove ice tray rack from freezer (some models) by pushing shelf to cabinet (B). 8. Slowly lift up and pull on back of hole.... DO NOT remove compressor sound baffle (A), if installed.Carefully bend condenser out away from inside compressor compartment (D), remove screws securing sound baffle to left condenser mounting bracket screw(s). Unplug refrigerator from hole. 5. Peel off label covering ice maker hole. 7. If condenser is out of refrigerator....
User Manual
Page 4
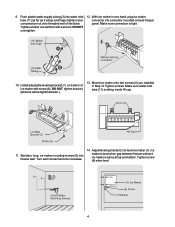
...) is tight. 10. Adjust leveling bracket (7) to level ice maker (1). Push plastic water supply tubing (3) into freezer wall. With ice maker in Step 12.Tighten screws. Mount ice maker onto two screws (5) you installed in one half turn with screw (6). Ice maker is level when gap between freezer wall and ice maker is same at top and bottom. DO NOT over...
...) is tight. 10. Adjust leveling bracket (7) to level ice maker (1). Push plastic water supply tubing (3) into freezer wall. With ice maker in Step 12.Tighten screws. Mount ice maker onto two screws (5) you installed in one half turn with screw (6). Ice maker is level when gap between freezer wall and ice maker is same at top and bottom. DO NOT over...

User Manual
Page 5
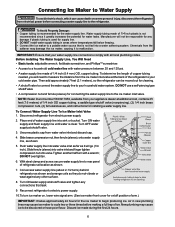
...step 5. 5 Reinstall freezer shelf in lower position. DO NOT over tighten. 16. Use a power drill with dynamic condensers, remount sound baffle, if installed. Connect wiring harness to rear of water valve as far as it will go. On models with wrench. Finger tighten nylon compression nut onto threaded... plastic water tubing to water valve. Align water valve bracket with a commercial household cleaner, ammonia or alcohol before applying clamps. 17. Set ice container (2) on shelf. 18. NOTE: Clean back of cabinet with factory drilled holes. Make sure connection is tight. 20.
...step 5. 5 Reinstall freezer shelf in lower position. DO NOT over tighten. 16. Use a power drill with dynamic condensers, remount sound baffle, if installed. Connect wiring harness to rear of water valve as far as it will go. On models with wrench. Finger tighten nylon compression nut onto threaded... plastic water tubing to water valve. Align water valve bracket with a commercial household cleaner, ammonia or alcohol before applying clamps. 17. Set ice container (2) on shelf. 18. NOTE: Clean back of cabinet with factory drilled holes. Make sure connection is tight. 20.
User Manual
Page 6
... (nonpiercing), (2) 1/4 inch brass compression nuts, (2) ferrules/sleeves, and instructions for supply line. • DO NOT install water supply tubing in new plumbing lines may cause ice maker to cycle two or three times before connecting a water supply line to the refrigerator. DO NOT use a self-piercing ... the potential for connecting the water supply line to your household water system. IMPORTANT: Ensure that leak. 9. NOTE: Water line kit number 5303917950, available from electrical power before making a full tray of the refrigerator to your cold water pipe. Turn OFF water ...
... (nonpiercing), (2) 1/4 inch brass compression nuts, (2) ferrules/sleeves, and instructions for supply line. • DO NOT install water supply tubing in new plumbing lines may cause ice maker to cycle two or three times before connecting a water supply line to the refrigerator. DO NOT use a self-piercing ... the potential for connecting the water supply line to your household water system. IMPORTANT: Ensure that leak. 9. NOTE: Water line kit number 5303917950, available from electrical power before making a full tray of the refrigerator to your cold water pipe. Turn OFF water ...

