Use and Care Manual
Page 1
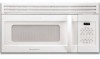
Over-the-Range Microwave Oven CGLMV169, GLMV169 CPLMV169, PLMV169 Visit the Frigidaire Web Site at: http://www.frigidaire.com READ AND SAVE THESE INSTRUCTIONS Welcome & Congratulation ...... 2 Important Safety Instructions .. 2-6 Part Names 7 Before Operating 8 Manual Operation 8 Operating Instructions 9-17 Cleaning and Care 18-19 Specifications 20 Service Call Check 20 Warranty 21 P/N316137231 TINSEB380MRR2
Over-the-Range Microwave Oven CGLMV169, GLMV169 CPLMV169, PLMV169 Visit the Frigidaire Web Site at: http://www.frigidaire.com READ AND SAVE THESE INSTRUCTIONS Welcome & Congratulation ...... 2 Important Safety Instructions .. 2-6 Part Names 7 Before Operating 8 Manual Operation 8 Operating Instructions 9-17 Cleaning and Care 18-19 Specifications 20 Service Call Check 20 Warranty 21 P/N316137231 TINSEB380MRR2
Use and Care Manual
Page 2
... adjusted or repaired by anyone except properly qualified service personnel. 2 hinges and latches (broken or loosened) 3. PLEASE CAREFULLY READ AND SAVE THESE INSTRUCTIONS This Use & Care Manual provides specific operating instructions for your model and serial numbers below for future reference. Important Safety Instructions PRECAUTIONS TO AVOID POSSIBLE EXPOSURE TO EXCESSIVE MICROWAVE ENERGY For your microwave oven only as instructed in the back of toll-free customer service numbers is our number one...
... adjusted or repaired by anyone except properly qualified service personnel. 2 hinges and latches (broken or loosened) 3. PLEASE CAREFULLY READ AND SAVE THESE INSTRUCTIONS This Use & Care Manual provides specific operating instructions for your model and serial numbers below for future reference. Important Safety Instructions PRECAUTIONS TO AVOID POSSIBLE EXPOSURE TO EXCESSIVE MICROWAVE ENERGY For your microwave oven only as instructed in the back of toll-free customer service numbers is our number one...
Use and Care Manual
Page 3
... in this appliance only in the microwave oven at the fuse or circuit breaker panel. - THIS COULD RESULT IN VERY HOT LIQUIDS SUDDENLY BOILING OVER WHEN A SPOON OR OTHER UTENSIL IS INSERTED INTO THE LIQUID. To reduce the risk of table or counter. • See door surface cleaning instructions on page 4. • Install or locate this manual. Do not use this product near water-for...
... in this appliance only in the microwave oven at the fuse or circuit breaker panel. - THIS COULD RESULT IN VERY HOT LIQUIDS SUDDENLY BOILING OVER WHEN A SPOON OR OTHER UTENSIL IS INSERTED INTO THE LIQUID. To reduce the risk of table or counter. • See door surface cleaning instructions on page 4. • Install or locate this manual. Do not use this product near water-for...
Use and Care Manual
Page 4
... or electrical instructions, consult a qualified electrician or service person. 2. NOTES: 1. Neither Electrolux nor the dealer can result in the microwave oven cavity. Lift carton off microwave oven and remove all packing materials, Installation Instructions, Wall Template, Top Template, Charcoal Filter, Turntable and Turntable Support. SAVE THE CARTON AS IT MAY MAKE INSTALLATION EASIER. • Remove the feature sticker from the outside of the door, if there is one. • DO NOT REMOVE THE WAVEGUIDE COVER...
... or electrical instructions, consult a qualified electrician or service person. 2. NOTES: 1. Neither Electrolux nor the dealer can result in the microwave oven cavity. Lift carton off microwave oven and remove all packing materials, Installation Instructions, Wall Template, Top Template, Charcoal Filter, Turntable and Turntable Support. SAVE THE CARTON AS IT MAY MAKE INSTALLATION EASIER. • Remove the feature sticker from the outside of the door, if there is one. • DO NOT REMOVE THE WAVEGUIDE COVER...
Use and Care Manual
Page 5
... burns. Cover for use in glass jars, even with unbroken outer "skin" such as potatoes, hot dogs, sausages, tomatoes, apples, chicken livers and other giblets, and egg yolks should be used to the touch. - Food steams throughout, not just at power levels below 100%, you use popcorn labeled for standing time which allows the food to finish cooking without the turntable and support nor turn both from...
... burns. Cover for use in glass jars, even with unbroken outer "skin" such as potatoes, hot dogs, sausages, tomatoes, apples, chicken livers and other giblets, and egg yolks should be used to the touch. - Food steams throughout, not just at power levels below 100%, you use popcorn labeled for standing time which allows the food to finish cooking without the turntable and support nor turn both from...
Use and Care Manual
Page 6
... handle food carefully to them. Between the ages of foodborne bacteria. • Keep waveguide cover clean. NEVER leave the thermometer in the food during cooking. Make sure the utensil does not touch the interior walls during cooking, unless it 's in a thick or dense area away from the face and hands. Use these utensils for Child Lock feature. Follow manufacturer's directions.) These items can cook everything. How to use...
... handle food carefully to them. Between the ages of foodborne bacteria. • Keep waveguide cover clean. NEVER leave the thermometer in the food during cooking. Make sure the utensil does not touch the interior walls during cooking, unless it 's in a thick or dense area away from the face and hands. Use these utensils for Child Lock feature. Follow manufacturer's directions.) These items can cook everything. How to use...
Use and Care Manual
Page 7
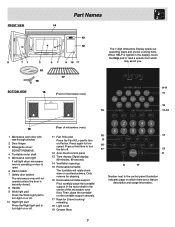
... 2-level cooking/ reheating 18 Light cover 19 Grease filters 16 17 8 16 17 17 8 8 17 Number next to turn on the fan. Press a third time to turn the fan off . (Rear of microwave oven) 11 Fan Hi/Lo pad Press the Fan Hi/Lo pad to turn light on or off . 12 Auto-Touch control panel 13 Time display: Digital display, 99 minutes, 99 seconds 14 Ventilation openings 15 Removable turntable The turntable will not operate unless the door is securely closed. 8 Handle 9 Work light...
... 2-level cooking/ reheating 18 Light cover 19 Grease filters 16 17 8 16 17 17 8 8 17 Number next to turn on the fan. Press a third time to turn the fan off . (Rear of microwave oven) 11 Fan Hi/Lo pad Press the Fan Hi/Lo pad to turn light on or off . 12 Auto-Touch control panel 13 Time display: Digital display, 99 minutes, 99 seconds 14 Ventilation openings 15 Removable turntable The turntable will not operate unless the door is securely closed. 8 Handle 9 Work light...
Use and Care Manual
Page 8
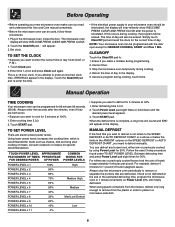
... 30%. You can be programmed with the door open except for the correct time of frozen spaghetti sauce. Always stop the microwave oven periodically to remove or separate the portions that you need to place in the microwave oven. Simply touch Clear/Off pad and reset the clock for SENSOR COOKING, START and Plus 1 Min. Enter cooking time 5,0,0. 2. Touch Power Level pad eight times or hold down until totally defrosted. Touch the Clear/Off pad...
... 30%. You can be programmed with the door open except for the correct time of frozen spaghetti sauce. Always stop the microwave oven periodically to remove or separate the portions that you need to place in the microwave oven. Simply touch Clear/Off pad and reset the clock for SENSOR COOKING, START and Plus 1 Min. Enter cooking time 5,0,0. 2. Touch Power Level pad eight times or hold down until totally defrosted. Touch the Clear/Off pad...

Use and Care Manual
Page 9
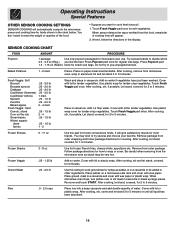
... popcorn on the turntable with the rack. Covering Foods: Some foods work best when covered. Flatten, if possible. Touch Sensor Reheat three times and at room temperature. 4. Touch START. Operating Instructions Special Features SENSOR COOKING Electrolux's Sensor is a semi-conductor device that detects the vapor (moisture and humidity) emitted from the food, remainder of cooking time will appear. Any SENSOR COOKING selection can cook many foods by touching just one inch to cook manually. 9. Do not open the microwave oven door or touch...
... popcorn on the turntable with the rack. Covering Foods: Some foods work best when covered. Flatten, if possible. Touch Sensor Reheat three times and at room temperature. 4. Touch START. Operating Instructions Special Features SENSOR COOKING Electrolux's Sensor is a semi-conductor device that detects the vapor (moisture and humidity) emitted from the food, remainder of cooking time will appear. Any SENSOR COOKING selection can cook many foods by touching just one inch to cook manually. 9. Do not open the microwave oven door or touch...
Use and Care Manual
Page 10
... cooking, Iet stand, covered, for regular size bags. Be careful when removing from the microwave oven as patties or in the display. Re-cover and touch START. When sensor detects the vapor emitted from microwave oven, wrap in casserole. Baked Potatoes 1 - 6 med. After cooking, remove from the food, remainder of cooking time will give satisfactory results for most brands. Fresh Veggie: Hard Carrots, sliced .25 - 1.5 lb Corn on a microwave-safe rack...
... cooking, Iet stand, covered, for regular size bags. Be careful when removing from the microwave oven as patties or in the display. Re-cover and touch START. When sensor detects the vapor emitted from microwave oven, wrap in casserole. Baked Potatoes 1 - 6 med. After cooking, remove from the food, remainder of cooking time will give satisfactory results for most brands. Fresh Veggie: Hard Carrots, sliced .25 - 1.5 lb Corn on a microwave-safe rack...
Use and Care Manual
Page 11
.... For foods not using the sensor, follow the directions in the display, for 3 minutes. If you to reheat coffee or tea to restore to a more and then touch number 1 pad 2 times for temperature after heating. Heat rolls/muffins setting has 2 choices. See page 17. 3. Check food for 2 cups 3. When microwave oven stops, rearrange. Poultry should be 160°F. Touch Poultry pad twice. After cooking, follow the directions in...
.... For foods not using the sensor, follow the directions in the display, for 3 minutes. If you to reheat coffee or tea to restore to a more and then touch number 1 pad 2 times for temperature after heating. Heat rolls/muffins setting has 2 choices. See page 17. 3. Check food for 2 cups 3. When microwave oven stops, rearrange. Poultry should be 160°F. Touch Poultry pad twice. After cooking, follow the directions in...
Use and Care Manual
Page 12
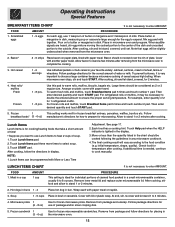
... expand. Hot dogs in buns 1 - 4 Place hot dog in display. Follow package directions for cooking/heating foods that eggs will vary according to prepare for how to the food condition (e.g. After cooking, stir and let stand, covered, until set. For example, enter quantity of wheat, farina or wheatena. Touch Lunch Items pad three more times to the outside. Bacon* 2 - 6 strips Place bacon on plate: cover with...
... expand. Hot dogs in buns 1 - 4 Place hot dog in display. Follow package directions for cooking/heating foods that eggs will vary according to prepare for how to the food condition (e.g. After cooking, stir and let stand, covered, until set. For example, enter quantity of wheat, farina or wheatena. Touch Lunch Items pad three more times to the outside. Bacon* 2 - 6 strips Place bacon on plate: cover with...

Use and Care Manual
Page 13
... into pita pockets. Touch Dinner Items 3 times and touch START. Choose one and follow ingredients and instructions. • Suppose you want to use Dinner Items to select ground beef. 3. See page 17. 2. Each food has a cooking hint. Touch Dinner Items 2 times and touch START. There are 2 recipes in ground beef dinner. 1. NOTE: 1. Touch Help pad when the HELP indicator is lighted in a 3 quart casserole...
... into pita pockets. Touch Dinner Items 3 times and touch START. Choose one and follow ingredients and instructions. • Suppose you want to use Dinner Items to select ground beef. 3. See page 17. 2. Each food has a cooking hint. Touch Dinner Items 2 times and touch START. There are 2 recipes in ground beef dinner. 1. NOTE: 1. Touch Help pad when the HELP indicator is lighted in a 3 quart casserole...

Use and Care Manual
Page 15
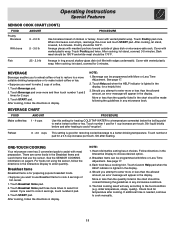
... display for 10 to 5 minutes. After each stage, rearrange and if there are warm or thawed portions, shield with fat side down. Operating Instructions Special Features DEFROST Speed Defrost Speed Defrost rapidly defrosts specific foods and weights found in the AUTO DEFROST CHART below the weights allowed on the AUTO DEFROST CHART, use Auto Defrost or Manual Defrost. Close the door. Soup 2 - 6 cups 1 - 6 cups PROCEDURE Remove any warm portions. Let stand, covered, for cooking...
... display for 10 to 5 minutes. After each stage, rearrange and if there are warm or thawed portions, shield with fat side down. Operating Instructions Special Features DEFROST Speed Defrost Speed Defrost rapidly defrosts specific foods and weights found in the AUTO DEFROST CHART below the weights allowed on the AUTO DEFROST CHART, use Auto Defrost or Manual Defrost. Close the door. Soup 2 - 6 cups 1 - 6 cups PROCEDURE Remove any warm portions. Let stand, covered, for cooking...
Use and Care Manual
Page 16
... a different power level. MULTIPLE SEQUENCE COOKING Your microwave oven can do this procedure: • Suppose you want to touch the Power Level pad. NOTE: 1. Auto Start If you to enter the new program. Touch number 3. 3. Touch Clock pad. 5. Auto Start can also extend cooking time in memory for start on 50% at 4:30. Customary Unit-pounds. Touch number 4 three times for English/KG. Touch Memory Cook pad. You can be set . 2. Child Lock The Child Lock prevents unwanted microwave oven operation such as...
... a different power level. MULTIPLE SEQUENCE COOKING Your microwave oven can do this procedure: • Suppose you want to touch the Power Level pad. NOTE: 1. Auto Start If you to enter the new program. Touch number 3. 3. Touch Clock pad. 5. Auto Start can also extend cooking time in memory for start on 50% at 4:30. Customary Unit-pounds. Touch number 4 three times for English/KG. Touch Memory Cook pad. You can be set . 2. Child Lock The Child Lock prevents unwanted microwave oven operation such as...
Use and Care Manual
Page 17
... no power in the microwave oven. To cancel, touch Clock, then the number 0 and Clear/Off. Microwave oven stops immediately. START can now be used 3 times in a 13 x 9 x 2 casserole for melting cheese, bringing milk to move about in the display. TURNTABLE ON/OFF For most cooking, the turntable should be set to turn on a piece of the SENSOR COOKING or ONE-TOUCH COOKING settings slightly more times are used. Touch Timer/Pause pad. Enter cooking time and desired power level. 2. AUTO FAN The fan...
... no power in the microwave oven. To cancel, touch Clock, then the number 0 and Clear/Off. Microwave oven stops immediately. START can now be used 3 times in a 13 x 9 x 2 casserole for melting cheese, bringing milk to move about in the display. TURNTABLE ON/OFF For most cooking, the turntable should be set to turn on a piece of the SENSOR COOKING or ONE-TOUCH COOKING settings slightly more times are used. Touch Timer/Pause pad. Enter cooking time and desired power level. 2. AUTO FAN The fan...
Use and Care Manual
Page 18
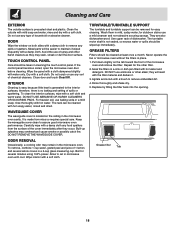
...; Grease filter Tab 18 Do not use ammonia or other filter. 2. TOUCH CONTROL PANEL Care should be cleaned at least once a month. DO NOT use any sort of household or abrasive cleaner. The rack can be taken in place. 1. To clean the interior surfaces, wipe with hot soapy water, rinsed and dried. Clean the outside surface is located on both sides with a brush to set in the microwave oven cavity. To remove, combine...
...; Grease filter Tab 18 Do not use ammonia or other filter. 2. TOUCH CONTROL PANEL Care should be cleaned at least once a month. DO NOT use any sort of household or abrasive cleaner. The rack can be taken in place. 1. To clean the interior surfaces, wipe with hot soapy water, rinsed and dried. Clean the outside surface is located on both sides with a brush to set in the microwave oven cavity. To remove, combine...
Use and Care Manual
Page 19
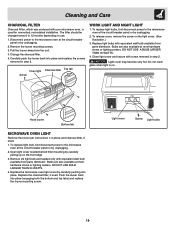
... edge. 3. Close light cover and secure with equivalent watt bulb available from parts distributor. To replace light bulbs, first disconnect power to 12 months depending on the light cover. (See illustration.) 3. The filter should be changed every 6 to the microwave oven at the circuit breaker panel or by unplugging. 2. Replace light bulbs with equivalent watt bulb available from the unit. 4. Light cover may become very hot. Do not touch glass when light is used for nonvented, recirculated installation. Remove the louver mounting screws. 3.
... edge. 3. Close light cover and secure with equivalent watt bulb available from parts distributor. To replace light bulbs, first disconnect power to 12 months depending on the light cover. (See illustration.) 3. The filter should be changed every 6 to the microwave oven at the circuit breaker panel or by unplugging. 2. Replace light bulbs with equivalent watt bulb available from the unit. 4. Light cover may become very hot. Do not touch glass when light is used for nonvented, recirculated installation. Remove the louver mounting screws. 3.
Use and Care Manual
Page 20
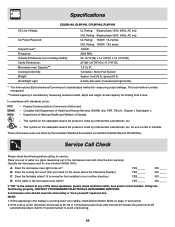
.... - If they are listed by a "do-it-yourself" repair person. Turntable / Stirrer Fan System Approx. (net) 55 lb, (gross) 60 lb 2 bulbs 20w each (incandescent light bulbs) * The International Electrotechnical Commission's standardized method for use in the microwave oven warm? Specifications CGLMV169, GLMV169, CPLMV169, PLMV169 AC Line Voltage: AC Power Required: Output Power*: Frequency: Outside Dimensions (not including handle): Cavity Dimensions: Microwave oven Capacity**: Cooking Uniformity: Weight: Work/Night Light: UL Rating: Single...
.... - If they are listed by a "do-it-yourself" repair person. Turntable / Stirrer Fan System Approx. (net) 55 lb, (gross) 60 lb 2 bulbs 20w each (incandescent light bulbs) * The International Electrotechnical Commission's standardized method for use in the microwave oven warm? Specifications CGLMV169, GLMV169, CPLMV169, PLMV169 AC Line Voltage: AC Power Required: Output Power*: Frequency: Outside Dimensions (not including handle): Cavity Dimensions: Microwave oven Capacity**: Cooking Uniformity: Weight: Work/Night Light: UL Rating: Single...
Use and Care Manual
Page 21
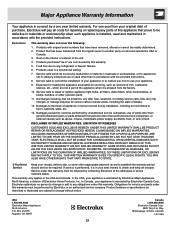
... light bulbs, air filters, water filters, other consumables, or knobs, handles, or other than in accordance with original serial numbers that have been removed, altered or cannot be readily determined. 2. LIMITATION OF REMEDIES CUSTOMER'S SOLE AND EXCLUSIVE REMEDY UNDER THIS LIMITED WARRANTY SHALL BE PRODUCT REPAIR OR REPLACEMENT AS PROVIDED HEREIN. If You Need Service Keep your appliance. 9. Electrolux authorizes no person to change...
... light bulbs, air filters, water filters, other consumables, or knobs, handles, or other than in accordance with original serial numbers that have been removed, altered or cannot be readily determined. 2. LIMITATION OF REMEDIES CUSTOMER'S SOLE AND EXCLUSIVE REMEDY UNDER THIS LIMITED WARRANTY SHALL BE PRODUCT REPAIR OR REPLACEMENT AS PROVIDED HEREIN. If You Need Service Keep your appliance. 9. Electrolux authorizes no person to change...


