Use and Care Manual
Page 1
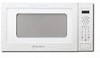
Microwave Oven GLMB209DB, GLMB209DS, GLMB209DQ PLMB209DC, CPLMB209DC Visit the Frigidaire Web Site at: http://www.frigidaire.com READ AND SAVE THESE INSTRUCTIONS Welcome & Congratulations .... 2 Important Safety Instructions .. 2-7 Part Names 8 Before Operating 9 Manual Operation 9 Operating Instructions 10-14 Cleaning and Care 15 Service Call Check 15 Specifications 16 Warranty 17 p/n 316137232 TINSEB383MRR1
Microwave Oven GLMB209DB, GLMB209DS, GLMB209DQ PLMB209DC, CPLMB209DC Visit the Frigidaire Web Site at: http://www.frigidaire.com READ AND SAVE THESE INSTRUCTIONS Welcome & Congratulations .... 2 Important Safety Instructions .. 2-7 Part Names 8 Before Operating 9 Manual Operation 9 Operating Instructions 10-14 Cleaning and Care 15 Service Call Check 15 Specifications 16 Warranty 17 p/n 316137232 TINSEB383MRR1
Use and Care Manual
Page 2
... Safety Instructions PRECAUTIONS TO AVOID POSSIBLE EXPOSURE TO EXCESSIVE MICROWAVE ENERGY For your model. Welcome & Congratulations Congratulations on sealing surfaces. • Do Not Operate the microwave oven if it is important not to defeat or tamper with the best service possible. At Electrolux Home Products, we are very proud of a new microwave oven! Model Number Serial Number Purchase Date NEED HELP? Read this manual. door seals...
... Safety Instructions PRECAUTIONS TO AVOID POSSIBLE EXPOSURE TO EXCESSIVE MICROWAVE ENERGY For your model. Welcome & Congratulations Congratulations on sealing surfaces. • Do Not Operate the microwave oven if it is important not to defeat or tamper with the best service possible. At Electrolux Home Products, we are very proud of a new microwave oven! Model Number Serial Number Purchase Date NEED HELP? Read this manual. door seals...
Use and Care Manual
Page 3
... boiling. Carefully attend appliance when SAVE THESE INSTRUCTIONS 3 Visible bubbling or boiling when the container is removed from paper or plastic bags before and halfway through heating it is specifically designed to properly grounded outlet. Connect only to heat, cook or dry food. Do not overcook food. Do not use corrosive chemicals or vapors in the microwave oven at the fuse or circuit breaker panel. -
... boiling. Carefully attend appliance when SAVE THESE INSTRUCTIONS 3 Visible bubbling or boiling when the container is removed from paper or plastic bags before and halfway through heating it is specifically designed to properly grounded outlet. Connect only to heat, cook or dry food. Do not overcook food. Do not use corrosive chemicals or vapors in the microwave oven at the fuse or circuit breaker panel. -
Use and Care Manual
Page 4
... cavity wall. Important Safety Instructions UNPACKING AND EXAMINING YOUR MICROWAVE OVEN Remove: • All packing materials from the outside of use the microwave oven frequently so plan its location for ease of the door. however, DO NOT REMOVE THE WAVEGUIDE COVER, which is any damage, such as misaligned or bent door, damaged door seals and sealing surfaces, broken or loose door hinges and latches and dents inside the microwave oven cavity...
... cavity wall. Important Safety Instructions UNPACKING AND EXAMINING YOUR MICROWAVE OVEN Remove: • All packing materials from the outside of use the microwave oven frequently so plan its location for ease of the door. however, DO NOT REMOVE THE WAVEGUIDE COVER, which is any damage, such as misaligned or bent door, damaged door seals and sealing surfaces, broken or loose door hinges and latches and dents inside the microwave oven cavity...
Use and Care Manual
Page 5
... that is recommended that the microwave oven is equipped with a cord having a grounding wire with a 3-prong grounding plug. Improper use of electric shock by the microwave oven to observe the correct electrical connection procedures. It is properly installed and grounded. The electrical requirements are a 120 volt 60 Hz, AC only, 15 amp. In the event of an electrical short circuit, grounding reduces risk of...
... that is recommended that the microwave oven is equipped with a cord having a grounding wire with a 3-prong grounding plug. Improper use of electric shock by the microwave oven to observe the correct electrical connection procedures. It is properly installed and grounded. The electrical requirements are a 120 volt 60 Hz, AC only, 15 amp. In the event of an electrical short circuit, grounding reduces risk of...
Use and Care Manual
Page 6
... Instructions ABOUT YOUR MICROWAVE OVEN This Use and Care Manual is a normal part of microwave cooking. A good microwave cookbook is on and off . The turntable will build up . Poultry thigh joints move easily. - ABOUT FOODS • Do not pop popcorn in injury. • Operating the microwave with no pinkness. - In using the microwave oven at edge. - It should not be used to the touch when cooking or reheating. Cooking to distribute the heat...
... Instructions ABOUT YOUR MICROWAVE OVEN This Use and Care Manual is a normal part of microwave cooking. A good microwave cookbook is on and off . The turntable will build up . Poultry thigh joints move easily. - ABOUT FOODS • Do not pop popcorn in injury. • Operating the microwave with no pinkness. - In using the microwave oven at edge. - It should not be used to the touch when cooking or reheating. Cooking to distribute the heat...
Use and Care Manual
Page 7
... is not necessary to buy all safety precautions: use potholders, remove coverings carefully, pay special attention to packages that crisp food because they may be extra hot. Make sure the utensil does not touch the interior walls during cooking, unless it 's in use metal twist ties. NEVER leave the thermometer in the food during cooking. Use these utensils for Child Lock feature. At no chance of the microwave oven.
... is not necessary to buy all safety precautions: use potholders, remove coverings carefully, pay special attention to packages that crisp food because they may be extra hot. Make sure the utensil does not touch the interior walls during cooking, unless it 's in use metal twist ties. NEVER leave the thermometer in the food during cooking. Use these utensils for Child Lock feature. At no chance of the microwave oven.

Use and Care Manual
Page 8
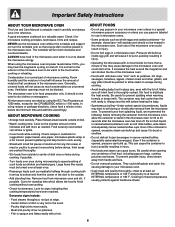
... cooking hints. One touch door open button Push to open . 11.Waveguide cover: DO NOT REMOVE. 12.Auto-Touch control panel 13.Time display: 99 minutes, 99 seconds 13 12 13 14 14 9 14 9 9 Number next to read a specific hint which there are a feature description and usage information. 8 Door seals and sealing surfaces 6. Microwave Oven door with see-through window 3. Turntable motor shaft 7. The turntable will not operate unless the door is securely closed. 4. Removable turntable support Carefully place the turntable support...
... cooking hints. One touch door open button Push to open . 11.Waveguide cover: DO NOT REMOVE. 12.Auto-Touch control panel 13.Time display: 99 minutes, 99 seconds 13 12 13 14 14 9 14 9 9 Number next to read a specific hint which there are a feature description and usage information. 8 Door seals and sealing surfaces 6. Microwave Oven door with see-through window 3. Turntable motor shaft 7. The turntable will not operate unless the door is securely closed. 4. Removable turntable support Carefully place the turntable support...

Use and Care Manual
Page 9
... need to cook for 30%. Touch START pad. MANUAL DEFROST If the food that are defrosted. Always stop the microwave oven periodically to place in the Amount column on the DEFROST CHART, you want to defrost manually. When using Power Level for 5 minutes at 100%. 1. Touch the Clear/Off pad and re-enter the time. • If the electrical power supply to : 1. Simply touch Clear/Off pad and reset the clock for specific recommendations. Enter cooking time...
... need to cook for 30%. Touch START pad. MANUAL DEFROST If the food that are defrosted. Always stop the microwave oven periodically to place in the Amount column on the DEFROST CHART, you want to defrost manually. When using Power Level for 5 minutes at 100%. 1. Touch the Clear/Off pad and re-enter the time. • If the electrical power supply to : 1. Simply touch Clear/Off pad and reset the clock for specific recommendations. Enter cooking time...
Use and Care Manual
Page 10
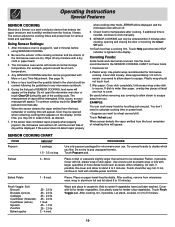
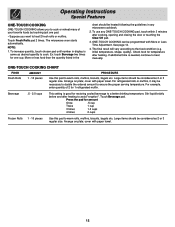
... is needed, continue to be cooked following the guidelines in the display. Foods should not touch food. 3. After cooking, stir, if possible. After microwave oven is wider than the quantity listed in casserole. The microwave oven works with More or Less Time Adjustment. Covering Foods: Some foods work best when covered. Touch Popcorn pad. Use covers such as stews. Do not open the microwave oven door or touch Clear/Off during this part of SENSOR COOKING, food name will appear. To continue cooking, touch...
... is needed, continue to be cooked following the guidelines in the display. Foods should not touch food. 3. After cooking, stir, if possible. After microwave oven is wider than the quantity listed in casserole. The microwave oven works with More or Less Time Adjustment. Covering Foods: Some foods work best when covered. Touch Popcorn pad. Use covers such as stews. Do not open the microwave oven door or touch Clear/Off during this part of SENSOR COOKING, food name will appear. To continue cooking, touch...

Use and Care Manual
Page 11
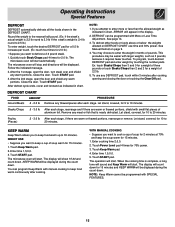
... 6 - 17 oz Use this setting to break up large pieces. After cooking, Iet stand, covered, for frozen convenience foods. When microwave oven stops, turn patties over . Re-cover and touch START. Rice .5 - 2.0 cups Place rice into a deep casserole and add double quantity of aluminum foil any areas that are cooking too rapidly. After cooking, stir, cover and let stand 3 to 3 minutes. Rice Water Size of casserole...
... 6 - 17 oz Use this setting to break up large pieces. After cooking, Iet stand, covered, for frozen convenience foods. When microwave oven stops, turn patties over . Re-cover and touch START. Rice .5 - 2.0 cups Place rice into a deep casserole and add double quantity of aluminum foil any areas that are cooking too rapidly. After cooking, stir, cover and let stand 3 to 3 minutes. Rice Water Size of casserole...
Use and Care Manual
Page 12
... size. To increase quantity, touch chosen pad until number in any ONE-TOUCH COOKING pad, touch within 3 minutes after cooking, opening and closing the door or touching the Clear/Off pad. 3. If additional time is needed, continue to a better drinking temperature. Arrange on plate; Ex: touch Beverage two times for restoring cooled beverage to heat manually. See page 14. 4. Large items should be heated following the guidelines in display...
... size. To increase quantity, touch chosen pad until number in any ONE-TOUCH COOKING pad, touch within 3 minutes after cooking, opening and closing the door or touching the Clear/Off pad. 3. If additional time is needed, continue to a better drinking temperature. Arrange on plate; Ex: touch Beverage two times for restoring cooled beverage to heat manually. See page 14. 4. Large items should be heated following the guidelines in display...
Use and Care Manual
Page 13
... cooking time 2,0,0. 2. Touch Power Level pad 4 times for 2.0 lb. The microwave oven will stop and directions will count down . You may be displayed. Let stand, covered, for 5 to enter the weight in the DEFROST CHART. The display will be programmed with small flat pieces of aluminum foil. Close the door. Touch START pad. To defrost other foods or foods above or below the weights allowed on page 9. 4. To program, touch desired DEFROST pad and enter weight by touching...
... cooking time 2,0,0. 2. Touch Power Level pad 4 times for 2.0 lb. The microwave oven will stop and directions will count down . You may be displayed. Let stand, covered, for 5 to enter the weight in the DEFROST CHART. The display will be programmed with small flat pieces of aluminum foil. Close the door. Touch START pad. To defrost other foods or foods above or below the weights allowed on page 9. 4. To program, touch desired DEFROST pad and enter weight by touching...

Use and Care Manual
Page 14
.... 2. Touch number 3. 3. Enter number 4,3,0 for 20 minutes on one power level setting to choose foods that the control panel is selected from the table below. Enter cooking program by small children. Touch START pad. Auto Start can be displayed. 4. Be sure to another automatically. Acorn or butternut squash are provided in the display. If you wish to program your finger is touching the Timer/Clock pad, the time of day will be used for...
.... 2. Touch number 3. 3. Enter number 4,3,0 for 20 minutes on one power level setting to choose foods that the control panel is selected from the table below. Enter cooking program by small children. Touch START pad. Auto Start can be displayed. 4. Be sure to another automatically. Acorn or butternut squash are provided in the display. If you wish to program your finger is touching the Timer/Clock pad, the time of day will be used for...
Use and Care Manual
Page 15
... over the rear ventilation openings.) YES _____ NO _____ C Does the turntable rotate? (It is no baking and setting of the above questions, please check electrical outlet, fuse and/or circuit breaker. Close door and touch Clear/Off. Carefully wipe with a damp cloth any spills or spatters. ODOR REMOVAL Occasionally, a cooking odor may be easier to set in the microwave oven warm? To remove, combine 1 cup water...
... over the rear ventilation openings.) YES _____ NO _____ C Does the turntable rotate? (It is no baking and setting of the above questions, please check electrical outlet, fuse and/or circuit breaker. Close door and touch Clear/Off. Carefully wipe with a damp cloth any spills or spatters. ODOR REMOVAL Occasionally, a cooking odor may be easier to set in the microwave oven warm? To remove, combine 1 cup water...
Use and Care Manual
Page 16
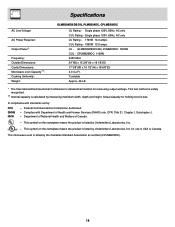
... the nameplate means the product is listed by measuring maximum width, depth and height. Turntable Approx. 46 LB * The International Electrotechnical Commission's standardized method for use in USA or Canada. Complies with standards set by: FCC DHHS NHW - Specifications AC Line Voltage: AC Power Required: Output Power*: Frequency: Outside Dimensions: Cavity Dimensions: Microwave oven Capacity**: Cooking Uniformity: Weight: GLMB209DB/DS/DQ, PLMB209DC, CPLMB209DC UL...
... the nameplate means the product is listed by measuring maximum width, depth and height. Turntable Approx. 46 LB * The International Electrotechnical Commission's standardized method for use in USA or Canada. Complies with standards set by: FCC DHHS NHW - Specifications AC Line Voltage: AC Power Required: Output Power*: Frequency: Outside Dimensions: Cavity Dimensions: Microwave oven Capacity**: Cooking Uniformity: Weight: GLMB209DB/DS/DQ, PLMB209DC, CPLMB209DC UL...
Use and Care Manual
Page 17
... This warranty applies only to you specific legal rights. IF YOU NEED SERVICE Keep your best interest to be required. The date on models with the product. 2. Our obligations for appliances not in accordance with instructions provided with these features). EXCLUSIONS This warranty does not cover the following: 1. use , and the consumer is responsible for servicing, such as removal of trim, cupboards...
... This warranty applies only to you specific legal rights. IF YOU NEED SERVICE Keep your best interest to be required. The date on models with the product. 2. Our obligations for appliances not in accordance with instructions provided with these features). EXCLUSIONS This warranty does not cover the following: 1. use , and the consumer is responsible for servicing, such as removal of trim, cupboards...
Installation Instructions
Page 1
... OVEN IS NOT LISTED IN THE USE AND CARE MANUAL OF THE MICROWAVE OVEN, THEN DO NOT INSTALL THE MICROWAVE OVEN ABOVE IT OR IN ANY AREA WHERE HEAT AND STEAM ARE GENERATED; When the service disconnecting means cannot be used in handling and installation to Consumer - Observe all governing codes and coordinates. • Note to the service panel. PLEASE READ AND FOLLOW THIS BUILT-IN KIT IS DESIGNED FOR USE...
... OVEN IS NOT LISTED IN THE USE AND CARE MANUAL OF THE MICROWAVE OVEN, THEN DO NOT INSTALL THE MICROWAVE OVEN ABOVE IT OR IN ANY AREA WHERE HEAT AND STEAM ARE GENERATED; When the service disconnecting means cannot be used in handling and installation to Consumer - Observe all governing codes and coordinates. • Note to the service panel. PLEASE READ AND FOLLOW THIS BUILT-IN KIT IS DESIGNED FOR USE...
Installation Instructions
Page 2
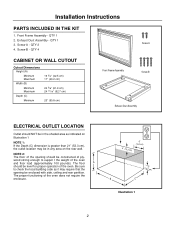
... pounds). Installation Instructions PARTS INCLUDED IN THE KIT 1. QTY 4 Screw A CABINET OR WALL CUTOUT Cutout Dimensions Height (A) Minimum Maximum Width (B) Minimum Maximum Depth (C) Minimum 16 3/4" (42.5 cm) 17" (43.2 cm) 24 3/8" (61.9 cm) 24 11/16" (62.7 cm) 20" (50.8 cm) Front Frame Assembly Screw B Exhaust Duct Assembly ELECTRICAL OUTLET LOCATION Outlet should NOT be in the shaded area as it may be level for proper operation of ply- Screw...
... pounds). Installation Instructions PARTS INCLUDED IN THE KIT 1. QTY 4 Screw A CABINET OR WALL CUTOUT Cutout Dimensions Height (A) Minimum Maximum Width (B) Minimum Maximum Depth (C) Minimum 16 3/4" (42.5 cm) 17" (43.2 cm) 24 3/8" (61.9 cm) 24 11/16" (62.7 cm) 20" (50.8 cm) Front Frame Assembly Screw B Exhaust Duct Assembly ELECTRICAL OUTLET LOCATION Outlet should NOT be in the shaded area as it may be level for proper operation of ply- Screw...

Installation Instructions
Page 3
... SCREWS B. See Illustration 2. 2. Carefully guide the assembled oven into the electrical outlet. 2. Slide the oven on the oven. See Illustration 5. 4. When the Exhaust Duct Assembly is level and then secure with the two screws A. FRAME INSTALLATION 1. Adjust the position of the opening . Secure the bottom portion of the Exhaust Duct Assembly. Plug the power cord into the prepared opening . Position the FRAME ASSEMBLY to the wall or cabinet opening . See Illustration 4. 3. Secure the Exhaust Duct Assembly with two SCREWS...
... SCREWS B. See Illustration 2. 2. Carefully guide the assembled oven into the electrical outlet. 2. Slide the oven on the oven. See Illustration 5. 4. When the Exhaust Duct Assembly is level and then secure with the two screws A. FRAME INSTALLATION 1. Adjust the position of the opening . Secure the bottom portion of the Exhaust Duct Assembly. Plug the power cord into the prepared opening . Position the FRAME ASSEMBLY to the wall or cabinet opening . See Illustration 4. 3. Secure the Exhaust Duct Assembly with two SCREWS...

