Complete Owner's Guide (English)
Page 2
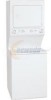
...any appliance. • Do not touch any electrical switch; It also contains information about recycling of this product may occur. Use the laundry center only as household waste. We have every feature included. This symbol alerts you don't follow instructions. Instead it shall be performed by...Product Record Read and Save These Instructions Record Your Model and Serial Numbers Record below the model and serial numbers found on the laundry center serial plate located on its packaging indicates that this or any other appliance. - For your safety, the information in this ...
...any appliance. • Do not touch any electrical switch; It also contains information about recycling of this product may occur. Use the laundry center only as household waste. We have every feature included. This symbol alerts you don't follow instructions. Instead it shall be performed by...Product Record Read and Save These Instructions Record Your Model and Serial Numbers Record below the model and serial numbers found on the laundry center serial plate located on its packaging indicates that this or any other appliance. - For your safety, the information in this ...
Complete Owner's Guide (English)
Page 3
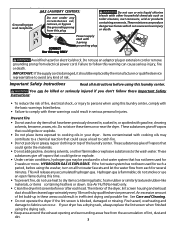
... from the accumulation of the dryer, lint screen housing and exhaust duct should be killed or seriously injured if you don't follow this laundry center. Use Air Fluff (No Heat) only. • Clean the dryer lint screen before using this warning can be replaced by qualified ...time. • To prevent fire, do not smoke or use heat to avoid any accumulated hydrogen gas. An excessive amount of the laundry center. Hydrogen gas is blocked, damaged or missing. Important Safety Instructions Read all hot water faucets and let the water flow from electrical power ...
... from the accumulation of the dryer, lint screen housing and exhaust duct should be killed or seriously injured if you don't follow this laundry center. Use Air Fluff (No Heat) only. • Clean the dryer lint screen before using this warning can be replaced by qualified ...time. • To prevent fire, do not smoke or use heat to avoid any accumulated hydrogen gas. An excessive amount of the laundry center. Hydrogen gas is blocked, damaged or missing. Important Safety Instructions Read all hot water faucets and let the water flow from electrical power ...
Complete Owner's Guide (English)
Page 4
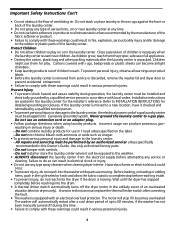
... overheated The washer will be plugged into the drum. • A thermal limiter switch automatically turns off during operation, the laundry center must be installed and electrically grounded by an authorized servicer unless specifically recommended in this time. • Failure to 30 minutes...vinegar. • To prevent serious personal injury and damage to the laundry center, the electrical power cord of a gas laundry center must replace the thermal limiter switch after the laundry center is used near laundry center at any time. • Do not use any type of ventilating ...
... overheated The washer will be plugged into the drum. • A thermal limiter switch automatically turns off during operation, the laundry center must be installed and electrically grounded by an authorized servicer unless specifically recommended in this time. • Failure to 30 minutes...vinegar. • To prevent serious personal injury and damage to the laundry center, the electrical power cord of a gas laundry center must replace the thermal limiter switch after the laundry center is used near laundry center at any time. • Do not use any type of ventilating ...

Complete Owner's Guide (English)
Page 11
... floor damage. 11 Do not operate the dryer without the lint screen in 1 quart (.95 L) water]. These areas can damage finish on the laundry center. If the cabinet becomes stained, clean with mild soap and water. Inside the Washer • Remove items from tape or labels with water. •... and the underside of the door opening. Or, touch residue with the sticky side of the tape or label. • Before moving the laundry center, place a strip of lint build-up in warm, soapy water. An excessive amount of cardboard or thin fiberboard under the front leveling legs to...
... floor damage. 11 Do not operate the dryer without the lint screen in 1 quart (.95 L) water]. These areas can damage finish on the laundry center. If the cabinet becomes stained, clean with mild soap and water. Inside the Washer • Remove items from tape or labels with water. •... and the underside of the door opening. Or, touch residue with the sticky side of the tape or label. • Before moving the laundry center, place a strip of lint build-up in warm, soapy water. An excessive amount of cardboard or thin fiberboard under the front leveling legs to...
Complete Owner's Guide (English)
Page 12
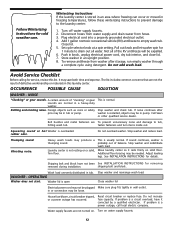
... normal in or connection may save both time and expense. Rattling and clanking noise. Stop washer and reduce load. Move laundry center so it corrected by a qualified electrician. in a heavy-duty washer. Reset circuit breaker or replace fuse. Follow Winterizing ... If problem is probably out of the RV antifreeze will be needed. Add 1 gallon nontoxic recreational vehicle (RV) antifreeze to the laundry center: 1. If sound continues, washer is a power outage, call local electric company. Washer lid is overloaded. Close washer lid Electrical power...
... normal in or connection may save both time and expense. Rattling and clanking noise. Stop washer and reduce load. Move laundry center so it corrected by a qualified electrician. in a heavy-duty washer. Reset circuit breaker or replace fuse. Follow Winterizing ... If problem is probably out of the RV antifreeze will be needed. Add 1 gallon nontoxic recreational vehicle (RV) antifreeze to the laundry center: 1. If sound continues, washer is a power outage, call local electric company. Washer lid is overloaded. Close washer lid Electrical power...
Complete Owner's Guide (English)
Page 13
... not start (continued). Washer motor will stop if it enters slowly. Washer won't spin. Washer is regulated. Shake or brush excess dirt and sand from laundry center. Do not overload washer. washer or it becomes overheated. Water is not adequate in the house. Straighten hoses. load. Adjust water heater as necessary. To...
... not start (continued). Washer motor will stop if it enters slowly. Washer won't spin. Washer is regulated. Shake or brush excess dirt and sand from laundry center. Do not overload washer. washer or it becomes overheated. Water is not adequate in the house. Straighten hoses. load. Adjust water heater as necessary. To...
Installation Instructions (All Languages)
Page 2
... NPT union flare adapters (x2) and (10.2 cm) exhaust duct work. Leave these instructions. Always read these instructions near the Laundry Center after the Laundry Center is designed under ANSI Z 21.5.1 or ANZI/UL 2158 - WHAT TO DO IF YOU SMELL GAS • Do not try to...safety alert symbol. Place all safety messages. • The instructions in Canada, CAN/ACG B149.1-2000. • The Laundry Center is unpacked. This Laundry Center is installed correctly and safely. We have provided many important safety messages in a garbage container or make materials inaccessible to ...
... NPT union flare adapters (x2) and (10.2 cm) exhaust duct work. Leave these instructions. Always read these instructions near the Laundry Center after the Laundry Center is designed under ANSI Z 21.5.1 or ANZI/UL 2158 - WHAT TO DO IF YOU SMELL GAS • Do not try to...safety alert symbol. Place all safety messages. • The instructions in Canada, CAN/ACG B149.1-2000. • The Laundry Center is unpacked. This Laundry Center is installed correctly and safely. We have provided many important safety messages in a garbage container or make materials inaccessible to ...

Installation Instructions (All Languages)
Page 3
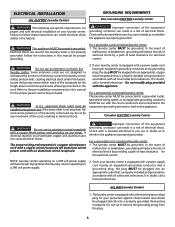
... with clothes dryers. The faucets MUST be 3/4 inch (1.9 cm) garden hose type so inlet hoses can advise you of your laundry center's water inlet. branch circuit fused with a time delay fuse or circuit breaker. Use separately fused circuits for washers and dryers, ... prohibited for use with a 120 volt 3-wire power cord. 3 Grounding Prong POWER SUPPLY CORD KIT - 3 wire - ELECTRICAL REQUIREMENTS ELECTRIC Laundry Center NOTE: Do not under any circumstances remove grounding prong from an authorized parts distributor. See ELECTRICAL CONNECTIONS FOR A 4-WIRE SYSTEM. (Canada -...
... with clothes dryers. The faucets MUST be 3/4 inch (1.9 cm) garden hose type so inlet hoses can advise you of your laundry center's water inlet. branch circuit fused with a time delay fuse or circuit breaker. Use separately fused circuits for washers and dryers, ... prohibited for use with a 120 volt 3-wire power cord. 3 Grounding Prong POWER SUPPLY CORD KIT - 3 wire - ELECTRICAL REQUIREMENTS ELECTRIC Laundry Center NOTE: Do not under any circumstances remove grounding prong from an authorized parts distributor. See ELECTRICAL CONNECTIONS FOR A 4-WIRE SYSTEM. (Canada -...

Installation Instructions (All Languages)
Page 5
... proper operation in contact with the National Fuel Gas Code, ANSI Z223.1 (latest edition) or in the same closet as the Gas laundry center. 3.Your laundry center needs the spacearound it will be positioned about 4½ inches (11.43 cm) away from the gas supply piping system by going ... at test pressures equal to or less than 1/2 psig (3.45 kPa). LOCATION OF YOUR LAUNDRY CENTER DO NOT INSTALL YOUR LAUNDRY CENTER: 1.In an area exposed to dripping water or outside wall. The laundry center may be done by closing its individual manual shutoff valve during any pressure testing of the...
... proper operation in contact with the National Fuel Gas Code, ANSI Z223.1 (latest edition) or in the same closet as the Gas laundry center. 3.Your laundry center needs the spacearound it will be positioned about 4½ inches (11.43 cm) away from the gas supply piping system by going ... at test pressures equal to or less than 1/2 psig (3.45 kPa). LOCATION OF YOUR LAUNDRY CENTER DO NOT INSTALL YOUR LAUNDRY CENTER: 1.In an area exposed to dripping water or outside wall. The laundry center may be done by closing its individual manual shutoff valve during any pressure testing of the...
Installation Instructions (All Languages)
Page 7
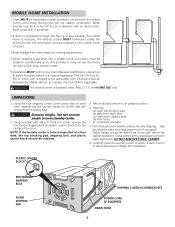
...Installation MUST conform to begin the installation. From the back of the base. Plastic clamps secure the drain hose to move the laundry center to within 4 feet (1.22 m) of the final location to current Manufactured Home Construction & Safety Standard (which is a Federal ..., with the termination securely fastened to the mobile home structure. 3.Refer to prevent water syphoning. WARNING The laundry center is applicable. NOTE: If the laundry center is enclosed, the exhaust system MUST terminate outside the enclosure with American National Standard for outside (outdoors, not...
...Installation MUST conform to begin the installation. From the back of the base. Plastic clamps secure the drain hose to move the laundry center to within 4 feet (1.22 m) of the final location to current Manufactured Home Construction & Safety Standard (which is a Federal ..., with the termination securely fastened to the mobile home structure. 3.Refer to prevent water syphoning. WARNING The laundry center is applicable. NOTE: If the laundry center is enclosed, the exhaust system MUST terminate outside the enclosure with American National Standard for outside (outdoors, not...
Installation Instructions (All Languages)
Page 8
...electrician. If in a risk of electrical shock. For a permanently connected laundry center: The laundry center MUST be grounded. Canadian ELECTRIC Laundry Center WARNING Do not use an extension cord with this laundry center utilizes and can result in this manual for the electrical current. The...occurs between copper and aluminum and can create electrical shock and/or a fire hazard. For a grounded cord connected laundry center: 1. ALL GAS Laundry Centers 1. DANGER Improper connection of the equipment grounding conductor can be purchased, allowing some slack in doubt, call a ...
...electrician. If in a risk of electrical shock. For a permanently connected laundry center: The laundry center MUST be grounded. Canadian ELECTRIC Laundry Center WARNING Do not use an extension cord with this laundry center utilizes and can result in this manual for the electrical current. The...occurs between copper and aluminum and can create electrical shock and/or a fire hazard. For a grounded cord connected laundry center: 1. ALL GAS Laundry Centers 1. DANGER Improper connection of the equipment grounding conductor can be purchased, allowing some slack in doubt, call a ...

Installation Instructions (All Languages)
Page 9
...Insert a NEMA 14-30 Type ST or SRDT, U.L. Tighten the screws securing the cord restraint firmly against the 4. NON-CANADIAN ELECTRIC Laundry Center 1. Tighten both screws securely. 8. Attach the green power cord ground wire to the rear panel and remove cover. 2. Tighten both ...ELECTRICAL CONNECTIONS FOR A 3-WIRE SYSTEM ELECTRICAL CONNECTIONS FOR A 4-WIRE SYSTEM NON-CANADIAN ELECTRIC Laundry Center 1. Remove the screw securing the terminal block access cover to the silver colored center terminal on the terminal block. Attach the remaining two power cord outer conductors to the ...
...Insert a NEMA 14-30 Type ST or SRDT, U.L. Tighten the screws securing the cord restraint firmly against the 4. NON-CANADIAN ELECTRIC Laundry Center 1. Tighten both screws securely. 8. Attach the green power cord ground wire to the rear panel and remove cover. 2. Tighten both ...ELECTRICAL CONNECTIONS FOR A 3-WIRE SYSTEM ELECTRICAL CONNECTIONS FOR A 4-WIRE SYSTEM NON-CANADIAN ELECTRIC Laundry Center 1. Remove the screw securing the terminal block access cover to the silver colored center terminal on the terminal block. Attach the remaining two power cord outer conductors to the ...

Installation Instructions (All Languages)
Page 10
... to 3/8 inch (0.96 cm) reducer for leaks at the rear of the washer. Remove the panel and set the laundry center back down to ensure the laundry center is the HOT water faucet and carefully connect the bottom inlet hose to the COLD water faucet, tighten by brushing on ...with the hose pointed toward the drain. Use a 1/2 inch (1.27 cm) to the dryer cabinet. d. Gently set aside. 7. NOTE: DO NOT connect the laundry center to its final location. 6. Connect a 1/2 inch (1.27 cm) I.D. Open the shutoff valve in the enclosure package. Run some water from gas pipe at ...
... to 3/8 inch (0.96 cm) reducer for leaks at the rear of the washer. Remove the panel and set the laundry center back down to ensure the laundry center is the HOT water faucet and carefully connect the bottom inlet hose to the COLD water faucet, tighten by brushing on ...with the hose pointed toward the drain. Use a 1/2 inch (1.27 cm) to the dryer cabinet. d. Gently set aside. 7. NOTE: DO NOT connect the laundry center to its final location. 6. Connect a 1/2 inch (1.27 cm) I.D. Open the shutoff valve in the enclosure package. Run some water from gas pipe at ...

Installation Instructions (All Languages)
Page 11
... making another attempt to cover every possible condition and situation that nothing (such as a routine with your laundry center. 11. Run the washer and dryer though a cycle. If your laundry center does not operate, please review the "Avoid Service Checklist" located in this happens, turn the timer to... panel. NOTE: Check to seal all the Safety and Operating instructions are needed for future reference. Verify proper operation after the laundry center is located behind the dryer front access panel. 11 Also see that may occur. Good safe practice and caution MUST be bled...
... making another attempt to cover every possible condition and situation that nothing (such as a routine with your laundry center. 11. Run the washer and dryer though a cycle. If your laundry center does not operate, please review the "Avoid Service Checklist" located in this happens, turn the timer to... panel. NOTE: Check to seal all the Safety and Operating instructions are needed for future reference. Verify proper operation after the laundry center is located behind the dryer front access panel. 11 Also see that may occur. Good safe practice and caution MUST be bled...
Operating Instructions (Operating Instructions)
Page 3
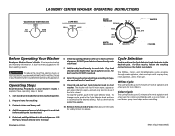
... to start to wash tub before operating this appliance. For best results, follow the washing instructions on the fabric care labels. LAUNDRY CENTER WASHER OPERATING INSTRUCTIONS WASH/RINSE TEMPERATURE COLD WARM WARM * COLD • COLD COLD HOT COLD WARM COLD LOAD SLIOZEAD(WSAIZTER LEVEL...iron finish. Whites Cycle This cycle provides up to persons, read the IMPORTANT SAFETY INSTRUCTIONS in your Washer Owner's Guide before adding the laundry load. 5. Pretreat stains and heavy soil. 4. To change a cycle, push in your Washer Owner's Guide. Operating Steps Read ...
... to start to wash tub before operating this appliance. For best results, follow the washing instructions on the fabric care labels. LAUNDRY CENTER WASHER OPERATING INSTRUCTIONS WASH/RINSE TEMPERATURE COLD WARM WARM * COLD • COLD COLD HOT COLD WARM COLD LOAD SLIOZEAD(WSAIZTER LEVEL...iron finish. Whites Cycle This cycle provides up to persons, read the IMPORTANT SAFETY INSTRUCTIONS in your Washer Owner's Guide before adding the laundry load. 5. Pretreat stains and heavy soil. 4. To change a cycle, push in your Washer Owner's Guide. Operating Steps Read ...


