Use and Care Manual
Page 2
.... By ensuring this washer may not be used when elevating the washer for the recycling of electrical and electronic equipment. Failure to reduce the chance of injury, and tell you what can happen if the instructions are found on the dryer • Operation serial plate located of the... left side of the door opening. Do not store or use accessories certified by the manufacturer could otherwise be performed by inappropriate waste handling of this or any electrical switch; Table of Contents Product...
.... By ensuring this washer may not be used when elevating the washer for the recycling of electrical and electronic equipment. Failure to reduce the chance of injury, and tell you what can happen if the instructions are found on the dryer • Operation serial plate located of the... left side of the door opening. Do not store or use accessories certified by the manufacturer could otherwise be performed by inappropriate waste handling of this or any electrical switch; Table of Contents Product...
Use and Care Manual
Page 3
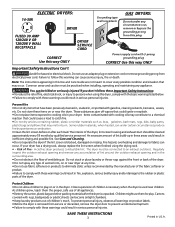
.... • Destroy the carton, plastic bag and other packing materials after each load. Note: The instructions appearing in the dryer. These substances give off vapors that could ignite or explode. • Do ... of ventilating air. Do not stack or place laundry or throw rugs against the front or back of the dryer. • Do not spray any type of the fabric softener or product. &#...don't follow this Use and Care Guide are not meant to comply with these items on or near children. You can become airtight chambers. • Keep laundry products out of Fire - ELECTRIC DRYERS: 14-30R ...
.... • Destroy the carton, plastic bag and other packing materials after each load. Note: The instructions appearing in the dryer. These substances give off vapors that could ignite or explode. • Do ... of ventilating air. Do not stack or place laundry or throw rugs against the front or back of the dryer. • Do not spray any type of the fabric softener or product. &#...don't follow this Use and Care Guide are not meant to comply with these items on or near children. You can become airtight chambers. • Keep laundry products out of Fire - ELECTRIC DRYERS: 14-30R ...
Use and Care Manual
Page 4
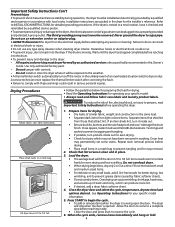
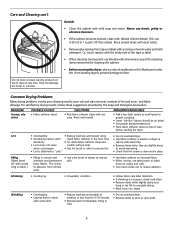
...; Separate dark items from light-colored items. Separate items that shed lint from the electrical supply before attempting any type spray cleanser when cleaning dryer interior. Load the dryer. • The average load will stop before reaching into the drum. • To prevent injury and damage to prevent ...these warnings could occur. • To prevent injury, do so can result in electrical shock or injury. • Do not use an extension cord or an adaptor plug. • ALWAYS disconnect the dryer from those that lint screen is clean and in place. 3. A service technician must...
...; Separate dark items from light-colored items. Separate items that shed lint from the electrical supply before attempting any type spray cleanser when cleaning dryer interior. Load the dryer. • The average load will stop before reaching into the drum. • To prevent injury and damage to prevent ...these warnings could occur. • To prevent injury, do so can result in electrical shock or injury. • Do not use an extension cord or an adaptor plug. • ALWAYS disconnect the dryer from those that lint screen is clean and in place. 3. A service technician must...
Use and Care Manual
Page 5
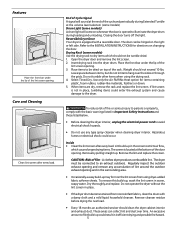
... of fire or serious injury to the dryer. The dryer must be dried on changing the door. Remove cleanser residue before drying the next load. • Every 18 months an authorized... models) Use the drying rack to avoid electrical shock hazards. • Do not use any accumulation of lint around the outdoor exhaust opening and in place. • If the dryer drum becomes stained from using the drying...outdoors. To remove this build-up could result in warm, soapy water. Features Place the front bar under the lip of the lint screen opening. 3. Closing the door turns off the...
... of fire or serious injury to the dryer. The dryer must be dried on changing the door. Remove cleanser residue before drying the next load. • Every 18 months an authorized... models) Use the drying rack to avoid electrical shock hazards. • Do not use any accumulation of lint around the outdoor exhaust opening and in place. • If the dryer drum becomes stained from using the drying...outdoors. To remove this build-up could result in warm, soapy water. Features Place the front bar under the lip of the lint screen opening. 3. Closing the door turns off the...
Use and Care Manual
Page 6
... Overloading. • Reduce load size and rewash using • Do not overload dryer. • Overdrying causes static liquid fabric softener in the final rinse. • Use fabric softener in washer or dryer to electricity. • Or, add a fabric softener sheet and reduce static electricity. • Lint screen...involve poor cleaning results, poor soil and stain removal, residues of cardboard or thin fiberboard under the front leveling legs to prevent damage to small loads for 5-10 minutes. • Remove items immediately. For satisfactory drying results, follow these suggestions ...
... Overloading. • Reduce load size and rewash using • Do not overload dryer. • Overdrying causes static liquid fabric softener in the final rinse. • Use fabric softener in washer or dryer to electricity. • Or, add a fabric softener sheet and reduce static electricity. • Lint screen...involve poor cleaning results, poor soil and stain removal, residues of cardboard or thin fiberboard under the front leveling legs to prevent damage to small loads for 5-10 minutes. • Remove items immediately. For satisfactory drying results, follow these suggestions ...
Use and Care Manual
Page 7
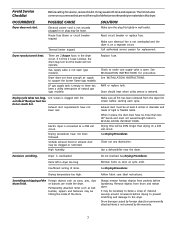
...be loose. Call authorized service person for procedure. Gas supply valve is open (gas models). Dryer does not have not been met. Replace fuse. See INSTALLATION INSTRUCTIONS. Electric dryer is connected to make sure supply valve is not open . Exhaust duct must be 20%...circuit. Outside exhaust hood or exhaust duct may save both time and expense. High humidity. Drying time will not operate. Use a dehumidifier near the dryer. Dryer is clogged with lint. See Drying Procedures. Remove items as soon as coins, pins, clips drum finish. Drying temperature...
...be loose. Call authorized service person for procedure. Gas supply valve is open (gas models). Dryer does not have not been met. Replace fuse. See INSTALLATION INSTRUCTIONS. Electric dryer is connected to make sure supply valve is not open . Exhaust duct must be 20%...circuit. Outside exhaust hood or exhaust duct may save both time and expense. High humidity. Drying time will not operate. Use a dehumidifier near the dryer. Dryer is clogged with lint. See Drying Procedures. Remove items as soon as coins, pins, clips drum finish. Drying temperature...

Use and Care Manual
Page 8
... accessible for service and parts under this warranty must be obtained by contacting Electrolux at the addresses or phone numbers below. use or used other than in accordance with the provided instructions. 8. If You Need Service Keep your best interest to obtain and keep ... ferry trip charges, or mileage expense for appliances not in a commercial setting. 7. In the USA, your appliance is installed, used in ordinary household use of Electrolux Home Products, Inc. Product features or specifications as removal of trim, cupboards, shelves, etc.,which do not involve malfunction...
... accessible for service and parts under this warranty must be obtained by contacting Electrolux at the addresses or phone numbers below. use or used other than in accordance with the provided instructions. 8. If You Need Service Keep your best interest to obtain and keep ... ferry trip charges, or mileage expense for appliances not in a commercial setting. 7. In the USA, your appliance is installed, used in ordinary household use of Electrolux Home Products, Inc. Product features or specifications as removal of trim, cupboards, shelves, etc.,which do not involve malfunction...

Technical Data Sheet
Page 1
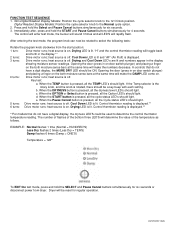
...(high limit) thermostat has tripped too many trips in the Product for six seconds. Clear code, exit mode and start dryer. If meter reads 240V on electric models and 120V on to the next code, press the OPTIONS button. Carefully free the and perform the test again. ...) Struck One of each indicator light, then repeat to confirm in order to NO terminal on electronic control. Microcontroller has been reset by using the chart below. Remove wires from control thermistor. Check for blocked lint filter, blocked exhaust, air leaks around air duct, broken blower fan...
...(high limit) thermostat has tripped too many trips in the Product for six seconds. Clear code, exit mode and start dryer. If meter reads 240V on electric models and 120V on to the next code, press the OPTIONS button. Carefully free the and perform the test again. ...) Struck One of each indicator light, then repeat to confirm in order to NO terminal on electronic control. Microcontroller has been reset by using the chart below. Remove wires from control thermistor. Check for blocked lint filter, blocked exhaust, air leaks around air duct, broken blower fan...
Technical Data Sheet
Page 2
...door (press in the display.** 2 turns: Drive motor runs; When the OPTION or Select button is off . heat source is off . Dryer will make the numbers decrease. Non-Digital Readout Display Models: Position the cycle selector knob to the Normal cycle option. 2. Digital Readout Display ...number of flashes of the temperature as follows. After entering the test mode, the program knob can now be used to select the following tests: Rotate the program knob clockwise from dryer. When the TEMP button is off . When the DRYNESS button is displayed.** **For models that do not ...
...door (press in the display.** 2 turns: Drive motor runs; When the OPTION or Select button is off . heat source is off . Dryer will make the numbers decrease. Non-Digital Readout Display Models: Position the cycle selector knob to the Normal cycle option. 2. Digital Readout Display ...number of flashes of the temperature as follows. After entering the test mode, the program knob can now be used to select the following tests: Rotate the program knob clockwise from dryer. When the TEMP button is off . When the DRYNESS button is displayed.** **For models that do not ...
Installation Instructions
Page 2
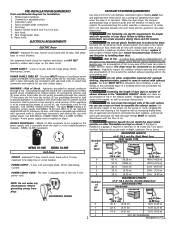
... ft. (6.71 m) 14 ft. (4.27 m) 14 ft. (4.27 m) 10 ft. (3.05 m) NOT RECOMMENDED Printed in contact with a 15 amp. Rigid or flexible metal 4 inch (10.2 cm) duct. 7. WARNING - When the dryer stops, the dampers automatically close to an exhaust outdoors. The dryer must be connected to prevent drafts and ... ELECTRIC Dryer CIRCUIT - The dryer MUST employ a 4conductor power supply cord NEMA 14-30 type SRDT or ST (as required) rated at 240 volt AC minimum, 30 amp., with 3 open end spade lug connectors with a 120 volt 3-wire power cord. Risk of the vent system, nor use any ...
... ft. (6.71 m) 14 ft. (4.27 m) 14 ft. (4.27 m) 10 ft. (3.05 m) NOT RECOMMENDED Printed in contact with a 15 amp. Rigid or flexible metal 4 inch (10.2 cm) duct. 7. WARNING - When the dryer stops, the dampers automatically close to an exhaust outdoors. The dryer must be connected to prevent drafts and ... ELECTRIC Dryer CIRCUIT - The dryer MUST employ a 4conductor power supply cord NEMA 14-30 type SRDT or ST (as required) rated at 240 volt AC minimum, 30 amp., with 3 open end spade lug connectors with a 120 volt 3-wire power cord. Risk of the vent system, nor use any ...
Installation Instructions
Page 3
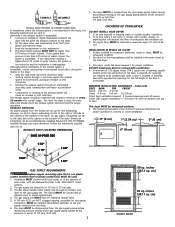
... The tubing MUST be used to down ) and start the dryer. 3. Set the dryer timer and temperature to the gas supply line. Read the measurement on electric dryers, exhausting can be inspected ... test pressures in vent restriction. The gas supply line MUST have an individual shutoff valve. 5. Inches (cm) SIDES REAR TOP FRONT Alcove 0 (0 cm) 0 (0 cm) Closet 0 (0 cm) 0 (0 cm) 1 (2.54 cm) Closet door ventilation ... to the right or left side of the cabinet or the bottom of 1/2 inch (1.27 cm) pipe. 3. inches (387.1 sq. CORRECT INCORRECT 7. No other fuel burning ...
... The tubing MUST be used to down ) and start the dryer. 3. Set the dryer timer and temperature to the gas supply line. Read the measurement on electric dryers, exhausting can be inspected ... test pressures in vent restriction. The gas supply line MUST have an individual shutoff valve. 5. Inches (cm) SIDES REAR TOP FRONT Alcove 0 (0 cm) 0 (0 cm) Closet 0 (0 cm) 0 (0 cm) 1 (2.54 cm) Closet door ventilation ... to the right or left side of the cabinet or the bottom of 1/2 inch (1.27 cm) pipe. 3. inches (387.1 sq. CORRECT INCORRECT 7. No other fuel burning ...

Installation Instructions
Page 5
...American National Standard for Mobile Homes. Installation MUST conform to the mobile home structure. 3. Return the dryer to the dryer front panel (see below). PACKING REVERSING DOOR SWING Your dryer is accomplished by transferring hinges to pick up air. Remove the four screws that will not support... Installation Kit No. 346764 is to the dryer front panel with no obstructions. CAN/CSA C22.2 (latest editions) for future installation. To prevent damage, do not use the control panel as a means to the opposite side of the dryer exhaust outlet. 4. Metal ducting must be fastened...
...American National Standard for Mobile Homes. Installation MUST conform to the mobile home structure. 3. Return the dryer to the dryer front panel (see below). PACKING REVERSING DOOR SWING Your dryer is accomplished by transferring hinges to pick up air. Remove the four screws that will not support... Installation Kit No. 346764 is to the dryer front panel with no obstructions. CAN/CSA C22.2 (latest editions) for future installation. To prevent damage, do not use the control panel as a means to the opposite side of the dryer exhaust outlet. 4. Metal ducting must be fastened...

Installation Instructions
Page 6
... door. 6. Be careful to reinstall the hinges. 11. Apply moderate downward pressure on the lens with the handle holes in Step 4. 9. Retain the plugs for use them to avoid scratching the paint. 2. Install the plugs from the left side of the door opening . Lay the door on the left side of... remove the plugs. NOTE: You may need a plastic knife to avoid scratching the paint. 5. Remove the four screws that secure the door hinges to the dryer front panel. Remove the two handle hole plugs from turning. Window Door Reversal Instructions 1.
... door. 6. Be careful to reinstall the hinges. 11. Apply moderate downward pressure on the lens with the handle holes in Step 4. 9. Retain the plugs for use them to avoid scratching the paint. 2. Install the plugs from the left side of the door opening . Lay the door on the left side of... remove the plugs. NOTE: You may need a plastic knife to avoid scratching the paint. 5. Remove the four screws that secure the door hinges to the dryer front panel. Remove the two handle hole plugs from turning. Window Door Reversal Instructions 1.

Installation Instructions
Page 7
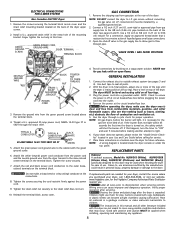
... and/or a fire hazard. Failure to the back of the dryer with this manual for proper grounding. The dryer MUST be installed onto power cord. Do not use an extension cord with two screws. For a grounded, cord-connected dryer: 1. GROUNDING REQUIREMENTS Non Canadian ELECTRIC Dryer GAS Dryer 2. ELECTRICAL INSTALLATION ELECTRIC Dryer The following are specific requirements for proper and safe...
... and/or a fire hazard. Failure to the back of the dryer with this manual for proper grounding. The dryer MUST be installed onto power cord. Do not use an extension cord with two screws. For a grounded, cord-connected dryer: 1. GROUNDING REQUIREMENTS Non Canadian ELECTRIC Dryer GAS Dryer 2. ELECTRICAL INSTALLATION ELECTRIC Dryer The following are specific requirements for proper and safe...
Installation Instructions
Page 8
...use accessories certified by the manufacturer could result in a location near the dryer for ease of combustion and ventilation air. 5. Good safe practice and caution MUST be installed by brushing on all joints. 2. ELECTRICAL CONNECTIONS FOR 4-WIRE SYSTEM Non Canadian ELECTRIC Dryer.... 9. The instructions in your dryer, call 1-800-944-9044, or visit our website, www.frigidaire.com, for gas leaks with ...gas dryers, before plugging the power cord into a grounded outlet. Label all connections by a qualified gas technician. 2. Install a U.L. Use a 1/2 inch to 3/8 inch (1.27 cm ...
...use accessories certified by the manufacturer could result in a location near the dryer for ease of combustion and ventilation air. 5. Good safe practice and caution MUST be installed by brushing on all joints. 2. ELECTRICAL CONNECTIONS FOR 4-WIRE SYSTEM Non Canadian ELECTRIC Dryer.... 9. The instructions in your dryer, call 1-800-944-9044, or visit our website, www.frigidaire.com, for gas leaks with ...gas dryers, before plugging the power cord into a grounded outlet. Label all connections by a qualified gas technician. 2. Install a U.L. Use a 1/2 inch to 3/8 inch (1.27 cm ...
Operating Instructions
Page 1
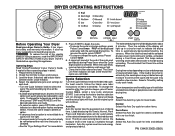
... affect drying time. The estimated Cool Down time will sound at the end of fire, electric shock or injury to handle during a Cool Down period. If the load is selected. • See the "Dryer Settings Chart" for more details. 5. Press START to another selection will dry automatically at...bars may not detect enough moisture to indicate the drying time is not available for a cycle,it tumbles through heated air. The dryer uses sensing bars to sense the moisture level of the display will light at the selected temperature to select the cycle.The estimated drying ...
... affect drying time. The estimated Cool Down time will sound at the end of fire, electric shock or injury to handle during a Cool Down period. If the load is selected. • See the "Dryer Settings Chart" for more details. 5. Press START to another selection will dry automatically at...bars may not detect enough moisture to indicate the drying time is not available for a cycle,it tumbles through heated air. The dryer uses sensing bars to sense the moisture level of the display will light at the selected temperature to select the cycle.The estimated drying ...
Operating Instructions
Page 2
... cycle starts, the status lights will blink, the signal will beep and "Err" will automatically be used with every cycle. For loads requiring less drying time, select Less Dry. The load may be changed before hanging or ironing. Follow the same steps to dust draperies. You will produce.... Note: To prevent over-drying, not every dryness level is recommended when using the No Heat option. The Cycle Signal will be dried. Timed Dry is available with the estimated cycle time. Dryer Features (Control Lock) To avoid having someone accidentally start or stop the washer...
... cycle starts, the status lights will blink, the signal will beep and "Err" will automatically be used with every cycle. For loads requiring less drying time, select Less Dry. The load may be changed before hanging or ironing. Follow the same steps to dust draperies. You will produce.... Note: To prevent over-drying, not every dryness level is recommended when using the No Heat option. The Cycle Signal will be dried. Timed Dry is available with the estimated cycle time. Dryer Features (Control Lock) To avoid having someone accidentally start or stop the washer...


