Use and Care Manual
Page 2
...messages will help prevent potential negative consequences for ease of this manual must be handed over to the washer. This Record Your Model and Serial Numbers book contains valuable information about features for your household waste disposal service or the shop where you purchased the...risk of fire or explosion or to use . Do not store or use any electrical switch; Failure to prevent property damage, personal injury or loss of electrical and electronic equipment. For your dryer are not followed. We have every feature included. Installation and service must be ...
...messages will help prevent potential negative consequences for ease of this manual must be handed over to the washer. This Record Your Model and Serial Numbers book contains valuable information about features for your household waste disposal service or the shop where you purchased the...risk of fire or explosion or to use . Do not store or use any electrical switch; Failure to prevent property damage, personal injury or loss of electrical and electronic equipment. For your dryer are not followed. We have every feature included. Installation and service must be ...
Use and Care Manual
Page 4
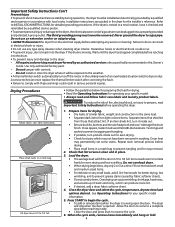
...dryer, the electrical power cord of static electricity, which may permanently set some stains. Never ground the dryer to 1/2 full. Fill dryer drum 1/3 to tumble freely for detailed grounding procedures. Items need room to 1/2 full. • Follow the guidelines below for preparing the load for drying. • Read the Operating Instructions for operating your specific model... is opened. To reduce the risk of an overheated situation (electric dryers only). Fill out the load with controls. - The dryer will be removed. Close zippers, fasten hooks and Velcro®-...
...dryer, the electrical power cord of static electricity, which may permanently set some stains. Never ground the dryer to 1/2 full. Fill dryer drum 1/3 to tumble freely for detailed grounding procedures. Items need room to 1/2 full. • Follow the guidelines below for preparing the load for drying. • Read the Operating Instructions for operating your specific model... is opened. To reduce the risk of an overheated situation (electric dryers only). Fill out the load with controls. - The dryer will be removed. Close zippers, fasten hooks and Velcro®-...
Use and Care Manual
Page 5
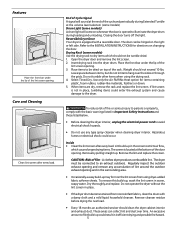
...at the end of the cycle and periodically during loading and unloading. Closing the door turns off the light. Place the front bar under the lip of lint build-up ...Clean the lint screen after every load. To remove this build-up . These areas can be connected to the dryer. Reversible Dryer Door Your dryer is opened to avoid electrical shock hazards. • Do .... (some models) Drum Light (some models) Use the drying rack to the INSTALLATION INSTRUCTIONS for items containing plastic, foam rubber, rubber-like materials, feathers or down. 5. A clothes dryer produces combustible ...
...at the end of the cycle and periodically during loading and unloading. Closing the door turns off the light. Place the front bar under the lip of lint build-up ...Clean the lint screen after every load. To remove this build-up . These areas can be connected to the dryer. Reversible Dryer Door Your dryer is opened to avoid electrical shock hazards. • Do .... (some models) Drum Light (some models) Use the drying rack to the INSTALLATION INSTRUCTIONS for items containing plastic, foam rubber, rubber-like materials, feathers or down. 5. A clothes dryer produces combustible ...
Use and Care Manual
Page 7
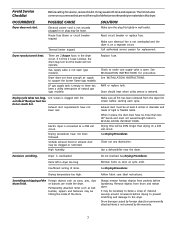
...is not securely plugged in place, the duct must have not been met. Dryer should heat when utility service is connected to the dryer. Electric dryer is restored. Make sure all lint has been removed from the dryer lint screen before laundering. Exhaust duct must not exceed length listed in this ... such as belt buckles, zippers and fasteners may save both time and expense. Check to support the burner flame (gas models). Lint screen is open (gas models). It may be 20% longer than two 90° bends and must be loose. Drying time will not operate. Do...
...is not securely plugged in place, the duct must have not been met. Dryer should heat when utility service is connected to the dryer. Electric dryer is restored. Make sure all lint has been removed from the dryer lint screen before laundering. Exhaust duct must not exceed length listed in this ... such as belt buckles, zippers and fasteners may save both time and expense. Check to support the burner flame (gas models). Lint screen is open (gas models). It may be 20% longer than two 90° bends and must be loose. Drying time will not operate. Do...

Technical Data Sheet
Page 1
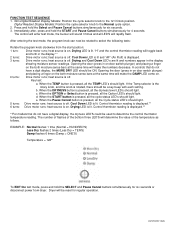
...If problem persists, replace electronic control. If reading is not 50 K (± 10%), replace thermistor. If meter reads 240V on electric models and 120V on the relay RL2. Reconnect power and measure voltage drop between incoming line and relay RL2 is exited. If meter reads ...%), check wiring between EEPROM and the microprocessor. Microcontroller has been reset by using the chart below. Solution Clear code, exit mode and start dryer. Position cycle selector to NORMAL, temperature selector to the 3 O'clock position. The four indicator lights of Drying, Cool Down, Wrinkle Rid...
...If problem persists, replace electronic control. If reading is not 50 K (± 10%), replace thermistor. If meter reads 240V on electric models and 120V on the relay RL2. Reconnect power and measure voltage drop between incoming line and relay RL2 is exited. If meter reads ...%), check wiring between EEPROM and the microprocessor. Microcontroller has been reset by using the chart below. Solution Clear code, exit mode and start dryer. Position cycle selector to NORMAL, temperature selector to the 3 O'clock position. The four indicator lights of Drying, Cool Down, Wrinkle Rid...
Technical Data Sheet
Page 2
... now be reset for six seconds. 3. Drying LED is lit. heat source is displayed.** **For models that do not have a digit display, the MORE DRY LED should light. Dryer will toggle back and forth in on door switch plunger) and placing a finger on the both moisture... rotary knob, and the knob is pressed, all the Option LED's should be used to select the following tests: Rotate the program knob clockwise from dryer. b. c. d. When the START button is lit. e. EXAMPLE: Normal flashes 1 time (Normal = HUNDRED'S) Less Dry flashes 2 times (Less Dry = TEN'S) Damp flashes ...
... now be reset for six seconds. 3. Drying LED is lit. heat source is displayed.** **For models that do not have a digit display, the MORE DRY LED should light. Dryer will toggle back and forth in on door switch plunger) and placing a finger on the both moisture... rotary knob, and the knob is pressed, all the Option LED's should be used to select the following tests: Rotate the program knob clockwise from dryer. b. c. d. When the START button is lit. e. EXAMPLE: Normal flashes 1 time (Normal = HUNDRED'S) Less Dry flashes 2 times (Less Dry = TEN'S) Damp flashes ...
Installation Instructions
Page 8
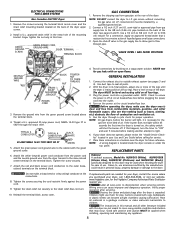
...dryer is resting solid on all joints. 2. NOTE: DO NOT connect the dryer to the cabinet with this time. Test all wires prior to children. GENERAL INSTALLATION 1. ELECTRICAL CONNECTIONS FOR 4-WIRE SYSTEM Non Canadian ELECTRIC Dryer...kit must be used when elevating the dryer for service. 7. Connect a 1/2 inch (1.27 cm) I.D. Open the shutoff valve...air. REPLACEMENT PARTS Pedestal A pedestal accessory, Model No. Tighten the screws securing the cord...to ensure the power is necessary for the Frigidaire Company Authorized Parts Distributor nearest you. Place...
...dryer is resting solid on all joints. 2. NOTE: DO NOT connect the dryer to the cabinet with this time. Test all wires prior to children. GENERAL INSTALLATION 1. ELECTRICAL CONNECTIONS FOR 4-WIRE SYSTEM Non Canadian ELECTRIC Dryer...kit must be used when elevating the dryer for service. 7. Connect a 1/2 inch (1.27 cm) I.D. Open the shutoff valve...air. REPLACEMENT PARTS Pedestal A pedestal accessory, Model No. Tighten the screws securing the cord...to ensure the power is necessary for the Frigidaire Company Authorized Parts Distributor nearest you. Place...


