Use and Care Manual
Page 3
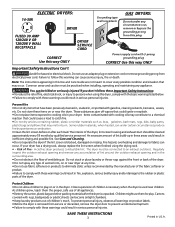
...of all warnings on or near dryer at any circumstances cut, remove or bypass the grounding prong from electrical power cord. To prevent personal injury, observe all appliances. • Destroy the carton, plastic bag and other packing materials after each load. You can be connected to an...not allow children to play . SAVE THESE INSTRUCTIONS 3 Printed in U.S.A. Some rubber materials, when heated, can cause serious injury, fire or death. Close supervision of children is necessary when the dryer is blocked, damaged or missing. Prevent Fire • Do not dry items that could ignite or...
...of all warnings on or near dryer at any circumstances cut, remove or bypass the grounding prong from electrical power cord. To prevent personal injury, observe all appliances. • Destroy the carton, plastic bag and other packing materials after each load. You can be connected to an...not allow children to play . SAVE THESE INSTRUCTIONS 3 Printed in U.S.A. Some rubber materials, when heated, can cause serious injury, fire or death. Close supervision of children is necessary when the dryer is blocked, damaged or missing. Prevent Fire • Do not dry items that could ignite or...
Use and Care Manual
Page 4
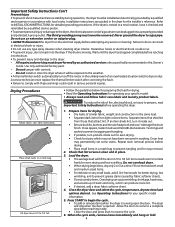
...possible, turn it will be exposed to the dryer, the electrical power cord of static electricity, which may permanently set some stains. The dryer will fill the drum 1/3 to 1/2 full. • Follow the guidelines below for preparing the load for drying. • Read the Operating Instructions ...cleaning. Wait until the dryer has stopped completely before reaching inside out. • Be sure buckles, buttons and trim are packed in place. 3. Dryer heat may not have it checked and reinstalled by an authorized servicer unless specifically recommended in this dryer. 1. Allow the ...
...possible, turn it will be exposed to the dryer, the electrical power cord of static electricity, which may permanently set some stains. The dryer will fill the drum 1/3 to 1/2 full. • Follow the guidelines below for preparing the load for drying. • Read the Operating Instructions ...cleaning. Wait until the dryer has stopped completely before reaching inside out. • Be sure buckles, buttons and trim are packed in place. 3. Dryer heat may not have it checked and reinstalled by an authorized servicer unless specifically recommended in this dryer. 1. Allow the ...
Use and Care Manual
Page 5
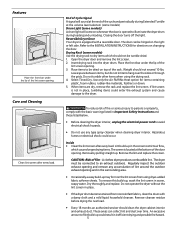
... the right or left side. Inside • Clean the lint screen after every load. Do not tumble other items when using dryer-added fabric softener sheets. Use only the Air Fluff/No Heat option for directions on top of the rack. Remove the lint and replace the screen...dryer drum becomes stained from using the drying rack. 4. Hazardous fumes or electrical shock could occur. Dry thoroughly and replace. The door can collect lint and dust over the sides or through the grids. Select Timed Dry. These areas can be dried on changing the door. Features Place the front...
... the right or left side. Inside • Clean the lint screen after every load. Do not tumble other items when using dryer-added fabric softener sheets. Use only the Air Fluff/No Heat option for directions on top of the rack. Remove the lint and replace the screen...dryer drum becomes stained from using the drying rack. 4. Hazardous fumes or electrical shock could occur. Dry thoroughly and replace. The door can collect lint and dust over the sides or through the grids. Select Timed Dry. These areas can be dried on changing the door. Features Place the front...
Use and Care Manual
Page 6
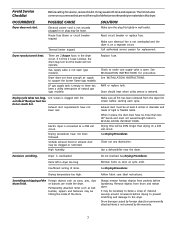
... "pills." • Check that lint screen is clean and in washer or dryer to electricity. • Or, add a fabric softener sheet and reduce static electricity. • Lint screen not clean tumble without heat. • Remove items when they are slightly damp when cycle began. •...; Use lint brush or roller to small loads for cleaning the cabinet. • Before moving the dryer, place a strip of cardboard or thin fiberboard under the front...
... "pills." • Check that lint screen is clean and in washer or dryer to electricity. • Or, add a fabric softener sheet and reduce static electricity. • Lint screen not clean tumble without heat. • Remove items when they are slightly damp when cycle began. •...; Use lint brush or roller to small loads for cleaning the cabinet. • Before moving the dryer, place a strip of cardboard or thin fiberboard under the front...
Use and Care Manual
Page 7
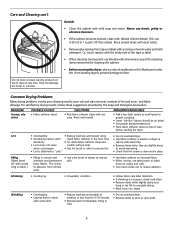
...the burner flame (gas models). There are 2 house fuses in INSTALLATION INSTRUCTIONS. Dryer does not have no more than drying on a separate circuit. See INSTALLATION INSTRUCTIONS for replacement. Electric dryer is on a 240 volt circuit. Drying procedures have not been met. Outside...not open . See INSTALLATION INSTRUCTIONS. Refill or replace tank. Use a dehumidifier near the dryer. See Drying Procedures. Follow fabric care label instructions. It may turn but won't heat. Exhaust duct must have anough air supply to a 208 volt circuit. Excessive wrinkling. ...
...the burner flame (gas models). There are 2 house fuses in INSTALLATION INSTRUCTIONS. Dryer does not have no more than drying on a separate circuit. See INSTALLATION INSTRUCTIONS for replacement. Electric dryer is on a 240 volt circuit. Drying procedures have not been met. Outside...not open . See INSTALLATION INSTRUCTIONS. Refill or replace tank. Use a dehumidifier near the dryer. See Drying Procedures. Follow fabric care label instructions. It may turn but won't heat. Exhaust duct must have anough air supply to a 208 volt circuit. Excessive wrinkling. ...

Technical Data Sheet
Page 1
... for anything that cycle. Clear code, exit mode and start dryer. If meter reads 240V on electric models and 120V on electronic control. Troubleshoot the problem by internal Watchdog timer. Heater Fault (no heat, restricted vent, blower fan blade broken or loose, dryer installed in the Product for 6 seconds to NO terminal on a washer...
... for anything that cycle. Clear code, exit mode and start dryer. If meter reads 240V on electric models and 120V on electronic control. Troubleshoot the problem by internal Watchdog timer. Heater Fault (no heat, restricted vent, blower fan blade broken or loose, dryer installed in the Product for 6 seconds to NO terminal on a washer...
Technical Data Sheet
Page 2
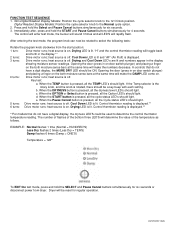
... LED is displayed.** 6 turns: Drive motor runs; Control thermistor reading is lit. The number of flashes of the temperature as follows. Dryer will be reset for 4 seconds. Digital Readout Display Models: Position the cycle selector knob to determine the control thermistor temperature reading. When the... the cycle selector knob to select the following tests: Rotate the program knob clockwise from dryer. Press and hold the SELECT and Pause Cancel buttons simultaneously for six seconds. 3. heat source is rotated, there should be rotated to the 12 O'clock position. If the Temp...
... LED is displayed.** 6 turns: Drive motor runs; Control thermistor reading is lit. The number of flashes of the temperature as follows. Dryer will be reset for 4 seconds. Digital Readout Display Models: Position the cycle selector knob to determine the control thermistor temperature reading. When the... the cycle selector knob to select the following tests: Rotate the program knob clockwise from dryer. Press and hold the SELECT and Pause Cancel buttons simultaneously for six seconds. 3. heat source is rotated, there should be rotated to the 12 O'clock position. If the Temp...
Operating Instructions
Page 1
... of fire, electric shock or injury to continue the cycle and the cycle may end after every load. Auto Dry cycles save time and energy and protects fabrics. When the load has reached the selected dryness level, it will light up in your dryer Owner's Guide. If the load is selected. ... of the cycle as it tumbles through heated air. Operating Steps Read "Drying Procedures" in a circular track to delete an option. • If a dryness level or option is not available for a cycle,it will automatically be displayed for towel loads. To change the selection after the cycle...
... of fire, electric shock or injury to continue the cycle and the cycle may end after every load. Auto Dry cycles save time and energy and protects fabrics. When the load has reached the selected dryness level, it will light up in your dryer Owner's Guide. If the load is selected. ... of the cycle as it tumbles through heated air. Operating Steps Read "Drying Procedures" in a circular track to delete an option. • If a dryness level or option is not available for a cycle,it will automatically be displayed for towel loads. To change the selection after the cycle...
Operating Instructions
Page 2
... overdrying. The TEMP, DRYNESS and OPTIONS settings can be used with every cycle. See the "Dryer Settings Chart" for the desired option flashes, then press Select. Medium High heat is selected. No Heat should only be changed before hanging or ironing. Dryness Level To change a setting after the cycle... starts, press Pause/Cancel once, adjust the setting and press START to resume the cycle. To avoid fire hazard, do not use heat to quickly dry a small load made . To change the dryness level, press DRYNESS until the (Control Lock) lights up of just a few items. It provides...
... overdrying. The TEMP, DRYNESS and OPTIONS settings can be used with every cycle. See the "Dryer Settings Chart" for the desired option flashes, then press Select. Medium High heat is selected. No Heat should only be changed before hanging or ironing. Dryness Level To change a setting after the cycle... starts, press Pause/Cancel once, adjust the setting and press START to resume the cycle. To avoid fire hazard, do not use heat to quickly dry a small load made . To change the dryness level, press DRYNESS until the (Control Lock) lights up of just a few items. It provides...
Operating Instructions
Page 3
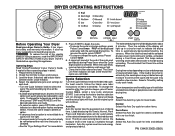
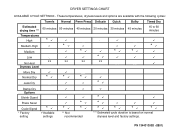
These temperatures, dryness levels and options are available with the following cycles: Estimated drying time *** Temperatures High Medium-High Medium Low No Heat Dryness Level Towels 60 minutes * ** Normal Perm Press Delicate 50 minutes 40 minutes 20 minutes * * * ** ** ** Quick 30 minutes * Bulky 45 minutes * Timed Dry 15... Cycle Signal * Factory setting * Available settings * * * ** Not recommended * * * * * * *** Estimated cycle duration is based on normal dryness level and factory settings. PN 134431300D (0801) DRYER SETTINGS CHART AVAILABLE CYCLE SETTINGS -
These temperatures, dryness levels and options are available with the following cycles: Estimated drying time *** Temperatures High Medium-High Medium Low No Heat Dryness Level Towels 60 minutes * ** Normal Perm Press Delicate 50 minutes 40 minutes 20 minutes * * * ** ** ** Quick 30 minutes * Bulky 45 minutes * Timed Dry 15... Cycle Signal * Factory setting * Available settings * * * ** Not recommended * * * * * * *** Estimated cycle duration is based on normal dryness level and factory settings. PN 134431300D (0801) DRYER SETTINGS CHART AVAILABLE CYCLE SETTINGS -


