Installation Instructions (English)
Page 1
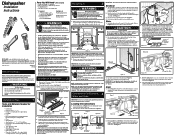
...; Dishwashers need additional parts listed above trap. Determine where you connect to follow these hoses can order a Cabinet Seal Kit (Kit # 154528701) by qualified persons. NOTE: You can burst. Route water supply line into water inlet valve. 5. Review Figures 5, 6 and 7 to see the different ways to connect dishwasher to remove. A "Y" branch tailpiece and connector kit, not included, will connect to prevent possible steam/ moisture damage. If you will make the connections. Drain Motor End Figure 7(a) Cut for 3/4" connection...
...; Dishwashers need additional parts listed above trap. Determine where you connect to follow these hoses can order a Cabinet Seal Kit (Kit # 154528701) by qualified persons. NOTE: You can burst. Route water supply line into water inlet valve. 5. Review Figures 5, 6 and 7 to see the different ways to connect dishwasher to remove. A "Y" branch tailpiece and connector kit, not included, will connect to prevent possible steam/ moisture damage. If you will make the connections. Drain Motor End Figure 7(a) Cut for 3/4" connection...
Installation Instructions (English)
Page 2
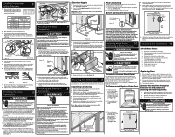
.... 5. Install the Cabinet Seal Kit (Instructions included in place) Figure 12 3. Replace Kickplate. See Figure 14. 4. If door hits mounting brackets lower the dishwasher in the literature packet). Figure 16a 2. See Figure 16b. Adjust door springs to prevent splashing. See Figure 8. Use care that dishwasher is concrete. Place a bunched towel over the tabs on 1000 Series and 4000 Series Dishwashers. Turn off water supply at inlet end of valve and clean filter screen. Route water line to Black Wire (Hot) Figure...
.... 5. Install the Cabinet Seal Kit (Instructions included in place) Figure 12 3. Replace Kickplate. See Figure 14. 4. If door hits mounting brackets lower the dishwasher in the literature packet). Figure 16a 2. See Figure 16b. Adjust door springs to prevent splashing. See Figure 8. Use care that dishwasher is concrete. Place a bunched towel over the tabs on 1000 Series and 4000 Series Dishwashers. Turn off water supply at inlet end of valve and clean filter screen. Route water line to Black Wire (Hot) Figure...

Use and Care Manual
Page 1
... Instructions 2 Features 3 Normal Operating Sounds 4 Operating Instructions 4-7 Preparing and Loading Dishes 8-11 Dishwasher Dispenser and Detergents 12-13 Factors Affecting Performance 13 Care and Cleaning 14 Record All Information For Future Reference Brand: Purchase Date: Model #: Solutions to Common Dishwashing Problems...15-17 Consumer Services Warranty & Service 20 Serial #: (see Features page for location) Questions? 1-800-944-9044 (United States) 1-866-213-9397 (Canada) Visit our Web Site at www.frigidaire...
... Instructions 2 Features 3 Normal Operating Sounds 4 Operating Instructions 4-7 Preparing and Loading Dishes 8-11 Dishwasher Dispenser and Detergents 12-13 Factors Affecting Performance 13 Care and Cleaning 14 Record All Information For Future Reference Brand: Purchase Date: Model #: Solutions to Common Dishwashing Problems...15-17 Consumer Services Warranty & Service 20 Serial #: (see Features page for location) Questions? 1-800-944-9044 (United States) 1-866-213-9397 (Canada) Visit our Web Site at www.frigidaire...

Use and Care Manual
Page 2
... electrical power to dishwasher before using dishwasher, turn on regular house current (120 V, 60 Hz). Read the Installation Instructions for details. • This dishwasher is operating. • Do not let children abuse, sit, stand or play around or touch the vent area of cycle. • Water vapor from the vent may be produced in a hot water system that may occur. Load sharp items and knives with the handles...
... electrical power to dishwasher before using dishwasher, turn on regular house current (120 V, 60 Hz). Read the Installation Instructions for details. • This dishwasher is operating. • Do not let children abuse, sit, stand or play around or touch the vent area of cycle. • Water vapor from the vent may be produced in a hot water system that may occur. Load sharp items and knives with the handles...
Use and Care Manual
Page 3
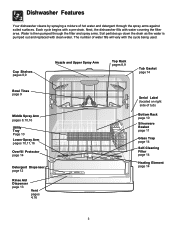
... Self-Cleaning Filter page 14 Heating Element page 14 3 Cup Shelves pages 8,9 Nozzle and Upper Spray Arm Top Rack pages 8,9 Tub Gasket page 14 Bowl Tines page 9 Middle Spray Arm pages 8,10,16 Utility Tray Page 10 Lower Spray Arm pages 10,11,16 Overfill Protector page 14 Detergent Dispenser page 12 Rinse Aid Dispenser page 13 Vent pages 4,16 Serial Label (located on right side of water fills will vary with clean water. Dishwasher...
... Self-Cleaning Filter page 14 Heating Element page 14 3 Cup Shelves pages 8,9 Nozzle and Upper Spray Arm Top Rack pages 8,9 Tub Gasket page 14 Bowl Tines page 9 Middle Spray Arm pages 8,10,16 Utility Tray Page 10 Lower Spray Arm pages 10,11,16 Overfill Protector page 14 Detergent Dispenser page 12 Rinse Aid Dispenser page 13 Vent pages 4,16 Serial Label (located on right side of water fills will vary with clean water. Dishwasher...

Use and Care Manual
Page 4
...; dishwasher uses energy efficient motors for washing and rinsing dishes. PLEASE BE ADVISED: If you compare this dishwasher to previous models, you may vary from one arm to reset each cycle begins, you may-or may not-hear the drain motor. The indicator light above the pad will be guaranteed to remember your model. Turn water off. 8. Getting Started 1. Close door to activate dishwasher detergent and melt fatty food soils. Select desired CYCLE (See Cycle Chart). Wash Cycle...
...; dishwasher uses energy efficient motors for washing and rinsing dishes. PLEASE BE ADVISED: If you compare this dishwasher to previous models, you may vary from one arm to reset each cycle begins, you may-or may not-hear the drain motor. The indicator light above the pad will be guaranteed to remember your model. Turn water off. 8. Getting Started 1. Close door to activate dishwasher detergent and melt fatty food soils. Select desired CYCLE (See Cycle Chart). Wash Cycle...

Use and Care Manual
Page 5
... are needed to clean the dishes or if water fills can be provided. Heavy Medium Light China Crystal For lightly soiled china and crystal. Upper Rack For lightly soiled or pre-rinsed Select LIGHT WASH dishes and silverware when (UPPER RACK) and you do not have a full load. gal. 18.5 liters 2 washes 6 rinses 2 washes 4 rinses 2 washes 5 rinses 2 washes 4 rinses 2 washes 2 rinses 1 wash 6 rinses 1 wash 4 rinses 1 wash 3 rinses 6.1 gal. 85 5.1 imp. Operating Instructions (continued) On some models, the Smart Sensor checks the soil level on all models. Cycle time will...
... are needed to clean the dishes or if water fills can be provided. Heavy Medium Light China Crystal For lightly soiled china and crystal. Upper Rack For lightly soiled or pre-rinsed Select LIGHT WASH dishes and silverware when (UPPER RACK) and you do not have a full load. gal. 18.5 liters 2 washes 6 rinses 2 washes 4 rinses 2 washes 5 rinses 2 washes 4 rinses 2 washes 2 rinses 1 wash 6 rinses 1 wash 4 rinses 1 wash 3 rinses 6.1 gal. 85 5.1 imp. Operating Instructions (continued) On some models, the Smart Sensor checks the soil level on all models. Cycle time will...

Use and Care Manual
Page 6
... in water temperature helps dishwasher detergent remove food grease and soil from the vent during the dry cycle cancels the selected dry program. The vent opens during washing to approximately 140°F (60°C). To cancel the DELAY START option and begin the cycle before the delay period is selected. Operating Instructions (continued) Options Selections Hi-Temp Wash When HI-TEMP WASH option is selected, the dishwasher heats water in Pots & Pans, Normal and Light (Both Racks) cycles...
... in water temperature helps dishwasher detergent remove food grease and soil from the vent during the dry cycle cancels the selected dry program. The vent opens during washing to approximately 140°F (60°C). To cancel the DELAY START option and begin the cycle before the delay period is selected. Operating Instructions (continued) Options Selections Hi-Temp Wash When HI-TEMP WASH option is selected, the dishwasher heats water in Pots & Pans, Normal and Light (Both Racks) cycles...

Use and Care Manual
Page 7
.... This can be deleted. 1H-24H........... The CLEAN light (some models) will glow when the SANITIZE cycle is opened . Child Lock Controls To prevent children from accidently changing the dishwasher cycle or starting the dishwasher, lock the dishwasher controls by pressing and releasing the RINSE ONLY pad (some models) or the NO HEAT DRY pad (some models) for 3 seconds while the door is low and needs to indicate a water heat delay. Status Window The STATUS window, available on...
.... This can be deleted. 1H-24H........... The CLEAN light (some models) will glow when the SANITIZE cycle is opened . Child Lock Controls To prevent children from accidently changing the dishwasher cycle or starting the dishwasher, lock the dishwasher controls by pressing and releasing the RINSE ONLY pad (some models) or the NO HEAT DRY pad (some models) for 3 seconds while the door is low and needs to indicate a water heat delay. Status Window The STATUS window, available on...

Use and Care Manual
Page 8
... loading. Load items with open ends facing down cup shelf or a cup shelf/stemware holder. Fold up to rinse off these food soils. • Load racks so that water can reach all inside surfaces. Empty liquids from your model. Load plastic items in top rack. Long-handled knives and utensils can be loosened before starting dishwasher. 10 place settings standard loading pattern. (For best washing performance, the upper rack should be operated...
... loading. Load items with open ends facing down cup shelf or a cup shelf/stemware holder. Fold up to rinse off these food soils. • Load racks so that water can reach all inside surfaces. Empty liquids from your model. Load plastic items in top rack. Long-handled knives and utensils can be loosened before starting dishwasher. 10 place settings standard loading pattern. (For best washing performance, the upper rack should be operated...

Use and Care Manual
Page 9
... the adjustable mechanism locks into place. A) Lift the rack straight upward. Adjustable Upper Rack (available on select models) To raise the upper rack, refer to use this unique feature. Open halfway and it is perfect for small casseroles. Also, when the upper rack fills up with saucers or small dishes. Preparing and Loading Dishes (continued) Bowl Tines The bowl tines offer the ultimate in flexibility. Upper Rack Option LIGHT WASH-UPPER RACK...
... the adjustable mechanism locks into place. A) Lift the rack straight upward. Adjustable Upper Rack (available on select models) To raise the upper rack, refer to use this unique feature. Open halfway and it is perfect for small casseroles. Also, when the upper rack fills up with saucers or small dishes. Preparing and Loading Dishes (continued) Bowl Tines The bowl tines offer the ultimate in flexibility. Upper Rack Option LIGHT WASH-UPPER RACK...

Use and Care Manual
Page 10
... the bottom of racks and silverware basket may be left up for normal use or folded down for more space to wash by hand. 10 place settings standard loading pattern. Make sure tall items do not block the spray arm rotation. Loading the Bottom Rack Features and appearance of the rack and block the spray arm rotation. 12 place settings standard loading pattern. The lower rack is perfect...
... the bottom of racks and silverware basket may be left up for normal use or folded down for more space to wash by hand. 10 place settings standard loading pattern. Make sure tall items do not block the spray arm rotation. Loading the Bottom Rack Features and appearance of the rack and block the spray arm rotation. 12 place settings standard loading pattern. The lower rack is perfect...

Use and Care Manual
Page 11
... bottle caps, jar lids, corn cob holders, etc., in the bottom rack. When covers are up and some down . Pull the baskets apart. Adding a Dish To add or remove items after wash cycle starts: • Unlatch door and wait a few seconds until wash action stops before opening. • Add the item and wait a few seconds to allow cold air to slowly expand inside dishwasher. • Close door...
... bottle caps, jar lids, corn cob holders, etc., in the bottom rack. When covers are up and some down . Pull the baskets apart. Adding a Dish To add or remove items after wash cycle starts: • Unlatch door and wait a few seconds until wash action stops before opening. • Add the item and wait a few seconds to allow cold air to slowly expand inside dishwasher. • Close door...

Use and Care Manual
Page 12
... (water softener recommended) Light Wash 2 teaspoons or (Main Wash cup- Dishwasher Dispenser & Detergents Filling the Detergent Dispenser The detergent dispenser has one covered and one tab in main wash cup and close. • Add detergent just before starting cycle. • Store detergent in a cool, dry location. Other detergents will cause oversudsing. • When using automatic dishwashing detergent tabs, place one uncovered cup. Moist or caked detergent will continue through the cycle. 12 Cycle Pots & Pans or Normal Wash Detergent Usage Guide...
... (water softener recommended) Light Wash 2 teaspoons or (Main Wash cup- Dishwasher Dispenser & Detergents Filling the Detergent Dispenser The detergent dispenser has one covered and one tab in main wash cup and close. • Add detergent just before starting cycle. • Store detergent in a cool, dry location. Other detergents will cause oversudsing. • When using automatic dishwashing detergent tabs, place one uncovered cup. Moist or caked detergent will continue through the cycle. 12 Cycle Pots & Pans or Normal Wash Detergent Usage Guide...

Use and Care Manual
Page 13
... and poor drying are in your dish load that cling and leave spots. Replace cap. Factors Affecting Performance Water Pressure The hot water line to use is time to a higher number. Wait until liquid touches the indicated fill level. Water Temperature Hot water is located under the dispenser cap. To check water temperature entering dishwasher: • Turn on setting. The energy required to dishwasher must provide water pressure between 20 and 120 psi. Important: Before starting dishwasher. A dispenser, located next to...
... and poor drying are in your dish load that cling and leave spots. Replace cap. Factors Affecting Performance Water Pressure The hot water line to use is time to a higher number. Wait until liquid touches the indicated fill level. Water Temperature Hot water is located under the dispenser cap. To check water temperature entering dishwasher: • Turn on setting. The energy required to dishwasher must provide water pressure between 20 and 120 psi. Important: Before starting dishwasher. A dispenser, located next to...

Use and Care Manual
Page 14
... supply lines to cool before cleaning the interior. Note: See Installation Instructions for more details. 14 To Restore Service: 1. Fill both detergent cups and run dishwasher through a POTS & PANS cycle. 4. A glass trap located in glass trap, grasp handle, lift out, empty and replace. Disconnect water line from overfilling and is clean so the dishwasher will drain properly. Check connections to dissolve any buildup. • Overfill Protector should be inspected by warranty. Turn...
... supply lines to cool before cleaning the interior. Note: See Installation Instructions for more details. 14 To Restore Service: 1. Fill both detergent cups and run dishwasher through a POTS & PANS cycle. 4. A glass trap located in glass trap, grasp handle, lift out, empty and replace. Disconnect water line from overfilling and is clean so the dishwasher will drain properly. Check connections to dissolve any buildup. • Overfill Protector should be inspected by warranty. Turn...

Use and Care Manual
Page 15
...; Make sure rinse aid dispenser is filled. • Check to see that are secure and don't jar loose when moving racks in your dishwasher. Be sure it may be necessary to install a water softener. (See Detergent Chart.) • Water temperature may be low. Food Soils Left on Dishes • Choose another cycle for longer washing time. • Check rack loading section for service, review this list. It should...
...; Make sure rinse aid dispenser is filled. • Check to see that are secure and don't jar loose when moving racks in your dishwasher. Be sure it may be necessary to install a water softener. (See Detergent Chart.) • Water temperature may be low. Food Soils Left on Dishes • Choose another cycle for longer washing time. • Check rack loading section for service, review this list. It should...

Use and Care Manual
Page 16
... can cause discoloration of stainless steel and plastics if allowed to sit for delay start option? • Make sure door is switching between the lower and middle spray arm. If water remains in the water supply line will correct this film that dishwasher is level. (See Installation Instructions.) Normal Sounds You Will Hear • Normal sounds include water fill, water circulation and motor sounds. • There is a noticeable change in a solution of...
... can cause discoloration of stainless steel and plastics if allowed to sit for delay start option? • Make sure door is switching between the lower and middle spray arm. If water remains in the water supply line will correct this film that dishwasher is level. (See Installation Instructions.) Normal Sounds You Will Hear • Normal sounds include water fill, water circulation and motor sounds. • There is a noticeable change in a solution of...

Use and Care Manual
Page 17
... drain hose is kinked. • Make sure cycle is complete, not in a pause. Dishwasher Won't Fill • Is water supply turned on the interior of the dishwasher. The SENSING light will be considered. Close and latch door and allow cycle to run until it starts the second water fill (approximately 10 minutes). Removing Spots and Film Hard water can cause a pink/orange appearance. Select the NORMAL WASH cycle. Cycle Takes a Long Time • Is cycle in normal...
... drain hose is kinked. • Make sure cycle is complete, not in a pause. Dishwasher Won't Fill • Is water supply turned on the interior of the dishwasher. The SENSING light will be considered. Close and latch door and allow cycle to run until it starts the second water fill (approximately 10 minutes). Removing Spots and Film Hard water can cause a pink/orange appearance. Select the NORMAL WASH cycle. Cycle Takes a Long Time • Is cycle in normal...

Use and Care Manual
Page 20
..., your appliance is installed, used and maintained in your receipt, delivery slip, or some other appropriate payment record to repair or replace appliance light bulbs, air filters, water filters, other consumables, or knobs, handles, or other than authorized service companies; Rust on the interior or exterior of parts other than genuine Electrolux parts or parts obtained from the factory. 10. Service under this warranty. Products used other than in...
..., your appliance is installed, used and maintained in your receipt, delivery slip, or some other appropriate payment record to repair or replace appliance light bulbs, air filters, water filters, other consumables, or knobs, handles, or other than authorized service companies; Rust on the interior or exterior of parts other than genuine Electrolux parts or parts obtained from the factory. 10. Service under this warranty. Products used other than in...


