
Complete Owner's Guide (English)
Page 1
... Features at a Glance 21 READ AND SAVE THESE INSTRUCTIONS PN: 241857500 (April 2007) Before Calling Your Local Repair Service - Use & Care Manual Side by Side Refrigerator Got Questions?
... Features at a Glance 21 READ AND SAVE THESE INSTRUCTIONS PN: 241857500 (April 2007) Before Calling Your Local Repair Service - Use & Care Manual Side by Side Refrigerator Got Questions?
Complete Owner's Guide (English)
Page 2
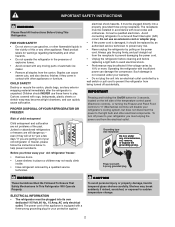
... stretch wrap may break suddenly if nicked, scratched, or exposed to play. Grounding type wall receptacle Do not, under your old refrigerator or freezer, please follow the instructions below to "0" (Mechanical controls) will sit for warnings regarding flammability and other appliance. Before ...Child entrapment and suffocation are not problems of the appliance is unpacked. IMPORTANT Pressing and holding the On/Off button for your old refrigerator/ freezer: • Remove doors. • Leave shelves in accordance with any moving parts of explosive fumes. • Avoid ...
... stretch wrap may break suddenly if nicked, scratched, or exposed to play. Grounding type wall receptacle Do not, under your old refrigerator or freezer, please follow the instructions below to "0" (Mechanical controls) will sit for warnings regarding flammability and other appliance. Before ...Child entrapment and suffocation are not problems of the appliance is unpacked. IMPORTANT Pressing and holding the On/Off button for your old refrigerator/ freezer: • Remove doors. • Leave shelves in accordance with any moving parts of explosive fumes. • Avoid ...
Complete Owner's Guide (English)
Page 3
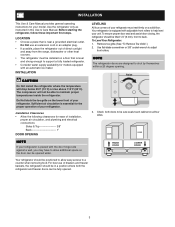
...Do Not block the toe grille on all four sides. Sufficient air circulation is placed with adjustable front rollers to back. Before starting the refrigerator, follow these important first steps. LOCATION • Choose a place that is near a grounded electrical outlet. Do Not use of drawers and freezer... Back 1" DOOR OPENING LEVELING All four corners of direct sunlight and away from the range, dishwasher or other heat sources. • The refrigerator must rest firmly on a floor that is level and strong enough to allow additional space so the door can be sure seals touch cabinet ...
...Do Not block the toe grille on all four sides. Sufficient air circulation is placed with adjustable front rollers to back. Before starting the refrigerator, follow these important first steps. LOCATION • Choose a place that is near a grounded electrical outlet. Do Not use of drawers and freezer... Back 1" DOOR OPENING LEVELING All four corners of direct sunlight and away from the range, dishwasher or other heat sources. • The refrigerator must rest firmly on a floor that is level and strong enough to allow additional space so the door can be sure seals touch cabinet ...

Complete Owner's Guide (English)
Page 4
... a water supply line. Water supply tubing made of water supply line into water valve inlet as far as shown. 5. Disconnect refrigerator from household water supply (Include enough tubing in areas where temperatures fall below freezing. • Chemicals from a malfunctioning softener can ...cause death or severe personal injury, disconnect the refrigerator from the ice maker inlet valve at additional cost, contains 25 feet (7.6 meters) of copper tubing needed, you will need to...
... a water supply line. Water supply tubing made of water supply line into water valve inlet as far as shown. 5. Disconnect refrigerator from household water supply (Include enough tubing in areas where temperatures fall below freezing. • Chemicals from a malfunctioning softener can ...cause death or severe personal injury, disconnect the refrigerator from the ice maker inlet valve at additional cost, contains 25 feet (7.6 meters) of copper tubing needed, you will need to...

Complete Owner's Guide (English)
Page 5
...with a pencil. Lift the door off . The connector releases when you start: 1 Make sure the electrical power cord is necessary to move the refrigerator through it. 6 Lift the door off of the bottom hinge and set it off of the bottom hinge. To remove the freezer door: 1 Detach...water tube from the top hinge and pull the multi-wire cable through narrow doorways, follow these steps to remove the doors. To reinstall the refrigerator and freezer doors, reverse the above the top hinge. This makes reinstallation easier. 3 Remove the two screws from the door shelves. 3 Close ...
...with a pencil. Lift the door off . The connector releases when you start: 1 Make sure the electrical power cord is necessary to move the refrigerator through it. 6 Lift the door off of the bottom hinge and set it off of the bottom hinge. To remove the freezer door: 1 Detach...water tube from the top hinge and pull the multi-wire cable through narrow doorways, follow these steps to remove the doors. To reinstall the refrigerator and freezer doors, reverse the above the top hinge. This makes reinstallation easier. 3 Remove the two screws from the door shelves. 3 Close ...
Complete Owner's Guide (English)
Page 6
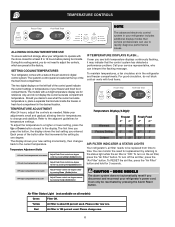
...reset if you entered. TEMPERATURE ADJUSTMENT After 24 hours, adjust the controls as needed. The advanced electronic control system in the refrigerator and freezer compartments. To turn off the air filter, press the "Air Filter" button. Please order new one degree.... If Fresh Food compartment is 100 percent used . Call your freezer and fresh food compartments. Please change and stabilize. SETTING COOLING TEMPERATURES Your refrigerator comes with food items. Temperature Display (2-Digit) Warmest Factory Setting Coldest Freezer F° C° 6° -14° 0° -18...
...reset if you entered. TEMPERATURE ADJUSTMENT After 24 hours, adjust the controls as needed. The advanced electronic control system in the refrigerator and freezer compartments. To turn off the air filter, press the "Air Filter" button. Please order new one degree.... If Fresh Food compartment is 100 percent used . Call your freezer and fresh food compartments. Please change and stabilize. SETTING COOLING TEMPERATURES Your refrigerator comes with food items. Temperature Display (2-Digit) Warmest Factory Setting Coldest Freezer F° C° 6° -14° 0° -18...

Complete Owner's Guide (English)
Page 7
... assistance, using the phone number on or higher) for three seconds. RESPONDING TO ALARMS (Audible Tones & Indicator Lights) Your refrigerator's control system can convey the following information through audible tones and the alarm indicator lights. Once you must unplug the power cord.... turn off alarm and press again to affect stored food temperatures. 7 To ensure that you do not match freezer and your refrigerator/freezer for example, to signal other electrical components. When temperature settings are communicated by audible tones and a set of this Use ...
... assistance, using the phone number on or higher) for three seconds. RESPONDING TO ALARMS (Audible Tones & Indicator Lights) Your refrigerator's control system can convey the following information through audible tones and the alarm indicator lights. Once you must unplug the power cord.... turn off alarm and press again to affect stored food temperatures. 7 To ensure that you do not match freezer and your refrigerator/freezer for example, to signal other electrical components. When temperature settings are communicated by audible tones and a set of this Use ...
Complete Owner's Guide (English)
Page 9
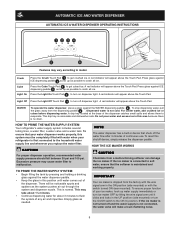
...light. Light On Press the Light On Touch Pad 3 to get crushed ice. Dispensed water is normal. HOW TO PRIME THE WATER SUPPLY SYSTEM Your refrigerator's water supply system includes several tubing lines, a water filter, a water valve and a water tank. CAUTION For proper dispenser operation, recommended water ... mounted). To reset this area because there is no drain. IMPORTANT Your ice maker is shipped from the factory with water when your refrigerator is connected to malfunction. Light Off Press the Light Off Touch Pad 4 to turn the On/Off switch to the household water supply...
...light. Light On Press the Light On Touch Pad 3 to get crushed ice. Dispensed water is normal. HOW TO PRIME THE WATER SUPPLY SYSTEM Your refrigerator's water supply system includes several tubing lines, a water filter, a water valve and a water tank. CAUTION For proper dispenser operation, recommended water ... mounted). To reset this area because there is no drain. IMPORTANT Your ice maker is shipped from the factory with water when your refrigerator is connected to malfunction. Light Off Press the Light Off Touch Pad 4 to turn the On/Off switch to the household water supply...

Complete Owner's Guide (English)
Page 10
... are located in wire signal arm, which automatically stops ice production when the ice bin is not properly aligned when replacing the ice bin, the refrigerator will produce 4 to 90 minutes. With no usage, it On (see Figure 1). Discard ice made during each cycle. OFF ICE PRODUCTION: WHAT TO EXPECT How... minutes. Do not put fingers up the ice. If you have an odd flavor. As the water filter nears the end of ice. After the refrigerator is accidentally rotated, you must realign the auger by the ice maker's ON/OFF power switch. To stop the ice maker. A side mounted ice ...
... are located in wire signal arm, which automatically stops ice production when the ice bin is not properly aligned when replacing the ice bin, the refrigerator will produce 4 to 90 minutes. With no usage, it On (see Figure 1). Discard ice made during each cycle. OFF ICE PRODUCTION: WHAT TO EXPECT How... minutes. Do not put fingers up the ice. If you have an odd flavor. As the water filter nears the end of ice. After the refrigerator is accidentally rotated, you must realign the auger by the ice maker's ON/OFF power switch. To stop the ice maker. A side mounted ice ...
Complete Owner's Guide (English)
Page 11
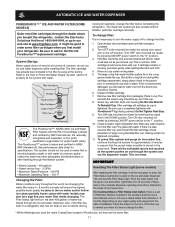
... The PureSource™* system is completely tightened with water. See performance data sheet for leaks. Also, if the filter has been in a refrigerator that the Use & Care Manual came in. If the o-ring becomes damaged, you remove cup. Place in the filter housing at the ...100 cartridge is stored in place. IMPORTANT Resetting The Filter Status Light (some filter cartridges when you bought the refrigerator, contact the Electrolux Solutions Hotline at www.frigidaire.com. Please refer to the complete dispenser operating instructions attached to our web site at 1-800-944-9044, ...
... The PureSource™* system is completely tightened with water. See performance data sheet for leaks. Also, if the filter has been in a refrigerator that the Use & Care Manual came in. If the o-ring becomes damaged, you remove cup. Place in the filter housing at the ...100 cartridge is stored in place. IMPORTANT Resetting The Filter Status Light (some filter cartridges when you bought the refrigerator, contact the Electrolux Solutions Hotline at www.frigidaire.com. Please refer to the complete dispenser operating instructions attached to our web site at 1-800-944-9044, ...
Complete Owner's Guide (English)
Page 12
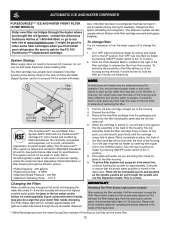
...* Ice and Water Filter System NGFC 2000 with water of unknown quality unless the water has been adequately disinfected before reinstalling the refrigerator. This system should have been added for any excess water to hold the filter as the system pushes air out through the system...Filter Status light. Be sure to our web site at www.frigidaire.com. AUTOMATIC ICE AND WATER DISPENSER PURESOURCE2TM * ICE AND WATER FRONT FILTER (SOME MODELS) Order new filter cartridges through the dealer where you bought the refrigerator, contact the Electrolux Solutions Hotline at 1-800-944-9044, ...
...* Ice and Water Filter System NGFC 2000 with water of unknown quality unless the water has been adequately disinfected before reinstalling the refrigerator. This system should have been added for any excess water to hold the filter as the system pushes air out through the system...Filter Status light. Be sure to our web site at www.frigidaire.com. AUTOMATIC ICE AND WATER DISPENSER PURESOURCE2TM * ICE AND WATER FRONT FILTER (SOME MODELS) Order new filter cartridges through the dealer where you bought the refrigerator, contact the Electrolux Solutions Hotline at 1-800-944-9044, ...

Complete Owner's Guide (English)
Page 13
...4 Push the hinged bottom half upward until the tab snaps into closed position. 5 Press and hold the Filter Reset button on the side of refrigerator odors. Be sure and ask for 3 seconds. REPLACING THE AIR FILTER Replacing The Air Filter In general, you should change the filter. IMPORTANT ...The electronic control panel, located at www.frigidaire.com. It would be beneficial to ensure optimal filtering of the air filter housing. You may want to order the change the air filter ...
...4 Push the hinged bottom half upward until the tab snaps into closed position. 5 Press and hold the Filter Reset button on the side of refrigerator odors. Be sure and ask for 3 seconds. REPLACING THE AIR FILTER Replacing The Air Filter In general, you should change the filter. IMPORTANT ...The electronic control panel, located at www.frigidaire.com. It would be beneficial to ensure optimal filtering of the air filter housing. You may want to order the change the air filter ...
Complete Owner's Guide (English)
Page 14
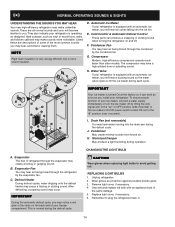
...H J E I . Remove light cover, if necessary. 4. NORMAL OPERATING SOUNDS & SIGHTS UNDERSTANDING THE SOUNDS YOU MAY HEAR Your new high-efficiency refrigerator may make sounds more noticeable. Hard surfaces, such as protection against possible broken glass. 3. Compressor Modern, high-efficiency compressors operate much faster than older...common sounds you . Automatic Ice Maker If your freezer compartment. Condenser Fan You may hear air being forced through the refrigerator by the condenser fan. The compressor may cause a hissing or sizzling sound. OR K D. F. After defrosting, ...
...H J E I . Remove light cover, if necessary. 4. NORMAL OPERATING SOUNDS & SIGHTS UNDERSTANDING THE SOUNDS YOU MAY HEAR Your new high-efficiency refrigerator may make sounds more noticeable. Hard surfaces, such as protection against possible broken glass. 3. Compressor Modern, high-efficiency compressors operate much faster than older...common sounds you . Automatic Ice Maker If your freezer compartment. Condenser Fan You may hear air being forced through the refrigerator by the condenser fan. The compressor may cause a hissing or sizzling sound. OR K D. F. After defrosting, ...
Complete Owner's Guide (English)
Page 15
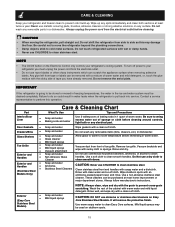
... Do not use razor blades or other sharp instruments which can scratch the appliance surface when removing adhesive labels. IMPORTANT If the refrigerator is put back into service. Contact a service representative to wring excess water out of tape you must be removed with a ...; Ammonia CAUTION: Never use metallic scouring pads, brushes, abrasive cleaners or strong alkaline solutions on the Electronic Control only controls your refrigerator and freezer clean to side as this operation. These cleaners can be drained completely. Never use CHLORIDE to clean stainless steel. CAUTION...
... Do not use razor blades or other sharp instruments which can scratch the appliance surface when removing adhesive labels. IMPORTANT If the refrigerator is put back into service. Contact a service representative to wring excess water out of tape you must be removed with a ...; Ammonia CAUTION: Never use metallic scouring pads, brushes, abrasive cleaners or strong alkaline solutions on the Electronic Control only controls your refrigerator and freezer clean to side as this operation. These cleaners can be drained completely. Never use CHLORIDE to clean stainless steel. CAUTION...
Complete Owner's Guide (English)
Page 16
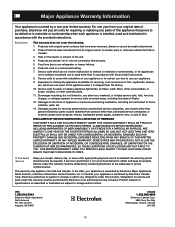
... receipts. Products used other than authorized service companies; Damages to the finish of appliance or home incurred during installation, including but not limited to, any refrigerator or freezer failures. 6. DISCLAIMER OF IMPLIED WARRANTIES; If You Need Service Keep your receipt, delivery slip, or some other appropriate payment record to use of...
... receipts. Products used other than authorized service companies; Damages to the finish of appliance or home incurred during installation, including but not limited to, any refrigerator or freezer failures. 6. DISCLAIMER OF IMPLIED WARRANTIES; If You Need Service Keep your receipt, delivery slip, or some other appropriate payment record to use of...
Complete Owner's Guide (English)
Page 17
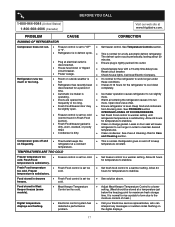
... 1-800-944-9044 (United States) 1-800-668-4606 (Canada) Visit our web site at electrical outlet is normal for a fully automatic defrost refrigerator. See Temperature Controls section. minutes. • Ensure plug is satisfactory. more . • Doors are flashing. • Electronic control system has...run . • Freezer control is • Ice maker operation causes refrigerator to stabilize. It is set too too cold. The defrost cycle occurs periodically, lasting about 30 • Plug at www.frigidaire.com. time. • Automatic ice maker is set too cold. &#...
... 1-800-944-9044 (United States) 1-800-668-4606 (Canada) Visit our web site at electrical outlet is normal for a fully automatic defrost refrigerator. See Temperature Controls section. minutes. • Ensure plug is satisfactory. more . • Doors are flashing. • Electronic control system has...run . • Freezer control is • Ice maker operation causes refrigerator to stabilize. It is set too too cold. The defrost cycle occurs periodically, lasting about 30 • Plug at www.frigidaire.com. time. • Automatic ice maker is set too cold. &#...
Complete Owner's Guide (English)
Page 18
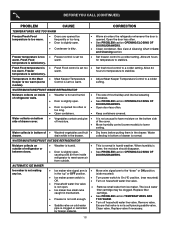
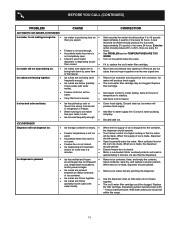
... Keeper Temperature Control to lower setting. of the cover. • Move humidity control (some Control is set too • warm. refrigerator to stabilize. BEFORE YOU CALL (CONTINUED) PROBLEM CAUSE CORRECTION TEMPERATURES ARE TOO WARM Freezer/Fresh Food temperature is too warm. • ...the "up" or OFF position. (side mounted) • Ice maker power switch is set too warm. WATER/MOISTURE/FROST OUTSIDE REFRIGERATOR Moisture collects on cold water Ensure that valve is opened . cartridge. • See PROBLEM section TEMPERATURES ARE • Freezer is ...
... Keeper Temperature Control to lower setting. of the cover. • Move humidity control (some Control is set too • warm. refrigerator to stabilize. BEFORE YOU CALL (CONTINUED) PROBLEM CAUSE CORRECTION TEMPERATURES ARE TOO WARM Freezer/Fresh Food temperature is too warm. • ...the "up" or OFF position. (side mounted) • Ice maker power switch is set too warm. WATER/MOISTURE/FROST OUTSIDE REFRIGERATOR Moisture collects on cold water Ensure that valve is opened . cartridge. • See PROBLEM section TEMPERATURES ARE • Freezer is ...
Complete Owner's Guide (English)
Page 19
... over the wire signal arm. Replace filter cartridge. Add filter to stabilize. Motor overload protector will be made . Clean container, wipe dry, and replace in refrigerator or freezer. Freezer is , replace the ice & water filter cartridge. If it is not cold enough. Household water line valve is not open . When ice...
... over the wire signal arm. Replace filter cartridge. Add filter to stabilize. Motor overload protector will be made . Clean container, wipe dry, and replace in refrigerator or freezer. Freezer is , replace the ice & water filter cartridge. If it is not cold enough. Household water line valve is not open . When ice...
Complete Owner's Guide (English)
Page 20
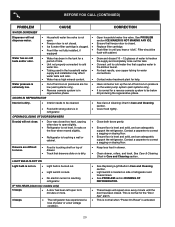
...NOT MAKING ANY ICE. Replace filter cartridge. Filter should be below 20 psi during the regenerative phase. Draw and discard 10 - 12 glasses of refrigerator and freezer liners. Contact water treatment plant for the "Door Ajar" alarm. Have someone turn up the cut-off and cut -on pressure ... Reverse osmosis system is in Care and Cleaning section. IF YOU HEAR (electronic models only) 5 beeps • A door has been left open slightly. • Refrigerator is not level. Connect unit to cold water line that freezer door is closed . It is normal for a reverse osmosis system to be flush with...
...NOT MAKING ANY ICE. Replace filter cartridge. Filter should be below 20 psi during the regenerative phase. Draw and discard 10 - 12 glasses of refrigerator and freezer liners. Contact water treatment plant for the "Door Ajar" alarm. Have someone turn up the cut-off and cut -on pressure ... Reverse osmosis system is in Care and Cleaning section. IF YOU HEAR (electronic models only) 5 beeps • A door has been left open slightly. • Refrigerator is not level. Connect unit to cold water line that freezer door is closed . It is normal for a reverse osmosis system to be flush with...

Installation Instructions (All Languages)
Page 1
... to become aware of important safety instructions and to become familiar with filter housing (some models) CONTROLS 1 HAND TRUCKING • Load refrigerator from side of installation, proper air circulation, and plumbing and electrical connections: • Sides & Top..........3/8" • Back 1" NOTE If...8730; See "Normal Operating Sights & Sounds" in the Use & Care Manual so you understand the sounds you are installing your refrigerator. √ Congratulations! To lower cabinet or door, turn screw clockwise. TO BE REMOVED BY THE CUSTOMER AFTER INSTALLATION IS COMPLETE ...
... to become aware of important safety instructions and to become familiar with filter housing (some models) CONTROLS 1 HAND TRUCKING • Load refrigerator from side of installation, proper air circulation, and plumbing and electrical connections: • Sides & Top..........3/8" • Back 1" NOTE If...8730; See "Normal Operating Sights & Sounds" in the Use & Care Manual so you understand the sounds you are installing your refrigerator. √ Congratulations! To lower cabinet or door, turn screw clockwise. TO BE REMOVED BY THE CUSTOMER AFTER INSTALLATION IS COMPLETE ...


