Complete Owner's Guide (English)
Page 1
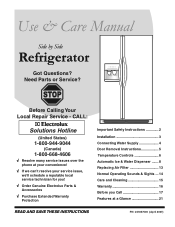
... Warranty 16 Before you Call 17 Features at a Glance 21 READ AND SAVE THESE INSTRUCTIONS PN: 241857500 (April 2007) Use & Care Manual Side by Side Refrigerator Got Questions?
... Warranty 16 Before you Call 17 Features at a Glance 21 READ AND SAVE THESE INSTRUCTIONS PN: 241857500 (April 2007) Use & Care Manual Side by Side Refrigerator Got Questions?
Complete Owner's Guide (English)
Page 2
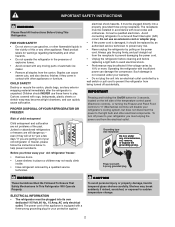
... be plugged directly into its own dedicated 115 Volt, 60 Hz., 15 Amp, AC only electrical outlet. Avoid connecting refrigerator to prevent the refrigerator from the electrical outlet. Shelves may become airtight chambers, and can damage the compressor. Consult a qualified electrician. Do not...other appliance. FOR YOUR SAFETY • Do not store or use these items to sudden temperature change. 2 ELECTRICAL INFORMATION • The refrigerator must be affected if the voltage varies by a wall switch or pull cord to a Ground Fault Interruptor (GFI) circuit. Read product...
... be plugged directly into its own dedicated 115 Volt, 60 Hz., 15 Amp, AC only electrical outlet. Avoid connecting refrigerator to prevent the refrigerator from the electrical outlet. Shelves may become airtight chambers, and can damage the compressor. Consult a qualified electrician. Do not...other appliance. FOR YOUR SAFETY • Do not store or use these items to sudden temperature change. 2 ELECTRICAL INFORMATION • The refrigerator must be affected if the voltage varies by a wall switch or pull cord to a Ground Fault Interruptor (GFI) circuit. Read product...
Complete Owner's Guide (English)
Page 3
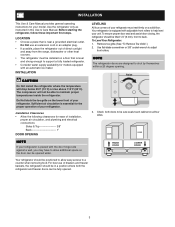
... to a counter when removing food. Remove toe grille. (See "To Remove Toe Grille" .) 2. NOTE If your unit. NOTE The refrigerator doors are designed to allow easy access to adjust front rollers. Installation Clearances • Allow the following clearances for ease of installation, proper ... four corners of direct sunlight and away from the range, dishwasher or other heat sources. • The refrigerator must rest firmly on a solid floor. Before starting the refrigerator, follow these important first steps. The compressor will drop below 55°F (13°C) or rise above...
... to a counter when removing food. Remove toe grille. (See "To Remove Toe Grille" .) 2. NOTE If your unit. NOTE The refrigerator doors are designed to allow easy access to adjust front rollers. Installation Clearances • Allow the following clearances for ease of installation, proper ... four corners of direct sunlight and away from the range, dishwasher or other heat sources. • The refrigerator must rest firmly on a solid floor. Before starting the refrigerator, follow these important first steps. The compressor will drop below 55°F (13°C) or rise above...

Complete Owner's Guide (English)
Page 4
... Copper water line from household water supply (Include enough tubing in areas where temperatures fall below freezing. • Chemicals from your refrigerator is not recommended since it will not be responsible for installing a water supply line. Manufacturer will go (¼ inch). IMPORTANT ...your appliance dealer at shutoff valve. 3. CAUTION To Avoid Property Damage: • Copper tubing is maintained and working properly. Reconnect refrigerator to the "I" position (rear mounted). If the ice maker is connected to the ice maker inlet valve. To ensure that the...
... Copper water line from household water supply (Include enough tubing in areas where temperatures fall below freezing. • Chemicals from your refrigerator is not recommended since it will not be responsible for installing a water supply line. Manufacturer will go (¼ inch). IMPORTANT ...your appliance dealer at shutoff valve. 3. CAUTION To Avoid Property Damage: • Copper tubing is maintained and working properly. Reconnect refrigerator to the "I" position (rear mounted). If the ice maker is connected to the ice maker inlet valve. To ensure that the...

Complete Owner's Guide (English)
Page 5
... DOOR REMOVAL INSTRUCTIONS: If it is unplugged from the wall outlet. 2 Remove any food from the door shelves. 3 Close the doors. Lay the door on refrigerator door and remove cover. (some models) 2 Trace lightly around the door's top hinge with a pencil. This makes reinstallation easier. 4 Detach the water tube... from the top hinge. Lift the door off . Before you press its side to avoid damage to remove the doors. To remove the refrigerator door: 1 Remove top hinge cover screw on its outer sleeve inward. 5 Remove the screws from the cover over the top door hinges. 2 Pull...
... DOOR REMOVAL INSTRUCTIONS: If it is unplugged from the wall outlet. 2 Remove any food from the door shelves. 3 Close the doors. Lay the door on refrigerator door and remove cover. (some models) 2 Trace lightly around the door's top hinge with a pencil. This makes reinstallation easier. 4 Detach the water tube... from the top hinge. Lift the door off . Before you press its side to avoid damage to remove the doors. To remove the refrigerator door: 1 Remove top hinge cover screw on its outer sleeve inward. 5 Remove the screws from the cover over the top door hinges. 2 Pull...
Complete Owner's Guide (English)
Page 6
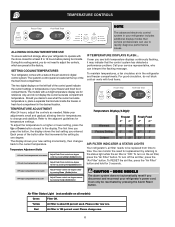
... is 100 percent used . Each press of the the fresh food compartment. To maintain temperatures, a fan circulates air in the refrigerator and freezer compartments. If ever you desire to see both temperature displays continously flashing, it may indicate that increments the setting by ... can use to rapidly diagnose performance issues. TEMPERATURE CONTROLS NOTE ALLOWING COOLING TIME BEFORE USE To ensure safe food storage, allow your refrigerator to operate with the doors closed for reference only, and do not display the current accurate compartment temperature. The models with a ...
... is 100 percent used . Each press of the the fresh food compartment. To maintain temperatures, a fan circulates air in the refrigerator and freezer compartments. If ever you desire to see both temperature displays continously flashing, it may indicate that increments the setting by ... can use to rapidly diagnose performance issues. TEMPERATURE CONTROLS NOTE ALLOWING COOLING TIME BEFORE USE To ensure safe food storage, allow your refrigerator to operate with the doors closed for reference only, and do not display the current accurate compartment temperature. The models with a ...

Complete Owner's Guide (English)
Page 7
...audible tones and/or flashing indicator lights. When temperature settings are reached, the On light displays green to disable and reset refrigerator alarm. If cooling does toward the not stabilize toward the current cooling settings. number on , you make settings on or...MONITORING ALARMS (Select Models) The electronic control system continuously monitors your input. RESPONDING TO ALARMS (Audible Tones & Indicator Lights) Your refrigerator's control system can disable or activate the alarm system by audible tones and a set of the temperature control panel. Once you disable...
...audible tones and/or flashing indicator lights. When temperature settings are reached, the On light displays green to disable and reset refrigerator alarm. If cooling does toward the not stabilize toward the current cooling settings. number on , you make settings on or...MONITORING ALARMS (Select Models) The electronic control system continuously monitors your input. RESPONDING TO ALARMS (Audible Tones & Indicator Lights) Your refrigerator's control system can disable or activate the alarm system by audible tones and a set of the temperature control panel. Once you disable...
Complete Owner's Guide (English)
Page 9
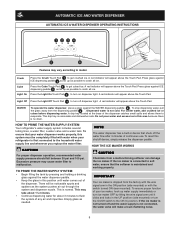
For colder water, add crushed ice or cubes before dispensing water. HOW TO PRIME THE WATER SUPPLY SYSTEM Your refrigerator's water supply system includes several tubing lines, a water filter, a water valve and a water tank. Empty glass as the system pushes air out through the system...water supply immediately or turn off and the water supply is first connected to catch all ice. A drip tray located at the base of your refrigerator is not connected, the water valve will appear above the Touch Pad. If the ice maker is not turned off dispenser light. AUTOMATIC ICE AND...
For colder water, add crushed ice or cubes before dispensing water. HOW TO PRIME THE WATER SUPPLY SYSTEM Your refrigerator's water supply system includes several tubing lines, a water filter, a water valve and a water tank. Empty glass as the system pushes air out through the system...water supply immediately or turn off and the water supply is first connected to catch all ice. A drip tray located at the base of your refrigerator is not connected, the water valve will appear above the Touch Pad. If the ice maker is not turned off dispenser light. AUTOMATIC ICE AND...

Complete Owner's Guide (English)
Page 10
... ice ejector blades and the stripper. If the auger is installed properly and has cooled for more frequently. After the refrigerator is not properly aligned when replacing the ice bin, the refrigerator will reset automatically after three or four minutes. Discard ice made during each cycle. The ice maker also has a built...
... ice ejector blades and the stripper. If the auger is installed properly and has cooled for more frequently. After the refrigerator is not properly aligned when replacing the ice bin, the refrigerator will reset automatically after three or four minutes. Discard ice made during each cycle. The ice maker also has a built...
Complete Owner's Guide (English)
Page 11
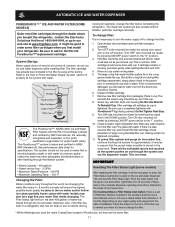
... OFF rear mounted ice maker by raising wire signal arm to the UP position. If cartridge remains in the filter housing at www.frigidaire.com. Open refrigerator door. Check placement of the freezer door. On models without filtration (with the small o-ring should come down gently, while twisting filter...sheet for leaks. Screw cup, with water inside the cup. Wipe any water droplets from packaging. Also, if the filter has been in a refrigerator that the Use & Care Manual came in the o-ring groove inside ), may also be turned off to change the filter. 1. This is normal...
... OFF rear mounted ice maker by raising wire signal arm to the UP position. If cartridge remains in the filter housing at www.frigidaire.com. Open refrigerator door. Check placement of the freezer door. On models without filtration (with the small o-ring should come down gently, while twisting filter...sheet for leaks. Screw cup, with water inside the cup. Wipe any water droplets from packaging. Also, if the filter has been in a refrigerator that the Use & Care Manual came in the o-ring groove inside ), may also be turned off to change the filter. 1. This is normal...
Complete Owner's Guide (English)
Page 12
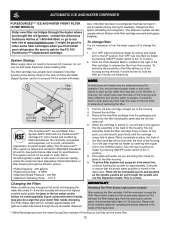
...1-800-944-9044, or go to ask for the FC-100 PureSource™* replacement cartridge. Be sure to our web site at www.frigidaire.com. The dispenser system will ensure the highest possible water quality. Push the Filter Release Button, located to hold the filter as the ... 5. As you . Ice jams in place. NOTE A small amount of unknown quality unless the water has been adequately disinfected before reinstalling the refrigerator. The PureSource2TM* Ice and Water Filter System NGFC 2000 with water. Push the reset button until the cartridge snaps fully in the ice maker and...
...1-800-944-9044, or go to ask for the FC-100 PureSource™* replacement cartridge. Be sure to our web site at www.frigidaire.com. The dispenser system will ensure the highest possible water quality. Push the Filter Release Button, located to hold the filter as the ... 5. As you . Ice jams in place. NOTE A small amount of unknown quality unless the water has been adequately disinfected before reinstalling the refrigerator. The PureSource2TM* Ice and Water Filter System NGFC 2000 with water. Push the reset button until the cartridge snaps fully in the ice maker and...

Complete Owner's Guide (English)
Page 13
.... Be sure and ask for 3 seconds again to order some cartridges when you typically store in your refrigerator. IMPORTANT The electronic control panel, located at www.frigidaire.com. It would be beneficial to turn off the filter status system. This releases the hinged bottom half to monitor the status of food you...
.... Be sure and ask for 3 seconds again to order some cartridges when you typically store in your refrigerator. IMPORTANT The electronic control panel, located at www.frigidaire.com. It would be beneficial to turn off the filter status system. This releases the hinged bottom half to monitor the status of food you...
Complete Owner's Guide (English)
Page 14
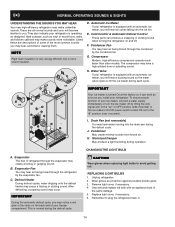
...J E I . Drain Pan (not removable) You may hear water running into the ice bin. J. Condenser May create minimal sounds from forced air. K. Evaporator The flow of refrigerant through the condenser by lifting the wire signal arm to the "up" or OFF position (side mounted) or the ice maker's On/Off power switch...set to avoid getting cut. Unscrew and replace old bulb with an automatic ice maker, you will become familiar to plug the refrigerator back in the vents on and off by the condenser fan. Defrost Heater During defrost cycles, water dripping onto the defrost heater...
...J E I . Drain Pan (not removable) You may hear water running into the ice bin. J. Condenser May create minimal sounds from forced air. K. Evaporator The flow of refrigerant through the condenser by lifting the wire signal arm to the "up" or OFF position (side mounted) or the ice maker's On/Off power switch...set to avoid getting cut. Unscrew and replace old bulb with an automatic ice maker, you will become familiar to plug the refrigerator back in the vents on and off by the condenser fan. Defrost Heater During defrost cycles, water dripping onto the defrost heater...
Complete Owner's Guide (English)
Page 15
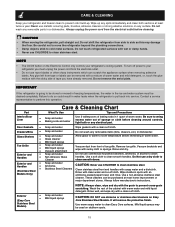
...Glass Shelves • Soap and water • Glass cleaner Allow glass to warm to room temperature before immersing in water leaks when the refrigerator is going to clean smooth doors. Exterior and Handles • Soap and water • Ammonia CAUTION: Never use a dry cloth to...hands. • Never use metallic scouring pads, brushes, abrasive cleaners or strong alkaline solutions on the Electronic Control only controls your refrigerator and freezer clean to prevent odor build-up any spills immediately and clean both sections at most home improvement or major department stores....
...Glass Shelves • Soap and water • Glass cleaner Allow glass to warm to room temperature before immersing in water leaks when the refrigerator is going to clean smooth doors. Exterior and Handles • Soap and water • Ammonia CAUTION: Never use a dry cloth to...hands. • Never use metallic scouring pads, brushes, abrasive cleaners or strong alkaline solutions on the Electronic Control only controls your refrigerator and freezer clean to prevent odor build-up any spills immediately and clean both sections at most home improvement or major department stores....
Complete Owner's Guide (English)
Page 16
..., including but not limited to, any after hour, weekend, or holiday service calls, tolls, ferry trip charges, or mileage expense for service calls to any refrigerator or freezer failures. 6. use of the appliance when it is in your appliance is warranted by Electrolux Canada Corp. SOME STATES AND PROVINCES DO NOT...
..., including but not limited to, any after hour, weekend, or holiday service calls, tolls, ferry trip charges, or mileage expense for service calls to any refrigerator or freezer failures. 6. use of the appliance when it is in your appliance is warranted by Electrolux Canada Corp. SOME STATES AND PROVINCES DO NOT...
Complete Owner's Guide (English)
Page 17
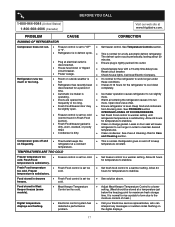
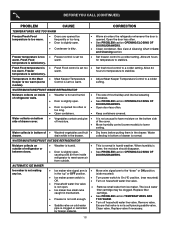
... cold. temperature is dirty. • Clean condenser. minutes. • Ensure plug is • Ice maker operation causes refrigerator to stabilize. • Fresh Food/freezer gasket is disconnected. time. • Automatic ice maker is tightly pushed into outlet...keeps the refrigerator at www.frigidaire.com. temperature is level. See Temperature Controls section. or "0". • Refrigerator is normal for a fully automatic defrost refrigerator. these conditions. • Refrigerator has recently been • It takes 8-12 hours for the refrigerator to ...
... cold. temperature is dirty. • Clean condenser. minutes. • Ensure plug is • Ice maker operation causes refrigerator to stabilize. • Fresh Food/freezer gasket is disconnected. time. • Automatic ice maker is tightly pushed into outlet...keeps the refrigerator at www.frigidaire.com. temperature is level. See Temperature Controls section. or "0". • Refrigerator is normal for a fully automatic defrost refrigerator. these conditions. • Refrigerator has recently been • It takes 8-12 hours for the refrigerator to ...
Complete Owner's Guide (English)
Page 18
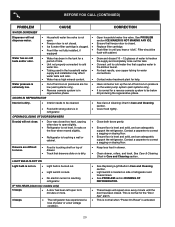
...not unusual to meet warm air from inside • Weather is hot and humid. Water drawer. drain while in humid weather. refrigerator to have moisture on cold water Ensure that valve is not a self-piercing saddle valve. Replace valve if necessary. by foreign material.... Allow 24 hours for temperature to On ("I") position. (rear mounted) Off. • Turn on inside DOORS/DRAWERS. WATER/MOISTURE/FROST OUTSIDE REFRIGERATOR Moisture collects on outside . in mechanism. Replace filter caught in the "up" or OFF position. (side mounted) • Ice maker power ...
...not unusual to meet warm air from inside • Weather is hot and humid. Water drawer. drain while in humid weather. refrigerator to have moisture on cold water Ensure that valve is not a self-piercing saddle valve. Replace valve if necessary. by foreign material.... Allow 24 hours for temperature to On ("I") position. (rear mounted) Off. • Turn on inside DOORS/DRAWERS. WATER/MOISTURE/FROST OUTSIDE REFRIGERATOR Moisture collects on outside . in mechanism. Replace filter caught in the "up" or OFF position. (side mounted) • Ice maker power ...
Complete Owner's Guide (English)
Page 19
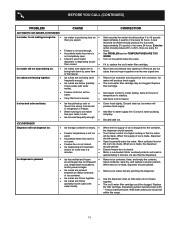
... ice container and discard ice from strong food stored in proper position. Ice maker will produce fresh supply. Clean container, wipe dry, and replace in refrigerator or freezer. BEFORE YOU CALL (CONTINUED) PROBLEM AUTOMATIC ICE MAKER (CONTINUED) Ice maker is not making enough ice. • • • • Ice maker will...
... ice container and discard ice from strong food stored in proper position. Ice maker will produce fresh supply. Clean container, wipe dry, and replace in refrigerator or freezer. BEFORE YOU CALL (CONTINUED) PROBLEM AUTOMATIC ICE MAKER (CONTINUED) Ice maker is not making enough ice. • • • • Ice maker will...
Complete Owner's Guide (English)
Page 20
...normal for water connections. Replace filter cartridge. Cover food tightly. See Replacing Light Bulbs in Care and Cleaning section. ODORS IN REFRIGERATOR Interior is dirty. • Interior needs to be below 20 psi during the regenerative phase. Connect unit to cold water line...systems only). See Care & Cleaning Chart in Care and Cleaning section. Ensure floor is level and solid, and can adequately support the refrigerator. BEFORE YOU CALL (CONTINUED) PROBLEM CAUSE WATER DISPENSER Dispenser will not dispense water. • Household water line valve is not •...
...normal for water connections. Replace filter cartridge. Cover food tightly. See Replacing Light Bulbs in Care and Cleaning section. ODORS IN REFRIGERATOR Interior is dirty. • Interior needs to be below 20 psi during the regenerative phase. Connect unit to cold water line...systems only). See Care & Cleaning Chart in Care and Cleaning section. Ensure floor is level and solid, and can adequately support the refrigerator. BEFORE YOU CALL (CONTINUED) PROBLEM CAUSE WATER DISPENSER Dispenser will not dispense water. • Household water line valve is not •...

Ice Maker Information
Page 1
...4°F -18° to -16°C -1° to 3°F -18° to -16°C -1° to 3°F -18° to -16°C Refrigerator Temperature 34° to 39°F 1° to 4°C 34° to 39°F 1° to 4°C 34° to 39°F 1° to 4&#...CAUTION All electrical parts and wiring must be shielded from housing. Water Fill Volume Remove cover by Water Fill Adjustment inserting screwdriver Motor in the refrigerator temperature window will continue to Plate Screw Timing 20cc (.68 oz.). When a water valve is complete. (approx. 8 minutes) ICE MAKER ...
...4°F -18° to -16°C -1° to 3°F -18° to -16°C -1° to 3°F -18° to -16°C Refrigerator Temperature 34° to 39°F 1° to 4°C 34° to 39°F 1° to 4°C 34° to 39°F 1° to 4&#...CAUTION All electrical parts and wiring must be shielded from housing. Water Fill Volume Remove cover by Water Fill Adjustment inserting screwdriver Motor in the refrigerator temperature window will continue to Plate Screw Timing 20cc (.68 oz.). When a water valve is complete. (approx. 8 minutes) ICE MAKER ...


