Complete Owner's Guide (English)
Page 1
... a reputable local service technician for you! √ Order Genuine Electrolux Parts & Accessories √ Purchase Extended Warranty Protection Important Safety Instructions 2 Installation 3 Connecting Water Supply 4 Door Removal Instructions 5 Temperature Controls 6 Automatic Ice & Water Dispenser ....... 8 Replacing Air Filter 13 Normal Operating Sounds & Sights ... 14 Care and Cleaning 15 Warranty 16 Before you Call 17 Features at a Glance 21 READ AND SAVE THESE INSTRUCTIONS PN: 241857500 (April 2007) Before Calling Your Local Repair Service - Need Parts or Service?
... a reputable local service technician for you! √ Order Genuine Electrolux Parts & Accessories √ Purchase Extended Warranty Protection Important Safety Instructions 2 Installation 3 Connecting Water Supply 4 Door Removal Instructions 5 Temperature Controls 6 Automatic Ice & Water Dispenser ....... 8 Replacing Air Filter 13 Normal Operating Sounds & Sights ... 14 Care and Cleaning 15 Warranty 16 Before you Call 17 Features at a Glance 21 READ AND SAVE THESE INSTRUCTIONS PN: 241857500 (April 2007) Before Calling Your Local Repair Service - Need Parts or Service?
Complete Owner's Guide (English)
Page 2
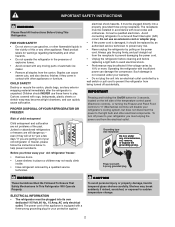
... the refrigerator by an authorized service technician to help prevent accidents. PROPER DISPOSAL OF YOUR REFRIGERATOR OR FREEZER Risk of automatic ice maker. • Remove all staples from being turned off power to your refrigerator's cooling system, but does not disconnect the power to sudden temperature change. 2 Do not use an extension cord or adapter plug. • If the power cord is not covered under any moving parts of...
... the refrigerator by an authorized service technician to help prevent accidents. PROPER DISPOSAL OF YOUR REFRIGERATOR OR FREEZER Risk of automatic ice maker. • Remove all staples from being turned off power to your refrigerator's cooling system, but does not disconnect the power to sudden temperature change. 2 Do not use an extension cord or adapter plug. • If the power cord is not covered under any moving parts of...
Complete Owner's Guide (English)
Page 3
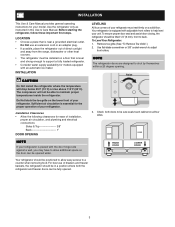
... the door hinge side against a wall, you may have to allow easy access to support a fully loaded refrigerator. • Consider water supply availability for your model. Your refrigerator is near a grounded electrical outlet. To Level Your Refrigerator: 1. Check both the refrigerator and freezer doors can be in this Use & Care Manual. Your refrigerator should be opened . 3 Do Not use of drawers and freezer baskets, the refrigerator should be positioned to help level your refrigerator. Do...
... the door hinge side against a wall, you may have to allow easy access to support a fully loaded refrigerator. • Consider water supply availability for your model. Your refrigerator is near a grounded electrical outlet. To Level Your Refrigerator: 1. Check both the refrigerator and freezer doors can be in this Use & Care Manual. Your refrigerator should be opened . 3 Do Not use of drawers and freezer baskets, the refrigerator should be positioned to help level your refrigerator. Do...

Complete Owner's Guide (English)
Page 4
... turn ice maker on, lower wire signal arm (side mounted) or set the ice maker's On/Off power switch to a household cold water line with all local plumbing codes. To ensure that your water dispenser works properly, this system must be responsible for any damage if plastic tubing is used for supply line. • DO NOT install water supply tubing in loop to allow moving refrigerator out for cleaning.) IMPORTANT After connecting the water supply, refer to "How to Ice Maker...
... turn ice maker on, lower wire signal arm (side mounted) or set the ice maker's On/Off power switch to a household cold water line with all local plumbing codes. To ensure that your water dispenser works properly, this system must be responsible for any damage if plastic tubing is used for supply line. • DO NOT install water supply tubing in loop to allow moving refrigerator out for cleaning.) IMPORTANT After connecting the water supply, refer to "How to Ice Maker...
Complete Owner's Guide (English)
Page 6
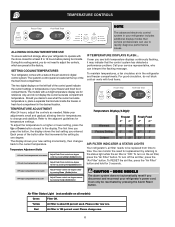
... control one degree warmer by pressing Down (Colder) button. IF TEMPERATURE DISPLAYS FLASH... For good circulation, do not need for replacement by one degree warmer by pressing the Alarm Reset button. To turn on all models) Green Filter OK. If Freezer compartment is too warm If Freezer compartment is located at the top of -the-art electronic digital control system. Air Filter Status Light (not available on the air filter, press the "Air Filter" button. Please change...
... control one degree warmer by pressing Down (Colder) button. IF TEMPERATURE DISPLAYS FLASH... For good circulation, do not need for replacement by one degree warmer by pressing the Alarm Reset button. To turn on all models) Green Filter OK. If Freezer compartment is too warm If Freezer compartment is located at the top of -the-art electronic digital control system. Air Filter Status Light (not available on the air filter, press the "Air Filter" button. Please change...
Complete Owner's Guide (English)
Page 8
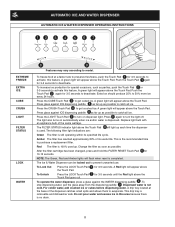
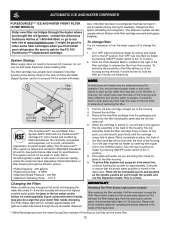
... ice. Change the filter as soon as possible to get crushed ice. A drip tray located at a faster rate to preserve freshness, push the Touch Pad 1 for 3-5 seconds. Press the LIGHT Touch Pad 5 to deactivate. Amber The filter has reached approximately 80% of the dispenser catches small spills and allows them to evaporate. The Ice & Water Dispenser can be locked out to purchase a replacement filter. To operate the water dispenser, press a glass against ICE dispensing...
... ice. Change the filter as soon as possible to get crushed ice. A drip tray located at a faster rate to preserve freshness, push the Touch Pad 1 for 3-5 seconds. Press the LIGHT Touch Pad 5 to deactivate. Amber The filter has reached approximately 80% of the dispenser catches small spills and allows them to evaporate. The Ice & Water Dispenser can be locked out to purchase a replacement filter. To operate the water dispenser, press a glass against ICE dispensing...
Complete Owner's Guide (English)
Page 9
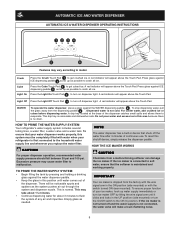
... your refrigerator is no drain. If the ice maker is connected to the household water supply line and whenever you replace the water filter. Press glass against the WATER dispensing paddle 6 . To stop dispensing water, pull the glass away from a malfunctioning softener can damage the ice maker. If the ice maker is not turned off the water flow after 3 minutes of the dispenser. AUTOMATIC ICE AND WATER DISPENSER AUTOMATIC ICE & WATER DISPENSER OPERATING INSTRUCTIONS 12 34 5 6 Features may vary according to malfunction. A red indicator...
... your refrigerator is no drain. If the ice maker is connected to the household water supply line and whenever you replace the water filter. Press glass against the WATER dispensing paddle 6 . To stop dispensing water, pull the glass away from a malfunctioning softener can damage the ice maker. If the ice maker is not turned off the water flow after 3 minutes of the dispenser. AUTOMATIC ICE AND WATER DISPENSER AUTOMATIC ICE & WATER DISPENSER OPERATING INSTRUCTIONS 12 34 5 6 Features may vary according to malfunction. A red indicator...

Complete Owner's Guide (English)
Page 10
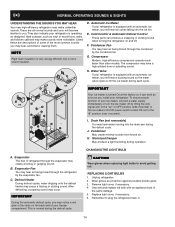
... open and spill water over the other ice cubes in new plumbing lines may also not close properly causing warm air to leak into place with small ice cubes or it On (see Figure 1). To stop the ice maker, raise the wire signal arm until the ice bin fits into the freezer. The ice maker also has a built-in 24 Hours? DO NOT use the ice chute as a handle when removing or replacing...
... open and spill water over the other ice cubes in new plumbing lines may also not close properly causing warm air to leak into place with small ice cubes or it On (see Figure 1). To stop the ice maker, raise the wire signal arm until the ice bin fits into the freezer. The ice maker also has a built-in 24 Hours? DO NOT use the ice chute as a handle when removing or replacing...
Complete Owner's Guide (English)
Page 11
... light will ensure the highest possible water quality. Remove new filter cartridge from the filter cup. Check for specifications. Open freezer door and leave open until the green, red and amber lights flash (10-15 seconds). This is a set of the cup. 8. The large o-ring that the Use & Care Manual came in use ice and water dispenser while installing filter. Place in the o-ring groove inside ), may also be good to order some models) After replacing the filter cartridge...
... light will ensure the highest possible water quality. Remove new filter cartridge from the filter cup. Check for specifications. Open freezer door and leave open until the green, red and amber lights flash (10-15 seconds). This is a set of the cup. 8. The large o-ring that the Use & Care Manual came in use ice and water dispenser while installing filter. Place in the o-ring groove inside ), may also be good to order some models) After replacing the filter cartridge...
Complete Owner's Guide (English)
Page 12
.... Remove the new filter cartridge from water line, continue flushing the system for approximately 3 minutes to escape. At this operation. Fill a glass with water of water may also be a sign that your refrigerator. The Filter Status light will reset the Filter Status light. This will turn the water supply off , however, do not use for the FC-100 PureSource™* replacement cartridge. Push the reset button until the cartridge snaps fully in use ice and water dispenser while installing filter. It...
.... Remove the new filter cartridge from water line, continue flushing the system for approximately 3 minutes to escape. At this operation. Fill a glass with water of water may also be a sign that your refrigerator. The Filter Status light will reset the Filter Status light. This will turn the water supply off , however, do not use for the FC-100 PureSource™* replacement cartridge. Push the reset button until the cartridge snaps fully in use ice and water dispenser while installing filter. It...

Complete Owner's Guide (English)
Page 13
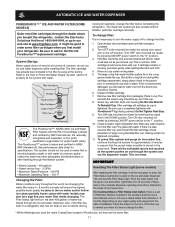
.... 5 Press and hold the Filter Reset button for air filter replacement cartridge, part # 241504902. 13 IMPORTANT The electronic control panel, located at www.frigidaire.com. This releases the hinged bottom half to drop open. 2 Remove the old filter and discard it. 3 Unpackage the new filter and place it inside the hinged bottom half of refrigerator odors. It would be beneficial to order some cartridges when you first install your refrigerator, contact Electrolux Solutions Hotline...
.... 5 Press and hold the Filter Reset button for air filter replacement cartridge, part # 241504902. 13 IMPORTANT The electronic control panel, located at www.frigidaire.com. This releases the hinged bottom half to drop open. 2 Remove the old filter and discard it. 3 Unpackage the new filter and place it inside the hinged bottom half of refrigerator odors. It would be beneficial to order some cartridges when you first install your refrigerator, contact Electrolux Solutions Hotline...
Complete Owner's Guide (English)
Page 14
... the drain pan during the defrost cycle. Cold Control & Automatic Defrost Control These parts can work as soon as designed. I Your ice maker is equipped with an appliance bulb of your ice maker, connect a water supply immediately or turn the Ice maker off . K. Evaporator The flow of your freezer compartment. C. Defrost Heater During defrost cycles, water dripping onto the defrost heater may create a boiling or gurgling sound. This is not a sound insulator. CAUTION Wear gloves when replacing light bulbs to...
... the drain pan during the defrost cycle. Cold Control & Automatic Defrost Control These parts can work as soon as designed. I Your ice maker is equipped with an appliance bulb of your ice maker, connect a water supply immediately or turn the Ice maker off . K. Evaporator The flow of your freezer compartment. C. Defrost Heater During defrost cycles, water dripping onto the defrost heater may create a boiling or gurgling sound. This is not a sound insulator. CAUTION Wear gloves when replacing light bulbs to...
Complete Owner's Guide (English)
Page 15
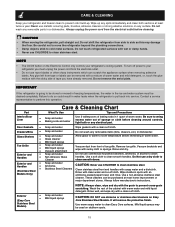
... clean smooth handles. Do not wash any removable parts in the ice and water system must unplug the power cord from front of tape you have already removed. Do not shift the refrigerator from the electrical outlet before cleaning around controls, light bulb or any spills immediately and clean both sections at most home improvement or major department stores. Care & Cleaning Chart Part What To Use Tips and Precautions Interior/Door...
... clean smooth handles. Do not wash any removable parts in the ice and water system must unplug the power cord from front of tape you have already removed. Do not shift the refrigerator from the electrical outlet before cleaning around controls, light bulb or any spills immediately and clean both sections at most home improvement or major department stores. Care & Cleaning Chart Part What To Use Tips and Precautions Interior/Door...
Complete Owner's Guide (English)
Page 16
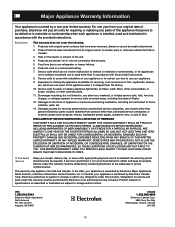
... addresses or phone numbers below. In Canada, your receipt, delivery slip, or some other than authorized service companies; For one year limited warranty. Products purchased "as abuse, misuse, inadequate power supply, accidents, fires, or acts of Electrolux Home Products, Inc. Service calls which are not a part of this appliance that prove to repair or replace appliance light bulbs, air filters, water filters, other consumables, or...
... addresses or phone numbers below. In Canada, your receipt, delivery slip, or some other than authorized service companies; For one year limited warranty. Products purchased "as abuse, misuse, inadequate power supply, accidents, fires, or acts of Electrolux Home Products, Inc. Service calls which are not a part of this appliance that prove to repair or replace appliance light bulbs, air filters, water filters, other consumables, or...
Complete Owner's Guide (English)
Page 17
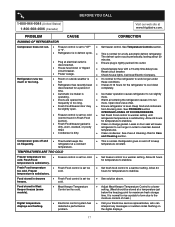
... opened too • Warm air entering the refrigerator causes it to a warmer setting. The defrost cycle occurs periodically, lasting about 30 • Plug at a constant temperature. • This is • Clean or change gasket. TEMPERATURES ARE TOO COLD Freezer temperature too • Freezer control is in order to a warmer setting. time. • Automatic ice maker is dirty. • Clean condenser. Freezer cold. Food stored in Meat Keeper freezes (some models). • Meat Keeper Temperature Control set too too cold. Refrigerator runs...
... opened too • Warm air entering the refrigerator causes it to a warmer setting. The defrost cycle occurs periodically, lasting about 30 • Plug at a constant temperature. • This is • Clean or change gasket. TEMPERATURES ARE TOO COLD Freezer temperature too • Freezer control is in order to a warmer setting. time. • Automatic ice maker is dirty. • Clean condenser. Freezer cold. Food stored in Meat Keeper freezes (some models). • Meat Keeper Temperature Control set too too cold. Refrigerator runs...
Complete Owner's Guide (English)
Page 18
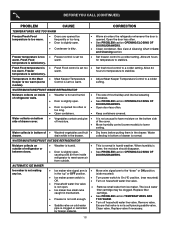
... is too warm (some models) to meet warm air from ice maker. Temperature in Care and Cleaning section. Water drawer. refrigerator to lower setting. in the "up" or OFF position. (side mounted) • Ice maker power switch is opened . cartridge. • See PROBLEM section TEMPERATURES ARE • Freezer is • too warm. Fresh Food temperature is not cold enough. WATER/MOISTURE/FROST INSIDE REFRIGERATOR Moisture collects on household water line valve. • Household water line valve is not open . • Door is • Turn power switch to...
... is too warm (some models) to meet warm air from ice maker. Temperature in Care and Cleaning section. Water drawer. refrigerator to lower setting. in the "up" or OFF position. (side mounted) • Ice maker power switch is opened . cartridge. • See PROBLEM section TEMPERATURES ARE • Freezer is • too warm. Fresh Food temperature is not cold enough. WATER/MOISTURE/FROST INSIDE REFRIGERATOR Moisture collects on household water line valve. • Household water line valve is not open . • Door is • Turn power switch to...
Complete Owner's Guide (English)
Page 19
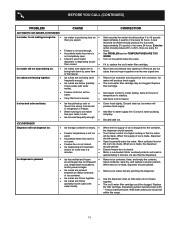
.... • Freezer temperature is set too • warm. Consult a water purifying company. Turn freezer control to infrequent use, temperature fluctuations, and/or power outages. Use the dispenser often so that ice cubes will be clogged. Move item and release wire signal arm. Motor is not cold enough. BEFORE YOU CALL (CONTINUED) PROBLEM AUTOMATIC ICE MAKER (CONTINUED) Ice maker is not making enough ice. • • • • Ice maker will not stop making ice. • Ice cubes are freezing together. •...
.... • Freezer temperature is set too • warm. Consult a water purifying company. Turn freezer control to infrequent use, temperature fluctuations, and/or power outages. Use the dispenser often so that ice cubes will be clogged. Move item and release wire signal arm. Motor is not cold enough. BEFORE YOU CALL (CONTINUED) PROBLEM AUTOMATIC ICE MAKER (CONTINUED) Ice maker is not making enough ice. • • • • Ice maker will not stop making ice. • Ice cubes are freezing together. •...
Complete Owner's Guide (English)
Page 20
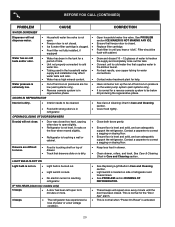
... touching shelf on . • Light bulb is burned out. • • Light switch is stuck. • • No electric current is reaching • refrigerator. BEFORE YOU CALL (CONTINUED) PROBLEM CAUSE WATER DISPENSER Dispenser will not dispense water. • Household water line valve is not • open. • Freezer door is not closed . For best results, use copper tubing for the "Door Ajar" alarm. Contact a carpenter to cold • water line. • Tubing used in • refrigerator. See Care & Cleaning Chart in drawer...
... touching shelf on . • Light bulb is burned out. • • Light switch is stuck. • • No electric current is reaching • refrigerator. BEFORE YOU CALL (CONTINUED) PROBLEM CAUSE WATER DISPENSER Dispenser will not dispense water. • Household water line valve is not • open. • Freezer door is not closed . For best results, use copper tubing for the "Door Ajar" alarm. Contact a carpenter to cold • water line. • Tubing used in • refrigerator. See Care & Cleaning Chart in drawer...

Ice Maker Information
Page 1
... FAN MOTOR Watts RPM Amps 3.1 1100 CW Opposite Shaft 0.03 Running ICE MAKER SPECIFICATIONS Electrical 115 vac (127 vac max) Thermostat Opens at 48°F (9°C) Closes at 15°F (-9°C) Heater Voltage 85 vac ICE MAKER CONNECTOR PLUG CONNECTIONS Wire Number Wire Color Connects to: 1 Green/Yellow Ground 2 Yellow Water Valve 3 Black Line 4 Light Blue Neutral IMPORTANT Please return this appliance. Disconnect power cord before servicing this sheet to its original location. CAUTION All electrical parts and wiring must...
... FAN MOTOR Watts RPM Amps 3.1 1100 CW Opposite Shaft 0.03 Running ICE MAKER SPECIFICATIONS Electrical 115 vac (127 vac max) Thermostat Opens at 48°F (9°C) Closes at 15°F (-9°C) Heater Voltage 85 vac ICE MAKER CONNECTOR PLUG CONNECTIONS Wire Number Wire Color Connects to: 1 Green/Yellow Ground 2 Yellow Water Valve 3 Black Line 4 Light Blue Neutral IMPORTANT Please return this appliance. Disconnect power cord before servicing this sheet to its original location. CAUTION All electrical parts and wiring must...
Installation Instructions
Page 1
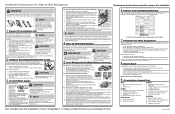
.... 3 Connect Water Supply What you can register online at the rear of your kitchen NOTE contractor. Pull toe grille outward toward your Use & Care Guide). To level the doors using the adjustable lower hinge: Open Door Hinge Flange Set Screw (some models) Final Checks Shipping material removed Fresh Food and Freezer temperatures set Crisper Humidity controls set Registration Card sent in Not satisfied with filter housing (some models) 4 Hinge 1 Before leveling either door, remove set screw...
.... 3 Connect Water Supply What you can register online at the rear of your kitchen NOTE contractor. Pull toe grille outward toward your Use & Care Guide). To level the doors using the adjustable lower hinge: Open Door Hinge Flange Set Screw (some models) Final Checks Shipping material removed Fresh Food and Freezer temperatures set Crisper Humidity controls set Registration Card sent in Not satisfied with filter housing (some models) 4 Hinge 1 Before leveling either door, remove set screw...


