
Use and Care Guide
Page 2
...800-944-9044 To Enjoy These Benefits: • Total freedom from repair bills so unexpected repairs won't upset your refrigerator is just a phone call away. • Top-quality repairs by factory-trained experts. • Quick access to clean serial plate. Please read this manual. It ...occur. Please attach sales receipt here for your model and serial numbers below for future purchases. Welcome & Congratulations Congratulations on your new refrigerator and Thank You for choosing our product. We hope you can rest assured your budget. • Fast, convenient toll-free service...
...800-944-9044 To Enjoy These Benefits: • Total freedom from repair bills so unexpected repairs won't upset your refrigerator is just a phone call away. • Top-quality repairs by factory-trained experts. • Quick access to clean serial plate. Please read this manual. It ...occur. Please attach sales receipt here for your model and serial numbers below for future purchases. Welcome & Congratulations Congratulations on your new refrigerator and Thank You for choosing our product. We hope you can rest assured your budget. • Fast, convenient toll-free service...

Use and Care Guide
Page 3
...in accordance with local codes and ordinances. Read product labels for your old refrigerator or freezer, please follow the instructions below to help prevent accidents. Junked or abondoned refrigerators or freezers are not problems of the appliance is equipped with a three-prong grounding... the compressor. Cartons covered with any moving parts of this or any exterior wrapping material immediately after the refrigerator is not covered under your old refrigerator/ freezer: • Remove doors. • Leave shelves in contact with insufficient power can quickly cause suffocation. ...
...in accordance with local codes and ordinances. Read product labels for your old refrigerator or freezer, please follow the instructions below to help prevent accidents. Junked or abondoned refrigerators or freezers are not problems of the appliance is equipped with a three-prong grounding... the compressor. Cartons covered with any moving parts of this or any exterior wrapping material immediately after the refrigerator is not covered under your old refrigerator/ freezer: • Remove doors. • Leave shelves in contact with insufficient power can quickly cause suffocation. ...

Use and Care Guide
Page 4
... black coils/tubing on a floor that is essential for the proper operation of refrigerator. To Level Your Refrigerator: 1. Do Not block the toe grille on the lower front of installation, proper air circulation, and plumbing and electrical connections: Sides & Top 3/8" Back 1" 2. Installation Clearances • Allow the following clearances for models equipped with an...
... black coils/tubing on a floor that is essential for the proper operation of refrigerator. To Level Your Refrigerator: 1. Do Not block the toe grille on the lower front of installation, proper air circulation, and plumbing and electrical connections: Sides & Top 3/8" Back 1" 2. Installation Clearances • Allow the following clearances for models equipped with an...

Use and Care Guide
Page 5
...Air in areas where temperatures fall below freezing. • Chemicals from a malfunctioning softener can cause death or severe personal injury, disconnect the refrigerator from the ice maker inlet valve at additional cost, contains 25 feet (7.6 meters) of arm). To Avoid Property Damage: • Copper...Water Supply Line, You Will Need • Basic Tools: adjustable wrench, flat-blade screwdriver, and PhillipsTM screwdriver • Access to the refrigerator. Slide brass compression nut, then ferrule (sleeve) onto water supply line, as shown and arrange coils so they do not vibrate or ...
...Air in areas where temperatures fall below freezing. • Chemicals from a malfunctioning softener can cause death or severe personal injury, disconnect the refrigerator from the ice maker inlet valve at additional cost, contains 25 feet (7.6 meters) of arm). To Avoid Property Damage: • Copper...Water Supply Line, You Will Need • Basic Tools: adjustable wrench, flat-blade screwdriver, and PhillipsTM screwdriver • Access to the refrigerator. Slide brass compression nut, then ferrule (sleeve) onto water supply line, as shown and arrange coils so they do not vibrate or ...

Use and Care Guide
Page 6
... begin, turn refrigerator temperature control to install top hinge. 17. Set door aside. 3. NOTE: The direction in step 8. 8. Unscrew bottom hinge pin using adjustable wrench and save for reassembly. Remove two outside screws enough to allow hinge and shim to puncture the foam. 12. Lower freezer door onto center hinge pin. 16. Tighten center...
... begin, turn refrigerator temperature control to install top hinge. 17. Set door aside. 3. NOTE: The direction in step 8. 8. Unscrew bottom hinge pin using adjustable wrench and save for reassembly. Remove two outside screws enough to allow hinge and shim to puncture the foam. 12. Lower freezer door onto center hinge pin. 16. Tighten center...

Use and Care Guide
Page 8
...handle bracket (Figure 1) or fits around the base of the door. Remove two screws attaching handle to top of the door. Use Phillips head screwdriver to the bottom of refrigerator door. 2. Carefully align trim and press down and off of dovetail button. 3. Start with two prongs...about halfway down and off of handle bracket. NOTE: For models with screws. Remove two screws attaching handle to top of handle over the two donut shaped areas. 3. Place bottom of refrigerator door. 2. TO ATTACH TRIM: 1. NOTE: Trim lock must be easier to door. 3. Door Removal and ...
...handle bracket (Figure 1) or fits around the base of the door. Remove two screws attaching handle to top of the door. Use Phillips head screwdriver to the bottom of refrigerator door. 2. Carefully align trim and press down and off of dovetail button. 3. Start with two prongs...about halfway down and off of handle bracket. NOTE: For models with screws. Remove two screws attaching handle to top of handle over the two donut shaped areas. 3. Place bottom of refrigerator door. 2. TO ATTACH TRIM: 1. NOTE: Trim lock must be easier to door. 3. Door Removal and ...

Use and Care Guide
Page 9
... loosening two outside screws in figure 3. Remove freezer handle. 2. Repeat step 1 for reassembly. Remove bottom hinge. Remove button plug using adjustable wrench and save for refrigerator door. Remove toe grille and top hinge cover. 2. Remove screw on hinge pin... 9 Door Removal and Reversal Instructions (continued) TO REMOVE REFRIGERATOR HANDLE: (Handles may be easier to reinstall doors To Remove Handles 1. Refrigerator Door Without Trim TO ATTACH REFRIGERATOR HANDLE: 1. Remove top hinge and lift freezer door off of refrigerator door and remove handle. 4.
... loosening two outside screws in figure 3. Remove freezer handle. 2. Repeat step 1 for reassembly. Remove bottom hinge. Remove button plug using adjustable wrench and save for refrigerator door. Remove toe grille and top hinge cover. 2. Remove screw on hinge pin... 9 Door Removal and Reversal Instructions (continued) TO REMOVE REFRIGERATOR HANDLE: (Handles may be easier to reinstall doors To Remove Handles 1. Refrigerator Door Without Trim TO ATTACH REFRIGERATOR HANDLE: 1. Remove top hinge and lift freezer door off of refrigerator door and remove handle. 4.

Use and Care Guide
Page 11
..., move the knob in small increments, allowing the temperature to a warmer setting. If Refrigerator compartment Is Too Cold Turn Refrigerator Control Slightly Towards Warm. To Turn Refrigerator Off Turn Refrigerator Control To 0. 11 If Freezer compartment Is Too Cold Turn Freezer Control Slightly Towards Warmer. For good circulation, do not block cold air vents with food...
..., move the knob in small increments, allowing the temperature to a warmer setting. If Refrigerator compartment Is Too Cold Turn Refrigerator Control Slightly Towards Warm. To Turn Refrigerator Off Turn Refrigerator Control To 0. 11 If Freezer compartment Is Too Cold Turn Freezer Control Slightly Towards Warmer. For good circulation, do not block cold air vents with food...
Use and Care Guide
Page 12
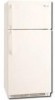
..., the SpillSafeTM shelves slide out for easy access to stop position. 2 Lift front edge up . 2 Pull shelf out. The shelves slide out independently of the refrigerator. To adjust sliding shelves: 1 Remove shelf by reversing this procedure. Fixed and Sliding 12 Shelves may break suddenly if nicked, scratched, or exposed to suit... for fast cleaning. Lower the shelf into the desired slots and lock into the wall bracket. Before adjusting the shelves, remove all food. SHELF ADJUSTMENT Refrigerator shelves are available in either glass or wire. 1 Lift front edge up and pull out.
..., the SpillSafeTM shelves slide out for easy access to stop position. 2 Lift front edge up . 2 Pull shelf out. The shelves slide out independently of the refrigerator. To adjust sliding shelves: 1 Remove shelf by reversing this procedure. Fixed and Sliding 12 Shelves may break suddenly if nicked, scratched, or exposed to suit... for fast cleaning. Lower the shelf into the desired slots and lock into the wall bracket. Before adjusting the shelves, remove all food. SHELF ADJUSTMENT Refrigerator shelves are available in either glass or wire. 1 Lift front edge up and pull out.

Use and Care Guide
Page 13
... RACK (SOME MODELS) The innovative design of jars, bottles, and cans. To install, hold the retainer at the top, and slide it over the outside wall of your refrigerator. Special Item Rack Adjustable Door Bin 13 The dairy compartment, which is warmer than the general food storage section, is... models have door racks or bins that can be quickly selected. Place bin in the bin from falling forward when opening or closing the refrigerator door. Tall Bottle Retainer (left side of the bin, as shown in place. Frequently used items can accommodate gallon-sized plastic drink containers...
... RACK (SOME MODELS) The innovative design of jars, bottles, and cans. To install, hold the retainer at the top, and slide it over the outside wall of your refrigerator. Special Item Rack Adjustable Door Bin 13 The dairy compartment, which is warmer than the general food storage section, is... models have door racks or bins that can be quickly selected. Place bin in the bin from falling forward when opening or closing the refrigerator door. Tall Bottle Retainer (left side of the bin, as shown in place. Frequently used items can accommodate gallon-sized plastic drink containers...

Use and Care Guide
Page 14
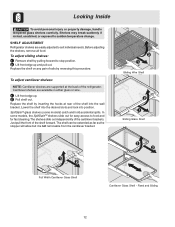
... wrapped before placing them in clear water and remove excess water before storing. Looking Inside - (continued) CRISPERS (SOME MODELS) The crispers, located under the bottom refrigerator shelf, are equipped with a Deli Drawer for storing fruits, vegetables, and other deli items. Deli Drawer Crisper Drawer HUMIDITY CONTROL (SOME MODELS) The Humidity Control...
... wrapped before placing them in clear water and remove excess water before storing. Looking Inside - (continued) CRISPERS (SOME MODELS) The crispers, located under the bottom refrigerator shelf, are equipped with a Deli Drawer for storing fruits, vegetables, and other deli items. Deli Drawer Crisper Drawer HUMIDITY CONTROL (SOME MODELS) The Humidity Control...
Use and Care Guide
Page 15
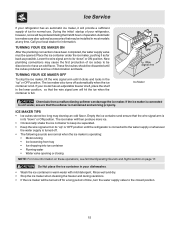
... operations, see Normal Operating Sounds and Sights section on page 17. Rinse well and dry. • Stop the ice maker when cleaning the freezer and during the first 24 hours of operation. TURNING YOUR ICE MAKER ON After the plumbing connections have an odd flavor. The ice maker will... water supply is turned off for normal use. TURNING YOUR ICE MAKER OFF To stop the ice maker, lift the wire signal arm until the refrigerator is operating: • Motor running • Ice loosening from a malfunctioning softener can damage the ice maker. Call your dishwasher. • Wash the ice ...
... operations, see Normal Operating Sounds and Sights section on page 17. Rinse well and dry. • Stop the ice maker when cleaning the freezer and during the first 24 hours of operation. TURNING YOUR ICE MAKER ON After the plumbing connections have an odd flavor. The ice maker will... water supply is turned off for normal use. TURNING YOUR ICE MAKER OFF To stop the ice maker, lift the wire signal arm until the refrigerator is operating: • Motor running • Ice loosening from a malfunctioning softener can damage the ice maker. Call your dishwasher. • Wash the ice ...
Use and Care Guide
Page 16
... to freeze as quickly as possible. • Avoid storing hard-to-freeze foods such as possible. 16 Do not place the refrigerator next to this is at one time. Fruits and Vegetables • Storage in the freezer interior where the temperature varies less. Trapped air can raise the temperature of frozen foods. •...
... to freeze as quickly as possible. • Avoid storing hard-to-freeze foods such as possible. 16 Do not place the refrigerator next to this is at one time. Fruits and Vegetables • Storage in the freezer interior where the temperature varies less. Trapped air can raise the temperature of frozen foods. •...

Use and Care Guide
Page 17
Don't be located on top of refrigerator). You may hear air being forced through the condenser by the evaporator...will be alarmed, these are located underneath your freezer compartment. This is equipped with an automatic ice maker, you may make unfamiliar sounds. Water Valve If your refrigerator is equipped with an automatic ice maker, you..., water dripping onto the defrost heater may create a boiling or gurgling sound. Automatic Ice Maker If your refrigerator is normal during each cycle. Hard surfaces, such as the water valve opens to an electric clock. G....
Don't be located on top of refrigerator). You may hear air being forced through the condenser by the evaporator...will be alarmed, these are located underneath your freezer compartment. This is equipped with an automatic ice maker, you may make unfamiliar sounds. Water Valve If your refrigerator is equipped with an automatic ice maker, you..., water dripping onto the defrost heater may create a boiling or gurgling sound. Automatic Ice Maker If your refrigerator is normal during each cycle. Hard surfaces, such as the water valve opens to an electric clock. G....

Use and Care Guide
Page 18
... around controls, light bulb or any electrical part. Always unplug the electrical power cord from condenser coils (see illustration on your refrigerator and freezer clean to side as possible, clean the condenser periodically. Vacuum dust from tape or labels can be removed with a mixture of...17 for location). Do not wash any removable items (bins, drawers, etc.) in illustration on top of compressor at bottom rear of toe grille. Any glue left from front of refrigerator (see item "J" in dishwasher. Vacuum backside and wipe with non-abrasive soapy water and a Handles...
... around controls, light bulb or any electrical part. Always unplug the electrical power cord from condenser coils (see illustration on your refrigerator and freezer clean to side as possible, clean the condenser periodically. Vacuum dust from tape or labels can be removed with a mixture of...17 for location). Do not wash any removable items (bins, drawers, etc.) in illustration on top of compressor at bottom rear of toe grille. Any glue left from front of refrigerator (see item "J" in dishwasher. Vacuum backside and wipe with non-abrasive soapy water and a Handles...

Use and Care Guide
Page 19
...significant pet traffic in . Defrost Water Pan (some models) Short Vacations Long Vacations Moving Vacation and Moving Tips • Leave refrigerator operating during sliding or moving. • Pad cabinet to avoid scratching surface. 19 Unsnap light shield as protection against possible broken...under normal operating conditions. Avoid cuts when replacing light bulbs, wear gloves. Replace light shield. 6. REPLACING THE FREEZER LIGHT BULB (SOME MODELS) 1. If the refrigerator is equipped with an appliance bulb of 3 weeks or less. • Use all perishable items from side....
...significant pet traffic in . Defrost Water Pan (some models) Short Vacations Long Vacations Moving Vacation and Moving Tips • Leave refrigerator operating during sliding or moving. • Pad cabinet to avoid scratching surface. 19 Unsnap light shield as protection against possible broken...under normal operating conditions. Avoid cuts when replacing light bulbs, wear gloves. Replace light shield. 6. REPLACING THE FREEZER LIGHT BULB (SOME MODELS) 1. If the refrigerator is equipped with an appliance bulb of 3 weeks or less. • Use all perishable items from side....

Use and Care Guide
Page 20
...establishes the warranty period should service be performed by us or an authorized Electrolux Home Products North America servicer. Warranty Information REFRIGERATOR WARRANTY Your refrigerator is protected by this warranty FULL ONE-YEAR WARRANTY LIMITED 2ND-5TH YEAR WARRANTY (Cabinet Liner and Sealed System) LIMITED WARRANTY... Costs of the technician's travel to the home and any costs for repairing or replacing any parts in the cabinet liner or Sealed Refrigeration System (compressor, condenser, evaporator, drier and tubing) which prove to be obtained by WCI Canada Inc. 01-U-RE-02 (Rev....
...establishes the warranty period should service be performed by us or an authorized Electrolux Home Products North America servicer. Warranty Information REFRIGERATOR WARRANTY Your refrigerator is protected by this warranty FULL ONE-YEAR WARRANTY LIMITED 2ND-5TH YEAR WARRANTY (Cabinet Liner and Sealed System) LIMITED WARRANTY... Costs of the technician's travel to the home and any costs for repairing or replacing any parts in the cabinet liner or Sealed Refrigeration System (compressor, condenser, evaporator, drier and tubing) which prove to be obtained by WCI Canada Inc. 01-U-RE-02 (Rev....

Use and Care Guide
Page 21
...4-5 OR To Reverse The Doors See "Door Removal & Reversal" Section On Pages 6-9 Before You Call Common Occurrences Refrigerator does not run. Then check freezer temperatures and adjust as needed. • The cabinet is not level. • Floor is weak. • ...review this appliance. • Ensure plug is satisfactory. Freezer temperature too cold. Reset circuit breaker. • The temperature control is noisy or vibrates. Freezer temperature is satisfactory. * Refrigerator is turned to a warmer setting until freezer temperature is satisfactory. It may be covered or wrapped...
...4-5 OR To Reverse The Doors See "Door Removal & Reversal" Section On Pages 6-9 Before You Call Common Occurrences Refrigerator does not run. Then check freezer temperatures and adjust as needed. • The cabinet is not level. • Floor is weak. • ...review this appliance. • Ensure plug is satisfactory. Freezer temperature too cold. Reset circuit breaker. • The temperature control is noisy or vibrates. Freezer temperature is satisfactory. * Refrigerator is turned to a warmer setting until freezer temperature is satisfactory. It may be covered or wrapped...


