
Wiring Diagram (All Languages)
Page 1
... The water fill adjustment screw will char at 200°F and flash ignite (burn) at 8.96F (-12.8C) ICE MAKER CONNECTOR PLUG CONNECTIONS Wire Number Wire Color Connects to the possibility of Compressor Run Time CONDENSER FAN MOTOR Watts RPM Amps 2.3 1100 CW Opposite Shaft .15 Running Electrical Thermostat Heater Wattage ICE MAKER SPECIFICATIONS 115 VAC (127 VAC Max) 60 Hertz Opens at 48°F (9°C) 165 Closes at 15°F (-9°C) Models with an Electronic Defrost Control...
... The water fill adjustment screw will char at 200°F and flash ignite (burn) at 8.96F (-12.8C) ICE MAKER CONNECTOR PLUG CONNECTIONS Wire Number Wire Color Connects to the possibility of Compressor Run Time CONDENSER FAN MOTOR Watts RPM Amps 2.3 1100 CW Opposite Shaft .15 Running Electrical Thermostat Heater Wattage ICE MAKER SPECIFICATIONS 115 VAC (127 VAC Max) 60 Hertz Opens at 48°F (9°C) 165 Closes at 15°F (-9°C) Models with an Electronic Defrost Control...

Wiring Diagram (All Languages)
Page 2
.... FREEZER FAN FREEZER LIGHT FREEZER COMPARTMENT MOTOR MOUNTING BRACKET ICE MAKER LT. BLUE REFRIGERATOR LIGHT LT. BLUE BLACK BLACK GRN/YEL BLUE MACHINE COMPARTMENT LT. BLUE LT. REFRIGERATOR COMPARTMENT DEFROST TIMER BROWN ORANGE RED LT. BLUE LT. BLUE LT. BLUE BLACK RED YELLOW LT. BLUE RED/BLACK BROWN SUPPLY SOLENOID WATER VALVE WATER VALVE DOOR COMPARTMENT TAN RED/BLACK TAN GRN/YEL RED/BLACK TAN GRN/YEL INTERLOCK SWITCH...
.... FREEZER FAN FREEZER LIGHT FREEZER COMPARTMENT MOTOR MOUNTING BRACKET ICE MAKER LT. BLUE REFRIGERATOR LIGHT LT. BLUE BLACK BLACK GRN/YEL BLUE MACHINE COMPARTMENT LT. BLUE LT. REFRIGERATOR COMPARTMENT DEFROST TIMER BROWN ORANGE RED LT. BLUE LT. BLUE LT. BLUE BLACK RED YELLOW LT. BLUE RED/BLACK BROWN SUPPLY SOLENOID WATER VALVE WATER VALVE DOOR COMPARTMENT TAN RED/BLACK TAN GRN/YEL RED/BLACK TAN GRN/YEL INTERLOCK SWITCH...

Installation Instructions (All Languages)
Page 1
... "Door Removal and Reversal Instructions" in your refrigerator must rest firmly on Refrigerator plugged in Refer to your Owner's Use and Care Manual for the door to swing open. 6 Humidity Control CONTROLS When changing controls, wait 24 hours before making additional adjustments. (For models with LED display, 3 to 5 is normal operating range.) 7 ICEMAKER Ensure icemaker is complete INSTALLATION CHECKOFF LIST Doors Handles are ready to back. Your refrigerator is setting solid on all corners Electrical Power House power turned on a solid floor. Connecting to refrigerator...
... "Door Removal and Reversal Instructions" in your refrigerator must rest firmly on Refrigerator plugged in Refer to your Owner's Use and Care Manual for the door to swing open. 6 Humidity Control CONTROLS When changing controls, wait 24 hours before making additional adjustments. (For models with LED display, 3 to 5 is normal operating range.) 7 ICEMAKER Ensure icemaker is complete INSTALLATION CHECKOFF LIST Doors Handles are ready to back. Your refrigerator is setting solid on all corners Electrical Power House power turned on a solid floor. Connecting to refrigerator...
Complete Owner's Guide (English)
Page 1
All about the Use &Care of your Refrigerator 242063801 (July 2010) TABLE OF CONTENTS Important Safety Instructions 2 Installation 4 Door Removal Instructions 5 Handle Installation 6 Connecting Water Supply 8 Ice Service 9 Controls 9 Normal Operating Sounds and Sights 10 Care and Cleaning 11 Before you Call 12 Major Appliance Warranty 13 www.frigidaire.com USA 1-800-944-9044 www.frigidaire.ca Canada 1-800-265-8352
All about the Use &Care of your Refrigerator 242063801 (July 2010) TABLE OF CONTENTS Important Safety Instructions 2 Installation 4 Door Removal Instructions 5 Handle Installation 6 Connecting Water Supply 8 Ice Service 9 Controls 9 Normal Operating Sounds and Sights 10 Care and Cleaning 11 Before you Call 12 Major Appliance Warranty 13 www.frigidaire.com USA 1-800-944-9044 www.frigidaire.ca Canada 1-800-265-8352
Complete Owner's Guide (English)
Page 2
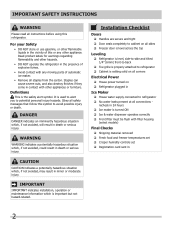
... contact with filter housing (select models) Final Checks Shipping material removed Fresh food and freezer temperatures set Crisper humidity controls set Registration card sent in 24 hours Ice maker is important but not hazard-related. For your Safety • DO NOT store or use gasoline, or other flammable liquids in death or serious injury. IMPORTANT IMPORTANT indicates installation, operation or...
... contact with filter housing (select models) Final Checks Shipping material removed Fresh food and freezer temperatures set Crisper humidity controls set Registration card sent in 24 hours Ice maker is important but not hazard-related. For your Safety • DO NOT store or use gasoline, or other flammable liquids in death or serious injury. IMPORTANT IMPORTANT indicates installation, operation or...
Complete Owner's Guide (English)
Page 3
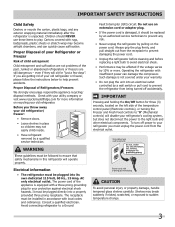
..., handle tempered glass shelves carefully. Proper Disposal of the past. If you must be plugged into an electrical outlet controlled by a qualified service technician. Do not use these items to your protection against electrical shock hazards. Always grip the plug firmly, and pull straight out from the receptacle to prevent damaging the power cord. • Unplug the refrigerator before cleaning and before replacing a light bulb to avoid electrical...
..., handle tempered glass shelves carefully. Proper Disposal of the past. If you must be plugged into an electrical outlet controlled by a qualified service technician. Do not use these items to your protection against electrical shock hazards. Always grip the plug firmly, and pull straight out from the receptacle to prevent damaging the power cord. • Unplug the refrigerator before cleaning and before replacing a light bulb to avoid electrical...
Complete Owner's Guide (English)
Page 4
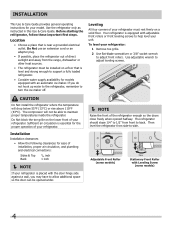
... to turn the ice maker off. Your refrigerator is near a grounded electrical outlet. Use adjustable wrench to allow additional space so the door can be installed on a solid floor. Adjustable Front Roller (some models) Raise Stationary Front Roller with the door hinge side against a wall, you do not hook up water to the refrigerator, remember to maintain proper temperatures inside the refrigerator. Use the refrigerator only as instructed in this Use & Care Guide. The compressor will...
... to turn the ice maker off. Your refrigerator is near a grounded electrical outlet. Use adjustable wrench to allow additional space so the door can be installed on a solid floor. Adjustable Front Roller (some models) Raise Stationary Front Roller with the door hinge side against a wall, you do not hook up water to the refrigerator, remember to maintain proper temperatures inside the refrigerator. Use the refrigerator only as instructed in this Use & Care Guide. The compressor will...

Complete Owner's Guide (English)
Page 5
... install top hinge. 17 Flip toe grille and reinstall. 18 Plug in electrical power cord and turn the refrigerator temperature control to opposite side. 15 Lower freezer door onto center hinge pin. 16 Close freezer door. Move hinge pin to other hole in hinge and tighten with adjustable wrench. 10 Reverse door handles (see instruction on opposite side with 3/8" socket wrench. 8 Install bottom hinge on next page). 11 Move freezer and refrigerator door stops to the other. Adjust setting as necessary. 5 Reversing...
... install top hinge. 17 Flip toe grille and reinstall. 18 Plug in electrical power cord and turn the refrigerator temperature control to opposite side. 15 Lower freezer door onto center hinge pin. 16 Close freezer door. Move hinge pin to other hole in hinge and tighten with adjustable wrench. 10 Reverse door handles (see instruction on opposite side with 3/8" socket wrench. 8 Install bottom hinge on next page). 11 Move freezer and refrigerator door stops to the other. Adjust setting as necessary. 5 Reversing...

Complete Owner's Guide (English)
Page 6
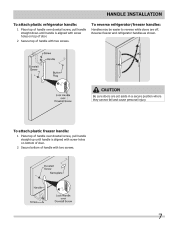
... metal refrigerator handle: 1 Place rounded part of handle onto shoulder screw on the rounded part of handles, please review these handles. Do not tighten the set screw yet. 2 Install the two (2) screws into the bottom of the handle. 3 Tighten the set screw on face of door and align the two (2) holes in bottom of door. Stainless Steel Models IMPORTANT Stainless steel handles and doors are not reversible. 6 To attach metal freezer handle...
... metal refrigerator handle: 1 Place rounded part of handle onto shoulder screw on the rounded part of handles, please review these handles. Do not tighten the set screw yet. 2 Install the two (2) screws into the bottom of the handle. 3 Tighten the set screw on face of door and align the two (2) holes in bottom of door. Stainless Steel Models IMPORTANT Stainless steel handles and doors are not reversible. 6 To attach metal freezer handle...
Complete Owner's Guide (English)
Page 7
To reverse refrigerator/freezer handles: Handles may be easier to reverse while doors are set aside in a secure position where they cannot fall and cause personal injury. CAUTION Be sure doors are off. To attach plastic freezer handle: 1 Place top of handle over dovetail screw, pull handle straight down until handle is aligned with screw holes on bottom of door. 2 Secure bottom of handle with two screws. 7 Handle installation To...
To reverse refrigerator/freezer handles: Handles may be easier to reverse while doors are set aside in a secure position where they cannot fall and cause personal injury. CAUTION Be sure doors are off. To attach plastic freezer handle: 1 Place top of handle over dovetail screw, pull handle straight down until handle is aligned with screw holes on bottom of door. 2 Secure bottom of handle with two screws. 7 Handle installation To...
Complete Owner's Guide (English)
Page 8
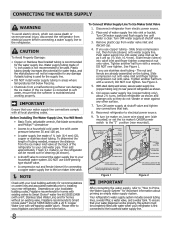
... Stainless Steel braided tubing is first connected to Prime the Water Supply System" for homes with existing valves its Smart Choice water® line kit 5305510264 (with all local plumbing codes. Before Installing The Water Supply Line, You Will Need: • Basic Tools: adjustable wrench, flat-blade screwdriver, and PhillipsTM screwdriver • Access to electrical power source. 9. Depending on , lower wire signal arm (side mounted) or set the ice maker's On/Off power switch...
... Stainless Steel braided tubing is first connected to Prime the Water Supply System" for homes with existing valves its Smart Choice water® line kit 5305510264 (with all local plumbing codes. Before Installing The Water Supply Line, You Will Need: • Basic Tools: adjustable wrench, flat-blade screwdriver, and PhillipsTM screwdriver • Access to electrical power source. 9. Depending on , lower wire signal arm (side mounted) or set the ice maker's On/Off power switch...

Complete Owner's Guide (English)
Page 9
... cooling, but does not disconnect the power to the light bulb and other electrical components. Air in small increments, allowing the temperature to stabilize. With no ice will be opened. Refrigerator & Freezer Controls NOTE When first turning refrigerator on, move the knob in new plumbing lines may be installed in the ON position. After 24 hours, adjust the controls as possible. For example, if the refrigerator control is turned to a colder setting...
... cooling, but does not disconnect the power to the light bulb and other electrical components. Air in small increments, allowing the temperature to stabilize. With no ice will be opened. Refrigerator & Freezer Controls NOTE When first turning refrigerator on, move the knob in new plumbing lines may be installed in the ON position. After 24 hours, adjust the controls as possible. For example, if the refrigerator control is turned to a colder setting...
Complete Owner's Guide (English)
Page 10
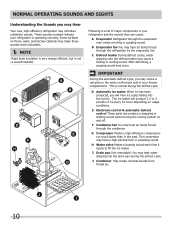
... control & automatic defrost control These parts can cause: A Evaporator Refrigerant through the evaporator may hear water dripping into the ice bin. F Condenser fan You may introduce unfamiliar sounds. H Water valve Makes a buzzing sound each time it opens to 3 pounds of ice every 24 hours depending on and off. Normal Operating Sounds and sights Understanding the Sounds you may Hear Your new, high-efficiency refrigerator may hear air being forced through the refrigerator...
... control & automatic defrost control These parts can cause: A Evaporator Refrigerant through the evaporator may hear water dripping into the ice bin. F Condenser fan You may introduce unfamiliar sounds. H Water valve Makes a buzzing sound each time it opens to 3 pounds of ice every 24 hours depending on and off. Normal Operating Sounds and sights Understanding the Sounds you may Hear Your new, high-efficiency refrigerator may hear air being forced through the refrigerator...

Complete Owner's Guide (English)
Page 11
Failure to clean smooth doors. Part Interior & Door • Liners • Door Gaskets • Drawers & Bins • Glass Shelves • • • Toe Grille • • • Exterior & • Handles • Exterior & • Handles (Stainless Steel • Models Only) Replacing Light • Bulbs • • • • • Care & Cleaning Tips What To Use Tips and Precautions Soap and water Baking soda and water Use 2 tablespoons of baking soda in freezing temperatures, be purchased at least twice...
Failure to clean smooth doors. Part Interior & Door • Liners • Door Gaskets • Drawers & Bins • Glass Shelves • • • Toe Grille • • • Exterior & • Handles • Exterior & • Handles (Stainless Steel • Models Only) Replacing Light • Bulbs • • • • • Care & Cleaning Tips What To Use Tips and Precautions Soap and water Baking soda and water Use 2 tablespoons of baking soda in freezing temperatures, be purchased at least twice...
Complete Owner's Guide (English)
Page 12
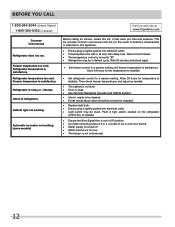
... cold. Odors in defrost cycle. Allow 24 hours for service, review this appliance. • Ensure plug is turned to a warmer setting until freezer temperature is noisy or vibrates. Automatic ice maker not working . Wait 20 minutes and check again. • Set freezer control to "O". • Refrigerator may save you time and expense. Common Occurrences Refrigerator does not run. Reset circuit breaker. • The temperature control is tightly pushed into electrical outlet. • Light switch...
... cold. Odors in defrost cycle. Allow 24 hours for service, review this appliance. • Ensure plug is turned to a warmer setting until freezer temperature is noisy or vibrates. Automatic ice maker not working . Wait 20 minutes and check again. • Set freezer control to "O". • Refrigerator may save you time and expense. Common Occurrences Refrigerator does not run. Reset circuit breaker. • The temperature control is tightly pushed into electrical outlet. • Light switch...

Complete Owner's Guide (English)
Page 13
... to repair or replace appliance light bulbs, air filters, water filters, other consumables, or knobs, handles, or other appropriate payment record to another party or removed outside the USA or Canada. 3. Obligations for servicing, such as abuse, misuse, inadequate power supply, accidents, fires, or acts of this warranty. Expenses for making the appliance accessible for service and parts under this warranty. 5. DISCLAIMEr OF IMPLIED WArrANTIES; Service calls to correct the installation...
... to repair or replace appliance light bulbs, air filters, water filters, other consumables, or knobs, handles, or other appropriate payment record to another party or removed outside the USA or Canada. 3. Obligations for servicing, such as abuse, misuse, inadequate power supply, accidents, fires, or acts of this warranty. Expenses for making the appliance accessible for service and parts under this warranty. 5. DISCLAIMEr OF IMPLIED WArrANTIES; Service calls to correct the installation...


