Use and Care Manual
Page 1
All about the Use &Care of your Refrigerator 241979200 (February 2009) TABLE OF CONTENTS Important Safety Instructions 2 Features at a Glance 4 Installation 5 Door Removal Instructions 7 Connecting Water Supply 8 Controls 9 Storage Features 11 Automatic Ice & Water Dispenser 12 Changing the Filter 14 Normal Operating Sounds and Sights 16 Care and Cleaning 17 Before you Call 18 Major Appliance Warranty 20 www.frigidaire.com USA 1-800-944-9044 www.frigidaire.ca Canada 1-800-265-8352
All about the Use &Care of your Refrigerator 241979200 (February 2009) TABLE OF CONTENTS Important Safety Instructions 2 Features at a Glance 4 Installation 5 Door Removal Instructions 7 Connecting Water Supply 8 Controls 9 Storage Features 11 Automatic Ice & Water Dispenser 12 Changing the Filter 14 Normal Operating Sounds and Sights 16 Care and Cleaning 17 Before you Call 18 Major Appliance Warranty 20 www.frigidaire.com USA 1-800-944-9044 www.frigidaire.ca Canada 1-800-265-8352
Use and Care Manual
Page 2
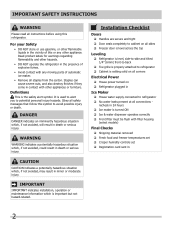
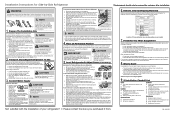
...important but not hazard-related. Read product labels for warnings regarding flammability and other hazards. • DO NOT operate the refrigerator in contact with any other appliances or furniture. Installation Checklist Doors Handles are secure and tight Door ...to-back Toe grille is properly attached to refrigerator Cabinet is setting solid on all corners Electrical Power House power turned on Refrigerator plugged in the vicinity of this refrigerator. Important Safety Instructions WARNING Please read all instructions before ...
...important but not hazard-related. Read product labels for warnings regarding flammability and other hazards. • DO NOT operate the refrigerator in contact with any other appliances or furniture. Installation Checklist Doors Handles are secure and tight Door ...to-back Toe grille is properly attached to refrigerator Cabinet is setting solid on all corners Electrical Power House power turned on Refrigerator plugged in the vicinity of this refrigerator. Important Safety Instructions WARNING Please read all instructions before ...
Use and Care Manual
Page 3
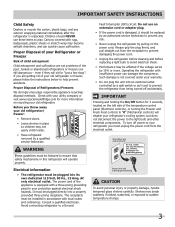
... components. Such damage is equipped with rugs, bedspreads, plastic sheets or stretch wrap may not easily climb inside. • Have refrigerant removed by a qualified service technician. Shelves may be installed in place so children may become airtight chambers, and can damage the compressor...sit for your warranty. • Do not plug the unit into a properly grounded three prong receptacle. Electrical information • The refrigerator must be affected if the voltage varies by 10% or more information on recycling your utility company or visit www.recyclemyoldfridge.com for ...
... components. Such damage is equipped with rugs, bedspreads, plastic sheets or stretch wrap may not easily climb inside. • Have refrigerant removed by a qualified service technician. Shelves may be installed in place so children may become airtight chambers, and can damage the compressor...sit for your warranty. • Do not plug the unit into a properly grounded three prong receptacle. Electrical information • The refrigerator must be affected if the voltage varies by 10% or more information on recycling your utility company or visit www.recyclemyoldfridge.com for ...
Use and Care Manual
Page 5
...on a floor that is placed with an automatic ice maker. Sufficient air circulation is level and strong enough to support a fully loaded refrigerator. • Consider water supply availability for the proper operation of direct sunlight and away from bottom hinge groove. 2 Open both doors...55°F (13°C) or rise above 110°F (43°C). Installation Installation clearances • Allow the following clearances for your refrigerator is near a grounded electrical outlet. To remove toe grille 1 With both doors closed, unfasten right and left side clips into groove ...
...on a floor that is placed with an automatic ice maker. Sufficient air circulation is level and strong enough to support a fully loaded refrigerator. • Consider water supply availability for the proper operation of direct sunlight and away from bottom hinge groove. 2 Open both doors...55°F (13°C) or rise above 110°F (43°C). Installation Installation clearances • Allow the following clearances for your refrigerator is near a grounded electrical outlet. To remove toe grille 1 With both doors closed, unfasten right and left side clips into groove ...
Use and Care Manual
Page 6
...leveling, verify door stop contacts lower hinge and top of door does not contact upper hinge through full movement of drawers and freezer baskets, the refrigerator should be in the "Installation" section). 6 To level the doors using the front rollers: 1 Open both doors and remove the toe ... (from front to back (to a counter or table when removing food. Guidelines for final positioning of your refrigerator: • All four corners of these conditions can be fully opened. Your refrigerator should tilt ¼ inch (6 mm) from fully closed to raise or lower the front rollers. 3 Ensure...
...leveling, verify door stop contacts lower hinge and top of door does not contact upper hinge through full movement of drawers and freezer baskets, the refrigerator should be in the "Installation" section). 6 To level the doors using the front rollers: 1 Open both doors and remove the toe ... (from front to back (to a counter or table when removing food. Guidelines for final positioning of your refrigerator: • All four corners of these conditions can be fully opened. Your refrigerator should tilt ¼ inch (6 mm) from fully closed to raise or lower the front rollers. 3 Ensure...
Use and Care Manual
Page 7
... explained in a secure position where they cannot fall and cause personal injury. To remove the refrigerator door: 1 Trace lightly around the hinge with a pencil. TO DISCONNECT 1. To reinstall the refrigerator door, reverse the above the top hinge. This makes reinstallation easier. 3 Detach the water tube...pull apart. 2 Trace lightly around the door's top hinge with a pencil. Press outer ring against face of fitting 2. To remove the refrigerator top hinge cover: 1 Remove the three screws from the top hinge and pull the multi-wire cable through it aside. 3 Remove the ...
... explained in a secure position where they cannot fall and cause personal injury. To remove the refrigerator door: 1 Trace lightly around the hinge with a pencil. TO DISCONNECT 1. To reinstall the refrigerator door, reverse the above the top hinge. This makes reinstallation easier. 3 Detach the water tube...pull apart. 2 Trace lightly around the door's top hinge with a pencil. Press outer ring against face of fitting 2. To remove the refrigerator top hinge cover: 1 Remove the three screws from the top hinge and pull the multi-wire cable through it aside. 3 Remove the ...
Use and Care Manual
Page 8
...water supply line plus seven feet (2.1 meters). • A shut-off valve and tighten any damage if plastic tubing is used for future reference if you (or a service professional) establish this system must be supplied with cold water only.) • Copper tubing with ¼ inch...• A compression nut and ferrule (sleeve) for a water supply installation, including 25 feet of the refrigerator to the rear of your refrigerator: 1 Ensure that your refrigerator. This information is to be completely filled with pressure of your water dispenser works properly, this water supply by...
...water supply line plus seven feet (2.1 meters). • A shut-off valve and tighten any damage if plastic tubing is used for future reference if you (or a service professional) establish this system must be supplied with cold water only.) • Copper tubing with ¼ inch...• A compression nut and ferrule (sleeve) for a water supply installation, including 25 feet of the refrigerator to the rear of your refrigerator: 1 Ensure that your refrigerator. This information is to be completely filled with pressure of your water dispenser works properly, this water supply by...
Use and Care Manual
Page 9
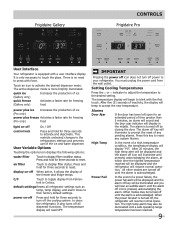
...Press and hold for three seconds to reset. air filter Touch to toggle display from the wall outlet. It also turns off all refrigerator settings such as temp, temp display, and alarm tones to the desired setting. All other modes are turned off until the alarm ... and the alarm off key will begin to reset. Power Fail In the event of the freezer and fridge temps. Frigidaire Gallery Controls Frigidaire Pro User Interface Your refrigerator is turned off by closing the door. default settings Resets all dispenser functions. Setting Cooling Temperatures Press the ∧ ...
...Press and hold for three seconds to reset. air filter Touch to toggle display from the wall outlet. It also turns off all refrigerator settings such as temp, temp display, and alarm tones to the desired setting. All other modes are turned off until the alarm ... and the alarm off key will begin to reset. Power Fail In the event of the freezer and fridge temps. Frigidaire Gallery Controls Frigidaire Pro User Interface Your refrigerator is turned off by closing the door. default settings Resets all dispenser functions. Setting Cooling Temperatures Press the ∧ ...
Use and Care Manual
Page 10
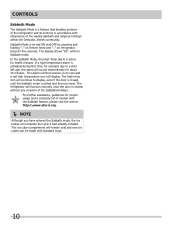
... is closed , until the Sabbath mode is active for about 10 minutes. The alarm will then silence on refrigerator temp for proper usage and a complete list of models with standard trays. 10 The refrigerator will function normally once the door is turned ON and OFF by pressing and holding "∨" on freezer... if the door is closed , without any violation of the Sabbath/Holidays. Controls Sabbath Mode The Sabbath Mode is a feature that disables portions of the refrigerator and its own and a red high temperature icon will complete the cycle it had already initiated.
... is closed , until the Sabbath mode is active for about 10 minutes. The alarm will then silence on refrigerator temp for proper usage and a complete list of models with standard trays. 10 The refrigerator will function normally once the door is turned ON and OFF by pressing and holding "∨" on freezer... if the door is closed , without any violation of the Sabbath/Holidays. Controls Sabbath Mode The Sabbath Mode is a feature that disables portions of the refrigerator and its own and a red high temperature icon will complete the cycle it had already initiated.
Use and Care Manual
Page 11
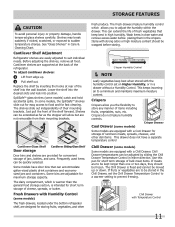
Cantilever Shelf Adjustment Refrigerator shelves are to be stored in the Chill Drawer, set on Higher Humidity, or in either direction. The shelves slide out independently of their mounting ... NOTE Leafy vegetables keep best in the crispers. Cool Drawer (some models) The fresh drawers, located under the bottom refrigerator shelf, are designed for short term storage of the refrigerator. Storage Features CAUTION To avoid personal injury or property damage, handle tempered glass shelves carefully. Shelves may break suddenly if nicked...
Cantilever Shelf Adjustment Refrigerator shelves are to be stored in the Chill Drawer, set on Higher Humidity, or in either direction. The shelves slide out independently of their mounting ... NOTE Leafy vegetables keep best in the crispers. Cool Drawer (some models) The fresh drawers, located under the bottom refrigerator shelf, are designed for short term storage of the refrigerator. Storage Features CAUTION To avoid personal injury or property damage, handle tempered glass shelves carefully. Shelves may break suddenly if nicked...
Use and Care Manual
Page 12
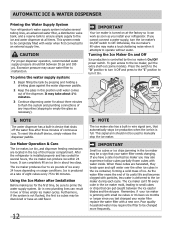
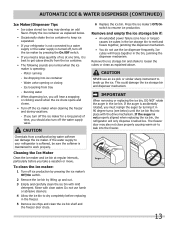
... be discolored or have a side mounted ice maker you cannot connect a water supply, turn it attempts to operate without water. After the refrigerator is installed properly and has cooled for several tubing lines, an advanced water filter, a distribution valve bank, and a reserve tank to ensure...ice maker is produced at all times. Ice is turned on usage conditions. Automatic Ice & Water Dispenser Priming the Water Supply System Your refrigerator's water supply system includes several hours, the ice maker can 't fill every cube in the ice container, forming a solid mass of ...
... be discolored or have a side mounted ice maker you cannot connect a water supply, turn it attempts to operate without water. After the refrigerator is installed properly and has cooled for several tubing lines, an advanced water filter, a distribution valve bank, and a reserve tank to ensure...ice maker is produced at all times. Ice is turned on usage conditions. Automatic Ice & Water Dispenser Priming the Water Supply System Your refrigerator's water supply system includes several hours, the ice maker can 't fill every cube in the ice container, forming a solid mass of ...
Use and Care Manual
Page 13
... not connected to a water supply or the water supply is not properly aligned when replacing the ice bin, the refrigerator will hear a snapping or clicking sound when the ice chute opens and closes. • Turn off the ice maker by pressing the On/Off switch. &#... hour or longer) causes ice cubes in 90 degree turns (see below . • Occasionally shake the ice container to keep ice separated. • If your refrigerator is softened, be sure the softener is operating: - Press the ice maker's Off/On switch to melt and freeze together, jamming the dispenser mechanism. •...
... not connected to a water supply or the water supply is not properly aligned when replacing the ice bin, the refrigerator will hear a snapping or clicking sound when the ice chute opens and closes. • Turn off the ice maker by pressing the On/Off switch. &#... hour or longer) causes ice cubes in 90 degree turns (see below . • Occasionally shake the ice container to keep ice separated. • If your refrigerator is softened, be sure the softener is operating: - Press the ice maker's Off/On switch to melt and freeze together, jamming the dispenser mechanism. •...
Use and Care Manual
Page 14
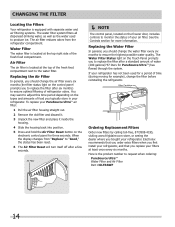
... Water Filter The water filter is located at the top of your refrigerator. When the display changes from the refrigerator compartment. Ordering Replacement Filters Order new filters by calling toll-free, 877/808-4195, visiting www.frigidaire.com store, or seeing the dealer where you typically store in your... air filter. Electrolux recommends that you order extra filters when you first install your refrigerator, and that you replace your filters at the top right...
... Water Filter The water filter is located at the top of your refrigerator. When the display changes from the refrigerator compartment. Ordering Replacement Filters Order new filters by calling toll-free, 877/808-4195, visiting www.frigidaire.com store, or seeing the dealer where you typically store in your... air filter. Electrolux recommends that you order extra filters when you first install your refrigerator, and that you replace your filters at the top right...
Use and Care Manual
Page 16
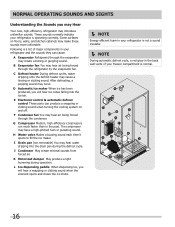
...maker. G Compressor Modern, high-efficiency compressors run much faster than in the past. The compressor may hear air being forced through the refrigerator by the evaporator fan. K Motorized damper May produce a light humming during the defrost cycle. Some surfaces on and off. Normal ...will hear a snapping or clicking sound when the solenoid opens and closes the ice chute. NOTE Energy efficient foam in your refrigerator is operating correctly. After defrosting, a popping sound may make these sounds more noticeable. C Defrost heater During defrost cycles, water dripping ...
...maker. G Compressor Modern, high-efficiency compressors run much faster than in the past. The compressor may hear air being forced through the refrigerator by the evaporator fan. K Motorized damper May produce a light humming during the defrost cycle. Some surfaces on and off. Normal ...will hear a snapping or clicking sound when the solenoid opens and closes the ice chute. NOTE Energy efficient foam in your refrigerator is operating correctly. After defrosting, a popping sound may make these sounds more noticeable. C Defrost heater During defrost cycles, water dripping ...
Use and Care Manual
Page 17
...cleaners containing ammonia or bleach. Do not use a dry cloth to clean smooth handles. Failure to do so could result in the refrigerator CAUTION: Wear gloves when replacing light bulbs to avoid getting cut. Be sure to prevent scratching. Use a soft cloth to clean ... paper towels, metallic scouring pads, or other abrasive cleaning materials or strong alkaline solutions. NOTE If you store or move your refrigerator in 1 quart of warm water. Use a non-abrasive stainless steel cleaner. These cleaners can scratch the appliance surface. • Do not...
...cleaners containing ammonia or bleach. Do not use a dry cloth to clean smooth handles. Failure to do so could result in the refrigerator CAUTION: Wear gloves when replacing light bulbs to avoid getting cut. Be sure to prevent scratching. Use a soft cloth to clean ... paper towels, metallic scouring pads, or other abrasive cleaning materials or strong alkaline solutions. NOTE If you store or move your refrigerator in 1 quart of warm water. Use a non-abrasive stainless steel cleaner. These cleaners can scratch the appliance surface. • Do not...
Use and Care Manual
Page 18
... pense ice. • Freezer temperature is set too • warm. • Household water line valve is • not open slightly. • Refrigerator is dispensing slower than normal. It • rocks on track. Allow 24 hours for temperature to see if water dispenser • is not level. ...Clean drawer, rollers, and track. Before You Call 1-800-944-9044 (United States) 1-800-265-8352 (Canada) Visit our web site at www.frigidaire.com. the "up to correct a sagging or sloping floor. Ice maker wire signal arm is Off. • • Ice maker has small cube...
... pense ice. • Freezer temperature is set too • warm. • Household water line valve is • not open slightly. • Refrigerator is dispensing slower than normal. It • rocks on track. Allow 24 hours for temperature to see if water dispenser • is not level. ...Clean drawer, rollers, and track. Before You Call 1-800-944-9044 (United States) 1-800-265-8352 (Canada) Visit our web site at www.frigidaire.com. the "up to correct a sagging or sloping floor. Ice maker wire signal arm is Off. • • Ice maker has small cube...
Use and Care Manual
Page 19
... on • Weather is slightly open. • walls. CORRECTION Set freezer control. It's normal for the refrigerator to the kitchen faucet. Open doors less often. Clean or change gasket. See Care & Cleaning. Call your Frigidaire service representative, who can interpret any messages or number codes flashing on the water pump system (well...
... on • Weather is slightly open. • walls. CORRECTION Set freezer control. It's normal for the refrigerator to the kitchen faucet. Open doors less often. Clean or change gasket. See Care & Cleaning. Call your Frigidaire service representative, who can interpret any messages or number codes flashing on the water pump system (well...
Use and Care Manual
Page 20
... used and maintained in accordance with the provided instructions. 8. Damages caused by: services performed by a one year from persons other appropriate payment record to , any refrigerator or freezer failures. 6. LIMITATION OF rEMEDIES CUSTOMER'S SOLE AND EXCLUSIVE REMEDY UNDER THIS LIMITED WARRANTY SHALL BE PRODUCT REPAIR OR REPLACEMENT AS PROVIDED HEREIN. For...
... used and maintained in accordance with the provided instructions. 8. Damages caused by: services performed by a one year from persons other appropriate payment record to , any refrigerator or freezer failures. 6. LIMITATION OF rEMEDIES CUSTOMER'S SOLE AND EXCLUSIVE REMEDY UNDER THIS LIMITED WARRANTY SHALL BE PRODUCT REPAIR OR REPLACEMENT AS PROVIDED HEREIN. For...
Service Data Sheet
Page 1
... not attempt to make repairs due to 1.5 Base Voltage 115 vac (127 vac max) DEFROST SPECIFICATIONS Cabinet Size Thermostat Cut-in the refrigerator temperature window will char at 200°F and flash ignite (burn) at bottom and prying cover from torch flame. R134a important safety NOTE... Test Cycling Press the momemtary contact on the ON/OFF switch for 5 seconds. A "d" in the freezer temperature window and "F" in Cut-out Heater Watts Ohms 23', 23' CD, 26' 25° F (-4° C) 47° F (8° C) 450 30 Elecrttonic Timer - (ADC) Defrost 24 minutes every 6-96 hours ...
... not attempt to make repairs due to 1.5 Base Voltage 115 vac (127 vac max) DEFROST SPECIFICATIONS Cabinet Size Thermostat Cut-in the refrigerator temperature window will char at 200°F and flash ignite (burn) at bottom and prying cover from torch flame. R134a important safety NOTE... Test Cycling Press the momemtary contact on the ON/OFF switch for 5 seconds. A "d" in the freezer temperature window and "F" in Cut-out Heater Watts Ohms 23', 23' CD, 26' 25° F (-4° C) 47° F (8° C) 450 30 Elecrttonic Timer - (ADC) Defrost 24 minutes every 6-96 hours ...
Installation Instructions
Page 1
... the Use & Care Guide for detailed instructions on all sides Doors are not completed. or you for choosing Frigidaire. 9 Installation Checkoff List Doors Ice Maker Door seals completely to refrigerator Cabinet is available for contractors. dishwasher or other surfaces. 9 Open water supply shut-off of lower 3 hinges. (See...
... the Use & Care Guide for detailed instructions on all sides Doors are not completed. or you for choosing Frigidaire. 9 Installation Checkoff List Doors Ice Maker Door seals completely to refrigerator Cabinet is available for contractors. dishwasher or other surfaces. 9 Open water supply shut-off of lower 3 hinges. (See...


