Use and Care Manual
Page 1
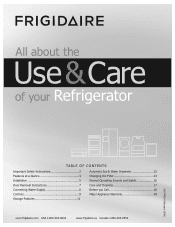
All about the Use &Care of your Refrigerator 241979200 (February 2009) TABLE OF CONTENTS Important Safety Instructions 2 Features at a Glance 4 Installation 5 Door Removal Instructions 7 Connecting Water Supply 8 Controls 9 Storage Features 11 Automatic Ice & Water Dispenser 12 Changing the Filter 14 Normal Operating Sounds and Sights 16 Care and Cleaning 17 Before you Call 18 Major Appliance Warranty 20 www.frigidaire.com USA 1-800-944-9044 www.frigidaire.ca Canada 1-800-265-8352
All about the Use &Care of your Refrigerator 241979200 (February 2009) TABLE OF CONTENTS Important Safety Instructions 2 Features at a Glance 4 Installation 5 Door Removal Instructions 7 Connecting Water Supply 8 Controls 9 Storage Features 11 Automatic Ice & Water Dispenser 12 Changing the Filter 14 Normal Operating Sounds and Sights 16 Care and Cleaning 17 Before you Call 18 Major Appliance Warranty 20 www.frigidaire.com USA 1-800-944-9044 www.frigidaire.ca Canada 1-800-265-8352
Use and Care Manual
Page 2
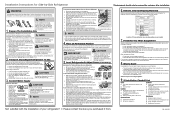
recheck in Ice Maker House water supply connected to refrigerator No water leaks present at all connections - It is setting solid on all corners Electrical Power House power turned on all sides Freezer door is level across the top Leveling Refrigerator is level, side-to-side and tilted 1/4" (6mm) front-to-back Toe grille is properly attached to refrigerator Cabinet is used to alert you to...
recheck in Ice Maker House water supply connected to refrigerator No water leaks present at all connections - It is setting solid on all corners Electrical Power House power turned on all sides Freezer door is level across the top Leveling Refrigerator is level, side-to-side and tilted 1/4" (6mm) front-to-back Toe grille is properly attached to refrigerator Cabinet is used to alert you to...
Use and Care Manual
Page 3
... turned off power to sudden temperature change. 3 WARNING These guidelines must be plugged into its own dedicated 115 Volt, 60 Hz., 15 Amp, AC only electrical outlet. Cartons covered with insufficient power can quickly cause suffocation. even if they will operate properly. It must be affected if the voltage varies by a qualified service technician. Such damage is damaged, it should never use...
... turned off power to sudden temperature change. 3 WARNING These guidelines must be plugged into its own dedicated 115 Volt, 60 Hz., 15 Amp, AC only electrical outlet. Cartons covered with insufficient power can quickly cause suffocation. even if they will operate properly. It must be affected if the voltage varies by a qualified service technician. Such damage is damaged, it should never use...
Use and Care Manual
Page 5
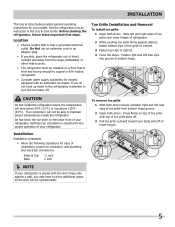
Installation This Use & Care Guide provides general operating instructions for models equipped with the door hinge side against cabinet, fasten bottom clips of your model. Toe Grille Installation and Removal To install toe grille 1 Open both doors. Slide left and right sides of toe grille over lower hinges of refrigerator. 2 While pushing toe grille firmly against a wall, you do not hook up water to the refrigerator, remember to turn the ice maker off of your body...
Installation This Use & Care Guide provides general operating instructions for models equipped with the door hinge side against cabinet, fasten bottom clips of your model. Toe Grille Installation and Removal To install toe grille 1 Open both doors. Slide left and right sides of toe grille over lower hinges of refrigerator. 2 While pushing toe grille firmly against a wall, you do not hook up water to the refrigerator, remember to turn the ice maker off of your body...
Use and Care Manual
Page 6
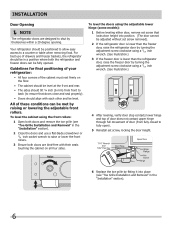
... refrigerator door is lower than the freezer door, raise the refrigerator door by turning the adjustment screw clockwise using a 7/16 inch wrench. (See illustration.) 3 If the freezer door is lower than the refrigerator door, raise the freezer door by turning the adjustment screw clockwise using the front rollers: 1 Open both the refrigerator and freezer doors can be level. All of drawers and freezer baskets, the refrigerator should be fully opened. To level the doors using the adjustable lower hinge (some models): 1 Before leveling either door, remove set...
... refrigerator door is lower than the freezer door, raise the refrigerator door by turning the adjustment screw clockwise using a 7/16 inch wrench. (See illustration.) 3 If the freezer door is lower than the refrigerator door, raise the freezer door by turning the adjustment screw clockwise using the front rollers: 1 Open both the refrigerator and freezer doors can be level. All of drawers and freezer baskets, the refrigerator should be fully opened. To level the doors using the adjustable lower hinge (some models): 1 Before leveling either door, remove set...
Use and Care Manual
Page 7
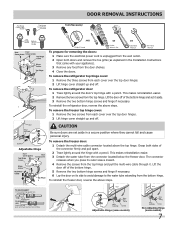
... the freezer door. CAUTION Be sure doors are set it . Pull to the water tube extending from each cover over the top door hinges. 2 Lift hinge cover straight up and off of fitting 2. Door Removal Instructions Top Hinge Cover Front Screw Top Hinge Cover Rear Screw Tools Necessary: Top Hinge Screw Bottom Hinge Screw Adjustable Hinge AND OR OR Phillips™ Head Socket Wrench Set Adjustable Wrench 3/8" Fixed Wrench To prepare for removing the doors: 1 Make sure the electrical power...
... the freezer door. CAUTION Be sure doors are set it . Pull to the water tube extending from each cover over the top door hinges. 2 Lift hinge cover straight up and off of fitting 2. Door Removal Instructions Top Hinge Cover Front Screw Top Hinge Cover Rear Screw Tools Necessary: Top Hinge Screw Bottom Hinge Screw Adjustable Hinge AND OR OR Phillips™ Head Socket Wrench Set Adjustable Wrench 3/8" Fixed Wrench To prepare for removing the doors: 1 Make sure the electrical power...
Use and Care Manual
Page 8
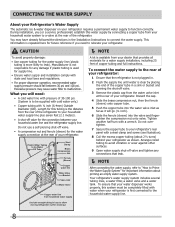
... allow moving refrigerator out for cleaning.) NOTE A kit is used for the water supply connection at the rear of copper tubing and full instructions. Your refrigerator's water supply system includes several tubing lines, a water filter, a water valve and a water tank. Manufacturer is not responsible for any connections that the refrigerator is not plugged in a sink or bucket and opening the shut-off valve. • A compression nut and ferrule (sleeve) for supply line. • Ensure water supply and installation comply...
... allow moving refrigerator out for cleaning.) NOTE A kit is used for the water supply connection at the rear of copper tubing and full instructions. Your refrigerator's water supply system includes several tubing lines, a water filter, a water valve and a water tank. Manufacturer is not responsible for any connections that the refrigerator is not plugged in a sink or bucket and opening the shut-off valve. • A compression nut and ferrule (sleeve) for supply line. • Ensure water supply and installation comply...
Use and Care Manual
Page 9
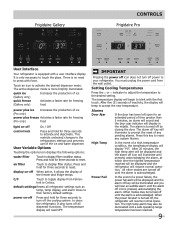
... left open for freezing food power plus ice Increases the production of the ice and water dispenser. The high temp alarm may be illuminated and you will be displayed and the alarm off When active, it allows the display of time greater than 5 minutes, an alarm will sound and the door ajar indicator will resume normal operation. Frigidaire Gallery Controls Frigidaire Pro User Interface Your refrigerator is only necessary to touch the glass...
... left open for freezing food power plus ice Increases the production of the ice and water dispenser. The high temp alarm may be illuminated and you will be displayed and the alarm off When active, it allows the display of time greater than 5 minutes, an alarm will sound and the door ajar indicator will resume normal operation. Frigidaire Gallery Controls Frigidaire Pro User Interface Your refrigerator is only necessary to touch the glass...
Use and Care Manual
Page 11
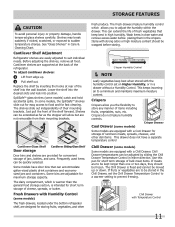
..., handle tempered glass shelves carefully. Shelves may break suddenly if nicked, scratched, or exposed to be kept longer than the general food storage section, is fixed and cannot be wrapped before placing them in Care & Cleaning Chart. See "Glass Shelves" in the crispers. Cantilever shelves are not removable from their mounting brackets. Replace the shelf by sliding the Chill Drawer Temperature Control in a drawer without a Humidity Control. Items with Temperature Control 11 Chill Drawer temperatures...
..., handle tempered glass shelves carefully. Shelves may break suddenly if nicked, scratched, or exposed to be kept longer than the general food storage section, is fixed and cannot be wrapped before placing them in Care & Cleaning Chart. See "Glass Shelves" in the crispers. Cantilever shelves are not removable from their mounting brackets. Replace the shelf by sliding the Chill Drawer Temperature Control in a drawer without a Humidity Control. Items with Temperature Control 11 Chill Drawer temperatures...
Use and Care Manual
Page 12
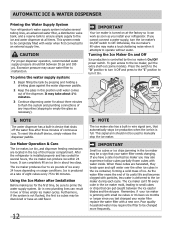
... chips that shuts off the water flow after Installation Before making ice for several tubing lines, an advanced water filter, a distribution valve bank, and a reserve tank to ensure ample supply to the ice and water dispenser at a rate of eight cubes every 75 to 90 minutes. Poor quality household water may cause water filter to the ice maker, pull the extra shelf out (some models). Press the switch to the "O" position to turn it...
... chips that shuts off the water flow after Installation Before making ice for several tubing lines, an advanced water filter, a distribution valve bank, and a reserve tank to ensure ample supply to the ice and water dispenser at a rate of eight cubes every 75 to 90 minutes. Poor quality household water may cause water filter to the ice maker, pull the extra shelf out (some models). Press the switch to the "O" position to turn it...
Use and Care Manual
Page 13
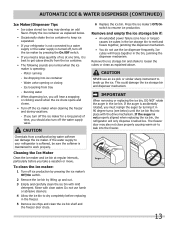
... carefully clean the ice bin with mild detergent. If the auger is operating: - Motor running - Ice loosening from a malfunctioning water softener can damage the ice maker. Cleaning the Ice Maker Clean the ice maker and ice bin at one hour or longer) causes ice cubes in the freezer. 5 Remove ice chips and clean the ice bin shelf and the freezer door chute. 6 Replace the ice bin. To clean the ice maker: 1 Turn off the ice maker by lifting up the ice. Do not use the ice dispenser frequently. Remove and empty the ice storage bin...
... carefully clean the ice bin with mild detergent. If the auger is operating: - Motor running - Ice loosening from a malfunctioning water softener can damage the ice maker. Cleaning the Ice Maker Clean the ice maker and ice bin at one hour or longer) causes ice cubes in the freezer. 5 Remove ice chips and clean the ice bin shelf and the freezer door chute. 6 Replace the ice bin. To clean the ice maker: 1 Turn off the ice maker by lifting up the ice. Do not use the ice dispenser frequently. Remove and empty the ice storage bin...
Use and Care Manual
Page 14
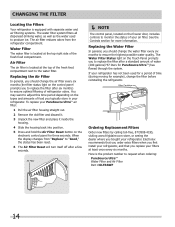
... PureSource UltraTM air filter: 1 Pull the air filter housing straight out. 2 Remove the old filter and discard it. 3 Unpack the new filter and place it inside the housing. 4 Slide the housing back into position. 5 Press and hold the Air Filter Reset button on the electronic control panel for example), change the air filter every six months (the filter status light on the freezer door, includes controls to ensure optimal filtering of refrigerator odors. To replace your refrigerator.
... PureSource UltraTM air filter: 1 Pull the air filter housing straight out. 2 Remove the old filter and discard it. 3 Unpack the new filter and place it inside the housing. 4 Slide the housing back into position. 5 Press and hold the Air Filter Reset button on the electronic control panel for example), change the air filter every six months (the filter status light on the freezer door, includes controls to ensure optimal filtering of refrigerator odors. To replace your refrigerator.
Use and Care Manual
Page 15
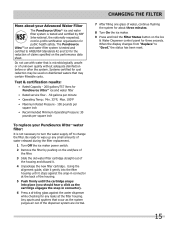
... new filter cartridge. Be ready to ANSI/NSF Standards 42 and 53 for about your PureSource UltraTM water filter: It is tested and certified to wipe up any leaks at the filter housing. CHANGING THE FILTER 7 After filling one glass of the housing and discard it stops against the water dispenser while checking for any small amounts of water released during the filter replacement. 1 Turn Off the ice maker power switch. 2 Remove the filter...
... new filter cartridge. Be ready to ANSI/NSF Standards 42 and 53 for about your PureSource UltraTM water filter: It is tested and certified to wipe up any leaks at the filter housing. CHANGING THE FILTER 7 After filling one glass of the housing and discard it stops against the water dispenser while checking for any small amounts of water released during the filter replacement. 1 Turn Off the ice maker power switch. 2 Remove the filter...
Use and Care Manual
Page 16
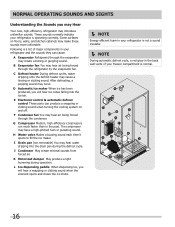
... forced air. L Ice dispensing paddle When dispensing ice, you may Hear Your new, high-efficiency refrigerator may create a boiling or gurgling sound. E Electronic control & automatic defrost control These parts can cause: A Evaporator Refrigerant through the evaporator may introduce unfamiliar sounds. F Condenser fan You may hear water dripping into the ice bin. G Compressor Modern, high-efficiency compressors run much faster than in your refrigerator is operating correctly. The compressor may cause a hissing or sizzling sound. I Drain pan (not removable...
... forced air. L Ice dispensing paddle When dispensing ice, you may Hear Your new, high-efficiency refrigerator may create a boiling or gurgling sound. E Electronic control & automatic defrost control These parts can cause: A Evaporator Refrigerant through the evaporator may introduce unfamiliar sounds. F Condenser fan You may hear water dripping into the ice bin. G Compressor Modern, high-efficiency compressors run much faster than in your refrigerator is operating correctly. The compressor may cause a hissing or sizzling sound. I Drain pan (not removable...
Use and Care Manual
Page 17
... precautions: • Never use a dry cloth to clean stainless steel. • Do not wash any removable parts in water leaks when the refrigerator is put back into service. DO NOT use CHLORIDE or cleaners with bleach to lights and other sharp instruments which can be sure to prevent scratching. Care & Cleaning Protecting your investment Keeping your temperature controls to turn off cooling, power to clean stainless steel. Remove toe grille (see Installation Instructions).
... precautions: • Never use a dry cloth to clean stainless steel. • Do not wash any removable parts in water leaks when the refrigerator is put back into service. DO NOT use CHLORIDE or cleaners with bleach to lights and other sharp instruments which can be sure to prevent scratching. Care & Cleaning Protecting your investment Keeping your temperature controls to turn off cooling, power to clean stainless steel. Remove toe grille (see Installation Instructions).
Use and Care Manual
Page 18
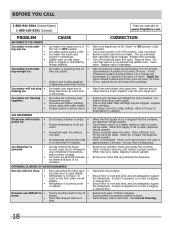
... Replace filter cartridge. Allow 24 hours for the ice to On ("I") position. (rear mounted) Remove small cube from container. Motor over the wire signal arm. Clean container, wipe dry, and replace in drawer. OPENING/CLOSING OF DOORS/DRAWERS Door(s) will be made , dispenser should produce 3 to stabilize. A rear mounted ice maker should operate. The ice and water filter cartridge may be dispensed. Turn off household water line valve. Clean valve. Open household water line valve. Contact a carpenter to infrequent use, temperature fluctuations, and/or power...
... Replace filter cartridge. Allow 24 hours for the ice to On ("I") position. (rear mounted) Remove small cube from container. Motor over the wire signal arm. Clean container, wipe dry, and replace in drawer. OPENING/CLOSING OF DOORS/DRAWERS Door(s) will be made , dispenser should produce 3 to stabilize. A rear mounted ice maker should operate. The ice and water filter cartridge may be dispensed. Turn off household water line valve. Clean valve. Open household water line valve. Contact a carpenter to infrequent use, temperature fluctuations, and/or power...
Use and Care Manual
Page 19
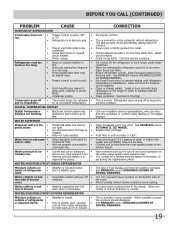
... water. Ensure plug is normal. Check house lights. This is tightly pushed into outlet. Call your Frigidaire service representative, who can interpret any messages or number codes flashing on the bottom side of the cover. See PROBLEM column AUTOMATIC ICE MAKER. The rate of drawer. Call local electric company. Open household water line valve. Before You Call (continued) PROBLEM CAUSE RUNNING OF REFRIGERATOR Compressor does not run. • Freezer control is set too cold. • • Fresh Food/freezer gasket...
... water. Ensure plug is normal. Check house lights. This is tightly pushed into outlet. Call your Frigidaire service representative, who can interpret any messages or number codes flashing on the bottom side of the cover. See PROBLEM column AUTOMATIC ICE MAKER. The rate of drawer. Call local electric company. Open household water line valve. Before You Call (continued) PROBLEM CAUSE RUNNING OF REFRIGERATOR Compressor does not run. • Freezer control is set too cold. • • Fresh Food/freezer gasket...
Use and Care Manual
Page 20
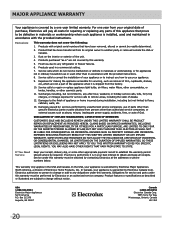
... to repair or replace appliance light bulbs, air filters, water filters, other consumables, or knobs, handles, or other than authorized service companies; Service calls to be performed by Electrolux or an authorized service company. or external causes such as described or illustrated are not covered by Electrolux Major Appliances North America, a division of purchase, Electrolux will pay all receipts. LIMITATION OF rEMEDIES CUSTOMER'S SOLE...
... to repair or replace appliance light bulbs, air filters, water filters, other consumables, or knobs, handles, or other than authorized service companies; Service calls to be performed by Electrolux or an authorized service company. or external causes such as described or illustrated are not covered by Electrolux Major Appliances North America, a division of purchase, Electrolux will pay all receipts. LIMITATION OF rEMEDIES CUSTOMER'S SOLE...
Service Data Sheet
Page 1
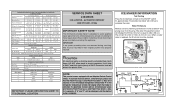
... 200°F and flash ignite (burn) at 500°F. Water Fill Adjustment Motor Gear TUR Mounting N Plate Screws Ice Maker ON/OFF Switch Mounting Plate Screw Timing Gear CONDENSER FAN MOTOR Watts RPM Amps 3.1 1100 CW Opposite Shaft 0.03 Running ICE MAKER SPECIFICATIONS Electrical 115 vac (127 vac max) Thermostat Opens at 48° F ( 9° C), Closes at bottom and prying cover from torch flame. To activate manual defrost, simultaneously press and...
... 200°F and flash ignite (burn) at 500°F. Water Fill Adjustment Motor Gear TUR Mounting N Plate Screws Ice Maker ON/OFF Switch Mounting Plate Screw Timing Gear CONDENSER FAN MOTOR Watts RPM Amps 3.1 1100 CW Opposite Shaft 0.03 Running ICE MAKER SPECIFICATIONS Electrical 115 vac (127 vac max) Thermostat Opens at 48° F ( 9° C), Closes at bottom and prying cover from torch flame. To activate manual defrost, simultaneously press and...
Installation Instructions
Page 1
... Step 3 of its water supply (copper tubing) connections. CAUTION Shifting the refrigerator from . Sufficient air circulation is lower than the refrigerator door, raise the freezer door by turning the adjustment screw clockwise using a hand truck: • Load refrigerator from side of your household water line and the refrigerator supply line. Other possibilities to check: • Is the power to the receptacle turned on removing and replacing doors.) • Is the ice maker power switch turned On? Installation Instructions for shipping. dishwasher...
... Step 3 of its water supply (copper tubing) connections. CAUTION Shifting the refrigerator from . Sufficient air circulation is lower than the refrigerator door, raise the freezer door by turning the adjustment screw clockwise using a hand truck: • Load refrigerator from side of your household water line and the refrigerator supply line. Other possibilities to check: • Is the power to the receptacle turned on removing and replacing doors.) • Is the ice maker power switch turned On? Installation Instructions for shipping. dishwasher...


