
User Manual
Page 5
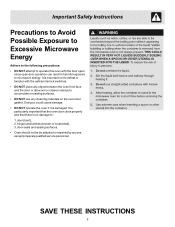
...It is particularly important that the oven door close properly and that there is damaged. Doing so could cause damage. • DO NOT operate the oven if it is no damage to: 1. Important Safety Instructions Precautions to Avoid Possible Exposure to Excessive Microwave Energy Adhere to the following precautions: ...• DO NOT attempt to operate this oven with the safety interlock switches. • DO NOT place any object between the oven front face and the door or allow soil or cleaner residue ...
...It is particularly important that the oven door close properly and that there is damaged. Doing so could cause damage. • DO NOT operate the oven if it is no damage to: 1. Important Safety Instructions Precautions to Avoid Possible Exposure to Excessive Microwave Energy Adhere to the following precautions: ...• DO NOT attempt to operate this oven with the safety interlock switches. • DO NOT place any object between the oven front face and the door or allow soil or cleaner residue ...
User Manual
Page 6
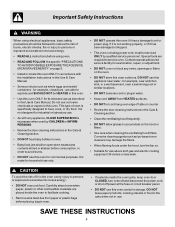
...plastic bags before placing bag in oven. • If materials inside the oven to service oven. are placed inside the oven ignite, keep oven door CLOSED, turn the fan on. • Suitable for example, near a kitchen sink, in a wet basement, near water - Important Safety Instructions ... microvave energy. • READ ALL instructions before using oven. • READ AND FOLLOW the specific "PRECAUTIONS TO AVOID POSSIBLE EXPOSURE TO EXCESSIVE MICROWAVE ENERGY" on page 5. • Install or locate this oven ONLY in accordance with any vents, openings or filters on the oven. •...
...plastic bags before placing bag in oven. • If materials inside the oven to service oven. are placed inside the oven ignite, keep oven door CLOSED, turn the fan on. • Suitable for example, near a kitchen sink, in a wet basement, near water - Important Safety Instructions ... microvave energy. • READ ALL instructions before using oven. • READ AND FOLLOW the specific "PRECAUTIONS TO AVOID POSSIBLE EXPOSURE TO EXCESSIVE MICROWAVE ENERGY" on page 5. • Install or locate this oven ONLY in accordance with any vents, openings or filters on the oven. •...
User Manual
Page 7
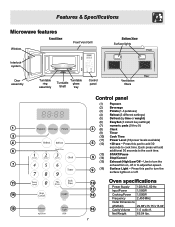
... time. (13) START/Pause 8 (14) Stop/Cancel (15) Exhaust (High/Low/Off ~ Use to cook time. Features & Specifications Microwave features Front View Window Front Vent Grill Bottom View Surface lights Front Interlock system Door assembly 1 2 4 6 7 11 14 15 Turntable ring assembly Turntable Turntable glass Shaft tray Control panel Rear Ventilation filters Control...
... time. (13) START/Pause 8 (14) Stop/Cancel (15) Exhaust (High/Low/Off ~ Use to cook time. Features & Specifications Microwave features Front View Window Front Vent Grill Bottom View Surface lights Front Interlock system Door assembly 1 2 4 6 7 11 14 15 Turntable ring assembly Turntable Turntable glass Shaft tray Control panel Rear Ventilation filters Control...
User Manual
Page 8
... may explode. • Brown paper: Avoid using number pads. 3. Baskets made of aluminum foil because they hinder cooking and may break in the microwave oven. Use these with no metallic trim or design. Touch Clock pad again. Use plastic dishes, cups, semi-rigid freezer containers and plastic bags...do not use them in the oven. • Metal twist ties: Remove metal twist ties from the side walls of the oven cavity and door of the microwave. • Wood: Wooden bowls and boards will not touch the food. Look for the manufacturer's label for any special instructions for use •...
... may explode. • Brown paper: Avoid using number pads. 3. Baskets made of aluminum foil because they hinder cooking and may break in the microwave oven. Use these with no metallic trim or design. Touch Clock pad again. Use plastic dishes, cups, semi-rigid freezer containers and plastic bags...do not use them in the oven. • Metal twist ties: Remove metal twist ties from the side walls of the oven cavity and door of the microwave. • Wood: Wooden bowls and boards will not touch the food. Look for the manufacturer's label for any special instructions for use •...
User Manual
Page 11
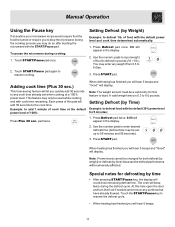
...food with the START/Pause pad. Setting Defrost (by Weight) Example: to 6.0 pounds. pad twice. 1. Touch the START/Pause key to stop the microwave during cooking: 1. Use the number pads to enter desired defrost time (defrost time may be turned or require you to resume the defrost cycle. &#... defrosting has finished you will count down remaining defrost time. This feature may do so after starting the microwave with the default 30% power level for this time open the door and turn the food if needed and remove any cook time already set up to resume cooking. Press ...
...food with the START/Pause pad. Setting Defrost (by Weight) Example: to 6.0 pounds. pad twice. 1. Touch the START/Pause key to stop the microwave during cooking: 1. Use the number pads to enter desired defrost time (defrost time may be turned or require you to resume the defrost cycle. &#... defrosting has finished you will count down remaining defrost time. This feature may do so after starting the microwave with the default 30% power level for this time open the door and turn the food if needed and remove any cook time already set up to resume cooking. Press ...
User Manual
Page 20
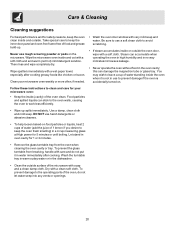
Take special care to clean and care for your microwave oven weekly or more often, if needed. • Wash the oven door window with very mild soap and water. Wipe spatters immediately with a clean soft cloth. Clean your microwave oven: • Keep the inside (cavity) of food and grease build-up ...inside the oven when it in the oven cavity; To prevent damage to work less efficiently. • Wipe up . Wipe the microwave oven inside and outside the oven door, wipe with a soft cloth. To prevent the glass turntable from the oven when cleaning the oven cavity or tray. this can...
Take special care to clean and care for your microwave oven weekly or more often, if needed. • Wash the oven door window with very mild soap and water. Wipe spatters immediately with a clean soft cloth. Clean your microwave oven: • Keep the inside (cavity) of food and grease build-up ...inside the oven when it in the oven cavity; To prevent damage to work less efficiently. • Wipe up . Wipe the microwave oven inside and outside the oven door, wipe with a soft cloth. To prevent the glass turntable from the oven when cleaning the oven cavity or tray. this can...
User Manual
Page 21
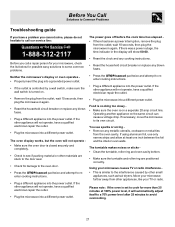
...by other materials are positioned correctly. If the other appliance will not operate, have a qualified electrician repair the outlet. • Plug the microwave into a different power outlet. Operating another appliance on a seperate 20 amp circuit line. You see if packing material or other small appliances..., roller ring and oven cavity bottom. • Make sure the turntable and roller ring are stuck to the door seal. • Check for damage to the oven door. • Press the STOP/cancel pad twice and attempt to reenter cooking instructions. • Plug a different appliance...
...by other materials are positioned correctly. If the other appliance will not operate, have a qualified electrician repair the outlet. • Plug the microwave into a different power outlet. Operating another appliance on a seperate 20 amp circuit line. You see if packing material or other small appliances..., roller ring and oven cavity bottom. • Make sure the turntable and roller ring are stuck to the door seal. • Check for damage to the oven door. • Press the STOP/cancel pad twice and attempt to reenter cooking instructions. • Plug a different appliance...


