User Manual
Page 9
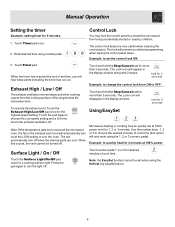
...once. 2. The control lock feature is very useful when cleaning the control panel. When the timer has reached the end of the range below the microwave oven. Exhaust High / Low / Off The exhaust ventilation moves steam and other cooking vapors from the cooking surface of set when using the Defrost (by... the microwave from ON to set at 100% power: Surface Light / On / Off Touch the Surface Light/On/Off pad once for more than 3 seconds. Note: the EasySet function cannot be turned off . Touch Timer pad. Press the pad again to turn the light off when the internal parts are ...
...once. 2. The control lock feature is very useful when cleaning the control panel. When the timer has reached the end of the range below the microwave oven. Exhaust High / Low / Off The exhaust ventilation moves steam and other cooking vapors from the cooking surface of set when using the Defrost (by... the microwave from ON to set at 100% power: Surface Light / On / Off Touch the Surface Light/On/Off pad once for more than 3 seconds. Note: the EasySet function cannot be turned off . Touch Timer pad. Press the pad again to turn the light off when the internal parts are ...
User Manual
Page 14
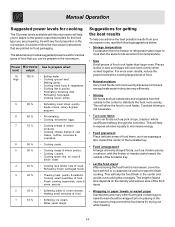
...Suggested power levels for cooking The 10 power levels available with this microwave will help you to adjust to the power output best suited for the food type you achieve the best possible results from your microwave oven, read the following suggestions below provides suggested power levels for getting the...in the center and avoids overcooking the out edges, The length of stand time depends on food packaging. As with the thicker or meatier parts toward the center of the turntable tray. • Food arrangement Arrange unevenly shaped foods, such as pork chops, roasts or whole cauliflower ...
...Suggested power levels for cooking The 10 power levels available with this microwave will help you to adjust to the power output best suited for the food type you achieve the best possible results from your microwave oven, read the following suggestions below provides suggested power levels for getting the...in the center and avoids overcooking the out edges, The length of stand time depends on food packaging. As with the thicker or meatier parts toward the center of the turntable tray. • Food arrangement Arrange unevenly shaped foods, such as pork chops, roasts or whole cauliflower ...
User Manual
Page 20
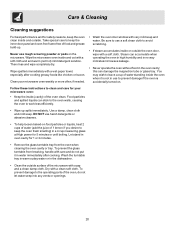
... can damage the magnetron tube or glass tray. DO NOT use to the operating parts of the oven, do not put it is accidentally turned on food particles or liquids, heat 2 cups of water (add the juice of the microwave with a soft cloth. Let stand in use harsh detergents or abrasive cleaners. &#... or tray. Take special care to leave a cup of water standing inside (cavity) of food and grease build-up spills immediately. Wipe the microwave oven inside and out with care and do not let water seep into any vents or openings. 20 Wipe spatters immediately with a clean soft cloth. You...
... can damage the magnetron tube or glass tray. DO NOT use to the operating parts of the oven, do not put it is accidentally turned on food particles or liquids, heat 2 cups of water (add the juice of the microwave with a soft cloth. Let stand in use harsh detergents or abrasive cleaners. &#... or tray. Take special care to leave a cup of water standing inside (cavity) of food and grease build-up spills immediately. Wipe the microwave oven inside and out with care and do not let water seep into any vents or openings. 20 Wipe spatters immediately with a clean soft cloth. You...
Installation Instructions
Page 2
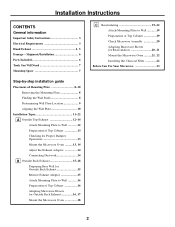
Shipment/Installation 6 Parts Included 6 Tools You Will Need 7 Mounting Space 7 Step-by-step installation guide Placement of Mounting Plate 8-10 Removing the Mounting Plate 8 Finding the Wall Studs 8 ...-22 A Outside Top Exhaust 12-14 Attach Mounting Plate to Wall 12 Preparation of Top Cabinet 13 Checking for Proper Damper Operation 13 Mount the Microwave Oven ..........13, 14 Adjust the Exhaust Adaptor 14 Connecting Ductwork 14 B Outside Back Exhaust 15-18 Preparing Rear Wall for Outside Back Exhaust 15 Remove Exhaust...
Shipment/Installation 6 Parts Included 6 Tools You Will Need 7 Mounting Space 7 Step-by-step installation guide Placement of Mounting Plate 8-10 Removing the Mounting Plate 8 Finding the Wall Studs 8 ...-22 A Outside Top Exhaust 12-14 Attach Mounting Plate to Wall 12 Preparation of Top Cabinet 13 Checking for Proper Damper Operation 13 Mount the Microwave Oven ..........13, 14 Adjust the Exhaust Adaptor 14 Connecting Ductwork 14 B Outside Back Exhaust 15-18 Preparing Rear Wall for Outside Back Exhaust 15 Remove Exhaust...
Installation Instructions
Page 20
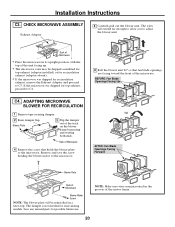
...the unit facing up. • The microwave oven may be reinstalled in its upright position, with the top of the motor frame. 20 CHECK MICROWAVE ASSEMBLY Exhaust Adaptor 5 Carefully pull out the blower unit. Back of Microwave • Place the microwave in a later step. Back of ... so that holds the blower plate to C5. Save any unused parts for recirculating models. BEFORE: Fan Blade Openings Facing Up Roll AFTER: Fan Blade Openings Facing Forward Blower Plate Back of the microwave. ADAPTING MICROWAVE BLOWER FOR RECIRCULATION 1 Remove tape securing damper. 2 Raise damper ...
...the unit facing up. • The microwave oven may be reinstalled in its upright position, with the top of the motor frame. 20 CHECK MICROWAVE ASSEMBLY Exhaust Adaptor 5 Carefully pull out the blower unit. Back of Microwave • Place the microwave in a later step. Back of ... so that holds the blower plate to C5. Save any unused parts for recirculating models. BEFORE: Fan Blade Openings Facing Up Roll AFTER: Fan Blade Openings Facing Forward Blower Plate Back of the microwave. ADAPTING MICROWAVE BLOWER FOR RECIRCULATION 1 Remove tape securing damper. 2 Raise damper ...


