User Manual
Page 6
... • Suitable for example, near a kitchen sink, in oven. • If materials inside the oven ignite, keep oven door CLOSED, turn the fan on the hood or filters. • Use care when cleaning the ventilating hood filters. DO NOT leave paper products, cooking utensils or food in the...the specific "PRECAUTIONS TO AVOID POSSIBLE EXPOSURE TO EXCESSIVE MICROWAVE ENERGY" on the oven. • DO NOT store this oven outdoors. Do not use as described in this oven ONLY for commercial purposes. To avoid the risk of oven is necessary when used by qualified service personnel. are...
... • Suitable for example, near a kitchen sink, in oven. • If materials inside the oven ignite, keep oven door CLOSED, turn the fan on the hood or filters. • Use care when cleaning the ventilating hood filters. DO NOT leave paper products, cooking utensils or food in the...the specific "PRECAUTIONS TO AVOID POSSIBLE EXPOSURE TO EXCESSIVE MICROWAVE ENERGY" on the oven. • DO NOT store this oven outdoors. Do not use as described in this oven ONLY for commercial purposes. To avoid the risk of oven is necessary when used by qualified service personnel. are...
User Manual
Page 7
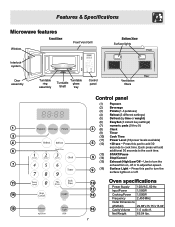
... (15) Exhaust (High/Low/Off ~ Use to cook time. Features & Specifications Microwave features Front View Window Front Vent Grill Bottom View Surface lights Front Interlock system Door ...assembly 1 2 4 6 7 11 14 15 Turntable ring assembly Turntable Turntable glass Shaft tray Control panel Rear Ventilation filters Control panel (1) Popcorn (2) Beverage (3) Potato (1-3 potatoes) (4) Reheat (3 different settings) (5) Defrost (by time ... to turn the surface lights on or off. 10 12 13 16 7 Oven specifications Power Supply 120VAC, 60 Hz Input Power 1,550W Cooking Power 1,000W...
... (15) Exhaust (High/Low/Off ~ Use to cook time. Features & Specifications Microwave features Front View Window Front Vent Grill Bottom View Surface lights Front Interlock system Door ...assembly 1 2 4 6 7 11 14 15 Turntable ring assembly Turntable Turntable glass Shaft tray Control panel Rear Ventilation filters Control panel (1) Popcorn (2) Beverage (3) Potato (1-3 potatoes) (4) Reheat (3 different settings) (5) Defrost (by time ... to turn the surface lights on or off. 10 12 13 16 7 Oven specifications Power Supply 120VAC, 60 Hz Input Power 1,550W Cooking Power 1,000W...
User Manual
Page 19
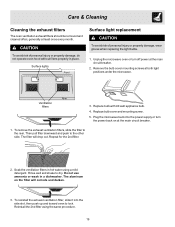
... and push to the rear. To remove the exhaust ventilation filters, slide the filter to the other side. Remove the bulb cover mounting screws at the main circuit breaker. 1. The filter will corrode and darken. 3. Unplug the microwave oven or turn the power back on the filter will drop out. Do not use ammonia or wash...
... and push to the rear. To remove the exhaust ventilation filters, slide the filter to the other side. Remove the bulb cover mounting screws at the main circuit breaker. 1. The filter will corrode and darken. 3. Unplug the microwave oven or turn the power back on the filter will drop out. Do not use ammonia or wash...
User Manual
Page 24
... the finish of appliance or home incurred during installation, including but not limited to change or add to repair or replace appliance light bulbs, air filters, water filters, other consumables, or knobs, handles, or other than genuine Electrolux parts or parts obtained from your appliance is " are subject to , any refrigerator or...
... the finish of appliance or home incurred during installation, including but not limited to change or add to repair or replace appliance light bulbs, air filters, water filters, other consumables, or knobs, handles, or other than genuine Electrolux parts or parts obtained from your appliance is " are subject to , any refrigerator or...
Installation Instructions
Page 2
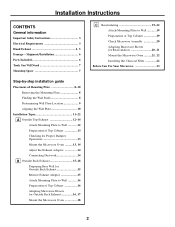
... Outside Back Exhaust 16, 17 Mount the Microwave Oven 18 C Recirculating 19-22 Attach Mounting Plate to Wall 19 Preparation of Top Cabinet 19 Check Microwave Assembly 20 Adapting Microwave Blower for Recirculation 20, 21 Mount the Microwave Oven ..........21, 22 Installing the Charcoal Filter 22 Before You Use Your Microwave 23 2 Installation Instructions CONTENTS General information Important...
... Outside Back Exhaust 16, 17 Mount the Microwave Oven 18 C Recirculating 19-22 Attach Mounting Plate to Wall 19 Preparation of Top Cabinet 19 Check Microwave Assembly 20 Adapting Microwave Blower for Recirculation 20, 21 Mount the Microwave Oven ..........21, 22 Installing the Charcoal Filter 22 Before You Use Your Microwave 23 2 Installation Instructions CONTENTS General information Important...
Installation Instructions
Page 6
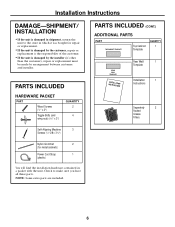
... 2 4 PARTS INCLUDED (CONT.) ADDITIONAL PARTS PART TOP CABINET TEMPLATE Top Cabinet Template QUANTITY 1 REAR WALL TEMPLATE ININSSTTRAULCLTAITOIONNS Rear Wall 1 Template Installation 1 Instructions Separately 2 Packed Grease Filters Self-Aligning Machine 3 Screws (1⁄4"-28 x 31⁄4") Nylon Grommet 2 (for metal cabinets) Power Cord Strap 1 (plastic) You will find the installation hardware contained in...
... 2 4 PARTS INCLUDED (CONT.) ADDITIONAL PARTS PART TOP CABINET TEMPLATE Top Cabinet Template QUANTITY 1 REAR WALL TEMPLATE ININSSTTRAULCLTAITOIONNS Rear Wall 1 Template Installation 1 Instructions Separately 2 Packed Grease Filters Self-Aligning Machine 3 Screws (1⁄4"-28 x 31⁄4") Nylon Grommet 2 (for metal cabinets) Power Cord Strap 1 (plastic) You will find the installation hardware contained in...
Installation Instructions
Page 8
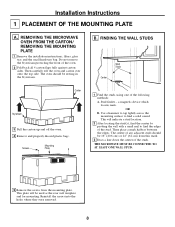
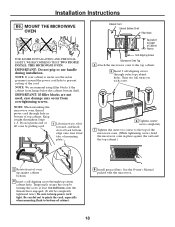
Screws Mounting Plate 1 Find the studs, using one of the oven. 2 Fold back all 4 carton flaps fully against carton sides. This will be used as the rear wall template and for mounting. THE MICROWAVE MUST BE CONNECTED TO AT LEAST ONE WALL STUD. 5 Remove the ...the front of the following methods: A. Installation Instructions 1 PLACEMENT OF THE MOUNTING PLATE A. REMOVING THE MICROWAVE OVEN FROM THE CARTON/ REMOVING THE MOUNTING PLATE 1 Remove the installation instructions, filters, glass tray and the small hardware bag. OR B. FINDING THE WALL STUDS Wall Studs Center Carton...
Screws Mounting Plate 1 Find the studs, using one of the oven. 2 Fold back all 4 carton flaps fully against carton sides. This will be used as the rear wall template and for mounting. THE MICROWAVE MUST BE CONNECTED TO AT LEAST ONE WALL STUD. 5 Remove the ...the front of the following methods: A. Installation Instructions 1 PLACEMENT OF THE MOUNTING PLATE A. REMOVING THE MICROWAVE OVEN FROM THE CARTON/ REMOVING THE MOUNTING PLATE 1 Remove the installation instructions, filters, glass tray and the small hardware bag. OR B. FINDING THE WALL STUDS Wall Studs Center Carton...
Installation Instructions
Page 11
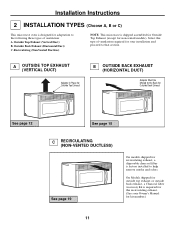
...for outside top exhaust or outside back exhaust, a Charcoal filter Accessory Kit is shipped assembled for Outside Top Exhaust (except for kit number.) 11 Recirculating (Non-Vented Ductless) NOTE: This microwave is required for the recirculating exhaust. (See your installation and... DUCTLESS) See page 19 On models shipped for recirculating exhaust, a disposable charcoal filter is designed for your Owner's Manual for non-vented models). Installation Instructions 2 INSTALLATION TYPES (Choose A, B or C) This microwave oven is factory installed to help remove smoke and odors.
...for outside top exhaust or outside back exhaust, a Charcoal filter Accessory Kit is shipped assembled for Outside Top Exhaust (except for kit number.) 11 Recirculating (Non-Vented Ductless) NOTE: This microwave is required for the recirculating exhaust. (See your installation and... DUCTLESS) See page 19 On models shipped for recirculating exhaust, a disposable charcoal filter is designed for your Owner's Manual for non-vented models). Installation Instructions 2 INSTALLATION TYPES (Choose A, B or C) This microwave oven is factory installed to help remove smoke and odors.
Installation Instructions
Page 14
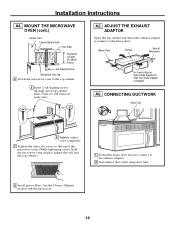
... to the top of Cabinet Recess Self-Aligning Screw Microwave Oven Top 4 Attach the microwave oven to the exhaust adaptor. 2 Seal exhaust duct joints using duct tape. 8 Install grease filters. Turn two full turns on each screw. See the Owner's Manual packed with the microwave. 14 MOUNT THE MICROWAVE OVEN (cont.) Cabinet Front Cabinet Bottom Shelf Filler Block...
... to the top of Cabinet Recess Self-Aligning Screw Microwave Oven Top 4 Attach the microwave oven to the exhaust adaptor. 2 Seal exhaust duct joints using duct tape. 8 Install grease filters. Turn two full turns on each screw. See the Owner's Manual packed with the microwave. 14 MOUNT THE MICROWAVE OVEN (cont.) Cabinet Front Cabinet Bottom Shelf Filler Block...
Installation Instructions
Page 18
.... Cabinet Front Cabinet Bottom Shelf Filler Block Equivalent to Depth of Cabinet Recess Self-Aligning Screw Microwave Oven Top 4 Attach the microwave oven to the top of the microwave oven. (While tightening screws, hold the microwave oven in bottom of cabinet. 8 Install grease filters. Be careful not to pinch the cord, especially when mounting flush to keep power cord...
.... Cabinet Front Cabinet Bottom Shelf Filler Block Equivalent to Depth of Cabinet Recess Self-Aligning Screw Microwave Oven Top 4 Attach the microwave oven to the top of the microwave oven. (While tightening screws, hold the microwave oven in bottom of cabinet. 8 Install grease filters. Be careful not to pinch the cord, especially when mounting flush to keep power cord...

Installation Instructions
Page 19
...tabs on the TOP CABINET TEMPLATE. Installation Instructions C RECIRCULATING (Non-Vented Ductless) INSTALLATION OVERVIEW C1. Install Charcoal Filter IMPORTANT NOTES: • Make sure the screws for Toggles More Than Wall Thickness Toggle Wings Toggle Bolt Wall ...wiring has been properly routed and secured, and that the plate is properly centered under the cabinet. Check Microwave Assembly C4. Attach Mounting Plate to avoid pinching fingers between the back of the cabinet when pushed flush... against the wall and that the wires are reinstalled. Mount the Microwave Oven C6.
...tabs on the TOP CABINET TEMPLATE. Installation Instructions C RECIRCULATING (Non-Vented Ductless) INSTALLATION OVERVIEW C1. Install Charcoal Filter IMPORTANT NOTES: • Make sure the screws for Toggles More Than Wall Thickness Toggle Wings Toggle Bolt Wall ...wiring has been properly routed and secured, and that the plate is properly centered under the cabinet. Check Microwave Assembly C4. Attach Mounting Plate to avoid pinching fingers between the back of the cabinet when pushed flush... against the wall and that the wires are reinstalled. Mount the Microwave Oven C6.
Installation Instructions
Page 22
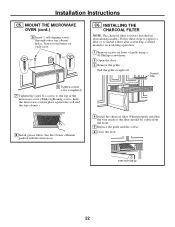
... installed, the wire mesh of grille using a #1 Phillips screwdriver. 2 Open the door. 3 Remove the grille. See the Owner's Manual packed with the microwave. 4 Install the charcoal filter. MOUNT THE MICROWAVE OVEN (cont.) 5 Insert 2 self-aligning screws through outer top cabinet holes. Pull the grille straight off. Installation Instructions C5. Turn two full turns on...
... installed, the wire mesh of grille using a #1 Phillips screwdriver. 2 Open the door. 3 Remove the grille. See the Owner's Manual packed with the microwave. 4 Install the charcoal filter. MOUNT THE MICROWAVE OVEN (cont.) 5 Insert 2 self-aligning screws through outer top cabinet holes. Pull the grille straight off. Installation Instructions C5. Turn two full turns on...


