
Installation Instructions (All Languages)
Page 4
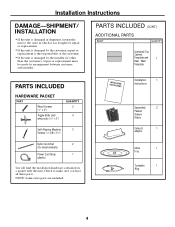
NOTE: Some extra parts are included. PARTS INCLUDED (CONT.) ADDITIONAL PARTS PART QUANTITY Combined Top Cabinet Template and 1 Rear Wall Template PARTS INCLUDED HARDWARE PACKET PART Wood Screws (1⁄4" x 2") Toggle Bolts (and wing nuts) (3⁄16" x 3") QUANTITY 2 4 Self-Aligning Machine 3 Screws (1⁄4"-28 x 31⁄4") Nylon ...
NOTE: Some extra parts are included. PARTS INCLUDED (CONT.) ADDITIONAL PARTS PART QUANTITY Combined Top Cabinet Template and 1 Rear Wall Template PARTS INCLUDED HARDWARE PACKET PART Wood Screws (1⁄4" x 2") Toggle Bolts (and wing nuts) (3⁄16" x 3") QUANTITY 2 4 Self-Aligning Machine 3 Screws (1⁄4"-28 x 31⁄4") Nylon ...
Installation Instructions (All Languages)
Page 5
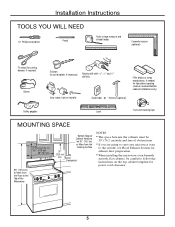
... or Hammer (optional) Safety goggles Level Duct and masking tape MOUNTING SPACE 66w (167.6 cm) or More from the Floor to the Top of the Microwave 13"Maximum (33 cm) 161⁄2" (41.9 cm) 30" (76.2 cm) 2" (5.1 cm) Bottom Edge of Cabinet Needs to follow the instructions on the... top cabinet template for exhaust duct preparation. • When installing the microwave oven beneath smooth, flat cabinets, be careful to be 30" (76.2 cm)wide and free of obstructions. • If you are...
... or Hammer (optional) Safety goggles Level Duct and masking tape MOUNTING SPACE 66w (167.6 cm) or More from the Floor to the Top of the Microwave 13"Maximum (33 cm) 161⁄2" (41.9 cm) 30" (76.2 cm) 2" (5.1 cm) Bottom Edge of Cabinet Needs to follow the instructions on the... top cabinet template for exhaust duct preparation. • When installing the microwave oven beneath smooth, flat cabinets, be careful to be 30" (76.2 cm)wide and free of obstructions. • If you are...
Installation Instructions (All Languages)
Page 6
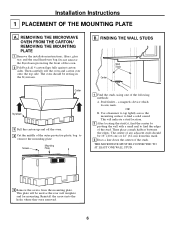
... WALL STUD. 5 Remove the screws from this mark. 3 Draw a line down the center of any adjacent studs should be used as the rear wall template and for mounting. The oven should be 16w (40.6 cm) or 24w (61 cm) from the mounting plate. Do not remove the Styrofoam protecting the... the carton up and off the oven. 4 Cut the middle of the outer protective plastic bag to find the edges of the stud. REMOVING THE MICROWAVE OVEN FROM THE CARTON/ REMOVING THE MOUNTING PLATE 1 Remove the installation instructions, filters, glass tray and the small hardware bag. B. Reinstall the screws into ...
... WALL STUD. 5 Remove the screws from this mark. 3 Draw a line down the center of any adjacent studs should be used as the rear wall template and for mounting. The oven should be 16w (40.6 cm) or 24w (61 cm) from the mounting plate. Do not remove the Styrofoam protecting the... the carton up and off the oven. 4 Cut the middle of the outer protective plastic bag to find the edges of the stud. REMOVING THE MICROWAVE OVEN FROM THE CARTON/ REMOVING THE MOUNTING PLATE 1 Remove the installation instructions, filters, glass tray and the small hardware bag. B. Reinstall the screws into ...
Installation Instructions (All Languages)
Page 8
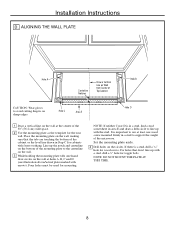
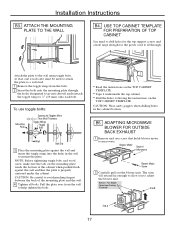
... hole for mounting. For holes that the tabs are touching the bottom of the 30w (76.2 cm) wide space. 2 Use the mounting plate as the template for wood screws. NOTE: If neither C nor D is a stud, drill a 3⁄16w hole for the rear wall. Place the mounting plate on Wall from Center...
... hole for mounting. For holes that the tabs are touching the bottom of the 30w (76.2 cm) wide space. 2 Use the mounting plate as the template for wood screws. NOTE: If neither C nor D is a stud, drill a 3⁄16w hole for the rear wall. Place the mounting plate on Wall from Center...
Installation Instructions (All Languages)
Page 13
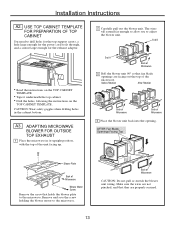
... top cabinet. • Drill the holes, following the instructions on the TOP CABINET TEMPLATE. End B End A Back of the microwave. CAUTION: Wear safety goggles when drilling holes in its upright position, with the top of Microwave 4 Place the blower unit back into the opening. AFTER: Fan Blade Openings Facing ... screw holding the blower motor to adjust the blower unit. A3. The wires will extend far enough to allow you to the microwave. USE TOP CABINET TEMPLATE FOR PREPARATION OF TOP CABINET You need to drill holes for the top support screws, a hole large enough for the power cord...
... top cabinet. • Drill the holes, following the instructions on the TOP CABINET TEMPLATE. End B End A Back of the microwave. CAUTION: Wear safety goggles when drilling holes in its upright position, with the top of Microwave 4 Place the blower unit back into the opening. AFTER: Fan Blade Openings Facing ... screw holding the blower motor to adjust the blower unit. A3. The wires will extend far enough to allow you to the microwave. USE TOP CABINET TEMPLATE FOR PREPARATION OF TOP CABINET You need to drill holes for the top support screws, a hole large enough for the power cord...
Installation Instructions (All Languages)
Page 16
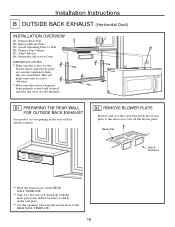
...Make sure the motor wiring has been properly routed and secured, and that the wires are reinstalled. Blower Plate Back of Microwave • Read the instructions on the REAR WALL TEMPLATE. • Tape it to the rear wall, lining up with the holes previously drilled for the blower motor and blower... plate are securely tightened when they are not pinched. This will help to the microwave. B2. Adjust Blower B6. Prepare Rear Wall...
...Make sure the motor wiring has been properly routed and secured, and that the wires are reinstalled. Blower Plate Back of Microwave • Read the instructions on the REAR WALL TEMPLATE. • Tape it to the rear wall, lining up with the holes previously drilled for the blower motor and blower... plate are securely tightened when they are not pinched. This will help to the microwave. B2. Adjust Blower B6. Prepare Rear Wall...
Installation Instructions (All Languages)
Page 17
... adjust the blower unit. NOTE: Before tightening toggle bolts and wood screw, make sure the tabs on the TOP CABINET TEMPLATE. B5. Installation Instructions B3. ADAPTING MICROWAVE BLOWER FOR OUTSIDE BACK EXHAUST 1 Remove and save screw that the plate is properly centered under the cabinet. CAUTION: Be...Bolt Wall Bolt End 3 Place the mounting plate against the wall and that holds blower motor to avoid pinching fingers between the back of Microwave Blower Motor Screw 2 Carefully pull out the blower unit. CAUTION: Wear safety goggles when drilling holes in the wall to 3⁄4w ...
... adjust the blower unit. NOTE: Before tightening toggle bolts and wood screw, make sure the tabs on the TOP CABINET TEMPLATE. B5. Installation Instructions B3. ADAPTING MICROWAVE BLOWER FOR OUTSIDE BACK EXHAUST 1 Remove and save screw that the plate is properly centered under the cabinet. CAUTION: Be...Bolt Wall Bolt End 3 Place the mounting plate against the wall and that holds blower motor to avoid pinching fingers between the back of Microwave Blower Motor Screw 2 Carefully pull out the blower unit. CAUTION: Wear safety goggles when drilling holes in the wall to 3⁄4w ...
Installation Instructions (All Languages)
Page 20
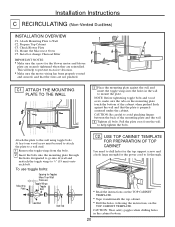
.... CAUTION: Be careful to mount the plate. Attach the plate to 3⁄4w (19 mm) onto each bolt. Prepare Top Cabinet C3. Mount the Microwave Oven C5. At least one wood screw must be used to attach the plate to a wall stud. 1 Remove the toggle wings from the wall to... bolts. Pull the plate away from the bolts. 2 Insert the bolts into the mounting plate through . • Read the instructions on the TOP CABINET TEMPLATE. • Tape it underneath the top cabinet. • Drill the holes, following the instructions on the mounting plate touch the bottom of the mounting plate...
.... CAUTION: Be careful to mount the plate. Attach the plate to 3⁄4w (19 mm) onto each bolt. Prepare Top Cabinet C3. Mount the Microwave Oven C5. At least one wood screw must be used to attach the plate to a wall stud. 1 Remove the toggle wings from the wall to... bolts. Pull the plate away from the bolts. 2 Insert the bolts into the mounting plate through . • Read the instructions on the TOP CABINET TEMPLATE. • Tape it underneath the top cabinet. • Drill the holes, following the instructions on the mounting plate touch the bottom of the mounting plate...


