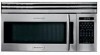
Frigidaire PLMVZ169HC Support Question
Frigidaire PLMVZ169HC Support Question
Find answers below for this question about Frigidaire PLMVZ169HC - 1.6 cu. Ft. Microwave Oven.Need a Frigidaire PLMVZ169HC manual? We have 3 online manuals for this item!
Question posted by mungz on August 12th, 2012
Frigidaire Mounting Templates Plmvz169
The person who posted this question about this Frigidaire product did not include a detailed explanation. Please use the "Request More Information" button to the right if more details would help you to answer this question.
Current Answers
Related Frigidaire PLMVZ169HC Manual Pages
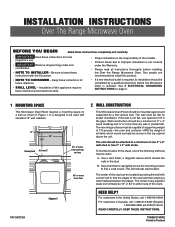
User Manual - Page 1

Microwave Oven
Visit the Frigidaire Web Site at:
http://www.frigidaire.com
READ AND SAVE THESE INSTRUCTIONS
Welcome & Congratulation....... 2 Important Safety Instructions... 2-6 Part Names 7 Before Operating 8 Manual Operation 8 Operating Instructions 9-17 Cleaning and Care 18-19 Specifications 20 Service Call Check 20 Warranty 21
P/N316495001
TINSEB150WRRZ-EL82 E
User Manual - Page 2
... are very proud of a new microwave oven! Check the section titled "Service Call Check". This section helps you can do to operate this oven with the door open since open-door operation can result in this manual. A list of toll-free customer service numbers is only a phone call Frigidaire Customer Services at : http://www...
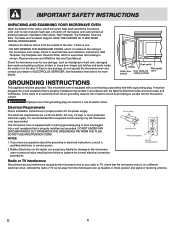
User Manual - Page 3

... must be grounded. Visible bubbling or boiling when the container is removed from the microwave oven is specifically designed to be serviced only by qualified service personnel...frequently. This type of injury to properly grounded outlet. To reduce the risk of microwave oven is not always present.
Do not use this appliance. Do not overcook food. ...
User Manual - Page 4
... into a wall receptacle that is properly installed and grounded.
DO NOT USE AN EXTENSION CORD. NOTES: 1. Lift carton off microwave oven and remove all packing materials, Installation Instructions, Wall Template, Top Template, Charcoal Filter, Turntable and Turntable Support.
Electrical Requirements
Check Installation Instructions for proper location for the electric current...
User Manual - Page 5

...Under certain special circumstances, liquids may start a fire. Do not boil liquids in microwave ovens.
• Some products such as potatoes, hot dogs, sausages, tomatoes, apples, chicken ... and counterclockwise. Such use of the microwave oven could dehydrate and catch fire, causing damage to your microwave oven unless in the microwave oven. When using the IEC Test Procedure...
User Manual - Page 6

...) • recycled paper products • brown paper bags
TEMP
FOOD
145°F - ACCESSORIES There are used in contact with any damage to hasten cooking.
• Microwave oven cooking bags are either defrosting or cooking too quickly.
Follow manufacturer's directions.)
These items can be allowed to buy all safety precautions: use metal twist...
User Manual - Page 7
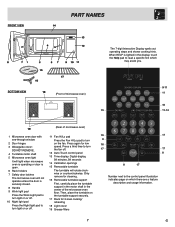
When HELP is lighted in the center of microwave oven)
1 Microwave oven door with see-through window
2 Door hinges 3 Waveguide cover:
DO NOT REMOVE. 4 Turntable motor shaft 5 Microwave oven light
It will light when microwave oven is operating or door is open. 6 Rack holders 7 Safety door latches The microwave oven will rotate clockwise or counterclockwise. Only remove for cleaning.
16 Removable...
User Manual - Page 8
.../OFF
Touch the Clear/Off pad to defrost for 30%. Consult cookbook or recipes for 30%.
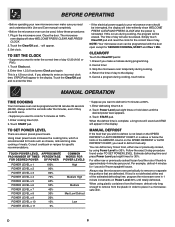
BEFORE OPERATING
• Before operating your microwave oven should be erased. or P.M.).
1. Stop the microwave oven temporarily during programming. 2. MANUAL DEFROST
If the food that are eleven preset power levels.
Estimate defrosting time and press Power Level pad...
User Manual - Page 9
... will be at normal storage temperature.
AVOID:
• Storing the rack in the microwave oven when not in the Interactive Display to turntable at one inch to escape.
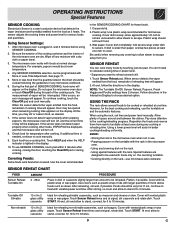
SENSOR REHEAT... 36oz Turntable On
Place in dish or casserole slightly larger than the quantity listed in the microwave
oven. • Using any covering to allow steam to cover. Flatten, if possible. Use covers...
User Manual - Page 10

...3 minutes. After cooking, stir and let stand, covered, for 1-3 minutes. When microwave oven stops, turn patties over or stir meat in aluminum foil and let stand 5 to ...- 1.5 lb 1 - 2
Wash and place in casserole. Cover with lid or plastic wrap.
Remove package from the microwave oven as patties or in a casserole and cover with wax paper. Frozen Veggie
.25 - 1.25 lb
Add no water ...
User Manual - Page 19

... NOT USE A BULB LARGER THAN 30 WATTS.
4.
Open light cover located behind filter mounting by carefully pulling up on . Remove old light bulb and replace only with your microwave oven, is on the front edge.
3. Remove the louver mounting screws. 3. Change the charcoal filter. 5. Bulbs are also available at the circuit breaker...
User Manual - Page 20

...oven is the answer to avoid overcooking. YES _____ YES _____ YES _____ YES _____
NO _____ NO _____ NO _____ NO _____
If "NO" is set by a "do-it-yourself" repair person. NOTE: 1. In compliance with Department of Canada.
- SPECIFICATIONS
CGLMV169, GLMV169, CPLMZ169, PLMVZ169... 8 7/8"(H) x 14 7/16"(D)
Microwave oven Capacity***:
1.6 Cu.Ft. Cooking Uniformity:
Turntable / Stirrer Fan...
Parts Catalog - Page 3
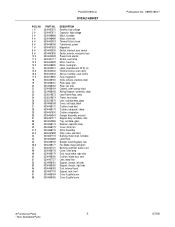
..., glass Retainer, capacitor strap Cover, stirrer fan Stirrer Assembly Filter, noise, electronic Bushing, motor shaft, turntable Latch Hook Bracket, mounting plate, rear Fan Blade, mag cooling fan Bushing, grommet, power cord Cover, oven lamp Duct, hood intake, right side Cushion, intake duct, seal Lens, lamp filter Support, chassis, left side Support, chassis...
Parts Catalog - Page 7
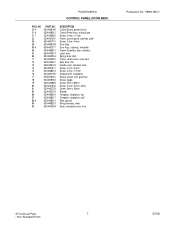
... x 8 mm Screw, 4 mm x 15 mm Hardware Kit, installation Sleeve, power cord, grommet Screw, toggle Screw, 5mm x 85mm Screw, 4 mm x 8 mm, white Screw, 5mm x 35mm Washer Template, installation, top Template, installation, wall Wire, ground Wiring Harness, main Rack, microwave oven, wire
Publication No: 5995518817
# Functional Parts
7
* Non-Illustrated Parts
07/08
Installation Instructions - Page 1
... above the unit. See 3 ELECTRICAL GROUNDING INSTRUCTIONS on page 2.
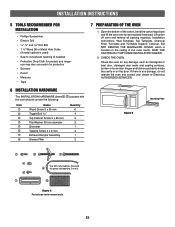
1 MOUNTING SPACE
This Microwave Oven/Hood requires a mounting space on a wall as shown in Thailand If the wall is designed... and ³⁄₈" or more from floor
Figure 1
2 WALL CONSTRUCTION
This Microwave Oven/Hood should be mounted against and supported by probing the wall with standard 12" wall cabinets.
12" 30...
Installation Instructions - Page 2

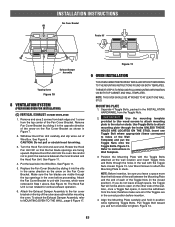
...; Elbow (10 ft.) 45° Elbow (5 ft.) Adaptor (5 ft.) 10" Wide Elbow (10 ft.)
90° Elbow (25 ft.) 45° Elbow (5 ft.) Wall cap (40 ft.) Roof cap (24 ft.) Figure 3
E2...diameter round duct should be used , care should be located inside the cabinet directly above the Microwave Oven mounting location as shown in Figure 2.
MAXIMUM DUCT LENGTH: For satisfactory air movement, the total duct ...
Installation Instructions - Page 3
... WAVEGUIDE COVER, which is located on plastic foam pad. CHECK THE OVEN. Figure 5
Mounting Plate
Figure 4 Parts shown not to common scale.
Open the bottom of the...Lift carton off oven and remove all packing materials, Installation Instructions, Wall Template, Top Template, Charcoal Filter, Turntable and Turntable Support;
Check the oven for any damage, do not operate the oven and contact ...
Installation Instructions - Page 5
... it cannot be able to the fan cover bracket on the Fan Cover Bracket. E5 Put the lead wire into the oven. Attach the Fan Cover Bracket to the stud or studs. IMPORTANT Use the mounting template provided to Use wood screws to attach mounting plate to unit with the Toggle Nuts closed position).
Installation Instructions - Page 6
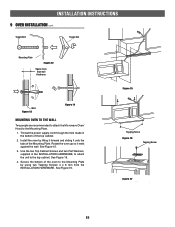
... of the top cabinet.
2. Figure 15
Tapping Screw
Figure 16
Tapping Screw
Figure 17
E6 Toggle Bolt
Toggle Nut
Mounting Plate
Figure 12
Space more than wall thickness
Wall Figure 13
Figure 14
MOUNTING OVEN TO THE WALL
Two people are recommended to attach the Microwave Oven/ Hood to the top cabinet.
See Figure 16.
4.
Installation Instructions - Page 7

E7 Make sure the unit has been installed according to all of the Installation Instructions and the Wall and Top Cabinet Templates.
2.
Plug in the power cord. 3. INSTALLATION INSTRUCTIONS
CHECKLIST FOR INSTALLATION
1. Keep the Operation Manual.
Similar Questions

Key Pad
I am interested in learning if the key pad on this device lights up? I just moved into a home with t...
I am interested in learning if the key pad on this device lights up? I just moved into a home with t...
(Posted by dgrieco 5 years ago)
Can I Install A Frigidaire Fgmv175qf With A Fgmv174kf Mounting Kit?
(Posted by josh2103 8 years ago)

Frigidaire Gallery 1.7 Cu Ft Over-the-range Microwave (stainless-steel) Won't
heat
heat
(Posted by rmrWillia 10 years ago)

Microwave Runs But Does Not Heat Items When Placed Inside. What Could Be Wrong?
We have tried everything and do not know if we just need to replace the entire microwave. Any ideas?...
We have tried everything and do not know if we just need to replace the entire microwave. Any ideas?...
(Posted by wrightam99 10 years ago)

Microwave Installation
mounting templates for frigidaire microwave plmvz169hc
mounting templates for frigidaire microwave plmvz169hc
(Posted by mungz 11 years ago)