
Installation Instructions
Page 3
...3 Electrical Requirements 3 Damage - Shipment/Installation 4 Parts Included 4 Tools You Will Need 5 Mounting Space 5 Step-by-step installation guide Placement of The Mounting Plate 6-8 Removing the Mounting Plate 6 Finding the Wall Studs 6 Determining Wall Plate Location 7 Aligning the Wall Plate 8 Installation Types 9 A Recirculating 10 -13 Attach Mounting Plate to Wall 10 Preparation of Top Cabinet 11 Check Blower Plate 11 Mount the Microwave Oven 11-12 Installing or Change the Charcoal Filter 12-13 Hood Exhaust 14-15 B Outside Back Exhaust 16-19 Preparing Rear Wall for...
...3 Electrical Requirements 3 Damage - Shipment/Installation 4 Parts Included 4 Tools You Will Need 5 Mounting Space 5 Step-by-step installation guide Placement of The Mounting Plate 6-8 Removing the Mounting Plate 6 Finding the Wall Studs 6 Determining Wall Plate Location 7 Aligning the Wall Plate 8 Installation Types 9 A Recirculating 10 -13 Attach Mounting Plate to Wall 10 Preparation of Top Cabinet 11 Check Blower Plate 11 Mount the Microwave Oven 11-12 Installing or Change the Charcoal Filter 12-13 Hood Exhaust 14-15 B Outside Back Exhaust 16-19 Preparing Rear Wall for...

Installation Instructions
Page 4
... electrical requirements noted (under ELECTRICAL REQUIREMENTS), a qualified electrician should be mounted to the National Electrical Code or the prevailing local code. FOR PERSONAL SAFETY, THIS APPLIANCE MUST BE PROPERLY GROUNDED TO AVOID SEVERE OR FATAL SHOCK. DO NOT, UNDER ANY CIRCUMSTANCES, CUT, DEFORM OR REMOVE ANY OF THE PRONGS FROM THE POWER CORD. Wire size must be located in addition to the added weight...
... electrical requirements noted (under ELECTRICAL REQUIREMENTS), a qualified electrician should be mounted to the National Electrical Code or the prevailing local code. FOR PERSONAL SAFETY, THIS APPLIANCE MUST BE PROPERLY GROUNDED TO AVOID SEVERE OR FATAL SHOCK. DO NOT, UNDER ANY CIRCUMSTANCES, CUT, DEFORM OR REMOVE ANY OF THE PRONGS FROM THE POWER CORD. Wire size must be located in addition to the added weight...
Installation Instructions
Page 5
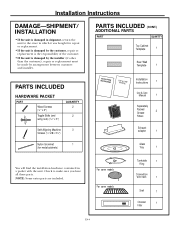
... must be made by arrangement between customer and installer. PARTS INCLUDED (CONT.) ADDITIONAL PARTS PART QUANTITY Top Cabinet Template 1 Rear Wall Template 1 PARTS INCLUDED HARDWARE PACKET PART Wood Screws (1⁄4" x 2") Toggle Bolts (and wing nuts) (3⁄16" x 3") QUANTITY 2 2 Self-Aligning Machine 3 Screws (1⁄4"-28 x 31⁄4") ININSSTTRAULCLTAITOIONNS UMSEAN&UCAALRE Installation Instructions 1 Use & Care Manual 1 Separately Packed Grease 2 Filters Exhaust adaptor 1 Nylon Grommet 1 (for repair or replacement. • If the unit is damaged by...
... must be made by arrangement between customer and installer. PARTS INCLUDED (CONT.) ADDITIONAL PARTS PART QUANTITY Top Cabinet Template 1 Rear Wall Template 1 PARTS INCLUDED HARDWARE PACKET PART Wood Screws (1⁄4" x 2") Toggle Bolts (and wing nuts) (3⁄16" x 3") QUANTITY 2 2 Self-Aligning Machine 3 Screws (1⁄4"-28 x 31⁄4") ININSSTTRAULCLTAITOIONNS UMSEAN&UCAALRE Installation Instructions 1 Use & Care Manual 1 Separately Packed Grease 2 Filters Exhaust adaptor 1 Nylon Grommet 1 (for repair or replacement. • If the unit is damaged by...

Installation Instructions
Page 7
... be used as the rear wall template and for mounting. Installation Instructions 1 PLACEMENT OF THE MOUNTING PLATE A. FINDING THE WALL STUDS Glass Tray 2 Fold back all 4 carton flaps fully against carton sides. Do not remove the Styrofoam protecting the front of the following methods: A. Reinstall the screws into the holes where they were removed. REMOVING THE MICROWAVE OVEN FROM THE CARTON/ REMOVING THE MOUNTING PLATE 1 Remove the installation instructions,use and care, exhaust adapter, turntable ring, shelf, filters, glass tray and...
... be used as the rear wall template and for mounting. Installation Instructions 1 PLACEMENT OF THE MOUNTING PLATE A. FINDING THE WALL STUDS Glass Tray 2 Fold back all 4 carton flaps fully against carton sides. Do not remove the Styrofoam protecting the front of the following methods: A. Reinstall the screws into the holes where they were removed. REMOVING THE MICROWAVE OVEN FROM THE CARTON/ REMOVING THE MOUNTING PLATE 1 Remove the installation instructions,use and care, exhaust adapter, turntable ring, shelf, filters, glass tray and...

Installation Instructions
Page 11
... Top Cabinet A3. Install or change Charcoal Filter IMPORTANT NOTES: • Make sure the screws for the blower motor and blower plate are securely tightened when they are not pinched. ATTACH THE MOUNTING PLATE TO THE WALL Attach the plate to the wall using adequate materials supporting 150 Ibs to allow proper top vent air exhaust/intake. 13" MAX. (33 cm) Cabinet Cabinet 1 Remove the toggle wings from the wall to...
... Top Cabinet A3. Install or change Charcoal Filter IMPORTANT NOTES: • Make sure the screws for the blower motor and blower plate are securely tightened when they are not pinched. ATTACH THE MOUNTING PLATE TO THE WALL Attach the plate to the wall using adequate materials supporting 150 Ibs to allow proper top vent air exhaust/intake. 13" MAX. (33 cm) Cabinet Cabinet 1 Remove the toggle wings from the wall to...

Installation Instructions
Page 13
... microwave oven. (While tightening screws, hold the microwave oven in some models. A 5.1 Unplug microwave oven or disconnect power. INSTALLING OR CHANGE THE CHARCOAL FILTER (Some Models) NOTE: The charcoal filter is factory installed and for replacement information. For models without the recirculation filter access door,follow these steps to see if yours is factory installed in place against the wall and the top cabinet.) A 5.3 Remove the charcoal filter by pushing the top of the filter cavity. Installation Instructions A4. MOUNT THE MICROWAVE OVEN...
... microwave oven. (While tightening screws, hold the microwave oven in some models. A 5.1 Unplug microwave oven or disconnect power. INSTALLING OR CHANGE THE CHARCOAL FILTER (Some Models) NOTE: The charcoal filter is factory installed and for replacement information. For models without the recirculation filter access door,follow these steps to see if yours is factory installed in place against the wall and the top cabinet.) A 5.3 Remove the charcoal filter by pushing the top of the filter cavity. Installation Instructions A4. MOUNT THE MICROWAVE OVEN...

Installation Instructions
Page 17
... the blower plate. B1. Remove Blower Plate B3. Mount the Microwave Oven IMPORTANT NOTES: • Make sure the screws for outside exhaust. IMPORTANT: LOCATE AT LEAST ONE STUD ON EITHER SIDE OF MSTHPAAERCKCEETDNHTTEOELRGOLGCINLAEET.IBOONLFTOSRIN2TAHDEDMITOIOUNNATLIN, EGVPELNALTYE AREA. REMOVE BLOWER PLATE Remove and save the screw that the wires are reinstalled. PREPARING THE REAR WALL FOR OUTSIDE BACK EXHAUST You need to the rear wall. • Cut the opening in the mounting plate. Attach Mounting Plate to the microwave. Prepare Rear Wall B2...
... the blower plate. B1. Remove Blower Plate B3. Mount the Microwave Oven IMPORTANT NOTES: • Make sure the screws for outside exhaust. IMPORTANT: LOCATE AT LEAST ONE STUD ON EITHER SIDE OF MSTHPAAERCKCEETDNHTTEOELRGOLGCINLAEET.IBOONLFTOSRIN2TAHDEDMITOIOUNNATLIN, EGVPELNALTYE AREA. REMOVE BLOWER PLATE Remove and save the screw that the wires are reinstalled. PREPARING THE REAR WALL FOR OUTSIDE BACK EXHAUST You need to the rear wall. • Cut the opening in the mounting plate. Attach Mounting Plate to the microwave. Prepare Rear Wall B2...

Installation Instructions
Page 21
... MOUNTING PLATE TO THE WALL To use toggle bolts: Mounting Plate Spacing for Outside Top Exhaust C4. Trim the rear wall template along the dotted line. 3/8" TO EDGE 12" Trim the rear wall template along the dotted line. Wall Bolt End 3 Place the mounting plate against the wall and that the wires are reinstalled. NOTE: Before tightening toggle bolts and wood screw, make sure the bottom of the mounting plate touch the bottom of the mounting plate...
... MOUNTING PLATE TO THE WALL To use toggle bolts: Mounting Plate Spacing for Outside Top Exhaust C4. Trim the rear wall template along the dotted line. 3/8" TO EDGE 12" Trim the rear wall template along the dotted line. Wall Bolt End 3 Place the mounting plate against the wall and that the wires are reinstalled. NOTE: Before tightening toggle bolts and wood screw, make sure the bottom of the mounting plate touch the bottom of the mounting plate...

Installation Instructions
Page 23
... with the screw removed in Step 1. Do not pinch cord or lift oven by pulling cord. 1 Lift microwave, tilt it is tight. 6 Replace blower plate with the screw removed in Step 1. EN-22 Adaptor Guide Back of top cabinet. NOTE: When mounting the microwave oven, thread power cord through top center cabinet hole. ADAPTING MICROWAVE BLOWER FOR OUTSIDE TOP EXHAUST (cont.) 5 Secure blower unit to assure that the damper hinge is installed. C5...
... with the screw removed in Step 1. Do not pinch cord or lift oven by pulling cord. 1 Lift microwave, tilt it is tight. 6 Replace blower plate with the screw removed in Step 1. EN-22 Adaptor Guide Back of top cabinet. NOTE: When mounting the microwave oven, thread power cord through top center cabinet hole. ADAPTING MICROWAVE BLOWER FOR OUTSIDE TOP EXHAUST (cont.) 5 Secure blower unit to assure that the damper hinge is installed. C5...

Installation Instructions
Page 25
Install turntable ring and glass tray in cavity. 6. ININSSTTARLULCATTIIOONNS 4. Plug power cord into a seperate and dedicated 15- Replace house fuse or turn breaker back on. to instructions. 5. FILL OUT PRODUCT REGISTRATION CARD AN SEND IN. USME &A|+&= NCUAARLE + 7. D RPEGROISDCTUARCRATDTION D D G D G EN-24 KEEP INSTALLATION INSTRUCTIONS FOR THE LOCAL INSPECTOR'S USE. ININSSTTARLULCATTIIOONNS 2. Remove all packing material from the microwave oven. 3. Read the USE & CARE Manual. Ensure proper ground exists before use 8. Installation Instructions ...
Install turntable ring and glass tray in cavity. 6. ININSSTTARLULCATTIIOONNS 4. Plug power cord into a seperate and dedicated 15- Replace house fuse or turn breaker back on. to instructions. 5. FILL OUT PRODUCT REGISTRATION CARD AN SEND IN. USME &A|+&= NCUAARLE + 7. D RPEGROISDCTUARCRATDTION D D G D G EN-24 KEEP INSTALLATION INSTRUCTIONS FOR THE LOCAL INSPECTOR'S USE. ININSSTTARLULCATTIIOONNS 2. Remove all packing material from the microwave oven. 3. Read the USE & CARE Manual. Ensure proper ground exists before use 8. Installation Instructions ...

Complete Owners Guide
Page 3
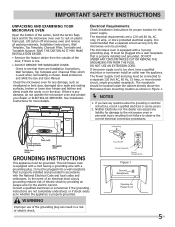
... as described in the microwave oven at the fuse or circuit breaker panel. - Obey all instructions before removing the container. - Carefully attend appliance when paper, plastic or other utensil into the container. • Clean ventilation openings and grease filters frequently. Remove wire twist-ties from heated surfaces. • Do not let cord hang over edge of table or counter. • See door surface cleaning instructions on . • This appliance...
... as described in the microwave oven at the fuse or circuit breaker panel. - Obey all instructions before removing the container. - Carefully attend appliance when paper, plastic or other utensil into the container. • Clean ventilation openings and grease filters frequently. Remove wire twist-ties from heated surfaces. • Do not let cord hang over edge of table or counter. • See door surface cleaning instructions on . • This appliance...
Complete Owners Guide
Page 5
... or loose door hinges and latches and dents inside the cabinet directly above the Microwave Oven mounting location as to observe the correct electrical connection procedures. Lift carton off microwave oven and remove all packing materials, Installation Instructions, Wall Template, Top Template, Charcoal Filter, Turntable and Turntable Support. Check the microwave oven for damage to the microwave oven or personal injury resulting from the outside of the door, if there is properly installed and grounded. The Power Supply Cord and plug must...
... or loose door hinges and latches and dents inside the cabinet directly above the Microwave Oven mounting location as to observe the correct electrical connection procedures. Lift carton off microwave oven and remove all packing materials, Installation Instructions, Wall Template, Top Template, Charcoal Filter, Turntable and Turntable Support. Check the microwave oven for damage to the microwave oven or personal injury resulting from the outside of the door, if there is properly installed and grounded. The Power Supply Cord and plug must...

Complete Owners Guide
Page 7
... directing steam away from walls, ceiling and door. 7 A dish which becomes very hot should not be in your clothes or accessories do not touch the safety door latches. • Keep aluminum foil used for large meats or foods that need to learn that the microwave oven is necessary when used by an adult is not a toy. Between the ages of a dish's covering and carefully open popcorn and oven cooking...
... directing steam away from walls, ceiling and door. 7 A dish which becomes very hot should not be in your clothes or accessories do not touch the safety door latches. • Keep aluminum foil used for large meats or foods that need to learn that the microwave oven is necessary when used by an adult is not a toy. Between the ages of a dish's covering and carefully open popcorn and oven cooking...

Complete Owners Guide
Page 10
... Clock button 3s, display is the table showing the various settings. Enter desired time using number pads. 3. Press Timer pad. Note: If the temperature gets too hot around the microwave oven, the fan in the exhaust vent hood will hear beep alerts indicating the timer has run out. When the timer has reached the end of the range below the microwave oven. Below is on. 2. When display is opened. Exhaust High / Low / Off The exhaust ventilation removes...
... Clock button 3s, display is the table showing the various settings. Enter desired time using number pads. 3. Press Timer pad. Note: If the temperature gets too hot around the microwave oven, the fan in the exhaust vent hood will hear beep alerts indicating the timer has run out. When the timer has reached the end of the range below the microwave oven. Below is on. 2. When display is opened. Exhaust High / Low / Off The exhaust ventilation removes...

Complete Owners Guide
Page 11
... displayed if a quick start cooking cycle is very useful when cleaning the control panel. MANUAL COOKING Control Lock You may lock the control panel to prevent the microwave from being accidentally started or used by weight) feature. Press START pad. "Food" will display. Use the number pads to enter desired heating time (cook time may choose. Example: to clear ''Food'' from the display. 5. Your oven has nine other power levels you will hear beeps and "End" will be set the control lock ON: Press and hold the Stop...
... displayed if a quick start cooking cycle is very useful when cleaning the control panel. MANUAL COOKING Control Lock You may lock the control panel to prevent the microwave from being accidentally started or used by weight) feature. Press START pad. "Food" will display. Use the number pads to enter desired heating time (cook time may choose. Example: to clear ''Food'' from the display. 5. Your oven has nine other power levels you will hear beeps and "End" will be set the control lock ON: Press and hold the Stop...

Complete Owners Guide
Page 20
... no cooking power. 1. on time. Press pad 4 times . 2. The filter indicator light will track the vent fan on time. Once the charcoal filter is changed, use reset yes to turn filter indicator off the filter indicator light when vented to outside. NOTE If the display shows oFF, pressing the START button will display and the START needs to be pressed to enter Demo mode. Off yes Turn off and begin new time for charcoal filter replacement. Rest yes Reset Filter Indicator The filter indicator light on the display...
... no cooking power. 1. on time. Press pad 4 times . 2. The filter indicator light will track the vent fan on time. Once the charcoal filter is changed, use reset yes to turn filter indicator off the filter indicator light when vented to outside. NOTE If the display shows oFF, pressing the START button will display and the START needs to be pressed to enter Demo mode. Off yes Turn off and begin new time for charcoal filter replacement. Rest yes Reset Filter Indicator The filter indicator light on the display...
Complete Owners Guide
Page 21
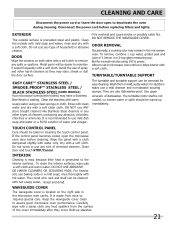
... cleaning. CLEANING AND CARE Disconnect the power cord or leave the door open the microwave oven door before replacing filters and lights. Disconnect the power cord before cleaning. Avoid the use a mild cleanser and non-abrasive scouring sponge. DO NOT REMOVE THE WAVEGUIDE COVER. Wash them in cleaning the touch control panel. They are also dishwasher-proof. The turntable motor shaft is located on both sides with a soft cloth. If the control panel becomes soiled, open to remove any sort of household...
... cleaning. CLEANING AND CARE Disconnect the power cord or leave the door open the microwave oven door before replacing filters and lights. Disconnect the power cord before cleaning. Avoid the use a mild cleanser and non-abrasive scouring sponge. DO NOT REMOVE THE WAVEGUIDE COVER. Wash them in cleaning the touch control panel. They are also dishwasher-proof. The turntable motor shaft is located on both sides with a soft cloth. If the control panel becomes soiled, open to remove any sort of household...

Complete Owners Guide
Page 22
... power cord before replacing filters and lights. Cleaning the exhaust filters The oven ventilation exhaust filters should be careful not to lock. To avoid risk of personal injury or property damage, wear gloves when replacing the light bulbs. To remove the exhaust ventilation filters, slide the filter to the other side. Repeat for the 2nd filter. 4. The aluminum on at the main circuit breaker. Re-install LED light cover and mounting screw. 7. Soak the ventilation filters in place. Vent exhaust filter part number...
... power cord before replacing filters and lights. Cleaning the exhaust filters The oven ventilation exhaust filters should be careful not to lock. To avoid risk of personal injury or property damage, wear gloves when replacing the light bulbs. To remove the exhaust ventilation filters, slide the filter to the other side. Repeat for the 2nd filter. 4. The aluminum on at the main circuit breaker. Re-install LED light cover and mounting screw. 7. Soak the ventilation filters in place. Vent exhaust filter part number...
Complete Owners Guide
Page 25
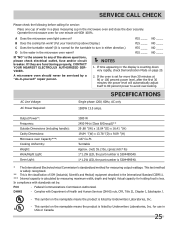
... overcooking. Output Power*: Frequency: Outside Dimensions (including handle): Cavity Dimensions: Microwave oven Capacity***: Cooking Uniformity: Weight: Work/Night Light: Oven Light: 1000 W 2450 MHz (Class B/Group2)** 29 .88 "(W) x 15.04 "(D) x 16.41 "(H) 19.84 "(W) x 13.78 "(D) x 9.09 "(H) 1.87 Cu.Ft. In compliance with Department of ISM (Industrial, Scientific and Medical) equipment described in the display is the classification of Health and Human Services (DHHS) rule...
... overcooking. Output Power*: Frequency: Outside Dimensions (including handle): Cavity Dimensions: Microwave oven Capacity***: Cooking Uniformity: Weight: Work/Night Light: Oven Light: 1000 W 2450 MHz (Class B/Group2)** 29 .88 "(W) x 15.04 "(D) x 16.41 "(H) 19.84 "(W) x 13.78 "(D) x 9.09 "(H) 1.87 Cu.Ft. In compliance with Department of ISM (Industrial, Scientific and Medical) equipment described in the display is the classification of Health and Human Services (DHHS) rule...

Product Specifications Sheet
Page 1
... Version: 07/22 Cooking Controls Clock Defrost Time Defrost Weight Number of Power Levels Cooking Power Ventilation System Ductless Vent Exhaust Fan Speeds Minimum Air Flow Capacity Maximum Air Flow Capacity Charcoal Filter Included Removable Grease Filter Grease Filter Included Grease Filter Dishwasher Safe Grease Filter Quantity Ducted Vent Additional Settings Child Lock Clock Display On / Off Demo On / Off Setting Weight Lb / Kg Surface Cooking Light Timer On / Off Vent Fan Exterior Door Swing Surface Light System Lighting Type Number of Lights Electrical Specifications Amps @ 120 Volts...
... Version: 07/22 Cooking Controls Clock Defrost Time Defrost Weight Number of Power Levels Cooking Power Ventilation System Ductless Vent Exhaust Fan Speeds Minimum Air Flow Capacity Maximum Air Flow Capacity Charcoal Filter Included Removable Grease Filter Grease Filter Included Grease Filter Dishwasher Safe Grease Filter Quantity Ducted Vent Additional Settings Child Lock Clock Display On / Off Demo On / Off Setting Weight Lb / Kg Surface Cooking Light Timer On / Off Vent Fan Exterior Door Swing Surface Light System Lighting Type Number of Lights Electrical Specifications Amps @ 120 Volts...

