
Installation Instructions
Page 3
... 3 Electrical Requirements 3 Damage - Shipment/Installation 4 Parts Included 4 Tools You Will Need 5 Mounting Space 5 Step-by-step installation guide Placement of The Mounting Plate 6-8 Removing the Mounting Plate 6 Finding the Wall Studs 6 Determining Wall Plate Location 7 Aligning the Wall Plate 8 Installation Types 9 A Recirculating 10 -13 Attach Mounting Plate to Wall 10 Preparation of Top Cabinet 11 Check Blower Plate 11 Mount the Microwave Oven 11-12 Installing or Change the Charcoal Filter 12-13 Hood Exhaust 14-15 B Outside Back Exhaust 16-19 Preparing Rear Wall for...
... 3 Electrical Requirements 3 Damage - Shipment/Installation 4 Parts Included 4 Tools You Will Need 5 Mounting Space 5 Step-by-step installation guide Placement of The Mounting Plate 6-8 Removing the Mounting Plate 6 Finding the Wall Studs 6 Determining Wall Plate Location 7 Aligning the Wall Plate 8 Installation Types 9 A Recirculating 10 -13 Attach Mounting Plate to Wall 10 Preparation of Top Cabinet 11 Check Blower Plate 11 Mount the Microwave Oven 11-12 Installing or Change the Charcoal Filter 12-13 Hood Exhaust 14-15 B Outside Back Exhaust 16-19 Preparing Rear Wall for...

Installation Instructions
Page 4
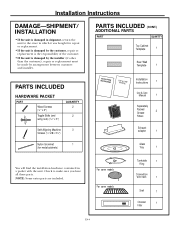
... any deficiencies. ELECTRICAL REQUIREMENTS Product rating is properly grounded. EN-3 DO NOT, UNDER ANY CIRCUMSTANCES, CUT, DEFORM OR REMOVE ANY OF THE PRONGS FROM THE POWER CORD. This product must be installed in the cabinet above the microwave oven. The outler box and supply circuit should be connected to avoid severe or fatal shock injury. Installation Instructions IMPORTANT SAFETY INSTRUCTIONS This product requires...
... any deficiencies. ELECTRICAL REQUIREMENTS Product rating is properly grounded. EN-3 DO NOT, UNDER ANY CIRCUMSTANCES, CUT, DEFORM OR REMOVE ANY OF THE PRONGS FROM THE POWER CORD. This product must be installed in the cabinet above the microwave oven. The outler box and supply circuit should be connected to avoid severe or fatal shock injury. Installation Instructions IMPORTANT SAFETY INSTRUCTIONS This product requires...
Installation Instructions
Page 5
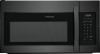
... a packet with the unit. NOTE: Some extra parts are included. PARTS INCLUDED (CONT.) ADDITIONAL PARTS PART QUANTITY Top Cabinet Template 1 Rear Wall Template 1 PARTS INCLUDED HARDWARE PACKET PART Wood Screws (1⁄4" x 2") Toggle Bolts (and wing nuts) (3⁄16" x 3") QUANTITY 2 2 Self-Aligning Machine 3 Screws (1⁄4"-28 x 31⁄4") ININSSTTRAULCLTAITOIONNS UMSEAN&UCAALRE Installation Instructions 1 Use & Care Manual 1 Separately Packed Grease 2 Filters Exhaust adaptor 1 Nylon Grommet 1 (for repair or replacement. • If the unit is damaged...
... a packet with the unit. NOTE: Some extra parts are included. PARTS INCLUDED (CONT.) ADDITIONAL PARTS PART QUANTITY Top Cabinet Template 1 Rear Wall Template 1 PARTS INCLUDED HARDWARE PACKET PART Wood Screws (1⁄4" x 2") Toggle Bolts (and wing nuts) (3⁄16" x 3") QUANTITY 2 2 Self-Aligning Machine 3 Screws (1⁄4"-28 x 31⁄4") ININSSTTRAULCLTAITOIONNS UMSEAN&UCAALRE Installation Instructions 1 Use & Care Manual 1 Separately Packed Grease 2 Filters Exhaust adaptor 1 Nylon Grommet 1 (for repair or replacement. • If the unit is damaged...

Installation Instructions
Page 7
... Bag Filters and Turntable Ring below glass tray Exhaust Adapter 4 Cut the middle of the outer protective plastic bag to find the edges of the mounting plate. Use a hammer to tap lightly across the mounting surface to remove the mounting plate Screws Screws Mounting Plate 5 Remove the screws from this mark. 3 Draw a line down the center of any adjacent studs should be used as the rear wall template and for mounting. B. Then carefully roll the oven and...
... Bag Filters and Turntable Ring below glass tray Exhaust Adapter 4 Cut the middle of the outer protective plastic bag to find the edges of the mounting plate. Use a hammer to tap lightly across the mounting surface to remove the mounting plate Screws Screws Mounting Plate 5 Remove the screws from this mark. 3 Draw a line down the center of any adjacent studs should be used as the rear wall template and for mounting. B. Then carefully roll the oven and...

Installation Instructions
Page 11
... screw, make sure the bottom of the mounting plate touch the bottom of the mounting plate and the wall. 4 Tighten all bolts. Pull the plate away from the wall to the wall using adequate materials supporting 150 Ibs to allow proper top vent air exhaust/intake. 13" MAX. (33 cm) Cabinet Cabinet 1 Remove the toggle wings from wall using toggle bolts. This will help tighten the bolts. DO NOT INSTALL...
... screw, make sure the bottom of the mounting plate touch the bottom of the mounting plate and the wall. 4 Tighten all bolts. Pull the plate away from the wall to the wall using adequate materials supporting 150 Ibs to allow proper top vent air exhaust/intake. 13" MAX. (33 cm) Cabinet Cabinet 1 Remove the toggle wings from wall using toggle bolts. This will help tighten the bolts. DO NOT INSTALL...

Installation Instructions
Page 13
... wall and the top cabinet.) A 5.3 Remove the charcoal filter by pushing the top of the filter cavity. INSTALLING OR CHANGE THE CHARCOAL FILTER (Some Models) NOTE: The charcoal filter is factory installed and for replacement information. A 5.1 Unplug microwave oven or disconnect power. EN-12 Refer to the Use and Care to replace or install a charcoal filter. Turn two full turns on the Vent, and then the cover open.. 7 Tighten the outer two screws to the top of the microwave oven. (While tightening screws...
... wall and the top cabinet.) A 5.3 Remove the charcoal filter by pushing the top of the filter cavity. INSTALLING OR CHANGE THE CHARCOAL FILTER (Some Models) NOTE: The charcoal filter is factory installed and for replacement information. A 5.1 Unplug microwave oven or disconnect power. EN-12 Refer to the Use and Care to replace or install a charcoal filter. Turn two full turns on the Vent, and then the cover open.. 7 Tighten the outer two screws to the top of the microwave oven. (While tightening screws...

Installation Instructions
Page 17
... holes to the rear wall. • Cut the opening in the mounting plate. Locate and mark holes to check that holds the blower plate to cut an opening , following the instructions of Microwave IMPORTANT: LOCATE AT LEAST ONE STUD ON EITHER SIDE OF MSTHPAAERCKCEETDNHTTEOELRGOLGCINLAEET.IBOONLFTOSRIN2TAHDEDMITOIOUNNATLIN, EGVPELNALTYE AREA. PREPARING THE REAR WALL FOR OUTSIDE BACK EXHAUST You need to the microwave. REMOVE BLOWER PLATE Remove and save the screw that the template is positioned lo3s2ocf...
... holes to the rear wall. • Cut the opening in the mounting plate. Locate and mark holes to check that holds the blower plate to cut an opening , following the instructions of Microwave IMPORTANT: LOCATE AT LEAST ONE STUD ON EITHER SIDE OF MSTHPAAERCKCEETDNHTTEOELRGOLGCINLAEET.IBOONLFTOSRIN2TAHDEDMITOIOUNNATLIN, EGVPELNALTYE AREA. PREPARING THE REAR WALL FOR OUTSIDE BACK EXHAUST You need to the microwave. REMOVE BLOWER PLATE Remove and save the screw that the template is positioned lo3s2ocf...

Installation Instructions
Page 21
... with holes in the wall to the wall using toggle bolts. Trim the rear wall template along the dotted line. 3/8" TO EDGE 12" Trim the rear wall template along the dotted line. Installation Instructions C OUTSIDE TOP EXHAUST (Vertical Duct) INSTALLATION OVERVIEW C1. Prepare Top Cabinet C3. NOTE: Before tightening toggle bolts and wood screw, make sure the bottom of the mounting plate touch the bottom of the mounting plate and the wall. 4 Tighten all bolts...
... with holes in the wall to the wall using toggle bolts. Trim the rear wall template along the dotted line. 3/8" TO EDGE 12" Trim the rear wall template along the dotted line. Installation Instructions C OUTSIDE TOP EXHAUST (Vertical Duct) INSTALLATION OVERVIEW C1. Prepare Top Cabinet C3. NOTE: Before tightening toggle bolts and wood screw, make sure the bottom of the mounting plate touch the bottom of the mounting plate and the wall. 4 Tighten all bolts...

Installation Instructions
Page 23
... plate by pulling cord. 1 Lift microwave, tilt it tight throughout Steps 1-3. NOTE: When mounting the microwave oven, thread power cord through top center cabinet hole. Installation Instructions C3. ADAPTING MICROWAVE BLOWER FOR OUTSIDE TOP EXHAUST (cont.) 5 Secure blower unit to the top of oven up against cabinet bottom. 3 Insert a self-aligning screw through hole in securely until it into the guides of Microwave • Make sure tape securing damper is removed...
... plate by pulling cord. 1 Lift microwave, tilt it tight throughout Steps 1-3. NOTE: When mounting the microwave oven, thread power cord through top center cabinet hole. Installation Instructions C3. ADAPTING MICROWAVE BLOWER FOR OUTSIDE TOP EXHAUST (cont.) 5 Secure blower unit to the top of oven up against cabinet bottom. 3 Insert a self-aligning screw through hole in securely until it into the guides of Microwave • Make sure tape securing damper is removed...

Installation Instructions
Page 25
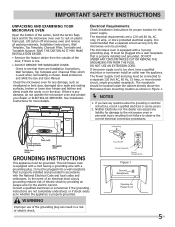
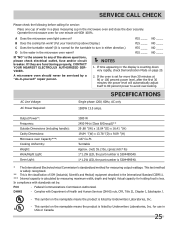
... USE & CARE Manual. ININSSTTARLULCATTIIOONNS 4. FILL OUT PRODUCT REGISTRATION CARD AN SEND IN. Remove all packing material from the microwave oven. 3. Plug power cord into a seperate and dedicated 15- USME &A|+&= NCUAARLE + 7. to instructions. 5. ININSSTTARLULCATTIIOONNS 2. Ensure proper ground exists before use 8. KEEP INSTALLATION INSTRUCTIONS FOR THE LOCAL INSPECTOR'S USE. Make sure the microwave oven has been installed according to 20-amp electrical outlet. Replace house fuse or turn breaker back on. Install turntable ring and glass tray...
... USE & CARE Manual. ININSSTTARLULCATTIIOONNS 4. FILL OUT PRODUCT REGISTRATION CARD AN SEND IN. Remove all packing material from the microwave oven. 3. Plug power cord into a seperate and dedicated 15- USME &A|+&= NCUAARLE + 7. to instructions. 5. ININSSTTARLULCATTIIOONNS 2. Ensure proper ground exists before use 8. KEEP INSTALLATION INSTRUCTIONS FOR THE LOCAL INSPECTOR'S USE. Make sure the microwave oven has been installed according to 20-amp electrical outlet. Replace house fuse or turn breaker back on. Install turntable ring and glass tray...

Complete Owners Guide
Page 3
... ventilation openings, louver or grease filters. • Use care when cleaning the louver and the grease filters. Do not overcook food. Do not use . • Liquids, such as water, coffee or tea are placed inside the microwave oven ignite, keep microwave oven door closed glass jars-are able to explode and should not be heated in this microwave oven. • Use this appliance only for examination, repair or...
... ventilation openings, louver or grease filters. • Use care when cleaning the louver and the grease filters. Do not overcook food. Do not use . • Liquids, such as water, coffee or tea are placed inside the microwave oven ignite, keep microwave oven door closed glass jars-are able to explode and should not be heated in this microwave oven. • Use this appliance only for examination, repair or...
Complete Owners Guide
Page 5
... not operate the microwave oven and contact your dealer or ELECTROLUX SERVICER. If the power supply cord is properly grounded. SAVE THE CARTON AS IT MAY MAKE INSTALLATION EASIER. • Remove the feature sticker from failure to observe the correct electrical connection procedures. Lift carton off microwave oven and remove all packing materials, Installation Instructions, Wall Template, Top Template, Charcoal Filter, Turntable and Turntable Support. IMPORTANT SAFETY INSTRUCTIONS UNPACKING AND EXAMINING YOUR MICROWAVE OVEN Open the...
... not operate the microwave oven and contact your dealer or ELECTROLUX SERVICER. If the power supply cord is properly grounded. SAVE THE CARTON AS IT MAY MAKE INSTALLATION EASIER. • Remove the feature sticker from failure to observe the correct electrical connection procedures. Lift carton off microwave oven and remove all packing materials, Installation Instructions, Wall Template, Top Template, Charcoal Filter, Turntable and Turntable Support. IMPORTANT SAFETY INSTRUCTIONS UNPACKING AND EXAMINING YOUR MICROWAVE OVEN Open the...

Complete Owners Guide
Page 7
... buy all safety precautions: use potholders, remove coverings carefully, pay special attention to packages that crisp food because they may be extra hot. Evaluate carefully before you have little fat or sugar in your needs. See page 20 for safe microwave cooking and reheating: • glass ceramic (Pyroceram®), such as Corningware®. • heat-resistant glass (Pyrex®) • microwave-safe plastics • paper plates...
... buy all safety precautions: use potholders, remove coverings carefully, pay special attention to packages that crisp food because they may be extra hot. Evaluate carefully before you have little fat or sugar in your needs. See page 20 for safe microwave cooking and reheating: • glass ceramic (Pyroceram®), such as Corningware®. • heat-resistant glass (Pyrex®) • microwave-safe plastics • paper plates...

Complete Owners Guide
Page 10
... Clock button 3s, display is opened. Press Timer pad once. 2. Exhaust High / Low / Off The exhaust ventilation removes steam and other cooking vapors from the cooking surface of set time, you to turn off . When this occurs, the vent cannot be turned off when the internal parts are cool. Enter time using number pads. 3. Press and hold pad . 2. Note: If the temperature gets too hot around the microwave oven, the fan in the exhaust vent hood...
... Clock button 3s, display is opened. Press Timer pad once. 2. Exhaust High / Low / Off The exhaust ventilation removes steam and other cooking vapors from the cooking surface of set time, you to turn off . When this occurs, the vent cannot be turned off when the internal parts are cool. Enter time using number pads. 3. Press and hold pad . 2. Note: If the temperature gets too hot around the microwave oven, the fan in the exhaust vent hood...

Complete Owners Guide
Page 11
... beeps and "End" will be displayed if a quick start cooking cycle is very useful when cleaning the control panel. Use the number pads to enter desired heating time (cook time may be set when using the 1, 2 or 3 numeric pads): Example: to quickly heat for 2 minutes at 100% power level for 1, 2 or 3 minutes. Use the number key to change the control lock from being accidentally started or used by weight) feature. When heating has finished you may choose. MANUAL COOKING Control Lock You may lock the control panel...
... beeps and "End" will be displayed if a quick start cooking cycle is very useful when cleaning the control panel. Use the number pads to enter desired heating time (cook time may be set when using the 1, 2 or 3 numeric pads): Example: to quickly heat for 2 minutes at 100% power level for 1, 2 or 3 minutes. Use the number key to change the control lock from being accidentally started or used by weight) feature. When heating has finished you may choose. MANUAL COOKING Control Lock You may lock the control panel...

Complete Owners Guide
Page 20
... display will track the vent fan on time. op-4 will work in a rapid countdown mode with no Will not reset the time for filter indicator light. 4. When Demo mode is changed, use reset yes to select. 3. on by default for charcoal filter replacement. Press START pad to outside. The filter indicator light will track the vent fan on time. CONVENIENT FEATURES On yes Filter indicator light on / oFF auto scrolls every 2 seconds through each selection. 4. Setting Demo Mode Example: setting the demoJ mode...
... display will track the vent fan on time. op-4 will work in a rapid countdown mode with no Will not reset the time for filter indicator light. 4. When Demo mode is changed, use reset yes to select. 3. on by default for charcoal filter replacement. Press START pad to outside. The filter indicator light will track the vent fan on time. CONVENIENT FEATURES On yes Filter indicator light on / oFF auto scrolls every 2 seconds through each selection. 4. Setting Demo Mode Example: setting the demoJ mode...
Complete Owners Guide
Page 21
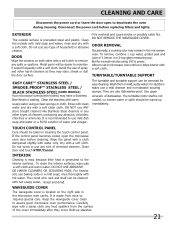
... wire rack and shelf can be easier to set in a 2-cup glass measuring cup. rinse and dry with a soft cloth. DO NOT REMOVE THE WAVEGUIDE COVER. for several minutes using a clean sponge or cloth. Built-up immediately. EXTERIOR The outside with a damp cloth any food spatters from mica so requires special care. Wash them in cleaning the touch control panel. Close door and touch STOP/Cancel INTERIOR Cleaning is easy because little heat...
... wire rack and shelf can be easier to set in a 2-cup glass measuring cup. rinse and dry with a soft cloth. DO NOT REMOVE THE WAVEGUIDE COVER. for several minutes using a clean sponge or cloth. Built-up immediately. EXTERIOR The outside with a damp cloth any food spatters from mica so requires special care. Wash them in cleaning the touch control panel. Close door and touch STOP/Cancel INTERIOR Cleaning is easy because little heat...

Complete Owners Guide
Page 22
...-installing mounting screw be removed and cleaned often; Remove the LED light mounting screw. 1. Rinse well and shake to lock. The aluminum on at the main circuit breaker. Cleaning the exhaust filters The oven ventilation exhaust filters should be careful not to the rear. To avoid risk of personal injury or property damage, wear gloves when replacing the light bulbs. Remove the LED light cover mounting screw under the microwave. Disconnect the power cord before replacing filters and lights. Unplug the microwave oven or turn the power...
...-installing mounting screw be removed and cleaned often; Remove the LED light mounting screw. 1. Rinse well and shake to lock. The aluminum on at the main circuit breaker. Cleaning the exhaust filters The oven ventilation exhaust filters should be careful not to the rear. To avoid risk of personal injury or property damage, wear gloves when replacing the light bulbs. Remove the LED light cover mounting screw under the microwave. Disconnect the power cord before replacing filters and lights. Unplug the microwave oven or turn the power...
Complete Owners Guide
Page 25
... 120V, 60Hz, AC only 1500W 13.5 amps. This symbol on the nameplate means the product is set by Underwriters Laboratories, Inc. If they are functioning properly, CONTACT YOUR NEAREST ELECTROLUX AUTHORIZED SERVICER. DHHS - for holding food is listed by a "do-it-yourself" repair person. 2. Output Power*: Frequency: Outside Dimensions (including handle): Cavity Dimensions: Microwave oven Capacity***: Cooking Uniformity: Weight: Work/Night Light: Oven Light: 1000 W 2450 MHz (Class B/Group2...
... 120V, 60Hz, AC only 1500W 13.5 amps. This symbol on the nameplate means the product is set by Underwriters Laboratories, Inc. If they are functioning properly, CONTACT YOUR NEAREST ELECTROLUX AUTHORIZED SERVICER. DHHS - for holding food is listed by a "do-it-yourself" repair person. 2. Output Power*: Frequency: Outside Dimensions (including handle): Cavity Dimensions: Microwave oven Capacity***: Cooking Uniformity: Weight: Work/Night Light: Oven Light: 1000 W 2450 MHz (Class B/Group2...

Product Specifications Sheet
Page 1
... Version: 07/22 Cooking Controls Clock Defrost Time Defrost Weight Number of Power Levels Cooking Power Ventilation System Ductless Vent Exhaust Fan Speeds Minimum Air Flow Capacity Maximum Air Flow Capacity Charcoal Filter Included Removable Grease Filter Grease Filter Included Grease Filter Dishwasher Safe Grease Filter Quantity Ducted Vent Additional Settings Child Lock Clock Display On / Off Demo On / Off Setting Weight Lb / Kg Surface Cooking Light Timer On / Off Vent Fan Exterior Door Swing Surface Light System Lighting Type Number of Lights Electrical Specifications Amps @ 120 Volts...
... Version: 07/22 Cooking Controls Clock Defrost Time Defrost Weight Number of Power Levels Cooking Power Ventilation System Ductless Vent Exhaust Fan Speeds Minimum Air Flow Capacity Maximum Air Flow Capacity Charcoal Filter Included Removable Grease Filter Grease Filter Included Grease Filter Dishwasher Safe Grease Filter Quantity Ducted Vent Additional Settings Child Lock Clock Display On / Off Demo On / Off Setting Weight Lb / Kg Surface Cooking Light Timer On / Off Vent Fan Exterior Door Swing Surface Light System Lighting Type Number of Lights Electrical Specifications Amps @ 120 Volts...

