Use and Care Manual
Page 1
Visit the Frigidaire Web Site at: http://www.frigidaire.com Counter-Top Microwave Oven with Sensor Cook Welcome 2 Important Safety Instructions .....3-6 Features and Specifications .......... 7 Before Operating 8 Manual Operation 9-12 Sensor Cook Operation ......... 13-15 Convenience Operation 16 Cooking Charts 17-18 Questions or for Service Call: 1-888-312-2117 READ AND SAVE THESE INSTRUCTIONS Care & Cleaning 19 Before You Call Solutions to Common Problems 20 Warranty Back Page p/n 316495003 (0706)
Visit the Frigidaire Web Site at: http://www.frigidaire.com Counter-Top Microwave Oven with Sensor Cook Welcome 2 Important Safety Instructions .....3-6 Features and Specifications .......... 7 Before Operating 8 Manual Operation 9-12 Sensor Cook Operation ......... 13-15 Convenience Operation 16 Cooking Charts 17-18 Questions or for Service Call: 1-888-312-2117 READ AND SAVE THESE INSTRUCTIONS Care & Cleaning 19 Before You Call Solutions to Common Problems 20 Warranty Back Page p/n 316495003 (0706)
Use and Care Manual
Page 2
... to record your product. This Use & Care Manual contains general operating instructions for your appliance and feature information for your microwave should be practiced when installing, operating and maintaining any appliance. Your satisfaction is located on your model and serial number and date of a new microwave! Your microwave may not look exactly like those shown. All rights reserved. 2 The serial plate is our number one priority. The self...
... to record your product. This Use & Care Manual contains general operating instructions for your appliance and feature information for your microwave should be practiced when installing, operating and maintaining any appliance. Your satisfaction is located on your model and serial number and date of a new microwave! Your microwave may not look exactly like those shown. All rights reserved. 2 The serial plate is our number one priority. The self...
Use and Care Manual
Page 3
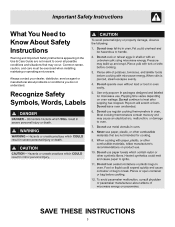
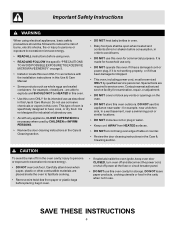
Always contact your dealer, distributor, service agent or manufacturer about problems or conditions you do not understand. Recognize Safety Symbols, Words, Labels SAVE THESE INSTRUCTIONS 3 Important Safety Instructions What You Need to Know About Safety Instructions Warning and Important Safety Instructions appearing in the Use & Care Guide are not meant to cover all possible conditions and situations that may occur. Common sense, caution, and care must be exercised when installing, maintaing or operating a microwave.
Always contact your dealer, distributor, service agent or manufacturer about problems or conditions you do not understand. Recognize Safety Symbols, Words, Labels SAVE THESE INSTRUCTIONS 3 Important Safety Instructions What You Need to Know About Safety Instructions Warning and Important Safety Instructions appearing in the Use & Care Guide are not meant to cover all possible conditions and situations that may occur. Common sense, caution, and care must be exercised when installing, maintaing or operating a microwave.

Use and Care Manual
Page 5
... Instructions Precautions to Avoid Possible Exposure to Excessive Microwave Energy Adhere to the following precautions: • DO NOT attempt to operate this oven with the safety interlock switches. • DO NOT place any object between the oven front face and the door or allow soil or cleaner residue to accumulate on sealing surfaces. • DO NOT use any cleaning...
... Instructions Precautions to Avoid Possible Exposure to Excessive Microwave Energy Adhere to the following precautions: • DO NOT attempt to operate this oven with the safety interlock switches. • DO NOT place any object between the oven front face and the door or allow soil or cleaner residue to accumulate on sealing surfaces. • DO NOT use any cleaning...
Use and Care Manual
Page 6
... openings on page 5. • Install or locate this oven ONLY in accordance with the installation instructions in this Use & Care Manual. • Some products such as described in order to excessive microvave energy. • DO NOT overcook food. To avoid the risk of table or counter. • Review the door cleaning instructions in a wet basement, near water - for example, near a kitchen sink, in the Care & Cleaning section. It is specifically...
... openings on page 5. • Install or locate this oven ONLY in accordance with the installation instructions in this Use & Care Manual. • Some products such as described in order to excessive microvave energy. • DO NOT overcook food. To avoid the risk of table or counter. • Review the door cleaning instructions in a wet basement, near water - for example, near a kitchen sink, in the Care & Cleaning section. It is specifically...
Use and Care Manual
Page 7
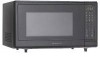
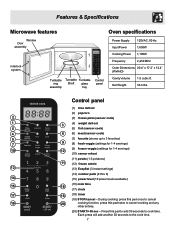
...Volume 1.5 cubic ft. Control panel (1) time defrost (2) popcorn 2 (3) frozen pizza (sensor cook) 1 3 (4) weight defrost 5 (5) fish (sensor cook) 4 6 (6) meat (sensor cook) 8 (7) favorite (stores up to 3 favorites) 7 9 (8) fresh veggie (settings for 1-4 servings) 10 (9) frozen veggie (settings for 1-4 servings) 12 (10) sensor reheat (11) potato (1-3 potatoes) 11 (12) frozen entrée 13 (13) EasySet (3 instant settings) (14) number pads (0 thru 9) 14 (15) power level (10 power levels available) 15 (16) cook time 16 (17) clock 17 18 (18) timer (19) STOP/cancel...
...Volume 1.5 cubic ft. Control panel (1) time defrost (2) popcorn 2 (3) frozen pizza (sensor cook) 1 3 (4) weight defrost 5 (5) fish (sensor cook) 4 6 (6) meat (sensor cook) 8 (7) favorite (stores up to 3 favorites) 7 9 (8) fresh veggie (settings for 1-4 servings) 10 (9) frozen veggie (settings for 1-4 servings) 12 (10) sensor reheat (11) potato (1-3 potatoes) 11 (12) frozen entrée 13 (13) EasySet (3 instant settings) (14) number pads (0 thru 9) 14 (15) power level (10 power levels available) 15 (16) cook time 16 (17) clock 17 18 (18) timer (19) STOP/cancel...
Use and Care Manual
Page 8
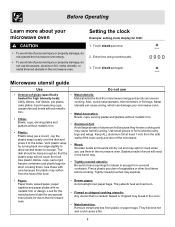
... instructions for steam to leave openings for use stoneware, aluminum foil, metal utensils, or metal trimmed utensils in the microwave oven. • Brown paper: Avoid using number pads. 3. Touch clock pad again. Use plastic dishes, cups, semi-rigid freezer containers and plastic bags for 9:00: 1. Use these with no metallic trim or design. They absorb heat and can damage your microwave oven Setting the clock Example: setting clock display for short cooking times...
... instructions for steam to leave openings for use stoneware, aluminum foil, metal utensils, or metal trimmed utensils in the microwave oven. • Brown paper: Avoid using number pads. 3. Touch clock pad again. Use plastic dishes, cups, semi-rigid freezer containers and plastic bags for 9:00: 1. Use these with no metallic trim or design. They absorb heat and can damage your microwave oven Setting the clock Example: setting clock display for short cooking times...
Use and Care Manual
Page 9
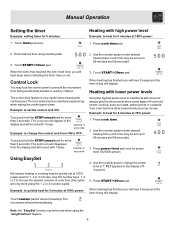
... display (70 % power). 5. Using EasySet Microwave heating or cooking may choose. When the timer has reached the end of day will prevent accidental programming when wiping the control panel clean. Touch START/+30sec pad. The Lock icon will only work using number pads. 3. When heating has finished you will hear 5 beeps and the time of set when using the "weight defrost" feature. 9 hold the STOP/cancel pad for 2 minutes at 100% power: 1. Use the number keys 1, 2 or 3 to set...
... display (70 % power). 5. Using EasySet Microwave heating or cooking may choose. When the timer has reached the end of day will prevent accidental programming when wiping the control panel clean. Touch START/+30sec pad. The Lock icon will only work using number pads. 3. When heating has finished you will hear 5 beeps and the time of set when using the "weight defrost" feature. 9 hold the STOP/cancel pad for 2 minutes at 100% power: 1. Use the number keys 1, 2 or 3 to set...
Use and Care Manual
Page 10
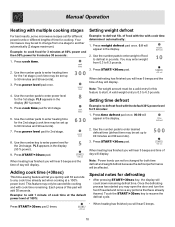
... the with multiple cooking stages Setting weight defrost For best results, some microwave recipes call for the 2nd stage. Use the number pads to enter weight of time for 3 minutes at a 100% power level. PL5 appears in the display (80 % power). 5. Use the number pads to enter heating time for the 2nd stage (cook time may open the door and turn the food if needed and remove any cook time already set up to defrost in the display. 2. Special notes...
... the with multiple cooking stages Setting weight defrost For best results, some microwave recipes call for the 2nd stage. Use the number pads to enter weight of time for 3 minutes at a 100% power level. PL5 appears in the display (80 % power). 5. Use the number pads to enter heating time for the 2nd stage (cook time may open the door and turn the food if needed and remove any cook time already set up to defrost in the display. 2. Special notes...
Use and Care Manual
Page 11
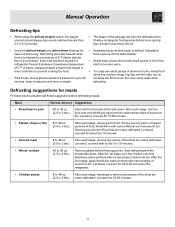
... touch the oven cavity walls when defrosting. Manual Operation Defrosting tips • When using the defrost weight feature, the weight entered should always be thawed is stored outside the freezer for meats For best results, please read these suggestions when defrosting meats. If the food has been stored in the refrigerator. • Chicken pieces 8 to 6.3 pounds). • The shape of aluminum foil. Let stand, covered...
... touch the oven cavity walls when defrosting. Manual Operation Defrosting tips • When using the defrost weight feature, the weight entered should always be thawed is stored outside the freezer for meats For best results, please read these suggestions when defrosting meats. If the food has been stored in the refrigerator. • Chicken pieces 8 to 6.3 pounds). • The shape of aluminum foil. Let stand, covered...
Use and Care Manual
Page 12
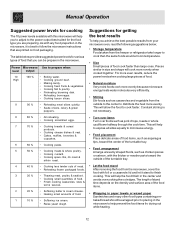
... the heat more evenly when cooked together. Pieces similar in size and shape will help the food finish in the • Raise yeast dough. After removing the food from the outside of the turntable tray. 4 40 % • Cooking less tender cuts of food that are preparing. avoids overcooking the out edges, The length of stand time depends on food packaging. Manual Operation Suggested power levels for cooking The 10 power levels...
... the heat more evenly when cooked together. Pieces similar in size and shape will help the food finish in the • Raise yeast dough. After removing the food from the outside of the turntable tray. 4 40 % • Cooking less tender cuts of food that are preparing. avoids overcooking the out edges, The length of stand time depends on food packaging. Manual Operation Suggested power levels for cooking The 10 power levels...
Use and Care Manual
Page 13
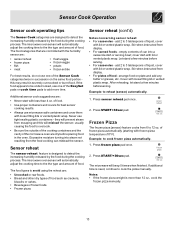
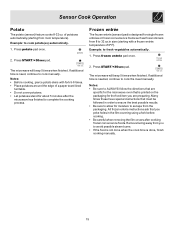
... pizza weight is designed to reheat (sensor) automatically. 1. The microwave oven sensor will automatically adjust the cooking time to add more than 4 oz. The food types to the the type and amount of food. cover dish with loose fitting lid or vented plastic wrap. After reheating, let stand a few minutes before serving. this will beep 5 times when finished. The microwave oven sensor will automatically adjust the cooking time...
... pizza weight is designed to reheat (sensor) automatically. 1. The microwave oven sensor will automatically adjust the cooking time to add more than 4 oz. The food types to the the type and amount of food. cover dish with loose fitting lid or vented plastic wrap. After reheating, let stand a few minutes before serving. this will beep 5 times when finished. The microwave oven sensor will automatically adjust the cooking time...

Use and Care Manual
Page 14
... glass bowl or colander. • Cover meat with lid or vented plastic wrap. Frozen veggie The frozen veggie (sensor) feature cooks from 6 to pause; Press START/+30sec pad. If additional time is done, finish cooking manually. then drain. • Once cooking has begun and the meat begins to thaw, press STOP/cancel pad once to cook the meat manually. Press fish pad once. open oven door...
... glass bowl or colander. • Cover meat with lid or vented plastic wrap. Frozen veggie The frozen veggie (sensor) feature cooks from 6 to pause; Press START/+30sec pad. If additional time is done, finish cooking manually. then drain. • Once cooking has begun and the meat begins to thaw, press STOP/cancel pad once to cook the meat manually. Press fish pad once. open oven door...
Use and Care Manual
Page 15
... frozen entrée instructions ask that must be followed in size (starting from you are preparing. Press START/+30sec pad. Press START/+30sec pad. If additional time is designed for moisture to cook the meat manually. Frozen entrée The frozen entrée (sensor) pad is need, continue to ALWAYS follow the directions that are specific for the microwave oven that is printed on...
... frozen entrée instructions ask that must be followed in size (starting from you are preparing. Press START/+30sec pad. Press START/+30sec pad. If additional time is designed for moisture to cook the meat manually. Frozen entrée The frozen entrée (sensor) pad is need, continue to ALWAYS follow the directions that are specific for the microwave oven that is printed on...
Use and Care Manual
Page 16
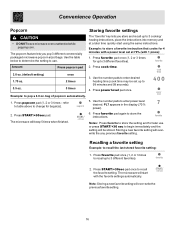
... any previous favorite setting. Use the number pads to 3 cooking/ heating instructions, place the instructions into memory and at 70% (with the favorite settings automatically. refer to table above to enter power level desired. Recalling a favorite setting Example: to recall the favorite setting. once 2 times 3 times 3. Press START/+30sec pad once to recall the last stored favorite setting: 1. bag of popcorn automatically. 1. Convenience Operation Popcorn • DO NOT leave micowave oven unattended while popping...
... any previous favorite setting. Use the number pads to 3 cooking/ heating instructions, place the instructions into memory and at 70% (with the favorite settings automatically. refer to table above to enter power level desired. Recalling a favorite setting Example: to recall the favorite setting. once 2 times 3 times 3. Press START/+30sec pad once to recall the last stored favorite setting: 1. bag of popcorn automatically. 1. Convenience Operation Popcorn • DO NOT leave micowave oven unattended while popping...

Use and Care Manual
Page 17
... the meat stand the recommended time. Start cooking the meat fat side down on roasting rack. for 5-10 min. Use narrow strips of aluminum foil to shield any bone tips or thin meat areas, or areas that the temperatures in (up to overcook. After cooking, check the temperature in a microwave-safe dish. Meat Power level Cook time Directions • Roast beef bonesless...
... the meat stand the recommended time. Start cooking the meat fat side down on roasting rack. for 5-10 min. Use narrow strips of aluminum foil to shield any bone tips or thin meat areas, or areas that the temperatures in (up to overcook. After cooking, check the temperature in a microwave-safe dish. Meat Power level Cook time Directions • Roast beef bonesless...

Use and Care Manual
Page 18
... Cooking vegetables in your microwave Place fish on a microwave-safe roasting rack in a microwave-safe dish. Use a tight cover to overcook fish; Power level: med-high (7) paper. Shrimp Cook time: 4-6½ min./lb. check it flakes easily with fork. Cover with Up to 1½ lbs. Fish fillets Cook time: 4-8 min./lb. Let stand 2-3 mins. Cover with wax paper. Arrange fish on roasting rack with a lid or vented microwavable...
... Cooking vegetables in your microwave Place fish on a microwave-safe roasting rack in a microwave-safe dish. Use a tight cover to overcook fish; Power level: med-high (7) paper. Shrimp Cook time: 4-6½ min./lb. check it flakes easily with fork. Cover with Up to 1½ lbs. Fish fillets Cook time: 4-8 min./lb. Let stand 2-3 mins. Cover with wax paper. Arrange fish on roasting rack with a lid or vented microwavable...

Use and Care Manual
Page 19
... vents or openings. 19 this can accumulate when operating the oven in high humidity and in no way indicates microwave leakage. • Never operate the oven without food in a 4 cup measuring glass at High power for 5 minutes or until boiling. Use a damp, clean cloth and mild soap. Steam can damage the magnetron tube or glass tray. Take special care to keep the inner door panel and oven fron frame free...
... vents or openings. 19 this can accumulate when operating the oven in high humidity and in no way indicates microwave leakage. • Never operate the oven without food in a 4 cup measuring glass at High power for 5 minutes or until boiling. Use a damp, clean cloth and mild soap. Steam can damage the magnetron tube or glass tray. Take special care to keep the inner door panel and oven fron frame free...

Use and Care Manual
Page 20
...; Reset the clock and any cooking instructions. • Reset the household circuit breaker or replace any blown fuses. • Plug a different appliance into the power outlet. Before You Call Solutions to Common Problems Troubleshooting guide If you have a problem you cannot solve, please do not hesitate to call our service line: Questions or for Service Call: 1-888-312-2117 Before you call a repair person for your microwave, check...
...; Reset the clock and any cooking instructions. • Reset the household circuit breaker or replace any blown fuses. • Plug a different appliance into the power outlet. Before You Call Solutions to Common Problems Troubleshooting guide If you have a problem you cannot solve, please do not hesitate to call our service line: Questions or for Service Call: 1-888-312-2117 Before you call a repair person for your microwave, check...
Parts Catalog
Page 1
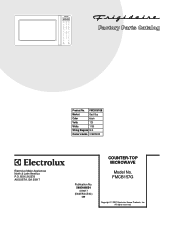
FMCB157G Copyright © 2007 Electrolux Home Products, Inc. Product No. BOX 212378 AUGUSTA, GA 30917 Publication No. 5995499554 07/09/17 (EN/SERVICE/KC) 099 Model No. All rights reserved. FMCB157GB Market Best Buy Color black Volts 120 Watts 1100 Wiring Diagram N/A Owner's Guide 316495003 FMCB157GB Cover.eps FMCB157GB Parts.eps TMV151F wiring.eps COUNTER-TOP MICROWAVE Electrolux Major Appliances North & Latin America P.O.
FMCB157G Copyright © 2007 Electrolux Home Products, Inc. Product No. BOX 212378 AUGUSTA, GA 30917 Publication No. 5995499554 07/09/17 (EN/SERVICE/KC) 099 Model No. All rights reserved. FMCB157GB Market Best Buy Color black Volts 120 Watts 1100 Wiring Diagram N/A Owner's Guide 316495003 FMCB157GB Cover.eps FMCB157GB Parts.eps TMV151F wiring.eps COUNTER-TOP MICROWAVE Electrolux Major Appliances North & Latin America P.O.


