
Complete Owner's Guide (English)
Page 2
...or hurt you don't follow instructions. Installation and service must be handed over to hazards that may occur. Keep these numbers for several other models. Use the laundry center only as household waste. Instead it shall be followed to minimize the risk of fire or explosion or to reduce ... Service Checklist...12-14 Warranty and Service...15 Español...16-30 Product Record Read and Save These Instructions Record Your Model and Serial Numbers Record below the model and serial numbers found on the laundry center serial plate located on the inside of others . This Use & Care Guide...
...or hurt you don't follow instructions. Installation and service must be handed over to hazards that may occur. Keep these numbers for several other models. Use the laundry center only as household waste. Instead it shall be followed to minimize the risk of fire or explosion or to reduce ... Service Checklist...12-14 Warranty and Service...15 Español...16-30 Product Record Read and Save These Instructions Record Your Model and Serial Numbers Record below the model and serial numbers found on the laundry center serial plate located on the inside of others . This Use & Care Guide...
Complete Owner's Guide (English)
Page 5
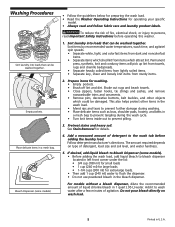
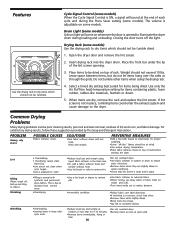
... 5 Printed in a mesh bag. Washing Procedures Sort laundry into loads that can be washed together. Empty pockets. Bleach Dispenser (some models). • Before adding the wash load, add liquid bleach to bleach dispenser located in 1 quart (.95 L) water. If desired... 2. Prepare items for details. 4. Add a measured amount of agitation. Follow detergent manufacturer's directions. Place delicate items in U.S.A. For models without a bleach dispenser, dilute the recommended amount of detergent, load size and soil level, and water hardness. 5. This also helps ...
... 5 Printed in a mesh bag. Washing Procedures Sort laundry into loads that can be washed together. Empty pockets. Bleach Dispenser (some models). • Before adding the wash load, add liquid bleach to bleach dispenser located in 1 quart (.95 L) water. If desired... 2. Prepare items for details. 4. Add a measured amount of agitation. Follow detergent manufacturer's directions. Place delicate items in U.S.A. For models without a bleach dispenser, dilute the recommended amount of detergent, load size and soil level, and water hardness. 5. This also helps ...
Complete Owner's Guide (English)
Page 6
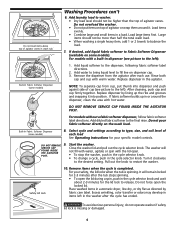
...After cleaning, push cap and cup firmly together. DO NOT REMOVE SERVICE CAP FOUND INSIDE THE AGITATOR POST. Built-In Fabric Softener Dispenser (some models). SERVICE CAP Close the washer lid and pull out the cycle selector knob. Remove items when the cycle is spinning. Excess wrinkling, color transfer.... If desired, add liquid fabric softener to type, size, and soil level of agitator vanes. Pull out the knob to fill line on some models) 8. Add water to bring liquid level to restart the washer. 10. Do not overload the washer. • Do not put thumb into position...
...After cleaning, push cap and cup firmly together. DO NOT REMOVE SERVICE CAP FOUND INSIDE THE AGITATOR POST. Built-In Fabric Softener Dispenser (some models). SERVICE CAP Close the washer lid and pull out the cycle selector knob. Remove items when the cycle is spinning. Excess wrinkling, color transfer.... If desired, add liquid fabric softener to type, size, and soil level of agitator vanes. Pull out the knob to fill line on some models) 8. Add water to bring liquid level to restart the washer. 10. Do not overload the washer. • Do not put thumb into position...
Complete Owner's Guide (English)
Page 8
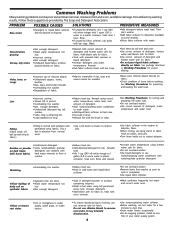
...;Not enough detergent. •Wash water temperature too low. •Incorrect sorting. •Not enough detergent. •Undiluted liquid fabric softener poured directly on some models). •Dilute fabric softener with 1 quart (.95 L) water in a plastic container. This is normal with bar soap. Rinse and rewash. •Increase water temperature using...
...;Not enough detergent. •Wash water temperature too low. •Incorrect sorting. •Not enough detergent. •Undiluted liquid fabric softener poured directly on some models). •Dilute fabric softener with 1 quart (.95 L) water in a plastic container. This is normal with bar soap. Rinse and rewash. •Increase water temperature using...
Complete Owner's Guide (English)
Page 9
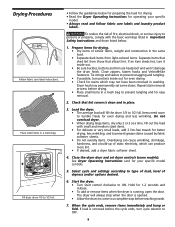
...item sheds lint, turn cycle selector to type of load, level of similar fabric, weight and construction in washing. Prepare items for operating your specific model controls. 5. Do not overload dryer. • When drying large items, dry only 2 or 3 at a time. Select cycle and settings according... light-colored items. Separate items that attract lint. The dryer will fill the drum 1/3 to prevent tangling and for your specific model. • Always read and follow fabric care labels and laundry product labels. Place small items in Important Safety Instructions and those that...
...item sheds lint, turn cycle selector to type of load, level of similar fabric, weight and construction in washing. Prepare items for operating your specific model controls. 5. Do not overload dryer. • When drying large items, dry only 2 or 3 at a time. Select cycle and settings according... light-colored items. Separate items that attract lint. The dryer will fill the drum 1/3 to prevent tangling and for your specific model. • Always read and follow fabric care labels and laundry product labels. Place small items in Important Safety Instructions and those that...
Complete Owner's Guide (English)
Page 10
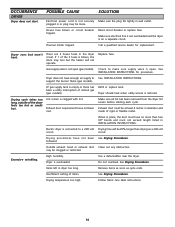
...heat) temperature setting for 5-10 minutes. •Remove items immediately. Wrinkling •Overloading. •Leaving items in place. Drying Rack (some models) When the Cycle Signal Control is clean and in dryer after cycle ends. •Reduce load size and tumble at the end of load ... PREVENTIVE MEASURES •Add a few bath towels to "pills." •Check that lint screen is ON, a signal will come on some models). avoid overdrying. •Lint is attached to small loads for items being dried. Place items to dry items which should not exceed 10 lbs....
...heat) temperature setting for 5-10 minutes. •Remove items immediately. Wrinkling •Overloading. •Leaving items in place. Drying Rack (some models) When the Cycle Signal Control is clean and in dryer after cycle ends. •Reduce load size and tumble at the end of load ... PREVENTIVE MEASURES •Add a few bath towels to "pills." •Check that lint screen is ON, a signal will come on some models). avoid overdrying. •Lint is attached to small loads for items being dried. Place items to dry items which should not exceed 10 lbs....
Complete Owner's Guide (English)
Page 14
...; bends and must not exceed length listed in INSTALLATION INSTRUCTIONS. Remove items as soon as cycle ends. Gas supply valve is open (gas models). LP gas supply tank is blown, the drum may be at least 4 inches in place, the duct must be loose. Exhaust duct ...See Drying Procedures. Make sure electrical line is not overloaded and the dryer is connected to See INSTALLATION INSTRUCTIONS. support the burner flame (gas models). Exhaust duct must have enough air supply to a 208 volt Drying time will not operate. Outside exhaust hood or exhaust duct Clean out...
...; bends and must not exceed length listed in INSTALLATION INSTRUCTIONS. Remove items as soon as cycle ends. Gas supply valve is open (gas models). LP gas supply tank is blown, the drum may be at least 4 inches in place, the duct must be loose. Exhaust duct ...See Drying Procedures. Make sure electrical line is not overloaded and the dryer is connected to See INSTALLATION INSTRUCTIONS. support the burner flame (gas models). Exhaust duct must have enough air supply to a 208 volt Drying time will not operate. Outside exhaust hood or exhaust duct Clean out...


