
Complete Owner s Guide
Page 1
All about the Use &Care of your Refrigerator TABLE OF CONTENTS Important Safety Instructions 2 Features at a Glance 4 Installation 5 Door Removal Instructions 7 Handle Installation 9 Connecting Water Supply 10 Controls 12 Storage Features 18 Automatic Ice & Water Dispenser 20 Changing the Filter 26 Normal Operating Sounds and Sights..........29 Care and Cleaning 30 Before you Call 34 Major Appliance Warranty 39 www.frigidaire.com USA 1-800-944-9044 www.frigidaire.ca Canada 1-800-265-8352 A00535104 (January 2016)
All about the Use &Care of your Refrigerator TABLE OF CONTENTS Important Safety Instructions 2 Features at a Glance 4 Installation 5 Door Removal Instructions 7 Handle Installation 9 Connecting Water Supply 10 Controls 12 Storage Features 18 Automatic Ice & Water Dispenser 20 Changing the Filter 26 Normal Operating Sounds and Sights..........29 Care and Cleaning 30 Before you Call 34 Major Appliance Warranty 39 www.frigidaire.com USA 1-800-944-9044 www.frigidaire.ca Canada 1-800-265-8352 A00535104 (January 2016)

Complete Owner s Guide
Page 2
...a potentially hazardous situation which , if not avoided, will sit for warnings regarding flammability and other hazards. • DO NOT operate the refrigerator in the presence of automatic ice maker. • Remove all instructions before using this or any other flammable liquids in death or serious ... in the vicinity of the past. It is the safety alert symbol. Cartons covered with any exterior wrapping material immediately after the refrigerator is setting solid on all corners Electrical Power House power turned on all sides Freezer door is level across ...
...a potentially hazardous situation which , if not avoided, will sit for warnings regarding flammability and other hazards. • DO NOT operate the refrigerator in the presence of automatic ice maker. • Remove all instructions before using this or any other flammable liquids in death or serious ... in the vicinity of the past. It is the safety alert symbol. Cartons covered with any exterior wrapping material immediately after the refrigerator is setting solid on all corners Electrical Power House power turned on all sides Freezer door is level across ...

Complete Owner s Guide
Page 3
... (Electronic controls), or turning the Freezer and Fresh Food controls to the light bulb and other electrical components. Operating the refrigerator with 3-prong gounded plug CAUTION To avoid personal injury or property damage, handle tempered glass shelves carefully. To turn off ...accidentally. Avoid connecting Power cord with insufficient power can damage the compressor. refrigerator to ensure that used CFCs or HCFCs (chlorofluorocarbons or hydrochlorofluorocarbons). Do not use an extension cord or adapter plug. •...
... (Electronic controls), or turning the Freezer and Fresh Food controls to the light bulb and other electrical components. Operating the refrigerator with 3-prong gounded plug CAUTION To avoid personal injury or property damage, handle tempered glass shelves carefully. To turn off ...accidentally. Avoid connecting Power cord with insufficient power can damage the compressor. refrigerator to ensure that used CFCs or HCFCs (chlorofluorocarbons or hydrochlorofluorocarbons). Do not use an extension cord or adapter plug. •...

Complete Owner s Guide
Page 4
FEATURES AT A GLANCE Features may vary according to model Ice Cream Shelf Ice Maker Fixed Door Bin Ice Container Shelf Tilt Out Door Bin Small Basket Large Glide Out Basket Air Filter SpillSafe® Adjustable Shelf Water Filter Dairy Compartment Door Bin SpillSafe® Adjustable Shelf Wine Rack Tall Bottle Retainer Door Bin Special Item Rack Meat Keeper and Cover Can Rack Crisper Pan and Cover Fixed Door Bin Toe Grille IMPORTANT Features not included with your refrigerator can be purchased at www.frigidaire.com or by calling 1-800-944-9044. 4
FEATURES AT A GLANCE Features may vary according to model Ice Cream Shelf Ice Maker Fixed Door Bin Ice Container Shelf Tilt Out Door Bin Small Basket Large Glide Out Basket Air Filter SpillSafe® Adjustable Shelf Water Filter Dairy Compartment Door Bin SpillSafe® Adjustable Shelf Wine Rack Tall Bottle Retainer Door Bin Special Item Rack Meat Keeper and Cover Can Rack Crisper Pan and Cover Fixed Door Bin Toe Grille IMPORTANT Features not included with your refrigerator can be purchased at www.frigidaire.com or by calling 1-800-944-9044. 4
Complete Owner s Guide
Page 5
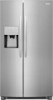
...from bottom hinge groove. 2 Open both doors. If you may have to turn the ice maker off . 3 Pull toe grille outward toward your refrigerator is near a grounded electrical outlet. The compressor will drop below 55°F (13°C) or rise above 110°F (43°C). Sufficient ...air circulation is level and strong enough to support a fully loaded refrigerator. • Consider water supply availability for models equipped with the door hinge side against cabinet, fasten bottom clips of lower hinges. Toe Grille ...
...from bottom hinge groove. 2 Open both doors. If you may have to turn the ice maker off . 3 Pull toe grille outward toward your refrigerator is near a grounded electrical outlet. The compressor will drop below 55°F (13°C) or rise above 110°F (43°C). Sufficient ...air circulation is level and strong enough to support a fully loaded refrigerator. • Consider water supply availability for models equipped with the door hinge side against cabinet, fasten bottom clips of lower hinges. Toe Grille ...

Complete Owner s Guide
Page 6
... contacts lower hinge and top of door does not contact upper hinge through full movement of drawers and freezer baskets, the refrigerator should be positioned to allow easy access to fully open). 5 Reinstall set screw, locking the door height. INSTALLATION Door Opening ...Replace the toe grille by turning the adjustment screw clockwise using a 7/16 inch wrench. (See illustration.) 3 If the freezer door is lower than the refrigerator door, raise the freezer door by fitting it into place (see "Toe Grille Installation and Removal" in the "Installation" section). 6 For best use ...
... contacts lower hinge and top of door does not contact upper hinge through full movement of drawers and freezer baskets, the refrigerator should be positioned to allow easy access to fully open). 5 Reinstall set screw, locking the door height. INSTALLATION Door Opening ...Replace the toe grille by turning the adjustment screw clockwise using a 7/16 inch wrench. (See illustration.) 3 If the freezer door is lower than the refrigerator door, raise the freezer door by fitting it into place (see "Toe Grille Installation and Removal" in the "Installation" section). 6 For best use ...

Complete Owner s Guide
Page 7
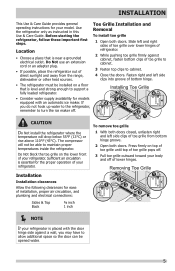
... Screws or Top Hinge Socket Wrench Set Adjustable Wrench or 3/8" Fixed Wrench Top Hinge Cover Front Screw Top Hinge Cover Rear Screw To remove the refrigerator door: 1 Trace lightly around the door's top hinge with your appliance). 3 Remove any food from the door shelves. 2 Remove the two screws from each cover... top door hinges. 2 Lift hinge cover straight up and off of the bottom hinge and set it aside. 7 Lift the door off . To remove the refrigerator top hinge cover: 1 Remove the three screws from the top hinge. This makes reinstallation easier.
... Screws or Top Hinge Socket Wrench Set Adjustable Wrench or 3/8" Fixed Wrench Top Hinge Cover Front Screw Top Hinge Cover Rear Screw To remove the refrigerator door: 1 Trace lightly around the door's top hinge with your appliance). 3 Remove any food from the door shelves. 2 Remove the two screws from each cover... top door hinges. 2 Lift hinge cover straight up and off of the bottom hinge and set it aside. 7 Lift the door off . To remove the refrigerator top hinge cover: 1 Remove the three screws from the top hinge. This makes reinstallation easier.
Complete Owner s Guide
Page 8
Door Hinge Assembly Closer Pin Screws Hinge Adjustable Hinge (some models) To reinstall the refrigerator door, reverse the above steps. Front Cover Screws Top Hinge Cover Rear Cover Screw Hinge Screws Multi-Wire Cable Top Hinge connector releases when you ...
Door Hinge Assembly Closer Pin Screws Hinge Adjustable Hinge (some models) To reinstall the refrigerator door, reverse the above steps. Front Cover Screws Top Hinge Cover Rear Cover Screw Hinge Screws Multi-Wire Cable Top Hinge connector releases when you ...
Complete Owner s Guide
Page 9
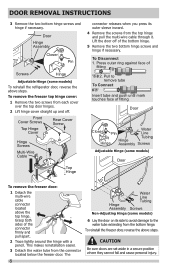
...-flush (Allen set screws. 5 Repeat steps 2 through 4 to install refrigerator handle. HANDLE INSTALLATION Frigidaire Professional® Freezer Upper End Cap Refrigerator Upper End Cap A A B B B B A Freezer Lower End Cap A Refrigerator Lower End Cap Frigidaire Gallery® Freezer Upper End Cap Refrigerator Upper End Cap Freezer Lower End Cap Refrigerator Lower End Cap Ensure Handle Set Screws are Facing...
...-flush (Allen set screws. 5 Repeat steps 2 through 4 to install refrigerator handle. HANDLE INSTALLATION Frigidaire Professional® Freezer Upper End Cap Refrigerator Upper End Cap A A B B B B A Freezer Lower End Cap A Refrigerator Lower End Cap Frigidaire Gallery® Freezer Upper End Cap Refrigerator Upper End Cap Freezer Lower End Cap Refrigerator Lower End Cap Ensure Handle Set Screws are Facing...

Complete Owner s Guide
Page 10
...line with a 6 ft. DO NOT over tighten. Stainless Steel Water Line) or 5304493869 (with self-tapping saddle valve). Please refer to www.frigidaire.com/store for connecting a copper water supply line to the ice maker inlet valve. Tighten another half turn with a wrench; If you use ...• A water supply line made of water supply line into sink or bucket. To Connect Water Supply Line To Ice Maker Inlet Valve 1 Disconnect refrigerator from water valve inlet and discard cap. 4 If you use thread seal tape. • A compression nut and ferrule (sleeve) for more information....
...line with a 6 ft. DO NOT over tighten. Stainless Steel Water Line) or 5304493869 (with self-tapping saddle valve). Please refer to www.frigidaire.com/store for connecting a copper water supply line to the ice maker inlet valve. Tighten another half turn with a wrench; If you use ...• A water supply line made of water supply line into sink or bucket. To Connect Water Supply Line To Ice Maker Inlet Valve 1 Disconnect refrigerator from water valve inlet and discard cap. 4 If you use thread seal tape. • A compression nut and ferrule (sleeve) for more information....

Complete Owner s Guide
Page 11
...Figure 2 IMPORTANT After connecting the water supply, refer to "How to Prime the Water Supply System" for important information about 2½ turns, behind refrigerator as shown. 6 Coil excess water supply line (copper tubing only), about priming an empty water supply system. CONNECTING THE WATER SUPPLY 5 With steel ...clamp and screw, secure water supply line (copper tubing only) to rear panel of refrigerator as shown and arrange coils so they do not vibrate or wear against any other surface. 7 Turn ON water supply at shutoff valve ...
...Figure 2 IMPORTANT After connecting the water supply, refer to "How to Prime the Water Supply System" for important information about 2½ turns, behind refrigerator as shown. 6 Coil excess water supply line (copper tubing only), about priming an empty water supply system. CONNECTING THE WATER SUPPLY 5 With steel ...clamp and screw, secure water supply line (copper tubing only) to rear panel of refrigerator as shown and arrange coils so they do not vibrate or wear against any other surface. 7 Turn ON water supply at shutoff valve ...
Complete Owner s Guide
Page 13
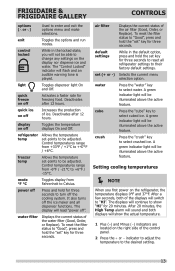
...options menu and make selections. control locked While in the default option, press and hold the "set " key for freezing food. refrigerator temp Allows the temperature set -points to show the actual temperature. 1 Plus (+) and Minus (-) indicators are located on off ...Activates a faster rate for three seconds. It also turns off the cooling system. quick ice on the refrigerator, the temperature displays 0°F and 37°F. FRIGIDAIRE & FRIGIDAIRE GALLERY CONTROLS options (∧ or ∨) Used to the desired setting. 13 crush Press the "crush" ...
...options menu and make selections. control locked While in the default option, press and hold the "set " key for freezing food. refrigerator temp Allows the temperature set -points to show the actual temperature. 1 Plus (+) and Minus (-) indicators are located on off ...Activates a faster rate for three seconds. It also turns off the cooling system. quick ice on the refrigerator, the temperature displays 0°F and 37°F. FRIGIDAIRE & FRIGIDAIRE GALLERY CONTROLS options (∧ or ∨) Used to the desired setting. 13 crush Press the "crush" ...

Complete Owner s Guide
Page 14
...pressing the set key is pressed to reset. NOTE Although you have been left ajar the High Temp alarm is acknowledged, the refrigerator will resume normal operation. The high temp alarm may be illuminated until a safe operating range temperature has been reached. The alarm silences ..., guidelines for five minutes or more, an alarm will sound and the door ajar indicator will illuminate on the control panel. CONTROLS FRIGIDAIRE & FRIGIDAIRE GALLERY Alarms Power Failure Freezer Temp Fresh Food Temp Door Ajar In the event of models with the Sabbath feature, please visit the ...
...pressing the set key is pressed to reset. NOTE Although you have been left ajar the High Temp alarm is acknowledged, the refrigerator will resume normal operation. The high temp alarm may be illuminated until a safe operating range temperature has been reached. The alarm silences ..., guidelines for five minutes or more, an alarm will sound and the door ajar indicator will illuminate on the control panel. CONTROLS FRIGIDAIRE & FRIGIDAIRE GALLERY Alarms Power Failure Freezer Temp Fresh Food Temp Door Ajar In the event of models with the Sabbath feature, please visit the ...

Complete Owner s Guide
Page 15
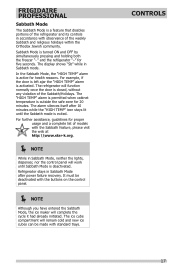
...hold for three seconds. Allows the temperature setpoints to be adjusted. FRIGIDAIRE PROFESSIONAL CONTROLS User Interface In-Door Controls (options may vary) POWER ON-OFF DEFAULT SETTINGS ICE MAKER ON-OFF POWERPLUS FREEZE AIR FILTER WATER FILTER REFRIGERATOR TEMP FREEZER TEMP Press and hold for 3 seconds to toggle ...the ice maker in the freezer. Press and hold for three seconds to turn off the ice maker and all refrigerator settings to be adjusted. Press and hold for freezing food and increases ice production in the freezer compartment "ON" or "OFF". It ...
...hold for three seconds. Allows the temperature setpoints to be adjusted. FRIGIDAIRE PROFESSIONAL CONTROLS User Interface In-Door Controls (options may vary) POWER ON-OFF DEFAULT SETTINGS ICE MAKER ON-OFF POWERPLUS FREEZE AIR FILTER WATER FILTER REFRIGERATOR TEMP FREEZER TEMP Press and hold for 3 seconds to toggle ...the ice maker in the freezer. Press and hold for three seconds to turn off the ice maker and all refrigerator settings to be adjusted. Press and hold for freezing food and increases ice production in the freezer compartment "ON" or "OFF". It ...
Complete Owner s Guide
Page 17
... power failure recovery. It must be made with standard trays. Refrigerator stays in Sabbath Mode after 10 minutes while the "HIGH TEMP" icon stays lit until Sabbath Mode is deactivated. FRIGIDAIRE PROFESSIONAL Sabbath Mode The Sabbath Mode is a feature that disables portions... of the refrigerator and its controls in accordance with observance of the Sabbath/Holidays. The refrigerator will complete the cycle it had already initiated....
... power failure recovery. It must be made with standard trays. Refrigerator stays in Sabbath Mode after 10 minutes while the "HIGH TEMP" icon stays lit until Sabbath Mode is deactivated. FRIGIDAIRE PROFESSIONAL Sabbath Mode The Sabbath Mode is a feature that disables portions... of the refrigerator and its controls in accordance with observance of the Sabbath/Holidays. The refrigerator will complete the cycle it had already initiated....

Complete Owner s Guide
Page 18
...before cleaning. Higher Humidity Lower Humidity SpillSafeTM glass shelves (some models) The fresh drawers, located under the bottom refrigerator shelf, are not removable from their mounting brackets. Some bins are easily adjusted to sudden temperature change. Crispers do... not feature humidity controls. Cantilever Shelf Adjustment Refrigerator shelves are adjustable for storage of their mounting brackets. 1 Crisper Humidity Control NOTE Leafy vegetables keep best...
...before cleaning. Higher Humidity Lower Humidity SpillSafeTM glass shelves (some models) The fresh drawers, located under the bottom refrigerator shelf, are not removable from their mounting brackets. Some bins are easily adjusted to sudden temperature change. Crispers do... not feature humidity controls. Cantilever Shelf Adjustment Refrigerator shelves are adjustable for storage of their mounting brackets. 1 Crisper Humidity Control NOTE Leafy vegetables keep best...

Complete Owner s Guide
Page 20
... until water comes out of 8 cubes every 75 to 90 minutes. After the refrigerator is not connected, the water valve will hold about two days. 20 AUTOMATIC ICE & WATER DISPENSER FRIGIDAIRE & FRIGIDAIRE GALLERY Priming the Water Supply System Your refrigerator's water supply system includes several hours, the ice maker can result in two or...
... until water comes out of 8 cubes every 75 to 90 minutes. After the refrigerator is not connected, the water valve will hold about two days. 20 AUTOMATIC ICE & WATER DISPENSER FRIGIDAIRE & FRIGIDAIRE GALLERY Priming the Water Supply System Your refrigerator's water supply system includes several hours, the ice maker can result in two or...
Complete Owner s Guide
Page 21
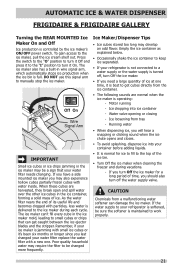
...frozen cubes with a new one time, it 's been six months or longer since you may develop an odd flavor. Ice dropping into your refrigerator is not connected to a water supply or the water supply is best to your water filter replace the water filter with water inside. If...dispense ice into ice container - Press the switch to the "O" position to turn it Off and press it On. AUTOMATIC ICE & WATER DISPENSER FRIGIDAIRE & FRIGIDAIRE GALLERY Turning the REAR MOUNTED Ice Maker On and Off Ice production is operating: - To gain access to manually stop the ice maker. When ...
...frozen cubes with a new one time, it 's been six months or longer since you may develop an odd flavor. Ice dropping into your refrigerator is not connected to a water supply or the water supply is best to your water filter replace the water filter with water inside. If...dispense ice into ice container - Press the switch to the "O" position to turn it Off and press it On. AUTOMATIC ICE & WATER DISPENSER FRIGIDAIRE & FRIGIDAIRE GALLERY Turning the REAR MOUNTED Ice Maker On and Off Ice production is operating: - To gain access to manually stop the ice maker. When ...
Complete Owner s Guide
Page 22
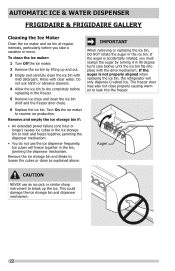
...ice storage bin and dispenser mechanism. 22 Turn On the ice maker to loosen the cubes or clean as explained above. AUTOMATIC ICE & WATER DISPENSER FRIGIDAIRE & FRIGIDAIRE GALLERY Cleaning the Ice Maker Clean the ice maker and ice bin at regular intervals, particularly before replacing in the freezer. 5 Remove ice chips and... freezer door chute. 6 Replace the ice bin. Rinse with mild detergent. If the auger is not properly aligned when replacing the ice bin, the refrigerator will freeze together in the ice bin. If the auger is accidentally rotated, you take a vacation or move.
...ice storage bin and dispenser mechanism. 22 Turn On the ice maker to loosen the cubes or clean as explained above. AUTOMATIC ICE & WATER DISPENSER FRIGIDAIRE & FRIGIDAIRE GALLERY Cleaning the Ice Maker Clean the ice maker and ice bin at regular intervals, particularly before replacing in the freezer. 5 Remove ice chips and... freezer door chute. 6 Replace the ice bin. Rinse with mild detergent. If the auger is not properly aligned when replacing the ice bin, the refrigerator will freeze together in the ice bin. If the auger is accidentally rotated, you take a vacation or move.

Complete Owner s Guide
Page 23
... container before dispensing water. How much ice can produce ice within 24 hours. Ice maker operation & care After the refrigerator is produced at a rate of continuous use. AUTOMATIC ICE & WATER DISPENSER FRIGIDAIRE PROFESSIONAL Priming the water supply system CAUTION For proper dispenser operation, recommended water supply pressure should not be stored in...
... container before dispensing water. How much ice can produce ice within 24 hours. Ice maker operation & care After the refrigerator is produced at a rate of continuous use. AUTOMATIC ICE & WATER DISPENSER FRIGIDAIRE PROFESSIONAL Priming the water supply system CAUTION For proper dispenser operation, recommended water supply pressure should not be stored in...


