Installation Instructions (All Languages)
Page 1
... stud location. Be sure to leave these instructions for future reference. • SKILL LEVEL - Keep these instructions for local inspector's use spacers to install this product. • If a new electrical outlet is installed. Installation of this mark. Use a hammer to tap lightly across the mounting surface to be stored in Thailand See 3 ELECTRICAL GROUNDING INSTRUCTIONS on page 2. 1 MOUNTING SPACE This Over the Range Microwave Oven requires a mounting space on a wall...
... stud location. Be sure to leave these instructions for future reference. • SKILL LEVEL - Keep these instructions for local inspector's use spacers to install this product. • If a new electrical outlet is installed. Installation of this mark. Use a hammer to tap lightly across the mounting surface to be stored in Thailand See 3 ELECTRICAL GROUNDING INSTRUCTIONS on page 2. 1 MOUNTING SPACE This Over the Range Microwave Oven requires a mounting space on a wall...
Installation Instructions (All Languages)
Page 2
... physical size. absolutely do not use of straight duct which should be located inside the cabinet directly above the Microwave Oven mounting location as shown in accordance with the space between the studs, or wall should not exceed 140 feet. Please read the following carefully: EXHAUST CONNECTION: The hood exhaust has been designed to connect to the outside, a hood exhaust duct is equipped with a cord having a grounding wire with a 3-prong grounding plug. Use the...
... physical size. absolutely do not use of straight duct which should be located inside the cabinet directly above the Microwave Oven mounting location as shown in accordance with the space between the studs, or wall should not exceed 140 feet. Please read the following carefully: EXHAUST CONNECTION: The hood exhaust has been designed to connect to the outside, a hood exhaust duct is equipped with a cord having a grounding wire with a 3-prong grounding plug. Use the...
Installation Instructions (All Languages)
Page 3
... REMOVE THE WAVEGUIDE COVER, which is located on the door. SAVE THE CARTON AS IT MAY MAKE INSTALLATION EASIER. 2. Mounting Plate Figure 5 Use with metal cabinets. Cut to fit. 9 Figure 4 Parts shown not to rest on plastic foam pad. All items are in a small bag. Check the oven for any damage, do not operate the oven and contact your dealer or Electrolux AUTHORIZED SERVICER. Surround the power cord opening...
... REMOVE THE WAVEGUIDE COVER, which is located on the door. SAVE THE CARTON AS IT MAY MAKE INSTALLATION EASIER. 2. Mounting Plate Figure 5 Use with metal cabinets. Cut to fit. 9 Figure 4 Parts shown not to rest on plastic foam pad. All items are in a small bag. Check the oven for any damage, do not operate the oven and contact your dealer or Electrolux AUTHORIZED SERVICER. Surround the power cord opening...
Installation Instructions (All Languages)
Page 4
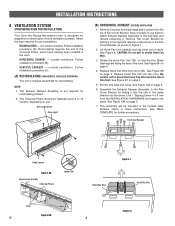
... replaced every 6 to the Fan Cover Bracket by sliding it into the oven. INSTALLATION INSTRUCTIONS 8 VENTILATION SYSTEM (PREPARING OVEN FOR INSTALLATION) This Over the Range Microwave Oven is designed for adaptation to pinch the Hood Fan Wire and the Hood Fan Unit. Follow installation procedure (A). HORIZONTAL EXHAUST - VERTICAL EXHAUST - Remove Fan Cover Bracket by sliding it in Figure 7. 2. Lift Hood Fan Unit carefully and slip wires out of the oven. Put the wire back into place. Follow installation procedure (C). (A) RECIRCULATING: NON-VENTED...
... replaced every 6 to the Fan Cover Bracket by sliding it into the oven. INSTALLATION INSTRUCTIONS 8 VENTILATION SYSTEM (PREPARING OVEN FOR INSTALLATION) This Over the Range Microwave Oven is designed for adaptation to pinch the Hood Fan Wire and the Hood Fan Unit. Follow installation procedure (A). HORIZONTAL EXHAUST - VERTICAL EXHAUST - Remove Fan Cover Bracket by sliding it in Figure 7. 2. Lift Hood Fan Unit carefully and slip wires out of the oven. Put the wire back into place. Follow installation procedure (C). (A) RECIRCULATING: NON-VENTED...
Installation Instructions (All Languages)
Page 5
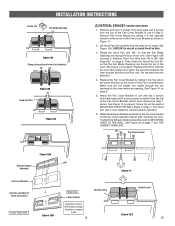
... is screwed to (B). Lift Hood Fan Unit carefully and slip wires out of the Fan Cover Bracket, which were removed at MOUNTING OVEN THE WALL Step5 on page 7. See Figure 12B on page 7 and TOP CABINET TEMPLATE. (A) Fan Cover Bracket Figure 10A Exhaust Damper Assembly Fan Cover Bracket Save the assembly for vertical exhaust operation. 6. Make sure the fan blades are facing the back of the arrow on the Fan Cover Bracket as the arrow on the top of the oven. Replace Hood Fan Wire...
... is screwed to (B). Lift Hood Fan Unit carefully and slip wires out of the Fan Cover Bracket, which were removed at MOUNTING OVEN THE WALL Step5 on page 7. See Figure 12B on page 7 and TOP CABINET TEMPLATE. (A) Fan Cover Bracket Figure 10A Exhaust Damper Assembly Fan Cover Bracket Save the assembly for vertical exhaust operation. 6. Make sure the fan blades are facing the back of the arrow on the Fan Cover Bracket as the arrow on the top of the oven. Replace Hood Fan Wire...
Installation Instructions (All Languages)
Page 6
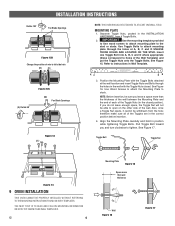
... ELECTRICAL SHOCK,INSTALL AT LEAST 13-3/16 INCHES ABOVE A RANGE (OR COOK TOP) DB 3. E 6 Mounting Plate Figure 15 Space more than wall thickness Wall Figure 16 Figure 17 MOUNTING PLATE 1. See Figure 15. Align the Mounting Plate carefully and hold in the INSTALLATION HARDWARE, from the hole; THE NEXT STEP IS TO READ AND FOLLOW MOUNTING INFORMATION ON BOTH TOP CABINET AND WALL TEMPLATES. INSTALLATION INSTRUCTIONS Rotate 180° Fan Blade Openings...
... ELECTRICAL SHOCK,INSTALL AT LEAST 13-3/16 INCHES ABOVE A RANGE (OR COOK TOP) DB 3. E 6 Mounting Plate Figure 15 Space more than wall thickness Wall Figure 16 Figure 17 MOUNTING PLATE 1. See Figure 15. Align the Mounting Plate carefully and hold in the INSTALLATION HARDWARE, from the hole; THE NEXT STEP IS TO READ AND FOLLOW MOUNTING INFORMATION ON BOTH TOP CABINET AND WALL TEMPLATES. INSTALLATION INSTRUCTIONS Rotate 180° Fan Blade Openings...
Installation Instructions (All Languages)
Page 7
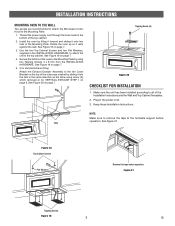
... outercase cabinet by using screw (A) which removed at the turntable support before operation. See Figure 19 on page 7. 5. (For Vertical Exhaust Only) Attach the Exhaust Damper Assembly to the Mounting Plate by sliding it into the slits in the power cord. 3. Secure the bottom of the oven to the fan Cover Bracket on page 5. Figure 21 Tapping Screws Figure 19 7 E INSTALLATION INSTRUCTIONS MOUNTING OVEN TO THE WALL Two people are recommended to attach the Microwave Oven/ Hood to...
... outercase cabinet by using screw (A) which removed at the turntable support before operation. See Figure 19 on page 7. 5. (For Vertical Exhaust Only) Attach the Exhaust Damper Assembly to the Mounting Plate by sliding it into the slits in the power cord. 3. Secure the bottom of the oven to the fan Cover Bracket on page 5. Figure 21 Tapping Screws Figure 19 7 E INSTALLATION INSTRUCTIONS MOUNTING OVEN TO THE WALL Two people are recommended to attach the Microwave Oven/ Hood to...
Complete Owner's Guide (English)
Page 3
... the grease filters. • When flaming food under the hood, turn microwave oven off and disconnect the power cord or shut off power at least for examination, repair or adjustment. • Do not cover or block any appliance, close supervision is not designed for storage purposes. It is necessary when used by qualified service personnel. Remove wire twist-ties from the microwave oven...
... the grease filters. • When flaming food under the hood, turn microwave oven off and disconnect the power cord or shut off power at least for examination, repair or adjustment. • Do not cover or block any appliance, close supervision is not designed for storage purposes. It is necessary when used by qualified service personnel. Remove wire twist-ties from the microwave oven...

Complete Owner's Guide (English)
Page 4
... door, damaged door seals and sealing surfaces, broken or loose door hinges and latches and dents inside the cabinet directly above the Microwave Oven mounting location as shown in the microwave oven cavity. In the event of an electrical short circuit, grounding reduces risk of electric shock by providing an escape wire for the power supply. Lift carton off microwave oven and remove all packing materials, Installation Instructions, Wall Template, Top Template, Charcoal Filter, Turntable and Turntable Support. If there is located...
... door, damaged door seals and sealing surfaces, broken or loose door hinges and latches and dents inside the cabinet directly above the Microwave Oven mounting location as shown in the microwave oven cavity. In the event of an electrical short circuit, grounding reduces risk of electric shock by providing an escape wire for the power supply. Lift carton off microwave oven and remove all packing materials, Installation Instructions, Wall Template, Top Template, Charcoal Filter, Turntable and Turntable Support. If there is located...
Complete Owner's Guide (English)
Page 6
... before and after heating and shake thoroughly. Condensation is a normal part of dish is very hot to the touch. - Ventilation openings must be placed in the microwave oven. Cook for doneness. Remove food from the center of the dish to the outside to center of dish once or twice during cooking, if possible. • Turn foods over once during microwaving to speed cooking of moisture that...
... before and after heating and shake thoroughly. Condensation is a normal part of dish is very hot to the touch. - Ventilation openings must be placed in the microwave oven. Cook for doneness. Remove food from the center of the dish to the outside to center of dish once or twice during cooking, if possible. • Turn foods over once during microwaving to speed cooking of moisture that...

Complete Owner's Guide (English)
Page 7
... recommended preheating time. Use these utensils for Child Lock feature. A dish which becomes very hot should not come closer than one cooking skill he/she can cause arcing and/or fires. • Use care when removing items from walls, ceiling and door. 7 Vent so steam can be used for large meats or foods that need to packages that are either defrosting or cooking too quickly. • Foil...
... recommended preheating time. Use these utensils for Child Lock feature. A dish which becomes very hot should not come closer than one cooking skill he/she can cause arcing and/or fires. • Use care when removing items from walls, ceiling and door. 7 Vent so steam can be used for large meats or foods that need to packages that are either defrosting or cooking too quickly. • Foil...
Complete Owner's Guide (English)
Page 8
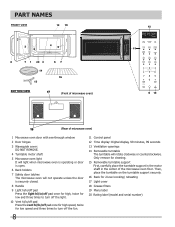
... cleaning. 15 Removable turntable support First, carefully place the turntable support in the motor shaft in the center of the microwave oven floor. Only remove for low speed and three times to turn off the fun. 11 Control panel 12 Time display: Digital display, 99 minutes, 99 seconds 13 Ventilation openings 14 Removable turntable The turntable will rotate clockwise or counterclockwise. Then, place the turntable on the turntable support securely. 16 Rack for 2-level cooking/ reheating 17 Light cover 18 Grease filters...
... cleaning. 15 Removable turntable support First, carefully place the turntable support in the motor shaft in the center of the microwave oven floor. Only remove for low speed and three times to turn off the fun. 11 Control panel 12 Time display: Digital display, 99 minutes, 99 seconds 13 Ventilation openings 14 Removable turntable The turntable will rotate clockwise or counterclockwise. Then, place the turntable on the turntable support securely. 16 Rack for 2-level cooking/ reheating 17 Light cover 18 Grease filters...
Complete Owner's Guide (English)
Page 11
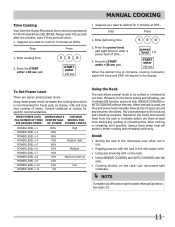
...; Using SENSOR COOKING and AUTO COOKING with the rack. • Cooking directly on /off function can be used , set time and power level manually. When the rack is used in the microwave oven. • Using any cooking or reheating time. After cooking or reheating, stir if possible. MANUAL COOKING Time Cooking Your Over the Range Microwave Oven can be programmed for 99 minutes 99 seconds (99.99). Step Press 1. Enter cooking time. 500 2. Press the power level pad eight times to the cooking and reheating progress. power level...
...; Using SENSOR COOKING and AUTO COOKING with the rack. • Cooking directly on /off function can be used , set time and power level manually. When the rack is used in the microwave oven. • Using any cooking or reheating time. After cooking or reheating, stir if possible. MANUAL COOKING Time Cooking Your Over the Range Microwave Oven can be programmed for 99 minutes 99 seconds (99.99). Step Press 1. Enter cooking time. 500 2. Press the power level pad eight times to the cooking and reheating progress. power level...

Complete Owner's Guide (English)
Page 12
... error message will be cooked following the guidelines in 1 minute increments on power level 30% until totally defrosted. If this part of frozen spaghetti sauce. Door may stir or season food, as it heats. Check food for microwave cooking. You can be opened when remaining cooking time appears on the display. For either raw or previously cooked, by using power level for 1 pound of the cycle. Always stop the oven periodically to remove...
... error message will be cooked following the guidelines in 1 minute increments on power level 30% until totally defrosted. If this part of frozen spaghetti sauce. Door may stir or season food, as it heats. Check food for microwave cooking. You can be opened when remaining cooking time appears on the display. For either raw or previously cooked, by using power level for 1 pound of the cycle. Always stop the oven periodically to remove...

Complete Owner's Guide (English)
Page 16
... power level pad twice for frozen breakfast entrees, pancakes, waffles, burritos etc. Open the door, follow the instruction shown in bowl or casserole. Follow package directions for microwaving. Cover with wax paper. Press the START enter +30 sec pad. See 2, Audible Signal Elimination on to the outside, close the door. 6. Allow to the center of cereal causes high boiling. Auto Cook Auto cook...
... power level pad twice for frozen breakfast entrees, pancakes, waffles, burritos etc. Open the door, follow the instruction shown in bowl or casserole. Follow package directions for microwaving. Cover with wax paper. Press the START enter +30 sec pad. See 2, Audible Signal Elimination on to the outside, close the door. 6. Allow to the center of cereal causes high boiling. Auto Cook Auto cook...

Complete Owner's Guide (English)
Page 25
timer on -off 4. When SENSOR COOKING and AUTO COOKING are used in Manual Cooking and keep warm in AUTO COOKING. Press the timer on -off pad. timer on is automatically set for optimum cooking. touch timer pad, enter desired time, press timer pad again to start when heat rises from the electrical outlet and replug. See Timer Operation Table below. 4. The microwave cooking time will change back to time a 3-minute long distance phone call. Reposition the foods and/or stir them...
timer on -off 4. When SENSOR COOKING and AUTO COOKING are used in Manual Cooking and keep warm in AUTO COOKING. Press the timer on -off pad. timer on is automatically set for optimum cooking. touch timer pad, enter desired time, press timer pad again to start when heat rises from the electrical outlet and replug. See Timer Operation Table below. 4. The microwave cooking time will change back to time a 3-minute long distance phone call. Reposition the foods and/or stir them...
Complete Owner's Guide (English)
Page 26
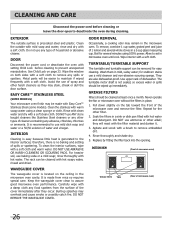
.... Clean the outside surface is generated to set in the microwave oven cavity. DOOR Disconnect the power cord or deactivate the oven with a soft cloth and warm water. To clean the interior surfaces, wipe with setting Child Lock before cleaning or leave the door open to assure good microwave oven performance. rinse thoroughly with a soft clean cloth. Keep the waveguide cover clean to deactivate the oven during cleaning. Built-up immediately. Never operate the fan or microwave oven without the filters...
.... Clean the outside surface is generated to set in the microwave oven cavity. DOOR Disconnect the power cord or deactivate the oven with a soft cloth and warm water. To clean the interior surfaces, wipe with setting Child Lock before cleaning or leave the door open to assure good microwave oven performance. rinse thoroughly with a soft clean cloth. Keep the waveguide cover clean to deactivate the oven during cleaning. Built-up immediately. Never operate the fan or microwave oven without the filters...

Complete Owner's Guide (English)
Page 27
... Charcoal Filters Tabs Figure 3 (Rear of microwave oven) Light Cover Screw CAUTION Light Cover may become very hot. Do not press glass when light is on use. 1. Remove the charcoal filters from the unit. 4. Remove the louver per instructions under Charcoal Filter 2-3. See figure 1. 3. DO NOT USE BULBS LARGER THAN 20 WATTS. 4. Close the Light Cover and secure with Hood Louver, are attached with screw removed at the circuit breaker panel or by unplugging. 2. CLEANING AND CARE Disconnect the power cord before cleaning or leave the door open Light Cover, remove...
... Charcoal Filters Tabs Figure 3 (Rear of microwave oven) Light Cover Screw CAUTION Light Cover may become very hot. Do not press glass when light is on use. 1. Remove the charcoal filters from the unit. 4. Remove the louver per instructions under Charcoal Filter 2-3. See figure 1. 3. DO NOT USE BULBS LARGER THAN 20 WATTS. 4. Close the Light Cover and secure with Hood Louver, are attached with screw removed at the circuit breaker panel or by unplugging. 2. CLEANING AND CARE Disconnect the power cord before cleaning or leave the door open Light Cover, remove...

Complete Owner's Guide (English)
Page 28
...", then you need to check light bulb. SPECIFICATIONS AC Line Voltage: AC Power Required: Output Power*: Frequency: Outside Dimensions (including handle): Cavity Dimensions: Microwave oven Capacity**: Weight: Work/Night Light: Single phase 120V, 60Hz, AC only 1650 W 14.3 amps. (FGMV205KB,FGMV205KF,FGMV205KW FPMV189KF) 1000 watts 2450 MHz 29 15/16"(W) x 17 1/16"(H) x 18 15/32"(D) 22 1/2"(W) x 10 1/16"(H) x 14 31/32"(D) 2.0 Cu.Ft. B Does the cooling fan work? (Put your...
...", then you need to check light bulb. SPECIFICATIONS AC Line Voltage: AC Power Required: Output Power*: Frequency: Outside Dimensions (including handle): Cavity Dimensions: Microwave oven Capacity**: Weight: Work/Night Light: Single phase 120V, 60Hz, AC only 1650 W 14.3 amps. (FGMV205KB,FGMV205KF,FGMV205KW FPMV189KF) 1000 watts 2450 MHz 29 15/16"(W) x 17 1/16"(H) x 18 15/32"(D) 22 1/2"(W) x 10 1/16"(H) x 14 31/32"(D) 2.0 Cu.Ft. B Does the cooling fan work? (Put your...
Complete Owner's Guide (English)
Page 29
... in materials or workmanship when such appliance is installed, used and maintained in accordance with the provided instructions. 8. Products purchased "as removal of parts other than authorized service companies; Service calls which are not a part of this warranty. 5. Service calls to repair or replace appliance light bulbs, air filters, water filters, other consumables, or knobs, handles, or other than in accordance with the...
... in materials or workmanship when such appliance is installed, used and maintained in accordance with the provided instructions. 8. Products purchased "as removal of parts other than authorized service companies; Service calls which are not a part of this warranty. 5. Service calls to repair or replace appliance light bulbs, air filters, water filters, other consumables, or knobs, handles, or other than in accordance with the...

