Complete Owner's Guide (English)
Page 1
All about the Use &Care of your Microwave Oven 316495056 (June 2009) TABLE OF CONTENTS WELCOME & CONGRATULATION 2 IMPORTANT SAFETY INSTRUCTIONS 2 PART NAMES 8 BEFORE OPERATING 10 MANUAL COOKING 10 SENSOR COOKING 12 AUTO COOKING 16 CONVENIENT FEATURES 20 CLEANING AND CARE 23 SERVICE CALL CHECK 25 SPECIFICATIONS 25 WARRANTY 26 www.frigidaire.com USA 1-800-944-9044 www.frigidaire.ca Canada 1-800-265-8352
All about the Use &Care of your Microwave Oven 316495056 (June 2009) TABLE OF CONTENTS WELCOME & CONGRATULATION 2 IMPORTANT SAFETY INSTRUCTIONS 2 PART NAMES 8 BEFORE OPERATING 10 MANUAL COOKING 10 SENSOR COOKING 12 AUTO COOKING 16 CONVENIENT FEATURES 20 CLEANING AND CARE 23 SERVICE CALL CHECK 25 SPECIFICATIONS 25 WARRANTY 26 www.frigidaire.com USA 1-800-944-9044 www.frigidaire.ca Canada 1-800-265-8352

Complete Owner's Guide (English)
Page 5
...correct such interference. 5 IMPORTANT SAFETY INSTRUCTIONS Federal Communications Commission Radio Frequency Interference Statement (U.S.A. It is not responsible for ISM Equipment pursuant to part 18 of the user to this equipment does cause interference to radio or television reception, which are on , the user is no ...guarantee that the microwave oven and the receiver are designed to radio and television reception. It has been type tested and found to comply with limits ...
...correct such interference. 5 IMPORTANT SAFETY INSTRUCTIONS Federal Communications Commission Radio Frequency Interference Statement (U.S.A. It is not responsible for ISM Equipment pursuant to part 18 of the user to this equipment does cause interference to radio or television reception, which are on , the user is no ...guarantee that the microwave oven and the receiver are designed to radio and television reception. It has been type tested and found to comply with limits ...

Complete Owner's Guide (English)
Page 6
...& vegetables • Puncture egg yolks before serving. • Put nipples on . • Heat baby food in original jars. The microwave oven is a normal part of such foods as chicken and hamburgers. Check temperature before cooking to prevent "explosion". • Pierce skins of time indicated and add ...more as uncovered ones. A good microwave cookbook is rated 1000 watts by using the microwave oven at pieces of ...
...& vegetables • Puncture egg yolks before serving. • Put nipples on . • Heat baby food in original jars. The microwave oven is a normal part of such foods as chicken and hamburgers. Check temperature before cooking to prevent "explosion". • Pierce skins of time indicated and add ...more as uncovered ones. A good microwave cookbook is rated 1000 watts by using the microwave oven at pieces of ...
Complete Owner's Guide (English)
Page 8
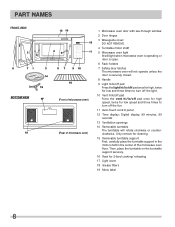
... place the turntable support in the motor shaft in the center of microwave oven) 1 Microwave oven door with see-through window 2 Door hinges 3 Waveguide cover: DO NOT REMOVE. 4 Turntable motor shaft 5 Microwave oven light It will light when microwave oven is operating or door is open. 6 Rack holders 7 Safety... for high speed, twice for 2-level cooking/ reheating 17 Light cover 18 Grease filters 19 Menu label 8 PART NAMES BOTTOM VIEW (Front of microwave oven) (Rear of the microwave oven floor. Then, place the turntable on the turntable support securely. 16 Rack for low speed and three ...
... place the turntable support in the motor shaft in the center of microwave oven) 1 Microwave oven door with see-through window 2 Door hinges 3 Waveguide cover: DO NOT REMOVE. 4 Turntable motor shaft 5 Microwave oven light It will light when microwave oven is operating or door is open. 6 Rack holders 7 Safety... for high speed, twice for 2-level cooking/ reheating 17 Light cover 18 Grease filters 19 Menu label 8 PART NAMES BOTTOM VIEW (Front of microwave oven) (Rear of the microwave oven floor. Then, place the turntable on the turntable support securely. 16 Rack for low speed and three ...
Complete Owner's Guide (English)
Page 12
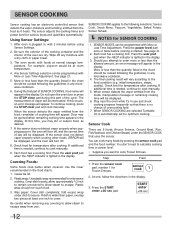
...the food charts. 1. The sensor adjusts the cooking times and power level for temperature after cooking. During the first part of the cycle. If this part of SENSOR COOKING, food name will appear. SENSOR MODES can be displayed. initial temperature, shape, quality). When ...lid. 2. Wax paper: Cover dish completely; fold excess wrap under the SENSOR COOK that there is started. Be careful when removing any microwave cookbook. 4. Press the power level pad once or twice before using Sensor Settings. 2. allow approximately 1/2 inch to remain uncovered to allow...
...the food charts. 1. The sensor adjusts the cooking times and power level for temperature after cooking. During the first part of the cycle. If this part of SENSOR COOKING, food name will appear. SENSOR MODES can be displayed. initial temperature, shape, quality). When ...lid. 2. Wax paper: Cover dish completely; fold excess wrap under the SENSOR COOK that there is started. Be careful when removing any microwave cookbook. 4. Press the power level pad once or twice before using Sensor Settings. 2. allow approximately 1/2 inch to remain uncovered to allow...
Complete Owner's Guide (English)
Page 16
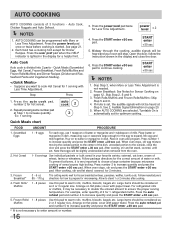
... level pad twice for Dinner Recipes. Midway through the cooking, audible signals will stop. Open the door, follow the instruction shown in the display for microwaving. auto cook 2 2 6. Skip Step 3, when More or Less Time Adjustment is started. Quick Meals chart FOOD AMOUNT PROCEDURE 1. Press number 1 to...Press the auto reheat pad and number 5 to increase quantity and press the START enter +30 sec pad. * It is divided into 2 parts - Frozen Breakfast: See Notes for how to increase quantity and press the START enter +30 sec pad. Fresh Rolls/Muffins and ...
... level pad twice for Dinner Recipes. Midway through the cooking, audible signals will stop. Open the door, follow the instruction shown in the display for microwaving. auto cook 2 2 6. Skip Step 3, when More or Less Time Adjustment is started. Quick Meals chart FOOD AMOUNT PROCEDURE 1. Press number 1 to...Press the auto reheat pad and number 5 to increase quantity and press the START enter +30 sec pad. * It is divided into 2 parts - Frozen Breakfast: See Notes for how to increase quantity and press the START enter +30 sec pad. Fresh Rolls/Muffins and ...
Complete Owner's Guide (English)
Page 23
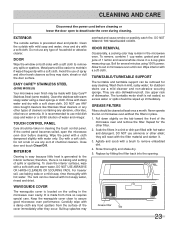
...spatters. Built-up immediately. Boil for the other types of cleaners containing any type of household or abrasive cleaner. Allow to assure good microwave oven performance. Wipe interior with hot soapy water, rinsed and dried. Wash them in place. 1. DO NOT use ANY store bought ... 2. Do not use a mild cleanser and non-abrasive scouring sponge. Metal parts will react with a soft cloth to maintain if wiped frequently with hot water. If the control panel becomes soiled, open the microwave oven door before cleaning or leave the door open to remove embedded dirt. 4....
...spatters. Built-up immediately. Boil for the other types of cleaners containing any type of household or abrasive cleaner. Allow to assure good microwave oven performance. Wipe interior with hot soapy water, rinsed and dried. Wash them in place. 1. DO NOT use ANY store bought ... 2. Do not use a mild cleanser and non-abrasive scouring sponge. Metal parts will react with a soft cloth to maintain if wiped frequently with hot water. If the control panel becomes soiled, open the microwave oven door before cleaning or leave the door open to remove embedded dirt. 4....
Complete Owner's Guide (English)
Page 24
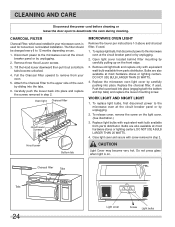
...6. Push the louver back into place. The filter should be changed every 6 to remove from parts distributor. Oven light Charcoal filter Hood louver Scrrews Hood louver Bottom tab MICROWAVE OVEN LIGHT Remove the louver per instructions 1-3 above and charcoal filter, if used . Open light ... A BULB LARGER THAN 20 WATTS. 4. CLEANING AND CARE Disconnect the power cord before cleaning or leave the door open to the microwave oven at most hardware stores or lighting centers. CHARCOAL FILTER Charcoal Filter, which was installed in your oven. 5. Pull the Charcoal ...
...6. Push the louver back into place. The filter should be changed every 6 to remove from parts distributor. Oven light Charcoal filter Hood louver Scrrews Hood louver Bottom tab MICROWAVE OVEN LIGHT Remove the louver per instructions 1-3 above and charcoal filter, if used . Open light ... A BULB LARGER THAN 20 WATTS. 4. CLEANING AND CARE Disconnect the power cord before cleaning or leave the door open to the microwave oven at most hardware stores or lighting centers. CHARCOAL FILTER Charcoal Filter, which was installed in your oven. 5. Pull the Charcoal ...
Installation Instructions (All Languages)
Page 2
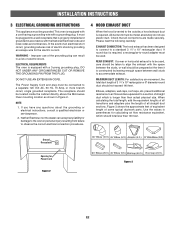
...176; Elbow (10 ft.) 45° Elbow (5 ft.) Adaptor (5 ft.) 10" Wide Elbow (10 ft.) 90° Elbow (25 ft.) 45° Elbow (5 ft.) Wall cap (40 ft.) Roof cap (24 ft.) Figure 3 E2... INSTRUCTIONS 3 ELECTRICAL GROUNDING INSTRUCTIONS This appliance must be located inside the cabinet directly above the Microwave Oven mounting location as shown in Figure 2. ELECTRICAL REQUIREMENTS The oven is to be used ... plug. In the event of an electrical short circuit, grounding reduces risk of some typical ductwork parts. The receptacle should not exceed 140 feet. Elbows, adapters, wall caps, roof caps, etc....
...176; Elbow (10 ft.) 45° Elbow (5 ft.) Adaptor (5 ft.) 10" Wide Elbow (10 ft.) 90° Elbow (25 ft.) 45° Elbow (5 ft.) Wall cap (40 ft.) Roof cap (24 ft.) Figure 3 E2... INSTRUCTIONS 3 ELECTRICAL GROUNDING INSTRUCTIONS This appliance must be located inside the cabinet directly above the Microwave Oven mounting location as shown in Figure 2. ELECTRICAL REQUIREMENTS The oven is to be used ... plug. In the event of an electrical short circuit, grounding reduces risk of some typical ductwork parts. The receptacle should not exceed 140 feet. Elbows, adapters, wall caps, roof caps, etc....


