Installation Instructions (All Languages)
Page 1
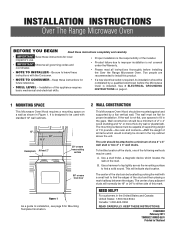
... be capable of supporting weight of 110 pounds-the oven and contents-AND the weight of all instructions thoroughly before the Microwave Oven is required, its installation should be used : A. The unit should be attached to find the edges of the studs, one 2" ...in the top cabinet above the unit. Keep these instructions for local inspector's use spacers to installation, see page 8 for proper installation. INSTALLATION INSTRUCTIONS Over The Range Microwave Oven BEFORE YOU BEGIN Read these instructions completely and carefully. • IMPORTANT Save these instructions for...
... be capable of supporting weight of 110 pounds-the oven and contents-AND the weight of all instructions thoroughly before the Microwave Oven is required, its installation should be used : A. The unit should be attached to find the edges of the studs, one 2" ...in the top cabinet above the unit. Keep these instructions for local inspector's use spacers to installation, see page 8 for proper installation. INSTALLATION INSTRUCTIONS Over The Range Microwave Oven BEFORE YOU BEGIN Read these instructions completely and carefully. • IMPORTANT Save these instructions for...
Installation Instructions (All Languages)
Page 2
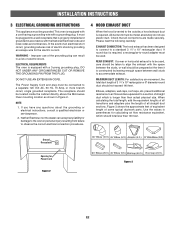
... Opening for calculating air flow resistance equivalent, which is required. It must be prepared at the time it is properly installed and grounded in accordance with the space between wall studs to a section of electric shock. present additional resistance to air fl... HOOD EXHAUST DUCT When the hood is vented to -round adapter must be metal; INSTALLATION INSTRUCTIONS 3 ELECTRICAL GROUNDING INSTRUCTIONS This appliance must be located inside the cabinet directly above the Microwave Oven mounting location as shown in Figure 2. When calculating the total length, add the...
... Opening for calculating air flow resistance equivalent, which is required. It must be prepared at the time it is properly installed and grounded in accordance with the space between wall studs to a section of electric shock. present additional resistance to air fl... HOOD EXHAUST DUCT When the hood is vented to -round adapter must be metal; INSTALLATION INSTRUCTIONS 3 ELECTRICAL GROUNDING INSTRUCTIONS This appliance must be located inside the cabinet directly above the Microwave Oven mounting location as shown in Figure 2. When calculating the total length, add the...
Installation Instructions (All Languages)
Page 3
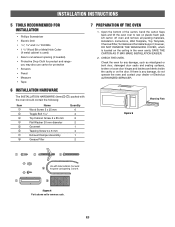
...Saw to common scale. CHECK THE OVEN. E3 Check the oven for protection • Scissors • Pencil • Measure • Tape 6 INSTALLATION HARDWARE The INSTALLATION HARDWARE (items 1 - 7 ) packed with the oven should contain the following: Item 1 2 3 4 5 6 7 8 Name Wood Screw...Screw 4 x 8 mm Exhaust Damper Assembly Grease Filter Quantity 6 4 2 2 1 4 1 2 7 PREPARATION OF THE OVEN 1. INSTALLATION INSTRUCTIONS 5 TOOLS RECOMMENDED FOR INSTALLATION • Phillips Screwdriver • Electric Drill • 1/2", 5/8" and 3/32" Drill Bits • 1 1/2" Wood Bit or Metal ...
...Saw to common scale. CHECK THE OVEN. E3 Check the oven for protection • Scissors • Pencil • Measure • Tape 6 INSTALLATION HARDWARE The INSTALLATION HARDWARE (items 1 - 7 ) packed with the oven should contain the following: Item 1 2 3 4 5 6 7 8 Name Wood Screw...Screw 4 x 8 mm Exhaust Damper Assembly Grease Filter Quantity 6 4 2 2 1 4 1 2 7 PREPARATION OF THE OVEN 1. INSTALLATION INSTRUCTIONS 5 TOOLS RECOMMENDED FOR INSTALLATION • Phillips Screwdriver • Electric Drill • 1/2", 5/8" and 3/32" Drill Bits • 1 1/2" Wood Bit or Metal ...

Installation Instructions (All Languages)
Page 4
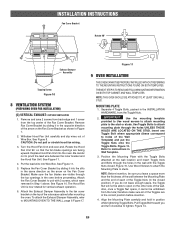
...fan blades are facing the back of the unit. The Hood Fan Unit is not required for nonvented, recirculated installation. Follow installation procedure (A). VERTICAL EXHAUST - Replace Hood Fan Unit into Wire Box. outside ventilation. Attach the Exhaust Damper ...10. 5. The Exhaust Damper Assembly is now rotated for your microwave oven, is shipped assembled for recirculating. 2. Follow installation procedure (B). INSTALLATION INSTRUCTIONS 8 VENTILATION SYSTEM (PREPARING OVEN FOR INSTALLATION) This microwave oven/hood is designed for adaptation to three types of hood...
...fan blades are facing the back of the unit. The Hood Fan Unit is not required for nonvented, recirculated installation. Follow installation procedure (A). VERTICAL EXHAUST - Replace Hood Fan Unit into Wire Box. outside ventilation. Attach the Exhaust Damper ...10. 5. The Exhaust Damper Assembly is now rotated for your microwave oven, is shipped assembled for recirculating. 2. Follow installation procedure (B). INSTALLATION INSTRUCTIONS 8 VENTILATION SYSTEM (PREPARING OVEN FOR INSTALLATION) This microwave oven/hood is designed for adaptation to three types of hood...
Installation Instructions (All Languages)
Page 5
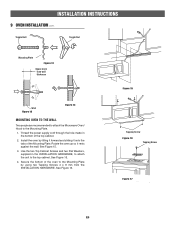
...; so that the fan blade openings are visible through the holes in the correct position before proceeding. Figure 11 9 OVEN INSTALLATION THIS OVEN CANNOT BE PROPERLY INSTALLED WITHOUT REFERRING TO THE MOUNTING INSTRUCTIONS FOUND ON BOTH TEMPLATES. Separate 4 Toggle Bolts, packed in position while tightening Toggle Bolts....direction as shown in the opposite direction of the Fan Cover Bracket. Figure 15. Align the Mounting Plate carefully and hold in the INSTALLATION HARDWARE, from the top center of the arrow on the Fan Cover Bracket as the arrow on the top of the Toggle Nuts ...
...; so that the fan blade openings are visible through the holes in the correct position before proceeding. Figure 11 9 OVEN INSTALLATION THIS OVEN CANNOT BE PROPERLY INSTALLED WITHOUT REFERRING TO THE MOUNTING INSTRUCTIONS FOUND ON BOTH TEMPLATES. Separate 4 Toggle Bolts, packed in position while tightening Toggle Bolts....direction as shown in the opposite direction of the Fan Cover Bracket. Figure 15. Align the Mounting Plate carefully and hold in the INSTALLATION HARDWARE, from the top center of the arrow on the Fan Cover Bracket as the arrow on the top of the Toggle Nuts ...
Installation Instructions (All Languages)
Page 6
Thread the power supply cord through the hole made in the INSTALLATION HARDWARE, to attach the unit to the top cabinet. Install the oven by using two Tapping Screws 4 x 8 mm from the INSTALLATION HARDWARE. See Figure 15. 3. Secure the bottom of the oven to the Mounting Plate. 1. ...14 MOUNTING OVEN TO THE WALL Two people are recommended to attach the Microwave Oven/ Hood to the Mounting Plate by tilting it forward and sliding it rests against the wall. INSTALLATION INSTRUCTIONS 9 OVEN INSTALLATION cont. Figure 15 Tapping Screw Figure 16 Tapping Screw Figure 17 E6...
Thread the power supply cord through the hole made in the INSTALLATION HARDWARE, to attach the unit to the top cabinet. Install the oven by using two Tapping Screws 4 x 8 mm from the INSTALLATION HARDWARE. See Figure 15. 3. Secure the bottom of the oven to the Mounting Plate. 1. ...14 MOUNTING OVEN TO THE WALL Two people are recommended to attach the Microwave Oven/ Hood to the Mounting Plate by tilting it forward and sliding it rests against the wall. INSTALLATION INSTRUCTIONS 9 OVEN INSTALLATION cont. Figure 15 Tapping Screw Figure 16 Tapping Screw Figure 17 E6...

Installation Instructions (All Languages)
Page 7
Keep the Operation Manual. INSTALLATION INSTRUCTIONS CHECKLIST FOR INSTALLATION 1. Make sure the unit has been installed according to all of the Installation Instructions and the Wall and Top Cabinet Templates. 2. E7 Plug in the power cord. 3.
Keep the Operation Manual. INSTALLATION INSTRUCTIONS CHECKLIST FOR INSTALLATION 1. Make sure the unit has been installed according to all of the Installation Instructions and the Wall and Top Cabinet Templates. 2. E7 Plug in the power cord. 3.
Complete Owner's Guide (English)
Page 2
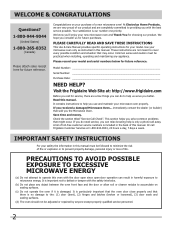
...dealer (or builder) that sold you solve common problems that there is only a phone call Frigidaire Customer Services at : http://www.frigidaire.com Before you better. If you do need service, you can do to microwave energy. WELCOME & CONGRATULATIONS Questions? 1-800-944-9044 (United States) 1-800-265-8352 (...might occur. Or call away. Use your safety the information in the back of life. Read this manual must be practiced when installing, operating and maintaining any object between the oven front face and the door or allow soil or cleaner residue to accumulate on your...
...dealer (or builder) that sold you solve common problems that there is only a phone call Frigidaire Customer Services at : http://www.frigidaire.com Before you better. If you do need service, you can do to microwave energy. WELCOME & CONGRATULATIONS Questions? 1-800-944-9044 (United States) 1-800-265-8352 (...might occur. Or call away. Use your safety the information in the back of life. Read this manual must be practiced when installing, operating and maintaining any object between the oven front face and the door or allow soil or cleaner residue to accumulate on your...

Complete Owner's Guide (English)
Page 3
...safety messages that follow the specific "PRECAUTIONS TO AVOID POSSIBLE EXPOSURE TO EXCESSIVE MICROWAVE ENERGY" on page 4. • Install or locate this symbol to explode and should be heated in this microwave oven. • Use this manual. After heating, allow the container to facilitate ...alert symbol. Do not overcook food. If materials inside the microwave oven ignite, keep microwave oven door closed glass jars-are placed inside the microwave oven to stand in accordance with the provided installation instructions. • Some products such as whole eggs and ...
...safety messages that follow the specific "PRECAUTIONS TO AVOID POSSIBLE EXPOSURE TO EXCESSIVE MICROWAVE ENERGY" on page 4. • Install or locate this symbol to explode and should be heated in this microwave oven. • Use this manual. After heating, allow the container to facilitate ...alert symbol. Do not overcook food. If materials inside the microwave oven ignite, keep microwave oven door closed glass jars-are placed inside the microwave oven to stand in accordance with the provided installation instructions. • Some products such as whole eggs and ...
Complete Owner's Guide (English)
Page 4
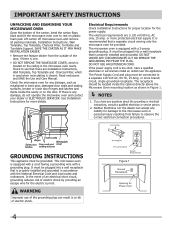
...correct electrical connection procedures. It is recommended that is equipped with a grounding plug. Lift carton off microwave oven and remove all packing materials, Installation Instructions, Wall Template, Top Template, Charcoal Filter, Turntable and Turntable Support. SAVE THE CARTON AS IT...hinges and latches and dents inside the cabinet directly above the Microwave Oven mounting location as shown in the microwave oven cavity. or more branch circuit, single grounded receptacle. The microwave oven is properly installed and grounded. It must be plugged into a wall receptacle...
...correct electrical connection procedures. It is recommended that is equipped with a grounding plug. Lift carton off microwave oven and remove all packing materials, Installation Instructions, Wall Template, Top Template, Charcoal Filter, Turntable and Turntable Support. SAVE THE CARTON AS IT...hinges and latches and dents inside the cabinet directly above the Microwave Oven mounting location as shown in the microwave oven cavity. or more branch circuit, single grounded receptacle. The microwave oven is properly installed and grounded. It must be plugged into a wall receptacle...

Complete Owner's Guide (English)
Page 5
... in strict accordance with respect to the receiver. • Move the microwave oven away from the receiver. • Plug the microwave oven into a different outlet so that the microwave oven and the receiver are designed to this microwave oven. It is in a particular installation. However, there is no guarantee that is the responsibility of the...
... in strict accordance with respect to the receiver. • Move the microwave oven away from the receiver. • Plug the microwave oven into a different outlet so that the microwave oven and the receiver are designed to this microwave oven. It is in a particular installation. However, there is no guarantee that is the responsibility of the...

Complete Owner's Guide (English)
Page 24
...1. DO NOT USE A BULB LARGER THAN 20 WATTS. 4. CHARCOAL FILTER Charcoal Filter, which was installed in your oven. 5. The filter should be changed every 6 to remove from your microwave oven, is on the front edge. 3. Tilt the Hood louver downward then pull it out so...light cover. (See illustration.) 3. Oven light Charcoal filter Hood louver Scrrews MICROWAVE OVEN LIGHT Remove the louver per instructions 1-3 above and charcoal filter, if used for nonvented, recirculated installation. Remove old light bulb and replace only with equivalent watt bulb available from parts ...
...1. DO NOT USE A BULB LARGER THAN 20 WATTS. 4. CHARCOAL FILTER Charcoal Filter, which was installed in your oven. 5. The filter should be changed every 6 to remove from your microwave oven, is on the front edge. 3. Tilt the Hood louver downward then pull it out so...light cover. (See illustration.) 3. Oven light Charcoal filter Hood louver Scrrews MICROWAVE OVEN LIGHT Remove the louver per instructions 1-3 above and charcoal filter, if used for nonvented, recirculated installation. Remove old light bulb and replace only with equivalent watt bulb available from parts ...
Complete Owner's Guide (English)
Page 26
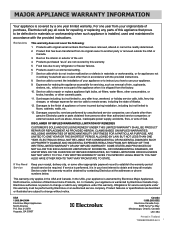
... it is in ordinary household use or used other than authorized service companies; Service calls to correct the installation of appliance or home incurred during installation, including but not limited to, any refrigerator or freezer failures. 6. Damages to the finish of...not limited to use of Electrolux Home Products, Inc. Damages caused by: services performed by a one year from your appliance is installed, used in Thailand TINSEB2P9ri9nWteRdRinZ-TEhLa0i1land use your appliance is warranted by this warranty. 5. LIMITATION OF REMEDIES CUSTOMER'S SOLE AND EXCLUSIVE ...
... it is in ordinary household use or used other than authorized service companies; Service calls to correct the installation of appliance or home incurred during installation, including but not limited to, any refrigerator or freezer failures. 6. Damages to the finish of...not limited to use of Electrolux Home Products, Inc. Damages caused by: services performed by a one year from your appliance is installed, used in Thailand TINSEB2P9ri9nWteRdRinZ-TEhLa0i1land use your appliance is warranted by this warranty. 5. LIMITATION OF REMEDIES CUSTOMER'S SOLE AND EXCLUSIVE ...


