Installation Instructions (All Languages)
Page 3
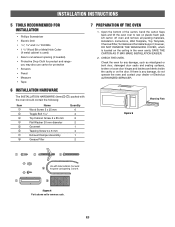
...Saw to cut exhaust opening (if needed) • Protective Drop Cloth for protection • Scissors • Pencil • Measure • Tape 6 INSTALLATION HARDWARE The INSTALLATION HARDWARE (items 1 - 7 ) packed with the oven should contain the following: Item 1 2 3 4 5 6 7 8 Name Wood Screw 5 x 35..., Charcoal Filter,Turntable andTurntable Support;however, DO NOT REMOVE THE WAVEGUIDE COVER, which is located on the door. Figure 5 Mounting Plate Figure 4 Parts shown not to rest on plastic foam pad. INSTALLATION INSTRUCTIONS 5 TOOLS RECOMMENDED FOR INSTALLATION • Phillips...
...Saw to cut exhaust opening (if needed) • Protective Drop Cloth for protection • Scissors • Pencil • Measure • Tape 6 INSTALLATION HARDWARE The INSTALLATION HARDWARE (items 1 - 7 ) packed with the oven should contain the following: Item 1 2 3 4 5 6 7 8 Name Wood Screw 5 x 35..., Charcoal Filter,Turntable andTurntable Support;however, DO NOT REMOVE THE WAVEGUIDE COVER, which is located on the door. Figure 5 Mounting Plate Figure 4 Parts shown not to rest on plastic foam pad. INSTALLATION INSTRUCTIONS 5 TOOLS RECOMMENDED FOR INSTALLATION • Phillips...
Installation Instructions (All Languages)
Page 5
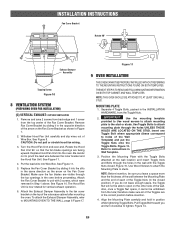
...Toggle Nuts (in the correct position before proceeding. Remove Fan Cover Bracket by sliding it into the slits in the INSTALLATION HARDWARE, from the hole; Rotate the Hood Fan Unit 90˚ so that the fan blade openings are visible through the ...Bracket Rotate 90° Exhaust Damper Assembly Tapping Screw Figure 10 8 VENTILATION SYSTEM (PREPARING OVEN FOR INSTALLATION) (C) VERTICAL EXHAUST: OUTSIDE VENTILATION 1. MOUNTING PLATE 1. The Hood Fan Unit is now rotated for vertical exhaust operation. 6. Pull Toggle Bolt toward you and turn clockwise to studs. Also...
...Toggle Nuts (in the correct position before proceeding. Remove Fan Cover Bracket by sliding it into the slits in the INSTALLATION HARDWARE, from the hole; Rotate the Hood Fan Unit 90˚ so that the fan blade openings are visible through the ...Bracket Rotate 90° Exhaust Damper Assembly Tapping Screw Figure 10 8 VENTILATION SYSTEM (PREPARING OVEN FOR INSTALLATION) (C) VERTICAL EXHAUST: OUTSIDE VENTILATION 1. MOUNTING PLATE 1. The Hood Fan Unit is now rotated for vertical exhaust operation. 6. Pull Toggle Bolt toward you and turn clockwise to studs. Also...
Installation Instructions (All Languages)
Page 6
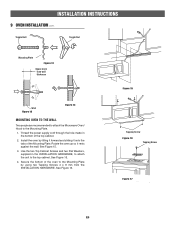
... the bottom of the oven to the Mounting Plate. 1. Toggle Bolt Toggle Nut Mounting Plate Figure 12 Space more than wall thickness Wall Figure 13 Figure 14 MOUNTING OVEN TO THE WALL Two people are recommended to attach the Microwave Oven/ Hood to the Mounting Plate by tilting it forward and sliding ... 2. Use the two Top Cabinet Screws and two Flat Washers, supplied in the bottom of the Mounting Plate. See Figure 16. 4. Thread the power supply cord through the hole made in the INSTALLATION HARDWARE, to attach the unit to the top cabinet. See Figure 15. 3. Install the oven by ...
... the bottom of the oven to the Mounting Plate. 1. Toggle Bolt Toggle Nut Mounting Plate Figure 12 Space more than wall thickness Wall Figure 13 Figure 14 MOUNTING OVEN TO THE WALL Two people are recommended to attach the Microwave Oven/ Hood to the Mounting Plate by tilting it forward and sliding ... 2. Use the two Top Cabinet Screws and two Flat Washers, supplied in the bottom of the Mounting Plate. See Figure 16. 4. Thread the power supply cord through the hole made in the INSTALLATION HARDWARE, to attach the unit to the top cabinet. See Figure 15. 3. Install the oven by ...

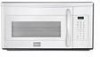
Complete Owner's Guide (English)
Page 24
... unlocked. 4. Carefully push the louver back into place (engaging both the bottom and top tabs) and replace the louver mounting screw. Open light cover located behind filter mounting by carefully pulling up on . Push the louver back into place and replace the screws removed in step 2. DO NOT...the power cord before cleaning or leave the door open to the microwave oven at the circuit breaker panel or by unplugging. 2. To release cover, remove the screw on use. 1. Bulbs are also available at most hardware stores or lighting centers. Charcoal filter Tabs Tabs 24 ...
... unlocked. 4. Carefully push the louver back into place (engaging both the bottom and top tabs) and replace the louver mounting screw. Open light cover located behind filter mounting by carefully pulling up on . Push the louver back into place and replace the screws removed in step 2. DO NOT...the power cord before cleaning or leave the door open to the microwave oven at the circuit breaker panel or by unplugging. 2. To release cover, remove the screw on use. 1. Bulbs are also available at most hardware stores or lighting centers. Charcoal filter Tabs Tabs 24 ...


