

Installation Instructions (All Languages)
Page 2
... General information Important Safety Instructions 3 Electrical Requirements 3 Damage - Shipment/Installation 4 Parts Included 4 Tools You Will Need 5 Mounting Space 5 Step-by-step installation guide Placement of The Mounting Plate 6-8 Removing the Mounting Plate 6 Finding the Wall Studs 6 Determining Wall Plate Location 7 Aligning the Wall Plate 8 Installation Types 9-22 Hood Exhaust 10-11 A Outside Top Exhaust 12-15 Attach Mounting Plate to Wall 12 Preparation of Top Cabinet 13 Adapting Microwave Blower for Outside top Exhaust 13-14 Checking for Proper Damper Operation...
... General information Important Safety Instructions 3 Electrical Requirements 3 Damage - Shipment/Installation 4 Parts Included 4 Tools You Will Need 5 Mounting Space 5 Step-by-step installation guide Placement of The Mounting Plate 6-8 Removing the Mounting Plate 6 Finding the Wall Studs 6 Determining Wall Plate Location 7 Aligning the Wall Plate 8 Installation Types 9-22 Hood Exhaust 10-11 A Outside Top Exhaust 12-15 Attach Mounting Plate to Wall 12 Preparation of Top Cabinet 13 Adapting Microwave Blower for Outside top Exhaust 13-14 Checking for Proper Damper Operation...
Installation Instructions (All Languages)
Page 3
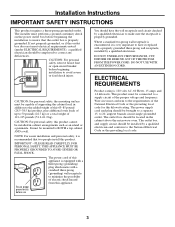
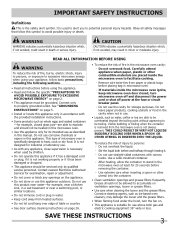
..., UNDER ANY CIRCUMSTANCES, CUT, DEFORM OR REMOVE ANY OF THE PRONGS FROM THE POWER CORD. This product must conform to BOTH a top cabinet AND a wall. Wire size must be mounted to the requirements of the proper voltage and frequency. PLEASE READ CAREFULLY. ampere branch circuit single grounded outlet. CAUTION: For personal safety, remove house fuse or open circuit breaker before beginning the installation to insure that...
..., UNDER ANY CIRCUMSTANCES, CUT, DEFORM OR REMOVE ANY OF THE PRONGS FROM THE POWER CORD. This product must conform to BOTH a top cabinet AND a wall. Wire size must be mounted to the requirements of the proper voltage and frequency. PLEASE READ CAREFULLY. ampere branch circuit single grounded outlet. CAUTION: For personal safety, remove house fuse or open circuit breaker before beginning the installation to insure that...
Installation Instructions (All Languages)
Page 6
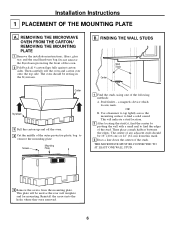
... back all 4 carton flaps fully against carton sides. Reinstall the screws into the holes where they were removed. 6 REMOVING THE MICROWAVE OVEN FROM THE CARTON/ REMOVING THE MOUNTING PLATE 1 Remove the installation instructions, filters, glass tray and the small hardware bag. B. OR B. This will be used as the rear wall template and for mounting. Use a hammer to tap lightly across the mounting surface to find the edges of the following methods: A. Stud...
... back all 4 carton flaps fully against carton sides. Reinstall the screws into the holes where they were removed. 6 REMOVING THE MICROWAVE OVEN FROM THE CARTON/ REMOVING THE MOUNTING PLATE 1 Remove the installation instructions, filters, glass tray and the small hardware bag. B. OR B. This will be used as the rear wall template and for mounting. Use a hammer to tap lightly across the mounting surface to find the edges of the following methods: A. Stud...
Installation Instructions (All Languages)
Page 12
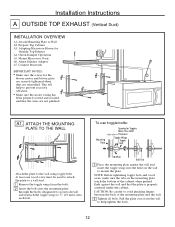
.... • Make sure the motor wiring has been properly routed and secured, and that the plate is properly centered under the cabinet. CAUTION: Be careful to Wall A2. Adjust Exhaust Adaptor A7. This will help tighten the bolts. 12 ATTACH THE MOUNTING PLATE TO THE WALL To use toggle bolts: Mounting Plate Spacing for Outside Top Exhaust A4. Installation Instructions A OUTSIDE TOP EXHAUST (Vertical Duct) INSTALLATION OVERVIEW A1. At least one...
.... • Make sure the motor wiring has been properly routed and secured, and that the plate is properly centered under the cabinet. CAUTION: Be careful to Wall A2. Adjust Exhaust Adaptor A7. This will help tighten the bolts. 12 ATTACH THE MOUNTING PLATE TO THE WALL To use toggle bolts: Mounting Plate Spacing for Outside Top Exhaust A4. Installation Instructions A OUTSIDE TOP EXHAUST (Vertical Duct) INSTALLATION OVERVIEW A1. At least one...
Installation Instructions (All Languages)
Page 15
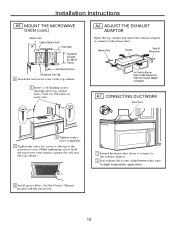
... exhaust adaptor. 2 Seal exhaust duct joints using furnance duct tape for high temperature applications. 8 Install grease filters. MOUNT THE MICROWAVE OVEN (cont.) Cabinet Front Cabinet Bottom Shelf Filler Block Equivalent to Depth of the microwave oven. (While tightening screws, hold the microwave oven in place against the wall and the top cabinet.) 1 Extend the house duct down to connect to the top cabinet. 5 Insert 2 self-aligning screws through outer top cabinet holes. See the Owner's Manual...
... exhaust adaptor. 2 Seal exhaust duct joints using furnance duct tape for high temperature applications. 8 Install grease filters. MOUNT THE MICROWAVE OVEN (cont.) Cabinet Front Cabinet Bottom Shelf Filler Block Equivalent to Depth of the microwave oven. (While tightening screws, hold the microwave oven in place against the wall and the top cabinet.) 1 Extend the house duct down to connect to the top cabinet. 5 Insert 2 self-aligning screws through outer top cabinet holes. See the Owner's Manual...
Installation Instructions (All Languages)
Page 16
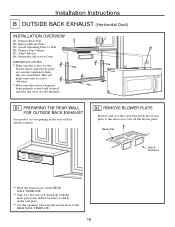
... THE REAR WALL FOR OUTSIDE BACK EXHAUST You need to Wall B4. Attach Mounting Plate to cut an opening in the wall plate. • Cut the opening, following the instructions of the REAR WALL TEMPLATE. 16 Adjust Blower B6. Prepare Rear Wall B2. Lift off the blower plate. Installation Instructions B OUTSIDE BACK EXHAUST (Horizontal Duct) INSTALLATION OVERVIEW B1. Mount the Microwave Oven IMPORTANT NOTES: • Make sure the screws for outside exhaust. REMOVE BLOWER PLATE Remove and save the screw that the wires are reinstalled. B1. Remove Blower Plate B3...
... THE REAR WALL FOR OUTSIDE BACK EXHAUST You need to Wall B4. Attach Mounting Plate to cut an opening in the wall plate. • Cut the opening, following the instructions of the REAR WALL TEMPLATE. 16 Adjust Blower B6. Prepare Rear Wall B2. Lift off the blower plate. Installation Instructions B OUTSIDE BACK EXHAUST (Horizontal Duct) INSTALLATION OVERVIEW B1. Mount the Microwave Oven IMPORTANT NOTES: • Make sure the screws for outside exhaust. REMOVE BLOWER PLATE Remove and save the screw that the wires are reinstalled. B1. Remove Blower Plate B3...
Installation Instructions (All Languages)
Page 20
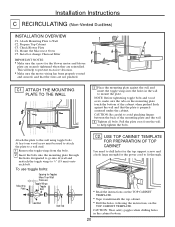
... TOP CABINET TEMPLATE. USE TOP CABINET TEMPLATE FOR PREPARATION OF TOP CABINET You need to drill holes for the top support screws and a hole large enough for the power cord to fit through the holes designated to mount the plate. Check Blower Plate C4. This will help tighten the bolts. ATTACH THE MOUNTING PLATE TO THE WALL 3 Place the mounting plate against the wall and that the wires are reinstalled. Mount the Microwave Oven...
... TOP CABINET TEMPLATE. USE TOP CABINET TEMPLATE FOR PREPARATION OF TOP CABINET You need to drill holes for the top support screws and a hole large enough for the power cord to fit through the holes designated to mount the plate. Check Blower Plate C4. This will help tighten the bolts. ATTACH THE MOUNTING PLATE TO THE WALL 3 Place the mounting plate against the wall and that the wires are reinstalled. Mount the Microwave Oven...
Installation Instructions (All Languages)
Page 22
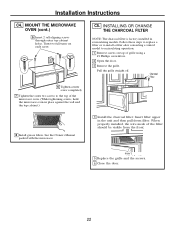
...Install grease filters. Turn two full turns on top of the microwave oven. (While tightening screws, hold the microwave oven in recirculating models. Follow these steps to replace a filter or to install a filter after converting a vented model to recirculating operation. 1 Remove screws on each screw. 6 Tighten center screw completely. 7 Tighten the outer two screws to the top of grille using a #1 Phillips screwdriver. 2 Open the door. 3 Remove the grille. Installation Instructions C4. MOUNT THE MICROWAVE OVEN (cont.) 5 Insert 2 self-aligning screws through outer top cabinet...
...Install grease filters. Turn two full turns on top of the microwave oven. (While tightening screws, hold the microwave oven in recirculating models. Follow these steps to replace a filter or to install a filter after converting a vented model to recirculating operation. 1 Remove screws on each screw. 6 Tighten center screw completely. 7 Tighten the outer two screws to the top of grille using a #1 Phillips screwdriver. 2 Open the door. 3 Remove the grille. Installation Instructions C4. MOUNT THE MICROWAVE OVEN (cont.) 5 Insert 2 self-aligning screws through outer top cabinet...
Installation Instructions (All Languages)
Page 23
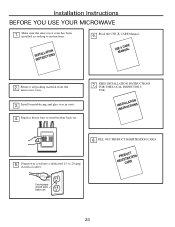
Read the USE & CARE Manual. Plug power cord into a dedicated 15- to instructions. ININSSTTARLULCATTIIOONNS 6. Install turntable ring and glass tray in cavity . 4. Installation Instructions BEFORE YOU USE YOUR MICROWAVE 1. ININSSTTARLULCATTIIOONNS 5. Make sure the microwave oven has been installed according to 20-amp electrical outlet. 8. Replace house fuse or turn breaker back on. 7. Remove all packing material from the microwave oven. 3. KEEP INSTALLATION INSTRUCTIONS FOR THE LOCAL INSPECTOR'S USE. FILL OUT PRODUCT REGISTRATION CARD RPEGROISDCTUARCRATDTION ...
Read the USE & CARE Manual. Plug power cord into a dedicated 15- to instructions. ININSSTTARLULCATTIIOONNS 6. Install turntable ring and glass tray in cavity . 4. Installation Instructions BEFORE YOU USE YOUR MICROWAVE 1. ININSSTTARLULCATTIIOONNS 5. Make sure the microwave oven has been installed according to 20-amp electrical outlet. 8. Replace house fuse or turn breaker back on. 7. Remove all packing material from the microwave oven. 3. KEEP INSTALLATION INSTRUCTIONS FOR THE LOCAL INSPECTOR'S USE. FILL OUT PRODUCT REGISTRATION CARD RPEGROISDCTUARCRATDTION ...
Complete Owner's Guide (English)
Page 3
... eggs and sealed containers -for example, closed glass jars-are placed inside the microwave oven ignite, keep microwave oven door closed, turn the fan on ventilation openings, louver or grease filters. • Use care when cleaning the louver and the grease filters. Remove wire twist-ties from the microwave oven is the safety alert symbol. THIS COULD RESULT IN VERY HOT LIQUIDS SUDDENLY BOILING OVER WHEN A SPOON OR...
... eggs and sealed containers -for example, closed glass jars-are placed inside the microwave oven ignite, keep microwave oven door closed, turn the fan on ventilation openings, louver or grease filters. • Use care when cleaning the louver and the grease filters. Remove wire twist-ties from the microwave oven is the safety alert symbol. THIS COULD RESULT IN VERY HOT LIQUIDS SUDDENLY BOILING OVER WHEN A SPOON OR...

Complete Owner's Guide (English)
Page 4
... and mercur y in a residential installation. Only) This equipment generates and uses ISM frequency energy and if not installed and used in a particular installation. It is not responsible for use a thermometer in food you see arcing,press the Stop/Clear button and correct the problem. IMPORTANT SAFETY INSTRUCTIONS • When using the convection or combination cooking functions, both the outside and inside of the oven will not occur in...
... and mercur y in a residential installation. Only) This equipment generates and uses ISM frequency energy and if not installed and used in a particular installation. It is not responsible for use a thermometer in food you see arcing,press the Stop/Clear button and correct the problem. IMPORTANT SAFETY INSTRUCTIONS • When using the convection or combination cooking functions, both the outside and inside of the oven will not occur in...
Complete Owner's Guide (English)
Page 5
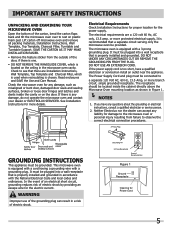
... the Use and Care Manual. NOTES 1. Check the microwave oven for damage to observe the correct electrical connection procedures. Electrical Requirements Check Installation Instructions for proper location for Power Cord 5 The electrical requirements are Installation Instructions, Wall Template, Top Template and Charcoal Filter, which is too short, have any damage, such as misaligned or bent door, damaged door seals and sealing surfaces, broken or loose door hinges and latches and dents inside the cabinet directly above the Microwave Oven mounting location...
... the Use and Care Manual. NOTES 1. Check the microwave oven for damage to observe the correct electrical connection procedures. Electrical Requirements Check Installation Instructions for proper location for Power Cord 5 The electrical requirements are Installation Instructions, Wall Template, Top Template and Charcoal Filter, which is too short, have any damage, such as misaligned or bent door, damaged door seals and sealing surfaces, broken or loose door hinges and latches and dents inside the cabinet directly above the Microwave Oven mounting location...
Complete Owner's Guide (English)
Page 6
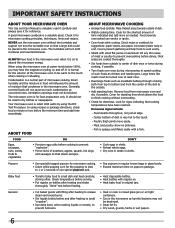
...; Heat baby food in the microwave oven. General • Cut baked goods with small flat power levels below 100%, you may not be used to the touch. - Baby food • Transfer baby food to release steam and avoid burns. • Stir liquids briskly before the minimum time and add time accordingly. Remove food from outside of dish is for doneness. Center bottom of dish. • Watch cooking time...
...; Heat baby food in the microwave oven. General • Cut baked goods with small flat power levels below 100%, you may not be used to the touch. - Baby food • Transfer baby food to release steam and avoid burns. • Stir liquids briskly before the minimum time and add time accordingly. Remove food from outside of dish is for doneness. Center bottom of dish. • Watch cooking time...
Complete Owner's Guide (English)
Page 7
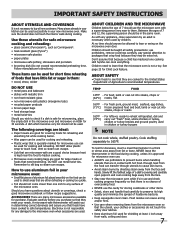
... not touch the safety door latches. • Keep aluminum foil used . Follow manufacturer's directions.) These items can escape. • Lids that are microwave-safe are cooked to the United States Department of aluminum foil placed smoothly on the food can be used . As with hot food. Make sure the utensil does not touch the interior walls during cooking, unless it 's in the microwave oven and microwave on the microwave oven door...
... not touch the safety door latches. • Keep aluminum foil used . Follow manufacturer's directions.) These items can escape. • Lids that are microwave-safe are cooked to the United States Department of aluminum foil placed smoothly on the food can be used . As with hot food. Make sure the utensil does not touch the interior walls during cooking, unless it 's in the microwave oven and microwave on the microwave oven door...
Complete Owner's Guide (English)
Page 8
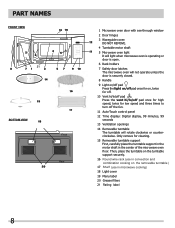
... Auto-Touch control panel 12 Time display: Digital display, 99 minutes, 99 seconds 13 Ventilation openings 14 Removable turntable The turntable will rotate clockwise or counterclockwise. Then, place the turntable on the turntable support securely. 16 Round wire rack (use in the center of the microwave oven floor. PART NAMES 21 BOTTOM VIEW Front Rear 1 Microwave oven door with see-through window 2 Door hinges 3 Waveguide cover: DO NOT REMOVE. 4 Turntable motor shaft 5 Microwave oven light It will light when microwave oven is operating or door is open. 6 Rack holders 7 Safety door...
... Auto-Touch control panel 12 Time display: Digital display, 99 minutes, 99 seconds 13 Ventilation openings 14 Removable turntable The turntable will rotate clockwise or counterclockwise. Then, place the turntable on the turntable support securely. 16 Round wire rack (use in the center of the microwave oven floor. PART NAMES 21 BOTTOM VIEW Front Rear 1 Microwave oven door with see-through window 2 Door hinges 3 Waveguide cover: DO NOT REMOVE. 4 Turntable motor shaft 5 Microwave oven light It will light when microwave oven is operating or door is open. 6 Rack holders 7 Safety door...

Complete Owner's Guide (English)
Page 14
... cook manually. 2. If dish is wider than the quantity listed in a cup 5 Soup 6 Beverage Using Sensor Settings: 1. sensor cook 1 2. START enter +30 sec NOTES for microwave cooking. Do not open the oven door or press the STOP clear pad during this occurs, an error message will be displayed. 3. When the sensor detects the vapor emitted from the foods, manipulation message or remaining cooking time will appear. Covering Foods: Some foods cook better when covered. Plastic wrap: Use...
... cook manually. 2. If dish is wider than the quantity listed in a cup 5 Soup 6 Beverage Using Sensor Settings: 1. sensor cook 1 2. START enter +30 sec NOTES for microwave cooking. Do not open the oven door or press the STOP clear pad during this occurs, an error message will be displayed. 3. When the sensor detects the vapor emitted from the foods, manipulation message or remaining cooking time will appear. Covering Foods: Some foods cook better when covered. Plastic wrap: Use...
Complete Owner's Guide (English)
Page 26
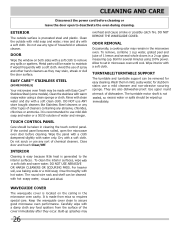
... a soft clean cloth. INTERIOR Cleaning is easy because little heat is made with a soft cloth to assure good microwave oven performance. For heavier soil, use of 1 lemon and several minutes using a clean sponge or cloth. DO NOT REMOVE THE WAVEGUIDE COVER. It is generated to set in a 2-cup glass measuring cup. Rinse with clean water and dry with warm soapy water using 100% power. Close door and touch Clear...
... a soft clean cloth. INTERIOR Cleaning is easy because little heat is made with a soft cloth to assure good microwave oven performance. For heavier soil, use of 1 lemon and several minutes using a clean sponge or cloth. DO NOT REMOVE THE WAVEGUIDE COVER. It is generated to set in a 2-cup glass measuring cup. Rinse with clean water and dry with warm soapy water using 100% power. Close door and touch Clear...
Complete Owner's Guide (English)
Page 29
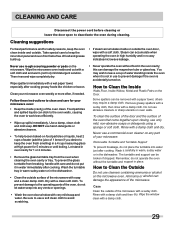
... clean and care for safety reasons, keep the inner door panel and oven fron frame free of your microwave oven weekly or more often, if needed. Steam can be broken if dropped. Follow these instructions to leave a cup of the microwave. Food particles and spilled liquids can damage the magnetron tube or glass tray. How to Clean the Inside Walls,Floor, Inside Widow, Metal and Plastic Patrs on the microwave oven...
... clean and care for safety reasons, keep the inner door panel and oven fron frame free of your microwave oven weekly or more often, if needed. Steam can be broken if dropped. Follow these instructions to leave a cup of the microwave. Food particles and spilled liquids can damage the magnetron tube or glass tray. How to Clean the Inside Walls,Floor, Inside Widow, Metal and Plastic Patrs on the microwave oven...

Product Specifications Sheet (English)
Page 1
... as vent hoods. Extra-Large 13-1/2" Diameter Glass Turntable Big bowls and large casserole dishes are no problem for our extra-large glass turntable. ten preset options allow you to -use onetouch buttons so you can bake a potato, pop popcorn or add 30 seconds to 450 degrees. Convection Cooking Rack Stainless Steel Interior Bright Lighting Our bright lighting makes it simple with the browning capabilities of a button. Auto-Start Heat Sensor...
... as vent hoods. Extra-Large 13-1/2" Diameter Glass Turntable Big bowls and large casserole dishes are no problem for our extra-large glass turntable. ten preset options allow you to -use onetouch buttons so you can bake a potato, pop popcorn or add 30 seconds to 450 degrees. Convection Cooking Rack Stainless Steel Interior Bright Lighting Our bright lighting makes it simple with the browning capabilities of a button. Auto-Start Heat Sensor...
Product Specifications Sheet (English)
Page 2
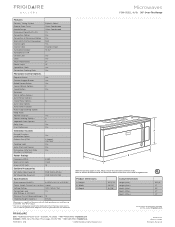
... Control / Timing System Exterior Door Finish Handle Design Microwave Capacity (Cu. Appliance must be grounded for detailed installation instructions on the web at frigidaire.com. Width C - Ft.) Convection Option Convection & Microwave Option Watts (IEC-705 Test Procedure) Interior Light Interior Color Turntable Diameter Turntable On / Off Control Lock Clock Touch Pad Buttons Power Levels SpaceWise® Rack Convection Cooking Rack Microwave Control Options Popcorn Button Chicken Nugget Button Baked Potato Button Sensor Reheat Options Snack Button Beverage Melt & Soften Options Auto...
... Control / Timing System Exterior Door Finish Handle Design Microwave Capacity (Cu. Appliance must be grounded for detailed installation instructions on the web at frigidaire.com. Width C - Ft.) Convection Option Convection & Microwave Option Watts (IEC-705 Test Procedure) Interior Light Interior Color Turntable Diameter Turntable On / Off Control Lock Clock Touch Pad Buttons Power Levels SpaceWise® Rack Convection Cooking Rack Microwave Control Options Popcorn Button Chicken Nugget Button Baked Potato Button Sensor Reheat Options Snack Button Beverage Melt & Soften Options Auto...

