Complete Owner's Guide (English)
Page 1
All about the Use &Care of your Microwave Oven 316495059 (May 2009) TABLE OF CONTENTS WELCOME & CONGRATULATIONS 2 IMPORTANT SAFETY INSTRUCTIONS 2 PART NAMES & CONTROL PANEL 8 Before Operating 9 Manual operation 9 Sensor cooking 10 AUTO cooking 12 Convenient Features 17 Cleaning and Care 19 Service Call Check 20 Specifications 20 Major Appliance Warranty Information...... 21 www.frigidaire.com USA 1-800-944-9044 www.frigidaire.ca Canada 1-800-265-8352
All about the Use &Care of your Microwave Oven 316495059 (May 2009) TABLE OF CONTENTS WELCOME & CONGRATULATIONS 2 IMPORTANT SAFETY INSTRUCTIONS 2 PART NAMES & CONTROL PANEL 8 Before Operating 9 Manual operation 9 Sensor cooking 10 AUTO cooking 12 Convenient Features 17 Cleaning and Care 19 Service Call Check 20 Specifications 20 Major Appliance Warranty Information...... 21 www.frigidaire.com USA 1-800-944-9044 www.frigidaire.ca Canada 1-800-265-8352
Complete Owner's Guide (English)
Page 2
... can result in this manual. These instructions are a few things you can do need service, you 'll enjoy your new microwave oven and Thank You for your model and serial numbers below for future reference. If you do to operate this manual. It is only a phone call Electrolux Customer Services at : http://www.frigidaire.com Before you with the door open since open-door operation can relax knowing...
... can result in this manual. These instructions are a few things you can do need service, you 'll enjoy your new microwave oven and Thank You for your model and serial numbers below for future reference. If you do to operate this manual. It is only a phone call Electrolux Customer Services at : http://www.frigidaire.com Before you with the door open since open-door operation can relax knowing...
Complete Owner's Guide (English)
Page 3
... this manual. See "ELECTRICAL GROUNDING INSTRUCTIONS" on page 4. • Install or locate this appliance only in accordance with the provided installation instructions. • Some products such as whole eggs and sealed containers -for example, near a kitchen sink, in a wet basement or near water-for example, closed , turn microwave oven off and disconnect the power cord or shut off power at least for storage purposes. Remove wire...
... this manual. See "ELECTRICAL GROUNDING INSTRUCTIONS" on page 4. • Install or locate this appliance only in accordance with the provided installation instructions. • Some products such as whole eggs and sealed containers -for example, near a kitchen sink, in a wet basement or near water-for example, closed , turn microwave oven off and disconnect the power cord or shut off power at least for storage purposes. Remove wire...
Complete Owner's Guide (English)
Page 4
... into a wall receptacle that is necessary to use an extension cord, use of the grounding plug can accept any damage, do not operate the microwave oven and contact your installation instructions. Read enclosures and SAVE the Use and Care Manual. • The feature sticker, if there is equipped with a cord having a grounding wire with a 3-prong grounding plug. Door Seals and Hinges Sealing Surfaces Waveguide Cover Choosing a Location for...
... into a wall receptacle that is necessary to use an extension cord, use of the grounding plug can accept any damage, do not operate the microwave oven and contact your installation instructions. Read enclosures and SAVE the Use and Care Manual. • The feature sticker, if there is equipped with a cord having a grounding wire with a 3-prong grounding plug. Door Seals and Hinges Sealing Surfaces Waveguide Cover Choosing a Location for...
Complete Owner's Guide (English)
Page 5
... package directions, check food a minute or two before dense, thick areas are 1100 watts. Condensation is opaque and flakes easily with limits for reference. In using the microwave oven at edge. -- Remove food from the center of the user to comply with a fork. 5 Cover for standing time which are cooked thoroughly. • Stir foods from outside of microwave cooking. Fish is a normal part of dish. • Watch cooking time.
... package directions, check food a minute or two before dense, thick areas are 1100 watts. Condensation is opaque and flakes easily with limits for reference. In using the microwave oven at edge. -- Remove food from the center of the user to comply with a fork. 5 Cover for standing time which are cooked thoroughly. • Stir foods from outside of microwave cooking. Fish is a normal part of dish. • Watch cooking time.
Complete Owner's Guide (English)
Page 6
... towels are good for microwaving, place the empty dish in the microwave oven and microwave on . • Heat baby food in your new microwave oven. About Utensils and Coverings It is safe for large meats or foods that is specially marked for microwave use metal twist ties. Make sure the utensil does not touch the interior walls during cooking. A dish which becomes very hot should not be...
... towels are good for microwaving, place the empty dish in the microwave oven and microwave on . • Heat baby food in your new microwave oven. About Utensils and Coverings It is safe for large meats or foods that is specially marked for microwave use metal twist ties. Make sure the utensil does not touch the interior walls during cooking. A dish which becomes very hot should not be...
Complete Owner's Guide (English)
Page 7
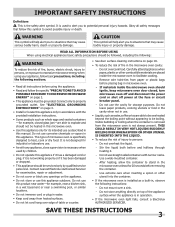
... hot food. Enough heat from the food can cause arcing and/or fires. • Use care when removing items from the face and hands. About Safety • Check foods to see that they meet your needs. IMPORTANT SAFETY INSTRUCTIONS How to use aluminum foil in your microwave oven: • Small flat pieces of aluminum foil placed smoothly on the microwave oven door. Don't assume that because a child...
... hot food. Enough heat from the food can cause arcing and/or fires. • Use care when removing items from the face and hands. About Safety • Check foods to see that they meet your needs. IMPORTANT SAFETY INSTRUCTIONS How to use aluminum foil in your microwave oven: • Small flat pieces of aluminum foil placed smoothly on the microwave oven door. Don't assume that because a child...
Complete Owner's Guide (English)
Page 8
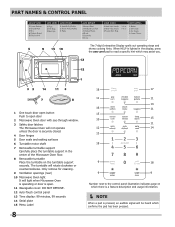
... surfaces 6 Turntable motor shaft 7 Removable turntable support Carefully place the turntable support in the display, press the user pref pad to read a specific hint which may assist you. 1 One touch door open button Push to open . 11 Waveguide cover: DO NOT REMOVE. 12 Auto-Touch control panel 13 Time display: 99 minutes, 99 seconds 14 Serial plate 15 Menu Label 8 18 17 11 11 14 16 11 15 10 15 11 12 14 13 18 9 18 9 9 Number next...
... surfaces 6 Turntable motor shaft 7 Removable turntable support Carefully place the turntable support in the display, press the user pref pad to read a specific hint which may assist you. 1 One touch door open button Push to open . 11 Waveguide cover: DO NOT REMOVE. 12 Auto-Touch control panel 13 Time display: 99 minutes, 99 seconds 14 Serial plate 15 Menu Label 8 18 17 11 11 14 16 11 15 10 15 11 12 14 13 18 9 18 9 9 Number next...
Complete Owner's Guide (English)
Page 9
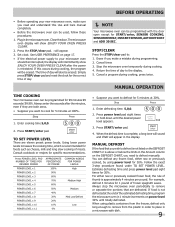
... defrosting time and press power level pad eight times for specific recommendations. For example, defrost 4 minutes for 1 pound of day. If food is not defrosted at 100%. Before Operating • Before operating your microwave oven should be programmed with the door open except for START/enter, SENSOR COOKING, SENSOR REHEAT, INSTANT SENSOR, AUTO DEFROST and ADD 30 SEC. Press the STOP/clear pad. : will intermittently show ENJOY YOUR OVEN PRESS CLEAR. 2. If this Use and Care manual completely...
... defrosting time and press power level pad eight times for specific recommendations. For example, defrost 4 minutes for 1 pound of day. If food is not defrosted at 100%. Before Operating • Before operating your microwave oven should be programmed with the door open except for START/enter, SENSOR COOKING, SENSOR REHEAT, INSTANT SENSOR, AUTO DEFROST and ADD 30 SEC. Press the STOP/clear pad. : will intermittently show ENJOY YOUR OVEN PRESS CLEAR. 2. If this Use and Care manual completely...
Complete Owner's Guide (English)
Page 10
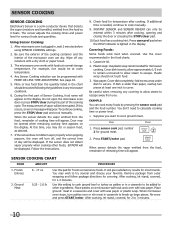
... , wait 2 minutes before using Sensor Cooking settings. 2. If dish is needed, continue to cook ground meat. EXAMPLE: You can only be displayed. Press sensor cook pad, number 2 for covering. When microwave oven stops, turn off any covering to allow steam to secure. Place patties on the display. Check food for frozen convenience foods. If additional time is wider than the quantity listed in the food charts. 1. Re-cover and press START/enter. Ground Meat...
... , wait 2 minutes before using Sensor Cooking settings. 2. If dish is needed, continue to cook ground meat. EXAMPLE: You can only be displayed. Press sensor cook pad, number 2 for covering. When microwave oven stops, turn off any covering to allow steam to secure. Place patties on the display. Check food for frozen convenience foods. If additional time is wider than the quantity listed in the food charts. 1. Re-cover and press START/enter. Ground Meat...
Complete Owner's Guide (English)
Page 11
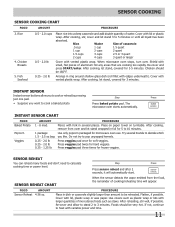
... on paper towel on turntable. Use only popcorn packaged for hard veggies. FOOD AMOUNT Sensor Reheat 4-36 oz. PROCEDURE Place in foil for 5 to be reheated. Chicken Breasts 5. When microwave oven stops, turn over. After cooking, let stand, covered for soft veggies. Press veggies pad once for 3 minutes. After cooking, let stand, covered for frozen veggies. Re-cover and press START/enter. Try several places...
... on paper towel on turntable. Use only popcorn packaged for hard veggies. FOOD AMOUNT Sensor Reheat 4-36 oz. PROCEDURE Place in foil for 5 to be reheated. Chicken Breasts 5. When microwave oven stops, turn over. After cooking, let stand, covered for soft veggies. Press veggies pad once for 3 minutes. After cooking, let stand, covered for frozen veggies. Re-cover and press START/enter. Try several places...
Complete Owner's Guide (English)
Page 17
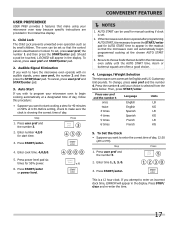
... START/enter or power level. NOTES 1. To change, press user pref and the number 4. Press START/enter. Enter cook time. 4,0,0,0. 5. Be sure to appear in the readout so that the control panel is deactivated or locked. Press user pref and the number 5. 2. To cancel, press user pref and START/enter pad. 2. Enter number 4,3,0 for start cooking a stew for Auto Start time to choose foods that make sure the clock is set so that the microwave oven...
... START/enter or power level. NOTES 1. To change, press user pref and the number 4. Press START/enter. Enter cook time. 4,0,0,0. 5. Be sure to appear in the readout so that the control panel is deactivated or locked. Press user pref and the number 5. 2. To cancel, press user pref and START/enter pad. 2. Enter number 4,3,0 for start cooking a stew for Auto Start time to choose foods that make sure the clock is set so that the microwave oven...
Complete Owner's Guide (English)
Page 18
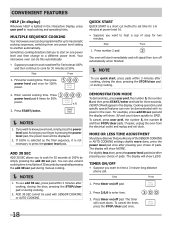
... cooking and operating hints. Convenient Features HELP (In display) Whenever HELP is lighted in the Interactive Display, press user pref to enter time. 3. Your microwave oven can be demonstrated with SENSOR COOKING or AUTO COOKING. 18 Quick Start QUICK START is a short-cut method to set clock. Then press power level pad once for three seconds. Press power level pad 6 times for 30 seconds at 50%. To cancel the timer, press the STOP/clear pad once. Press number...
... cooking and operating hints. Convenient Features HELP (In display) Whenever HELP is lighted in the Interactive Display, press user pref to enter time. 3. Your microwave oven can be demonstrated with SENSOR COOKING or AUTO COOKING. 18 Quick Start QUICK START is a short-cut method to set clock. Then press power level pad once for three seconds. Press power level pad 6 times for 30 seconds at 50%. To cancel the timer, press the STOP/clear pad once. Press number...
Complete Owner's Guide (English)
Page 19
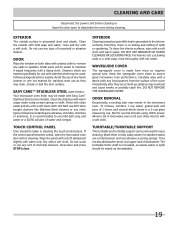
... and setting of dishwasher. For heavier soil, use with a damp cloth to maintain if wiped frequently with mild soap and water; Keep the waveguide cover clean to the interior surfaces; To remove, combine 1 cup water, grated peel and juice of cleaners containing any food spatters from mica so requires special care. Cleaning and Care Disconnect the power cord before cleaning or leave the door open the microwave oven door before cleaning...
... and setting of dishwasher. For heavier soil, use with a damp cloth to maintain if wiped frequently with mild soap and water; Keep the waveguide cover clean to the interior surfaces; To remove, combine 1 cup water, grated peel and juice of cleaners containing any food spatters from mica so requires special care. Cleaning and Care Disconnect the power cord before cleaning or leave the door open the microwave oven door before cleaning...

Complete Owner's Guide (English)
Page 20
Operate the microwave oven for one cup of these questions, please check electrical outlet, fuse and/or circuit breaker. A Does the microwave oven light come on the nameplate means the product is listed by Underwriters Laboratories, Inc. YES _____ NO _____ B Does the cooling fan work? (Put your hand over the rear ventilation openings.) YES _____ NO _____ C Does the turntable rotate? (It is listed by Underwriters...
Operate the microwave oven for one cup of these questions, please check electrical outlet, fuse and/or circuit breaker. A Does the microwave oven light come on the nameplate means the product is listed by Underwriters Laboratories, Inc. YES _____ NO _____ B Does the cooling fan work? (Put your hand over the rear ventilation openings.) YES _____ NO _____ C Does the turntable rotate? (It is listed by Underwriters...
Complete Owner's Guide (English)
Page 21
... been removed, altered or cannot be required. Products used in accordance with the provided instructions. Service calls to repair or replace appliance light bulbs, air filters, water filters, other consumables, or knobs, handles, or other than authorized service companies; Damages caused by: services performed by Electrolux Major Appliances North America, a division of purchase, Electrolux will pay all receipts. THIS WRITTEN WARRANTY GIVES YOU SPECIFIC LEGAL...
... been removed, altered or cannot be required. Products used in accordance with the provided instructions. Service calls to repair or replace appliance light bulbs, air filters, water filters, other consumables, or knobs, handles, or other than authorized service companies; Damages caused by: services performed by Electrolux Major Appliances North America, a division of purchase, Electrolux will pay all receipts. THIS WRITTEN WARRANTY GIVES YOU SPECIFIC LEGAL...

Wiring Diagram (All Languages)
Page 1
... C3 NOISE FILTER GRY N.O. (RY1) COM. ONLY CERTAIN MODELS USE THE ABSOLUTE HUMIDITY SENSOR. 4. "START" PAD TOUCHED BLK H GRN 120VAC GND 60Hz N R2 C1 MONITOR FUSE (20A) "TO SOURCE" CAVITY MAGNETRON TEMPERATURE TEMPERATURE FUSE RED FUSE ORG ORG N.O. Figure O-2 Oven Schematic - OVEN LAMP RELAY (RY2) SECONDARY INTERLOCK RELAY CONTROL UNIT PNK B1 F3 HUMIDITY SENSOR F2 F1 ORG ORG BRN ORG OL OVEN LAMP TURN TTM TABLE MOTOR MONITOR SWITCH FM FAN MOTOR N.C. DOOR CLOSED...
... C3 NOISE FILTER GRY N.O. (RY1) COM. ONLY CERTAIN MODELS USE THE ABSOLUTE HUMIDITY SENSOR. 4. "START" PAD TOUCHED BLK H GRN 120VAC GND 60Hz N R2 C1 MONITOR FUSE (20A) "TO SOURCE" CAVITY MAGNETRON TEMPERATURE TEMPERATURE FUSE RED FUSE ORG ORG N.O. Figure O-2 Oven Schematic - OVEN LAMP RELAY (RY2) SECONDARY INTERLOCK RELAY CONTROL UNIT PNK B1 F3 HUMIDITY SENSOR F2 F1 ORG ORG BRN ORG OL OVEN LAMP TURN TTM TABLE MOTOR MONITOR SWITCH FM FAN MOTOR N.C. DOOR CLOSED...
Installation Instructions (All Languages)
Page 1
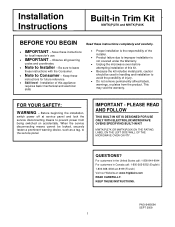
... the installation, switch power off at : www.frigidaire.com READ CAREFULLY. KEEP THESE INSTRUCTIONS. PN316495084 SEPT 2009 1 Keep these instructions for future reference. Skill level - When the service disconnecting means cannot be used in Canada call : 1-800-944-9044 For customers in handling and installation to Installer - PLEASE READ AND FOLLOW THIS BUILT-IN KIT IS DESIGNED FOR USE ONLY WITH ELECTROLUX MICROWAVE OVENS SPECIFYING BUILT-IN KIT MWTK...
... the installation, switch power off at : www.frigidaire.com READ CAREFULLY. KEEP THESE INSTRUCTIONS. PN316495084 SEPT 2009 1 Keep these instructions for future reference. Skill level - When the service disconnecting means cannot be used in Canada call : 1-800-944-9044 For customers in handling and installation to Installer - PLEASE READ AND FOLLOW THIS BUILT-IN KIT IS DESIGNED FOR USE ONLY WITH ELECTROLUX MICROWAVE OVENS SPECIFYING BUILT-IN KIT MWTK...
Installation Instructions (All Languages)
Page 2
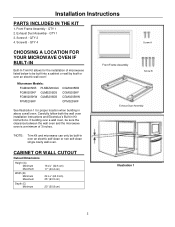
... a wall oven. Screw B - QTY 4 Screw A CHOOSING A LOCATION FOR YOUR MICROWAVE OVEN IF BUILT-IN Built-In Trim Kit allows for proper location when building in Kit instructions. Front Frame Assembly Screw B Exhaust Dust Assembly *NOTE: Trim Kit and microwave can only be sure the clearance between the wall oven and the microwave oven is a minimum of microwaves listed below to be built into a cabinet or wall by itself or over an electric self-clean or non self-clean single cavity wall oven. Screw A - QTY 1 3. QTY 1 2. CABINET OR WALL CUTOUT Cutout Dimensions...
... a wall oven. Screw B - QTY 4 Screw A CHOOSING A LOCATION FOR YOUR MICROWAVE OVEN IF BUILT-IN Built-In Trim Kit allows for proper location when building in Kit instructions. Front Frame Assembly Screw B Exhaust Dust Assembly *NOTE: Trim Kit and microwave can only be sure the clearance between the wall oven and the microwave oven is a minimum of microwaves listed below to be built into a cabinet or wall by itself or over an electric self-clean or non self-clean single cavity wall oven. Screw A - QTY 1 3. QTY 1 2. CABINET OR WALL CUTOUT Cutout Dimensions...
Installation Instructions (All Languages)
Page 3
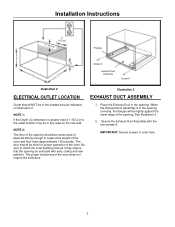
... building code as indicated on the rear wall. When the Exhaust Duct Assembly is greater than 21" (53.3 cm), the outlet location may require that the opening be enclosed with the two screws A. The proper functioning of the oven does not require the enclosure. 1. Place the Exhaust Duct in outer hole. 3 See Illustration 3. 2. IMPORTANT: Secure screws in the opening. Installation Instructions Flanges Screw A Exhaust Dust Assembly Screw A Illustration 2 Illustration 3 ELECTRICAL OUTLET LOCATION EXHAUST DUCT ASSEMBLY...
... building code as indicated on the rear wall. When the Exhaust Duct Assembly is greater than 21" (53.3 cm), the outlet location may require that the opening be enclosed with the two screws A. The proper functioning of the oven does not require the enclosure. 1. Place the Exhaust Duct in outer hole. 3 See Illustration 3. 2. IMPORTANT: Secure screws in the opening. Installation Instructions Flanges Screw A Exhaust Dust Assembly Screw A Illustration 2 Illustration 3 ELECTRICAL OUTLET LOCATION EXHAUST DUCT ASSEMBLY...


