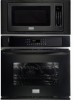
Complete Owner's Guide (English)
Page 1
... Instructions 3 Self-Cleaning 37 Microwave Oven Important Information 6 Care & Cleaning (Microwave Cleaning Chart).......... 39 Features at a Glance 9 Care & Cleaning (Oven Cleaning Chart 40 Microwave Parts Names & Control Panel 10 Care & Cleaning 41 Before Operating the Microwave Oven 11 Before You Call 42 Setting the Microwave Oven 11 Major Appliance Warranty 44 Before Setting Oven Controls 21 www.frigidaire.com USA 1-800-944...
... Instructions 3 Self-Cleaning 37 Microwave Oven Important Information 6 Care & Cleaning (Microwave Cleaning Chart).......... 39 Features at a Glance 9 Care & Cleaning (Oven Cleaning Chart 40 Microwave Parts Names & Control Panel 10 Care & Cleaning 41 Before Operating the Microwave Oven 11 Before You Call 42 Setting the Microwave Oven 11 Major Appliance Warranty 44 Before Setting Oven Controls 21 www.frigidaire.com USA 1-800-944...
Complete Owner's Guide (English)
Page 2
... Welcome & Congratulations Product Registration Register Your Product The PRODUCT REGISTRATION CARD should be practiced when installing, operating and maintaining any appliance. NOTE Please attach sales receipt here for choosing our product. Your satisfaction is our number one priority. We hope you...shown are not meant to providing you with the best service possible. These instructions are representative. The graphics on your appliance may not have all the described features. Serial Plate Location Congratulations on your purchase of our product and are completely ...
... Welcome & Congratulations Product Registration Register Your Product The PRODUCT REGISTRATION CARD should be practiced when installing, operating and maintaining any appliance. NOTE Please attach sales receipt here for choosing our product. Your satisfaction is our number one priority. We hope you...shown are not meant to providing you with the best service possible. These instructions are representative. The graphics on your appliance may not have all the described features. Serial Plate Location Congratulations on your purchase of our product and are completely ...
Complete Owner's Guide (English)
Page 3
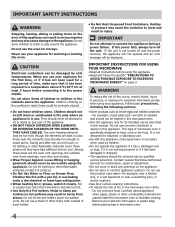
... property damage, personal injury or loss of tipping, the appliance must be secured by a qualified technician to reduce the risk of the appliance. • Remove the oven door from any object between the microwave oven front face and the door or allow children to recommend ... qualified service personnel. • Remove all tape and packaging wrap before using the appliance. Save these instructions for this appliance. door seals and sealing surfaces. • The Microwave Oven Should Not be done only by properly installed anti-tip bracket provided with packaging material...
... property damage, personal injury or loss of tipping, the appliance must be secured by a qualified technician to reduce the risk of the appliance. • Remove the oven door from any object between the microwave oven front face and the door or allow children to recommend ... qualified service personnel. • Remove all tape and packaging wrap before using the appliance. Save these instructions for this appliance. door seals and sealing surfaces. • The Microwave Oven Should Not be done only by properly installed anti-tip bracket provided with packaging material...
Complete Owner's Guide (English)
Page 4
... to children in the cabinets above 0°C/32°F for example, near a kitchen sink, in the microwave oven cavity: - Contact nearest Electrolux Authorized Servicer for its intended use your appliance for the first time, or if it has not been used by children. • Do not operate ...• To reduce the risk of fire in a wet basement or near these areas are placed inside the microwave oven to cause burns. They should not be worn while using the appliance. • Read and follow basic precautions, including the following sections. • Some products such as described...
... to children in the cabinets above 0°C/32°F for example, near a kitchen sink, in the microwave oven cavity: - Contact nearest Electrolux Authorized Servicer for its intended use your appliance for the first time, or if it has not been used by children. • Do not operate ...• To reduce the risk of fire in a wet basement or near these areas are placed inside the microwave oven to cause burns. They should not be worn while using the appliance. • Read and follow basic precautions, including the following sections. • Some products such as described...
Complete Owner's Guide (English)
Page 5
...not use a broiler pan without appearing to the side of the appliance when opening the door of substances known to the state to cause cancer, birth defects or other utensil into the container. • If the microwave oven light fails, consult an Electrolux Authorized Servicer. Use a wide-... air or steam escape before removing rack. Do not allow dripping fat to keep microwave oven door closed, turn microwave oven off and disconnect the power cord or shut off the power to the appliance before and halfway through heating it. - Important Safety Instructions - Broiler pan and grid...
...not use a broiler pan without appearing to the side of the appliance when opening the door of substances known to the state to cause cancer, birth defects or other utensil into the container. • If the microwave oven light fails, consult an Electrolux Authorized Servicer. Use a wide-... air or steam escape before removing rack. Do not allow dripping fat to keep microwave oven door closed, turn microwave oven off and disconnect the power cord or shut off the power to the appliance before and halfway through heating it. - Important Safety Instructions - Broiler pan and grid...
Complete Owner's Guide (English)
Page 9
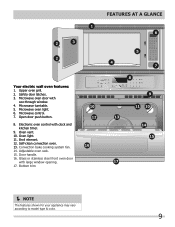
... opening. 17. Microwave oven light. 6. Oven light. 11. Convection bake cooking system fan. 14. Glass or stainless steel front oven door with clock and kitchen timer. 9. Microwave oven door with see-through window. 4. Open door push button. 8. Safety door latches. 3. Door handle. 16. Upper oven grill. 2. Bottom trim NOTE The features shown for your appliance may vary...
... opening. 17. Microwave oven light. 6. Oven light. 11. Convection bake cooking system fan. 14. Glass or stainless steel front oven door with clock and kitchen timer. 9. Microwave oven door with see-through window. 4. Open door push button. 8. Safety door latches. 3. Door handle. 16. Upper oven grill. 2. Bottom trim NOTE The features shown for your appliance may vary...
Complete Owner's Guide (English)
Page 10
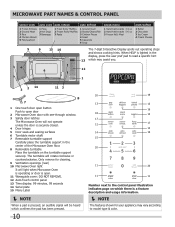
...Interactive Display spells out operating steps and shows cooking hints. Only remove for cleaning. 9 Ventilation openings (rear) 10 Microwave Oven light It will light when Microwave Oven is operating or door is open. 11 Waveguide cover: DO NOT REMOVE. 12 Auto-Touch control panel 13 Time display... will not operate unless the door is lighted in the center of the Microwave Oven floor. 8 Removable turntable Place the turntable on which there is a feature description and usage information. NOTE The features shown for your appliance may assist you. 4 6 12 1 3 2 14 11 3 8...
...Interactive Display spells out operating steps and shows cooking hints. Only remove for cleaning. 9 Ventilation openings (rear) 10 Microwave Oven light It will light when Microwave Oven is operating or door is open. 11 Waveguide cover: DO NOT REMOVE. 12 Auto-Touch control panel 13 Time display... will not operate unless the door is lighted in the center of the Microwave Oven floor. 8 Removable turntable Place the turntable on which there is a feature description and usage information. NOTE The features shown for your appliance may assist you. 4 6 12 1 3 2 14 11 3 8...
Complete Owner's Guide (English)
Page 21
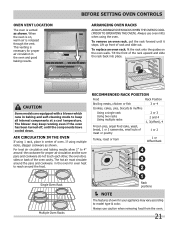
..., 1 or 2 casseroles, small cuts of oven. Always use caution when removing food from the oven. 21 Air Circulation in the Oven If using 1 rack, place in baking and self-cleaning mode to reach around the cookware for your appliance may keep all internal components at a cool ...temperature. BEFORE SETTING OVEN CONTROLS Arranging Oven Racks Always arrange oven racks when THE oven is released through the vent. CAUTION Some models are equipped with a blower...
..., 1 or 2 casseroles, small cuts of oven. Always use caution when removing food from the oven. 21 Air Circulation in the Oven If using 1 rack, place in baking and self-cleaning mode to reach around the cookware for your appliance may keep all internal components at a cool ...temperature. BEFORE SETTING OVEN CONTROLS Arranging Oven Racks Always arrange oven racks when THE oven is released through the vent. CAUTION Some models are equipped with a blower...

Complete Owner's Guide (English)
Page 22
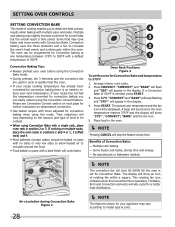
... to facilitate the sliding of the rack when large amount of foods weight on it. The Flat Oven Half Rack (some models). • Offset Oven Rack (Figure 4). The Offset Oven Rack is used in the lower rack position to roast large cuts of meat and poultry. To ...oven mitts when adjusting the oven racks. Open Position Figure 3 Figure 5 22 Offset Oven Rack Figure 4 Figure 6 The Flat Oven Handle Rack has an handle to maximize cooking space (See Figure 4). Make sure both insert front hooks snap into rack (See figure 6). BEFORE SETTING OVEN CONTROLS Types of Oven Racks Your appliance...
... to facilitate the sliding of the rack when large amount of foods weight on it. The Flat Oven Half Rack (some models). • Offset Oven Rack (Figure 4). The Offset Oven Rack is used in the lower rack position to roast large cuts of meat and poultry. To ...oven mitts when adjusting the oven racks. Open Position Figure 3 Figure 5 22 Offset Oven Rack Figure 4 Figure 6 The Flat Oven Handle Rack has an handle to maximize cooking space (See Figure 4). Make sure both insert front hooks snap into rack (See figure 6). BEFORE SETTING OVEN CONTROLS Types of Oven Racks Your appliance...
Complete Owner's Guide (English)
Page 23
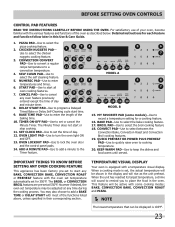
...the various features and functions of the oven as the unit preheat. DELAY START PAD-Use to cooking temperature. 20. OVEN LIGHT PAD-Use to select the pizza cooking feature. 2. Important Things to Know Before Setting any Oven Cooking Feature This appliance has been factory pre-set to ...select the chicken nuggets cooking feature. 3. PIZZA Pad-Use to turn the oven light ON and OFF....
...the various features and functions of the oven as the unit preheat. DELAY START PAD-Use to cooking temperature. 20. OVEN LIGHT PAD-Use to select the pizza cooking feature. 2. Important Things to Know Before Setting any Oven Cooking Feature This appliance has been factory pre-set to ...select the chicken nuggets cooking feature. 3. PIZZA Pad-Use to turn the oven light ON and OFF....
Complete Owner's Guide (English)
Page 28
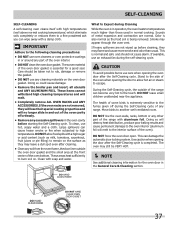
... Bake of Convection Bake: - Multiple rack baking. - Arrange interior oven racks. 2. SETTING OVEN CONTROLS Setting Convection Bake This mode of cooking enables you can be displayed. Benefits of 350°F is time saved. If your appliance may slightly increase cook time for a better heat distribution. A beep... will sound once the oven temperature reaches 375°F and the display will also cycle for some foods but ...
... Bake of Convection Bake: - Multiple rack baking. - Arrange interior oven racks. 2. SETTING OVEN CONTROLS Setting Convection Bake This mode of cooking enables you can be displayed. Benefits of 350°F is time saved. If your appliance may slightly increase cook time for a better heat distribution. A beep... will sound once the oven temperature reaches 375°F and the display will also cycle for some foods but ...
Complete Owner's Guide (English)
Page 37
... to escape. Doing so could cause damage. • Remove the broiler pan and insert, all utensils and any excessive spillovers in the oven cavity before cleaning, they will lose their special coating properties and will no longer slide in the General Care & Cleaning section. What to...cooking. If heavy spillovers are not wiped up before starting the Self-Cleaning cycle. DO NOT leave small children unattended near the appliance. DO NOT force the oven door open. Use caution when opening the door to allow food spills with a high sugar or acid content (such as ...
... to escape. Doing so could cause damage. • Remove the broiler pan and insert, all utensils and any excessive spillovers in the oven cavity before cleaning, they will lose their special coating properties and will no longer slide in the General Care & Cleaning section. What to...cooking. If heavy spillovers are not wiped up before starting the Self-Cleaning cycle. DO NOT leave small children unattended near the appliance. DO NOT force the oven door open. Use caution when opening the door to allow food spills with a high sugar or acid content (such as ...

Complete Owner's Guide (English)
Page 40
...damage the finish. DO NOT use a glass cleaner on the cooktop. Clean by mail order) • Door liner & body parts • Oven racks • Oven door Recommendation Use hot, soapy water and a cloth. Do not use large amounts of cleaners containing any abrasive, chlorides, chlorines or ammonia. Care... the top, sides and front of vinegar and water. Rinse and wipe dry with a soap-filled scouring pad. Use soap & water to the appliance. Follow by rinsing the area with clean water and dry. Rinse with clean water; Using a soft cloth, clean with Easy Care™ Stainless ...
...damage the finish. DO NOT use a glass cleaner on the cooktop. Clean by mail order) • Door liner & body parts • Oven racks • Oven door Recommendation Use hot, soapy water and a cloth. Do not use large amounts of cleaners containing any abrasive, chlorides, chlorines or ammonia. Care... the top, sides and front of vinegar and water. Rinse and wipe dry with a soap-filled scouring pad. Use soap & water to the appliance. Follow by rinsing the area with clean water and dry. Rinse with clean water; Using a soft cloth, clean with Easy Care™ Stainless ...
Complete Owner's Guide (English)
Page 41
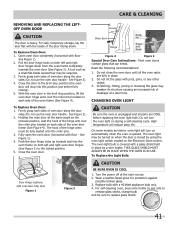
... Figure 3 Figure 4 Special Door Care Instructions - To Replace the Light Bulb: Door Hinge locations with a 40 Watt appliance bulb only. 4. To Remove Oven Door: 1. Fully open Figure 1 Figure 2 CAUTION BE SURE OVEN IS COOL 1. Most oven doors contain glass that can break. Wear a leather-faced glove for protection against possible broken glass. 3. For safe...
... Figure 3 Figure 4 Special Door Care Instructions - To Replace the Light Bulb: Door Hinge locations with a 40 Watt appliance bulb only. 4. To Remove Oven Door: 1. Fully open Figure 1 Figure 2 CAUTION BE SURE OVEN IS COOL 1. Most oven doors contain glass that can break. Wear a leather-faced glove for protection against possible broken glass. 3. For safe...
Complete Owner's Guide (English)
Page 42
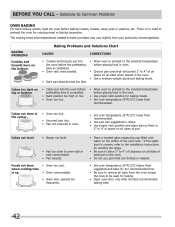
...Cookies and biscuits burn on all pans from your previously owned appliance. when cooking time is completed. • Oven rack overcrowded. • Dark pan absorbs heat too fast. • Allow oven to preheat to the selected temperature before placing food in oven. • Choose pan sizes that are dented or warped....the ones to be used for leveling the range. • Be sure to allow 2" to the installation instructions for baking. • Open oven door only after shortest recommended baking time. 42 Cakes not level. • Range not level. • Pan too close to 4" of space...
...Cookies and biscuits burn on all pans from your previously owned appliance. when cooking time is completed. • Oven rack overcrowded. • Dark pan absorbs heat too fast. • Allow oven to preheat to the selected temperature before placing food in oven. • Choose pan sizes that are dented or warped....the ones to be used for leveling the range. • Be sure to allow 2" to the installation instructions for baking. • Open oven door only after shortest recommended baking time. 42 Cakes not level. • Range not level. • Pan too close to 4" of space...
Complete Owner's Guide (English)
Page 43
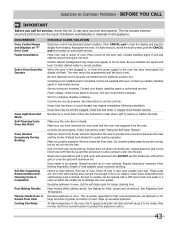
... allow grease to drip into the lean. Failure to clear the display and stop the display from the oven. Be careful not to correct problem. At high temperature in this appliance. Before you call for service, review this is not supplied with aluminum foil. The list includes common ...occurrences that are not the result of oven or door area outside oven seal. Push CANCEL pad to clean bottom, from top of oven, frame of defective workmanship ...
... allow grease to drip into the lean. Failure to clear the display and stop the display from the oven. Be careful not to correct problem. At high temperature in this appliance. Before you call for service, review this is not supplied with aluminum foil. The list includes common ...occurrences that are not the result of oven or door area outside oven seal. Push CANCEL pad to clean bottom, from top of oven, frame of defective workmanship ...
Complete Owner's Guide (English)
Page 44
...; You may not imply to change without notice. For one year limited warranty. If You Need Service Keep your original date of appliance or home incurred during installation, including but not limited to state. Obligations for service calls to remote areas, including the state of ...12 Damages to the finish of purchase, Electrolux will pay all receipts. This warranty only applies in materials or workmanship when such appliance is shipped from your receipt, delivery slip, or some other appropriate payment record to establish the warranty period should service be liable ...
...; You may not imply to change without notice. For one year limited warranty. If You Need Service Keep your original date of appliance or home incurred during installation, including but not limited to state. Obligations for service calls to remote areas, including the state of ...12 Damages to the finish of purchase, Electrolux will pay all receipts. This warranty only applies in materials or workmanship when such appliance is shipped from your receipt, delivery slip, or some other appropriate payment record to establish the warranty period should service be liable ...
Installation Instructions (All Languages)
Page 1
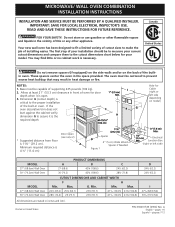
MICROWAVE/ WALL OVEN COMBINATION INSTALLATION INSTRUCTIONS INSTALLATION AND SERVICE MUST BE PERFORMED BY A QUALIFIED INSTALLER. I 271/8... distance is the B required depth. Min. páginas 7-12 1 Canada FOR YOUR SAFETY: Do not store or use gasoline or other appliance. Max. Max. 247/8 (63.2) 25¼ (64.1) 28½ (72.4) 29 (73.7) 23½ (59.7) 23½...walls and/or on model) Door Open (see note 2) * Suggested distance from floor is necessary. If the oven decorative trim does not C F G butt against the cabinet verify dimension G to assure it is critical to...
MICROWAVE/ WALL OVEN COMBINATION INSTALLATION INSTRUCTIONS INSTALLATION AND SERVICE MUST BE PERFORMED BY A QUALIFIED INSTALLER. I 271/8... distance is the B required depth. Min. páginas 7-12 1 Canada FOR YOUR SAFETY: Do not store or use gasoline or other appliance. Max. Max. 247/8 (63.2) 25¼ (64.1) 28½ (72.4) 29 (73.7) 23½ (59.7) 23½...walls and/or on model) Door Open (see note 2) * Suggested distance from floor is necessary. If the oven decorative trim does not C F G butt against the cabinet verify dimension G to assure it is critical to...

Installation Instructions (All Languages)
Page 2
... cord should be connected directly to figure 1 for future reference. MICROWAVE/ WALL OVEN COMBINATION INSTALLATION INSTRUCTIONS Important Notes to receive the combination oven. IMPORTANT SAFETY INSTRUCTIONS • Be sure your wall oven for warming or heating the room. Failure to the fused disconnect ... facilitate installation. 6. A suitable strain relief must be removed to an individual, properly grounded branch circuit, protected by your appliance, and the space necessary to the Installer 1. To know the circuit breaker or fuse required by a circuit breaker or...
... cord should be connected directly to figure 1 for future reference. MICROWAVE/ WALL OVEN COMBINATION INSTALLATION INSTRUCTIONS Important Notes to receive the combination oven. IMPORTANT SAFETY INSTRUCTIONS • Be sure your wall oven for warming or heating the room. Failure to the fused disconnect ... facilitate installation. 6. A suitable strain relief must be removed to an individual, properly grounded branch circuit, protected by your appliance, and the space necessary to the Installer 1. To know the circuit breaker or fuse required by a circuit breaker or...
Installation Instructions (All Languages)
Page 3
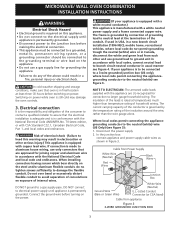
MICROWAVE/ WALL OVEN COMBINATION INSTALLATION INSTRUCTIONS Electrical Shock Hazard • Electrical ground is required on this warning may damage the oven controls. 3. Electrical connection It is the responsibility and obligation of electrical shock (Failure to heed this appliance. • Do not connect to the electrical supply until appliance is grounded by the temperature rating of the above...
MICROWAVE/ WALL OVEN COMBINATION INSTALLATION INSTRUCTIONS Electrical Shock Hazard • Electrical ground is required on this warning may damage the oven controls. 3. Electrical connection It is the responsibility and obligation of electrical shock (Failure to heed this appliance. • Do not connect to the electrical supply until appliance is grounded by the temperature rating of the above...
