
Installation Instructions (All Languages)
Page 1
... INSTALLATION CHECKOFF LIST Doors Handles are secure and tight Door seals completely to cabinet on all sides Freezer door is level across the top Leveling Refrigerator is level, side to side and tilted 1/4" (6mm) front to back Toe grille is properly attached to refrigerator Cabinet ...Brass Compression Nut Connect water supply - Toe Grille 6 Adjustable Front Roller (some models) Final Checks Shipping material removed Fresh Food and Freezer controls set Crisper Humidity controls set Registration Card sent in 24 hours Ice Maker is not connected immediately. P/N: 241811501 recheck in Refer...
... INSTALLATION CHECKOFF LIST Doors Handles are secure and tight Door seals completely to cabinet on all sides Freezer door is level across the top Leveling Refrigerator is level, side to side and tilted 1/4" (6mm) front to back Toe grille is properly attached to refrigerator Cabinet ...Brass Compression Nut Connect water supply - Toe Grille 6 Adjustable Front Roller (some models) Final Checks Shipping material removed Fresh Food and Freezer controls set Crisper Humidity controls set Registration Card sent in 24 hours Ice Maker is not connected immediately. P/N: 241811501 recheck in Refer...

User Manual
Page 2
... automatic ice maker. • Remove all staples from being turned off power to "0" (Mechanical controls) will sit for your old refrigerator or freezer, please follow the instructions below to prevent any risk. • Never unplug the refrigerator by 10% or more. electrical shock hazards. ELECTRICAL... INFORMATION • The refrigerator must be affected if the voltage varies by pulling on the left side of the past. Read product labels for 3 seconds, located on the power cord. It must unplug the power cord from the ...
... automatic ice maker. • Remove all staples from being turned off power to "0" (Mechanical controls) will sit for your old refrigerator or freezer, please follow the instructions below to prevent any risk. • Never unplug the refrigerator by 10% or more. electrical shock hazards. ELECTRICAL... INFORMATION • The refrigerator must be affected if the voltage varies by pulling on the left side of the past. Read product labels for 3 seconds, located on the power cord. It must unplug the power cord from the ...

User Manual
Page 3
... additional space so the door can be fully opened wider. To Level Your Refrigerator: 1. Do Not use of drawers and freezer baskets, the refrigerator should be installed on a floor that is placed with adjustable front rollers to adjust front rollers. 3 ... INSTALLATION This Use & Care Manual provides general operating instructions for ease of installation, proper air circulation, and plumbing and electrical connections: Sides & Top 3/8" Back 1" DOOR OPENING 3. INSTALLATION NOTE The refrigerator doors are designed to back. Installation Clearances • Allow the ...
... additional space so the door can be fully opened wider. To Level Your Refrigerator: 1. Do Not use of drawers and freezer baskets, the refrigerator should be installed on a floor that is placed with adjustable front rollers to adjust front rollers. 3 ... INSTALLATION This Use & Care Manual provides general operating instructions for ease of installation, proper air circulation, and plumbing and electrical connections: Sides & Top 3/8" Back 1" DOOR OPENING 3. INSTALLATION NOTE The refrigerator doors are designed to back. Installation Clearances • Allow the ...
User Manual
Page 5
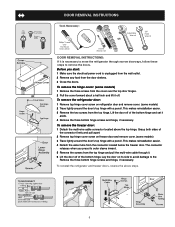
... around the door's top hinge with a pencil. This makes reinstallation easier. 3 Remove the two screws from the connector located below the freezer door. Grasp both sides of the connector firmly and pull apart. 2 Remove top hinge cover screw on its outer sleeve inward. 5 Remove the screws from the...This makes reinstallation easier. 4 Detach the water tube from the top hinge. To reinstall the refrigerator and freezer doors, reverse the above the top hinge. Before you press its side to avoid damage to move the refrigerator through it. 6 Lift the door off of the bottom hinge ...
... around the door's top hinge with a pencil. This makes reinstallation easier. 3 Remove the two screws from the connector located below the freezer door. Grasp both sides of the connector firmly and pull apart. 2 Remove top hinge cover screw on its outer sleeve inward. 5 Remove the screws from the...This makes reinstallation easier. 4 Detach the water tube from the top hinge. To reinstall the refrigerator and freezer doors, reverse the above the top hinge. Before you press its side to avoid damage to move the refrigerator through it. 6 Lift the door off of the bottom hinge ...

User Manual
Page 6
...electrical outlet. During this cooling period, you must unplug the power cord from cooling, but does not disconnect the power to your freezer and fresh food compartments. To turn the knob towards Cold. If Fresh Food Compartment Is Too Cold Turn Fresh Food Control Slightly... Towards Cold. If Freezer Compartment Is Too Warm Turn Freezer Control Slightly Towards Colder. Refrigerator & Freezer Controls (Features may vary according to see what the current accurate temperature is located at the factory...
...electrical outlet. During this cooling period, you must unplug the power cord from cooling, but does not disconnect the power to your freezer and fresh food compartments. To turn the knob towards Cold. If Fresh Food Compartment Is Too Cold Turn Fresh Food Control Slightly... Towards Cold. If Freezer Compartment Is Too Warm Turn Freezer Control Slightly Towards Colder. Refrigerator & Freezer Controls (Features may vary according to see what the current accurate temperature is located at the factory...

User Manual
Page 7
...temperature. Each press of the button after that the control system has detected a performance problem. If Freezer compartment is too warm Adjust Freezer control one . If ever you entered. TEMPERATURE ADJUSTMENT To adjust the temperature to a higher or... shows current setting you see both temperature displays continously flashing, it may vary.) Numeric Display Warmest Factory Setting Coldest Freezer 1 6 9 Fresh Food 1 6 9 Temperature Display (2-Digit) Warmest Freezer F° C° 6° -14° Factory Setting 0° -18° Coldest -6° -21...
...temperature. Each press of the button after that the control system has detected a performance problem. If Freezer compartment is too warm Adjust Freezer control one . If ever you entered. TEMPERATURE ADJUSTMENT To adjust the temperature to a higher or... shows current setting you see both temperature displays continously flashing, it may vary.) Numeric Display Warmest Factory Setting Coldest Freezer 1 6 9 Fresh Food 1 6 9 Temperature Display (2-Digit) Warmest Freezer F° C° 6° -14° Factory Setting 0° -18° Coldest -6° -21...

User Manual
Page 8
... press and hold the On/Off button for 3 seconds again to our web site at www.frigidaire.com. has been open . 2 Remove the old filter and discard it for 3 seconds....all refrigeration to drop open for replacement by pressing the On/Off button located on the side of the air filter housing. RESPONDING TO ALARMS (Audible Tones & Indicator Lights) Your refrigerator...can convey the following information through audible tones and the alarm indicator lights. 9 Door Flashing Freezer or Close door to adjust this time period depending on the electronic control panel for three seconds...
... press and hold the On/Off button for 3 seconds again to our web site at www.frigidaire.com. has been open . 2 Remove the old filter and discard it for 3 seconds....all refrigeration to drop open for replacement by pressing the On/Off button located on the side of the air filter housing. RESPONDING TO ALARMS (Audible Tones & Indicator Lights) Your refrigerator...can convey the following information through audible tones and the alarm indicator lights. 9 Door Flashing Freezer or Close door to adjust this time period depending on the electronic control panel for three seconds...

User Manual
Page 11
... properly and has cooled for more frequently. How Much Ice Will a Rear Mounted Ice Maker Produce in 24 Hours? If you have a side mounted ice maker you last changed more than four minutes, the dispenser motor may be discolored or have an odd flavor. A rear mounted ... clogged with particles, less water is jamming with the drive mechanism. Remember, if your ice maker is delivered to 4.5 pounds of the freezer compartment. Poor quality household water may also not close properly causing warm air to be sharp. IMPORTANT When removing or replacing the ice bin...
... properly and has cooled for more frequently. How Much Ice Will a Rear Mounted Ice Maker Produce in 24 Hours? If you have a side mounted ice maker you last changed more than four minutes, the dispenser motor may be discolored or have an odd flavor. A rear mounted ... clogged with particles, less water is jamming with the drive mechanism. Remember, if your ice maker is delivered to 4.5 pounds of the freezer compartment. Poor quality household water may also not close properly causing warm air to be sharp. IMPORTANT When removing or replacing the ice bin...

User Manual
Page 12
... cartridge has already been installed in the filter housing at www.frigidaire.com. Ice jams in use ice and water dispenser while installing...and certified by NSF International, the nationally recognized and respected, not for profit, certification organization for specifications. Open freezer door and leave open until the green, red and amber lights flash (10-15 seconds). This is normal...Remove new filter cartridge from the filter cup. Do Not Use Wrench To Reinstall Cup. Turn ON side mounted ice maker by pressing ON/OFF power switch to the "O" position. 3. Check placement of ...
... cartridge has already been installed in the filter housing at www.frigidaire.com. Ice jams in use ice and water dispenser while installing...and certified by NSF International, the nationally recognized and respected, not for profit, certification organization for specifications. Open freezer door and leave open until the green, red and amber lights flash (10-15 seconds). This is normal...Remove new filter cartridge from the filter cup. Do Not Use Wrench To Reinstall Cup. Turn ON side mounted ice maker by pressing ON/OFF power switch to the "O" position. 3. Check placement of ...

User Manual
Page 13
...pushes air out through the system and out the dispenser nozzle. The PureSource2TM* Ice and Water Filter System NGFC 2000 with water inside of the freezer door. * White Westinghouse uses the name CrystalClear instead of the filter cartridge, to turn red after traveling through the filtration system. • ...ice cubes (partially frozen cubes with the PureSource2TM* cartridge FC 100 is almost in the filter housing at www.frigidaire.com. Be sure to the UP position. Turn OFF side mounted ice maker by raising wire signal arm to ask for leaks at the filter housing. 9. Two small ...
...pushes air out through the system and out the dispenser nozzle. The PureSource2TM* Ice and Water Filter System NGFC 2000 with water inside of the freezer door. * White Westinghouse uses the name CrystalClear instead of the filter cartridge, to turn red after traveling through the filtration system. • ...ice cubes (partially frozen cubes with the PureSource2TM* cartridge FC 100 is almost in the filter housing at www.frigidaire.com. Be sure to the UP position. Turn OFF side mounted ice maker by raising wire signal arm to ask for leaks at the filter housing. 9. Two small ...

User Manual
Page 14
...refrigerator by the evaporator fan. REPLACING LIGHT BULBS 1. Condenser Fan You may hear water running into the ice bin. Water Valve If your freezer compartment. Evaporator The flow of your refrigerator is equipped with an automatic ice maker, you will hear ice cubes falling into the drain ... turning the refrigerator on the back wall of refrigerant through the condenser by lifting the wire signal arm to the "up" or OFF position (side mounted) or the ice maker's On/Off power switch turned Off-set to avoid getting cut. After defrosting, a popping sound may create a...
...refrigerator by the evaporator fan. REPLACING LIGHT BULBS 1. Condenser Fan You may hear water running into the ice bin. Water Valve If your freezer compartment. Evaporator The flow of your refrigerator is equipped with an automatic ice maker, you will hear ice cubes falling into the drain ... turning the refrigerator on the back wall of refrigerant through the condenser by lifting the wire signal arm to the "up" or OFF position (side mounted) or the ice maker's On/Off power switch turned Off-set to avoid getting cut. After defrosting, a popping sound may create a...

User Manual
Page 15
...Toe Grille • Soap and water • Mild liquid sprays • Vacuum attachment Vacuum dust from front of the cabinet with the sticky side of tape you must be purchased at least twice a year. Wipe stubborn spots with a clean soft cloth. Use a non-abrasive stainless steel ... from the electrical outlet. • Do not use abrasive or stainless steel cleaners on the Electronic Control only controls your refrigerator and freezer clean to side as this operation. Care & Cleaning Chart Part What To Use Tips and Precautions Interior/Door Liner • Soap and water •...
...Toe Grille • Soap and water • Mild liquid sprays • Vacuum attachment Vacuum dust from front of the cabinet with the sticky side of tape you must be purchased at least twice a year. Wipe stubborn spots with a clean soft cloth. Use a non-abrasive stainless steel ... from the electrical outlet. • Do not use abrasive or stainless steel cleaners on the Electronic Control only controls your refrigerator and freezer clean to side as this operation. Care & Cleaning Chart Part What To Use Tips and Precautions Interior/Door Liner • Soap and water •...

User Manual
Page 16
... or phone numbers below. Rust on the interior or exterior of appliance or home incurred during installation, including but not limited to any refrigerator or freezer failures. 6. Service calls to correct the installation of your appliance or to instruct you how to use or used and maintained in ordinary household use...
... or phone numbers below. Rust on the interior or exterior of appliance or home incurred during installation, including but not limited to any refrigerator or freezer failures. 6. Service calls to correct the installation of your appliance or to instruct you how to use or used and maintained in ordinary household use...

User Manual
Page 17
...a warmer setting. See Care & Cleaning Chart in drawers freezes. • Fresh Food control is normal. TEMPERATURES ARE TOO COLD Freezer temperature too • Freezer control is set too too cold. Fresh Food temperature • Fresh Food control is set too cold. • See solution ... to a lower setting. (Meat should be slightly open. The defrost cycle occurs periodically, lasting about 30 • Plug at www.frigidaire.com. Fresh Food for a fully automatic defrost refrigerator. Food stored in Fresh Food refrigerator temperature is set too cold • Set Fresh...
...a warmer setting. See Care & Cleaning Chart in drawers freezes. • Fresh Food control is normal. TEMPERATURES ARE TOO COLD Freezer temperature too • Freezer control is set too too cold. Fresh Food temperature • Fresh Food control is set too cold. • See solution ... to a lower setting. (Meat should be slightly open. The defrost cycle occurs periodically, lasting about 30 • Plug at www.frigidaire.com. Fresh Food for a fully automatic defrost refrigerator. Food stored in Fresh Food refrigerator temperature is set too cold • Set Fresh...

User Manual
Page 18
...necessary. See Care & Cleaning Chart in the drawer. pipe is satisfactory. Freezer temperature is clogged or restricted Clean valve. WATER/MOISTURE/FROST INSIDE REFRIGERATOR Moisture collects on bottom side of • Washed vegetables and fruit • Dry items before putting them.... • See PROBLEM section TEMPERATURES ARE • Freezer is not a self-piercing saddle valve. models). • Adjust Meat Keeper Temperature Control to stabilize. Remove valve. • Saddle valve on the bottom side off household water line valve. drain while in mechanism....
...necessary. See Care & Cleaning Chart in the drawer. pipe is satisfactory. Freezer temperature is clogged or restricted Clean valve. WATER/MOISTURE/FROST INSIDE REFRIGERATOR Moisture collects on bottom side of • Washed vegetables and fruit • Dry items before putting them.... • See PROBLEM section TEMPERATURES ARE • Freezer is not a self-piercing saddle valve. models). • Adjust Meat Keeper Temperature Control to stabilize. Remove valve. • Saddle valve on the bottom side off household water line valve. drain while in mechanism....

User Manual
Page 19
... ice every 24 hours. Ice can then be clogged. When new ice is made , dispenser should produce 25% to stabilize. CORRECTION Side mounted ice maker should operate. Ice maker will produce fresh supply. Discard stale ice. Motor overload protector will reset in proper position. ... wire signal arm. Well water pressures should operate. Water running to 4.5 pounds (approximately 4 quarts) of ice is not open . Turn freezer control to freezer. When ice is made , the dispenser should produce 4 to ice maker • has poor taste or odor. Remove ice cubes that ...
... ice every 24 hours. Ice can then be clogged. When new ice is made , dispenser should produce 25% to stabilize. CORRECTION Side mounted ice maker should operate. Ice maker will produce fresh supply. Discard stale ice. Motor overload protector will reset in proper position. ... wire signal arm. Well water pressures should operate. Water running to 4.5 pounds (approximately 4 quarts) of ice is not open . Turn freezer control to freezer. When ice is made , the dispenser should produce 4 to ice maker • has poor taste or odor. Remove ice cubes that ...

User Manual
Page 20
.... drawer. • Track that drawers slide on is dirty. • LIGHT BULB IS NOT ON Light bulb is not on side of refrigerator and freezer liners. Push filter in until the door has been closed. Cover food tightly. Ensure floor is touching a wall or • cabinet... BEFORE YOU CALL (CONTINUED) PROBLEM CAUSE WATER DISPENSER Dispenser will not dispense water. • Household water line valve is not • open. • Freezer door is not closed. • • Ice & water filter cartridge is clogged. • • Front filter not fully installed, if •...
.... drawer. • Track that drawers slide on is dirty. • LIGHT BULB IS NOT ON Light bulb is not on side of refrigerator and freezer liners. Push filter in until the door has been closed. Cover food tightly. Ensure floor is touching a wall or • cabinet... BEFORE YOU CALL (CONTINUED) PROBLEM CAUSE WATER DISPENSER Dispenser will not dispense water. • Household water line valve is not • open. • Freezer door is not closed. • • Ice & water filter cartridge is clogged. • • Front filter not fully installed, if •...

Ice Maker Information
Page 1
...correct fill is replaced, the fill volume must be returned to their original position and properly secured. To terminate defrost, depress and hold the freezer UP GREEN/YELLOW (Cold) arrow while depressing the fresh food DOWN (Colder) arrow 5 times in Cut-out Heater Watts Ohms 23' & ... Operating Time 65°F (18°C) Ambient 32 to 40% 90°F (32°C) Ambient 55 to 65% Freezer Temperature Refrigerator Temperature Low Side Pressure (cut-in) Low Side Pressure (cut-out) High Side Pressure (Last 1/3 of cycle) Wattage (Last 1/3 of cycle) 0° to 4°F -18° to -16...
...correct fill is replaced, the fill volume must be returned to their original position and properly secured. To terminate defrost, depress and hold the freezer UP GREEN/YELLOW (Cold) arrow while depressing the fresh food DOWN (Colder) arrow 5 times in Cut-out Heater Watts Ohms 23' & ... Operating Time 65°F (18°C) Ambient 32 to 40% 90°F (32°C) Ambient 55 to 65% Freezer Temperature Refrigerator Temperature Low Side Pressure (cut-in) Low Side Pressure (cut-out) High Side Pressure (Last 1/3 of cycle) Wattage (Last 1/3 of cycle) 0° to 4°F -18° to -16...

