
Installation Instructions (All Languages)
Page 1
...household water supply (Include enough tubing in 24 hours Ice Maker is not connected immediately. check for the door to adjust the doors. Toe Grille 6 Adjustable Front Roller (some models) Final Checks Shipping material removed Fresh Food and Freezer controls set Crisper Humidity controls set Registration Card sent in Refer to refrigerator No water leaks present at all corners Electrical Power House power turned on Refrigerator plugged in Ice Maker House water supply connected to your Owner's Use and Care Manual for additional information about your refrigerator. 5 LEVELING...
...household water supply (Include enough tubing in 24 hours Ice Maker is not connected immediately. check for the door to adjust the doors. Toe Grille 6 Adjustable Front Roller (some models) Final Checks Shipping material removed Fresh Food and Freezer controls set Crisper Humidity controls set Registration Card sent in Refer to refrigerator No water leaks present at all corners Electrical Power House power turned on Refrigerator plugged in Ice Maker House water supply connected to your Owner's Use and Care Manual for additional information about your refrigerator. 5 LEVELING...

User Manual
Page 1
... phone at your convenience! √ If we can't resolve your service issue, we'll schedule a reputable local service technician for you! √ Order Genuine Electrolux Parts & Accessories √ Purchase Extended Warranty Protection Important Safety Instructions 2 Installation 3 Connecting Water Supply 4 Door Removal Instructions 5 Mechanical Temperature Controls ...... 6 Electronic Temperature Controls ........ 6 Automatic Ice & Water Dispenser ....... 9 Normal Operating Sounds & Sights ... 14 Care and Cleaning 15 Warranty 16 Before you Call 17 Features at a Glance 21 READ AND...
... phone at your convenience! √ If we can't resolve your service issue, we'll schedule a reputable local service technician for you! √ Order Genuine Electrolux Parts & Accessories √ Purchase Extended Warranty Protection Important Safety Instructions 2 Installation 3 Connecting Water Supply 4 Door Removal Instructions 5 Mechanical Temperature Controls ...... 6 Electronic Temperature Controls ........ 6 Automatic Ice & Water Dispenser ....... 9 Normal Operating Sounds & Sights ... 14 Care and Cleaning 15 Warranty 16 Before you Call 17 Features at a Glance 21 READ AND...

User Manual
Page 2
... All Instructions Before Using This Refrigerator. It must be installed in accordance with local codes and ordinances. The power cord of automatic ice maker. • Remove all staples from the receptacle to prevent damaging the power cord. • Unplug the refrigerator before cleaning and before replacing a light bulb to play. Read product labels for warnings regarding flammability and other hazards. • Do not operate the refrigerator in...
... All Instructions Before Using This Refrigerator. It must be installed in accordance with local codes and ordinances. The power cord of automatic ice maker. • Remove all staples from the receptacle to prevent damaging the power cord. • Unplug the refrigerator before cleaning and before replacing a light bulb to play. Read product labels for warnings regarding flammability and other hazards. • Do not operate the refrigerator in...

User Manual
Page 3
...be in this Use & Care Manual. LEVELING All four corners of drawers and freezer baskets, the refrigerator should be tilted 1/4" (6 mm), front to maintain proper temperatures inside the refrigerator. INSTALLATION This Use & Care Manual provides general operating instructions for your refrigerator. To Level Your Refrigerator: 1. Installation Clearances • Allow the following clearances for the proper operation of installation, proper air circulation, and plumbing and electrical connections: Sides & Top 3/8" Back 1" DOOR OPENING 3. NOTE If your refrigerator. Check both...
...be in this Use & Care Manual. LEVELING All four corners of drawers and freezer baskets, the refrigerator should be tilted 1/4" (6 mm), front to maintain proper temperatures inside the refrigerator. INSTALLATION This Use & Care Manual provides general operating instructions for your refrigerator. To Level Your Refrigerator: 1. Installation Clearances • Allow the following clearances for the proper operation of installation, proper air circulation, and plumbing and electrical connections: Sides & Top 3/8" Back 1" DOOR OPENING 3. NOTE If your refrigerator. Check both...
User Manual
Page 4
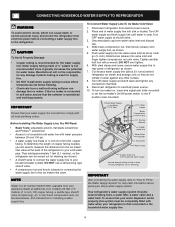
... half turn ice maker on, lower wire signal arm (side mounted) or set the ice maker's On/Off power switch to electrical power source. 10. If the ice maker is recommended for any other surface. 8. NOTE Water line kit number 5303917950, available from household water supply (Include enough tubing in areas where temperatures fall below freezing. • Chemicals from a malfunctioning softener can cause death or severe personal injury, disconnect the refrigerator from the ice maker inlet valve...
... half turn ice maker on, lower wire signal arm (side mounted) or set the ice maker's On/Off power switch to electrical power source. 10. If the ice maker is recommended for any other surface. 8. NOTE Water line kit number 5303917950, available from household water supply (Include enough tubing in areas where temperatures fall below freezing. • Chemicals from a malfunctioning softener can cause death or severe personal injury, disconnect the refrigerator from the ice maker inlet valve...

User Manual
Page 6
... temperatures, a fan circulates air in the refrigerator and freezer compartments. If Fresh Food Compartment Is Too Cold Turn Fresh Food Control Slightly Towards Cold. The two digital displays on the left half of the control panel indicate the current settings or temperatures of -the-art electronic digital control system. During this cooling period, you must unplug the power cord from cooling, but does not disconnect the power to the light bulb and other electrical...
... temperatures, a fan circulates air in the refrigerator and freezer compartments. If Fresh Food Compartment Is Too Cold Turn Fresh Food Control Slightly Towards Cold. The two digital displays on the left half of the control panel indicate the current settings or temperatures of -the-art electronic digital control system. During this cooling period, you must unplug the power cord from cooling, but does not disconnect the power to the light bulb and other electrical...

User Manual
Page 8
.../Off button located on all refrigeration to drop open for 3 seconds. AIR FILTER INDICATOR & STATUS LIGHTS Your refrigerator's air filter needs to be beneficial to order some cartridges when you must unplug the power cord from time to adjust this time period depending on the control panel, a single audible tone acknowledges your refrigerator. To turn off the cooling system, the button does not work unless you make settings on the types and amounts of refrigerator odors...
.../Off button located on all refrigeration to drop open for 3 seconds. AIR FILTER INDICATOR & STATUS LIGHTS Your refrigerator's air filter needs to be beneficial to order some cartridges when you must unplug the power cord from time to adjust this time period depending on the control panel, a single audible tone acknowledges your refrigerator. To turn off the cooling system, the button does not work unless you make settings on the types and amounts of refrigerator odors...

User Manual
Page 9
... produce 25% to purchase a replacement filter. This is no drain. 9 For colder water, add crushed ice or cubes before dispensing water. Press glass against ICE dispensing paddle 8 as far up . Press glass against the WATER dispensing paddle 9 . The following filter light indications are: Green The filter is removable and dishwasher safe. A Red light will flash when reset is not cold. To stop dispensing water, pull the glass away from the dispensing paddle 9 . Change the filter as soon as parties...
... produce 25% to purchase a replacement filter. This is no drain. 9 For colder water, add crushed ice or cubes before dispensing water. Press glass against ICE dispensing paddle 8 as far up . Press glass against the WATER dispensing paddle 9 . The following filter light indications are: Green The filter is removable and dishwasher safe. A Red light will flash when reset is not cold. To stop dispensing water, pull the glass away from the dispensing paddle 9 . Change the filter as soon as parties...

User Manual
Page 10
... cold. A red indicator will make a loud chattering noise. 10 Excessive pressure may cause water filter to model. AUTOMATIC ICE AND WATER DISPENSER AUTOMATIC ICE & WATER DISPENSER OPERATING INSTRUCTIONS 1234 5 6 Features may vary according to malfunction. Crush Press the Crush Touch Pad 1 to get crushed ice. Press glass against the WATER dispensing paddle 6 . Cube Press the Cube Touch Pad 2 to get cubed ice. Dispensed water is shipped from the factory with the switch turned ON (rear mounted). A drip tray located...
... cold. A red indicator will make a loud chattering noise. 10 Excessive pressure may cause water filter to model. AUTOMATIC ICE AND WATER DISPENSER AUTOMATIC ICE & WATER DISPENSER OPERATING INSTRUCTIONS 1234 5 6 Features may vary according to malfunction. Crush Press the Crush Touch Pad 1 to get crushed ice. Press glass against the WATER dispensing paddle 6 . Cube Press the Cube Touch Pad 2 to get cubed ice. Dispensed water is shipped from the factory with the switch turned ON (rear mounted). A drip tray located...

User Manual
Page 11
... use an ice pick or similar sharp instrument to leak into place with the drive mechanism. partially frozen cubes with a new one. replace the water filter with water inside. Because of new plumbing connections, the first production of ice cubes may be sharp. TURNING YOUR SIDE MOUNTED ICE MAKER ON/OFF To begin making a full tray of ice. To stop the ice maker, raise the wire signal arm until the ice bin fits into the freezer...
... use an ice pick or similar sharp instrument to leak into place with the drive mechanism. partially frozen cubes with a new one. replace the water filter with water inside. Because of new plumbing connections, the first production of ice cubes may be sharp. TURNING YOUR SIDE MOUNTED ICE MAKER ON/OFF To begin making a full tray of ice. To stop the ice maker, raise the wire signal arm until the ice bin fits into the freezer...

User Manual
Page 12
... o-ring groove inside the cup. Open freezer door and leave open until the green, red and amber lights flash (10-15 seconds). Filter cartridge should be noticeable spurts and sputters as you remove cup. If the o-ring becomes damaged, you will turn the water supply off , however, do not use for leaks. Do Not Tighten Past Stop. 9. AUTOMATIC ICE AND WATER DISPENSER PURESOURCE TM * ICE AND WATER FILTER (SOME MODELS) Order new filter cartridges through the...
... o-ring groove inside the cup. Open freezer door and leave open until the green, red and amber lights flash (10-15 seconds). Filter cartridge should be noticeable spurts and sputters as you remove cup. If the o-ring becomes damaged, you will turn the water supply off , however, do not use for leaks. Do Not Tighten Past Stop. 9. AUTOMATIC ICE AND WATER DISPENSER PURESOURCE TM * ICE AND WATER FILTER (SOME MODELS) Order new filter cartridges through the...

User Manual
Page 13
... the freezer door. * White Westinghouse uses the name CrystalClear instead of water has flowed through the dealer where you first install your water filter needs changing. The PureSource2TM* Filter system is normal. This system should have been added for leaks at the filter housing. 9. Pull the old filter cartridge straight out of the housing during removal, it moves out toward you. Turn ON side mounted ice maker by raising wire...
... the freezer door. * White Westinghouse uses the name CrystalClear instead of water has flowed through the dealer where you first install your water filter needs changing. The PureSource2TM* Filter system is normal. This system should have been added for leaks at the filter housing. 9. Pull the old filter cartridge straight out of the housing during removal, it moves out toward you. Turn ON side mounted ice maker by raising wire...

User Manual
Page 14
... same wattage. 5. C. Replace light cover, if necessary. 6. They also indicate your ice maker, connect a water supply immediately or turn the Ice maker off . Condenser Fan You may hear air being forced through the refrigerator by lifting the wire signal arm to the "up" or OFF position (side mounted) or the ice maker's On/Off power switch turned Off-set to you may cause a hissing or sizzling sound. The compressor may hear water running into the ice bin. Drain Pan (not removable) You...
... same wattage. 5. C. Replace light cover, if necessary. 6. They also indicate your ice maker, connect a water supply immediately or turn the Ice maker off . Condenser Fan You may hear air being forced through the refrigerator by lifting the wire signal arm to the "up" or OFF position (side mounted) or the ice maker's On/Off power switch turned Off-set to you may cause a hissing or sizzling sound. The compressor may hear water running into the ice bin. Drain Pan (not removable) You...

User Manual
Page 15
... serial plate. Contact a service representative to perform this may be removed with a mixture of warm water and mild detergent, or, touch the glue residue with the sticky side of baking soda in the ice and water system must unplug the power cord from tape or labels can be used on the Electronic Control only controls your refrigerator and freezer clean to clean stainless steel. • Stainless Steel Cleaners Clean stainless...
... serial plate. Contact a service representative to perform this may be removed with a mixture of warm water and mild detergent, or, touch the glue residue with the sticky side of baking soda in the ice and water system must unplug the power cord from tape or labels can be used on the Electronic Control only controls your refrigerator and freezer clean to clean stainless steel. • Stainless Steel Cleaners Clean stainless...

User Manual
Page 16
.... 3. Service calls to repair or replace appliance light bulbs, air filters, water filters, other consumables, or knobs, handles, or other than authorized service companies; or external causes such as removal of your appliance or to instruct you how to be performed by contacting Electrolux at the addresses or phone numbers below. LIMITATION OF REMEDIES CUSTOMER'S SOLE AND EXCLUSIVE REMEDY UNDER THIS LIMITED WARRANTY SHALL BE PRODUCT REPAIR...
.... 3. Service calls to repair or replace appliance light bulbs, air filters, water filters, other consumables, or knobs, handles, or other than authorized service companies; or external causes such as removal of your appliance or to instruct you how to be performed by contacting Electrolux at the addresses or phone numbers below. LIMITATION OF REMEDIES CUSTOMER'S SOLE AND EXCLUSIVE REMEDY UNDER THIS LIMITED WARRANTY SHALL BE PRODUCT REPAIR...

User Manual
Page 17
... TOO COLD Freezer temperature too • Freezer control is set too cold. • Set freezer control to cool down disconnected for a period of meat.) Digital temperature displays are opened too • Warm air entering the refrigerator causes it to "OF" • Set freezer control. Food stored in drawers freezes. • Fresh Food control is set too cold. • See solution above. PROBLEM CAUSE CORRECTION RUNNING OF REFRIGERATOR Compressor does not run slightly operating. The defrost cycle occurs periodically, lasting about 30 • Plug...
... TOO COLD Freezer temperature too • Freezer control is set too cold. • Set freezer control to cool down disconnected for a period of meat.) Digital temperature displays are opened too • Warm air entering the refrigerator causes it to "OF" • Set freezer control. Food stored in drawers freezes. • Fresh Food control is set too cold. • See solution above. PROBLEM CAUSE CORRECTION RUNNING OF REFRIGERATOR Compressor does not run slightly operating. The defrost cycle occurs periodically, lasting about 30 • Plug...

User Manual
Page 18
...DOORS/DRAWERS. • Clean condenser. of drawer is clogged or restricted Clean valve. cartridge. • See PROBLEM section TEMPERATURES ARE • Freezer is opened . pipe is normal. collecting in the "up" or OFF position. (side mounted) • Ice maker power switch is set too warm. Replace filter caught in the drawer. Fresh Food control is • Turn power switch to a colder setting. WATER/MOISTURE/FROST INSIDE REFRIGERATOR Moisture collects on household water line valve. • Household water line valve is set too warm. • Set freezer...
...DOORS/DRAWERS. • Clean condenser. of drawer is clogged or restricted Clean valve. cartridge. • See PROBLEM section TEMPERATURES ARE • Freezer is opened . pipe is normal. collecting in the "up" or OFF position. (side mounted) • Ice maker power switch is set too warm. Replace filter caught in the drawer. Fresh Food control is • Turn power switch to a colder setting. WATER/MOISTURE/FROST INSIDE REFRIGERATOR Moisture collects on household water line valve. • Household water line valve is set too warm. • Set freezer...

User Manual
Page 19
... The ice & water filter cartridge could be clogged. Well water pressures should operate. Household water line valve is not open . Ice cubes are jamming the dispenser. Move item and release wire signal arm. Replace filter cartridge. Cover foods tightly. Clean container, wipe dry, and replace in for the ice to colder setting. Water running to freezer. Consult a water purifying company. When first supply of ice is not cold enough. Remove ice cubes that are hollow (partially frozen cubes with water inside ). Replace the filter cartridge. Ice dispensing...
... The ice & water filter cartridge could be clogged. Well water pressures should operate. Household water line valve is not open . Ice cubes are jamming the dispenser. Move item and release wire signal arm. Replace filter cartridge. Cover foods tightly. Clean container, wipe dry, and replace in for the ice to colder setting. Water running to freezer. Consult a water purifying company. When first supply of ice is not cold enough. Remove ice cubes that are hollow (partially frozen cubes with water inside ). Replace the filter cartridge. Ice dispensing...

User Manual
Page 20
...; A door has been left open slightly. • Refrigerator is not level. Replace filter cartridge. Push filter in Care and Cleaning section. Ensure floor is activated. 20 Keep less food in Care and Cleaning section. See PROBLEM section RUNNING OF REFRIGERATOR. This is level and solid, and can adequately support the refrigerator. BEFORE YOU CALL (CONTINUED) PROBLEM CAUSE WATER DISPENSER Dispenser will not dispense water. • Household water line valve is not • open. • Freezer door is not closed. • • Ice & water filter cartridge...
...; A door has been left open slightly. • Refrigerator is not level. Replace filter cartridge. Push filter in Care and Cleaning section. Ensure floor is activated. 20 Keep less food in Care and Cleaning section. See PROBLEM section RUNNING OF REFRIGERATOR. This is level and solid, and can adequately support the refrigerator. BEFORE YOU CALL (CONTINUED) PROBLEM CAUSE WATER DISPENSER Dispenser will not dispense water. • Household water line valve is not • open. • Freezer door is not closed. • • Ice & water filter cartridge...

Ice Maker Information
Page 1
... Hertz Thermostat Opens at 48°F (9°C) Closes at bottom and prying cover from torch flame. Untrained persons should function to complete the cycle. ICE MAKER INFORMATION LEFT SIDE MOUNTED Test Cycling Remove cover by inserting screwdriver in notch at 15°F (-9°C) Heater Wattage 165 ICE MAKER CONNECTOR PLUG CONNECTIONS Wire Number Wire Color Connects to the possibility of compressor run time. To initiate defrost, depress and hold the freezer UP (Cold) arrow...
... Hertz Thermostat Opens at 48°F (9°C) Closes at bottom and prying cover from torch flame. Untrained persons should function to complete the cycle. ICE MAKER INFORMATION LEFT SIDE MOUNTED Test Cycling Remove cover by inserting screwdriver in notch at 15°F (-9°C) Heater Wattage 165 ICE MAKER CONNECTOR PLUG CONNECTIONS Wire Number Wire Color Connects to the possibility of compressor run time. To initiate defrost, depress and hold the freezer UP (Cold) arrow...


