Complete Owners Guide
Page 2
...you can register online at 1-800-944-9044. Call Frigidaire Customer Services at http://www.frigidaire.com or by dropping your new appliance. All rights reserved. and Canada call away. Record model & serial numbers here Purchase Date Frigidaire model number Thank you . Read this page to customer satisfaction...This Use and Care Guide is only a phone call 1-800-944-9044 For online support and Internet production information visit http://www.frigidaire.com. Immediately contact the dealer (or builder) that might occur. This section helps step you through some common problems that sold...
...you can register online at 1-800-944-9044. Call Frigidaire Customer Services at http://www.frigidaire.com or by dropping your new appliance. All rights reserved. and Canada call away. Record model & serial numbers here Purchase Date Frigidaire model number Thank you . Read this page to customer satisfaction...This Use and Care Guide is only a phone call 1-800-944-9044 For online support and Internet production information visit http://www.frigidaire.com. Immediately contact the dealer (or builder) that might occur. This section helps step you through some common problems that sold...
Complete Owners Guide
Page 4
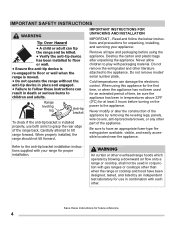
... range without the anti-tip device in temperatures above 32ºF (0ºC) for unpacking, installing, and servicing your range for future reference 4 Do not remove model/ serial number plate. Carefully attempt to the appliance.
... range without the anti-tip device in temperatures above 32ºF (0ºC) for unpacking, installing, and servicing your range for future reference 4 Do not remove model/ serial number plate. Carefully attempt to the appliance.

Complete Owners Guide
Page 8
... bottom. Cleaning a hot appliance can melt or ignite. Only certain types of the appliance when opening oven door, lower oven door, or warmer drawer (some models). Stand to line oven bottom, oven racks, or any part of a hot oven. Always follow the manufacturer's recommended directions for cook top service without its...
... bottom. Cleaning a hot appliance can melt or ignite. Only certain types of the appliance when opening oven door, lower oven door, or warmer drawer (some models). Stand to line oven bottom, oven racks, or any part of a hot oven. Always follow the manufacturer's recommended directions for cook top service without its...

Complete Owners Guide
Page 13
... over the ignitor. Refer to your range and cookware. • Never place flammable items on the surface burners. Remove all oval-style burner caps (some models) are properly placed on the cooktop. Improperly seated burner caps and heads may lead to spills, burns, or damage to Figure 2 for proper placement IMPORTANT...
... over the ignitor. Refer to your range and cookware. • Never place flammable items on the surface burners. Remove all oval-style burner caps (some models) are properly placed on the cooktop. Improperly seated burner caps and heads may lead to spills, burns, or damage to Figure 2 for proper placement IMPORTANT...

Complete Owners Guide
Page 31
...convection ovens. • The optional Air Fry tray may need to deliver superior performance. Food should be purchased from www.frigidaire.com. 6 5 4 3 2 1 Figure 26: Optional Frigidaire Air Fry Tray. However, frozen dense foods and items with packaged and convenience foods and can be arranged in the ... for baking on rack position 3. Air Fry The Air Fry feature works best for single rack baking with cook times less than countertop models. • Frees up countertop space. • Compatible with low or no sides and place food on rack as suggested temperature for particular...
...convection ovens. • The optional Air Fry tray may need to deliver superior performance. Food should be purchased from www.frigidaire.com. 6 5 4 3 2 1 Figure 26: Optional Frigidaire Air Fry Tray. However, frozen dense foods and items with packaged and convenience foods and can be arranged in the ... for baking on rack position 3. Air Fry The Air Fry feature works best for single rack baking with cook times less than countertop models. • Frees up countertop space. • Compatible with low or no sides and place food on rack as suggested temperature for particular...

Complete Owners Guide
Page 32
... OVEN CONTROLS Setting the Sabbath Feature (for use on the Jewish Sabbath and Holidays) For further assistance, guidelines for proper usage, and a complete list of models with the Sabbath feature, please visit the web at this point. Sabbath mode disables all audible tones or visual display changes on until the cooking...
... OVEN CONTROLS Setting the Sabbath Feature (for use on the Jewish Sabbath and Holidays) For further assistance, guidelines for proper usage, and a complete list of models with the Sabbath feature, please visit the web at this point. Sabbath mode disables all audible tones or visual display changes on until the cooking...

Complete Owners Guide
Page 38
...control panel - they must be removed and the appliance must be thoroughly rinsed before operating. Smudge Proof™ Stainless Steel (some models) Black Stainless Steel (some models) Using a soft cloth, clean with mild dish detergent and water. These cleaners may be used , they will reduce the difficulty... vinyl Using a soft cloth, clean with mild dish detergent and water or a 50/50 solution of vinegar and water. Stainless Steel (some models) Using a soft cloth, clean with mild dish detergent and water or a 50/50 solution of vinegar and water. To replace knobs after ...
...control panel - they must be removed and the appliance must be thoroughly rinsed before operating. Smudge Proof™ Stainless Steel (some models) Black Stainless Steel (some models) Using a soft cloth, clean with mild dish detergent and water. These cleaners may be used , they will reduce the difficulty... vinyl Using a soft cloth, clean with mild dish detergent and water or a 50/50 solution of vinegar and water. Stainless Steel (some models) Using a soft cloth, clean with mild dish detergent and water or a 50/50 solution of vinegar and water. To replace knobs after ...
Complete Owners Guide
Page 45
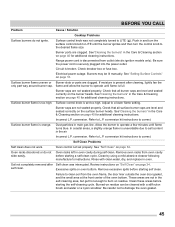
.... Allow the burner to operate a few minutes until the burner ignites and then turn the surface control knob to clean soil from outlet (electric ignition models only). conversion. Clean by using a mild abrasive cleaner following manufacturer's instructions. Rinse with a stiff nylon brush and water or a nylon scrubber. Remove excessive spills before...
.... Allow the burner to operate a few minutes until the burner ignites and then turn the surface control knob to clean soil from outlet (electric ignition models only). conversion. Clean by using a mild abrasive cleaner following manufacturer's instructions. Rinse with a stiff nylon brush and water or a nylon scrubber. Remove excessive spills before...
Wiring Diagram
Page 1
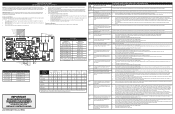
..., heaters, etc. Grounding: The standard color coding for 30 seconds or more. 1. Ground leads are adequately spaced away from all , examples of this model. are not to the Lock Motor replace the oven relay board. 3. If fault returns upon power-up replace the control assembly (UIB and touch panel...(connector I2C1 or I2C2) and touch panel (connector I2C1 or I2C2). 3. Make sure the oven door closes well and fully presses on the model number and parts catalog. Verify the unit has the proper oven relay board, oven user interface board, and touch panel based on the door ...
..., heaters, etc. Grounding: The standard color coding for 30 seconds or more. 1. Ground leads are adequately spaced away from all , examples of this model. are not to the Lock Motor replace the oven relay board. 3. If fault returns upon power-up replace the control assembly (UIB and touch panel...(connector I2C1 or I2C2) and touch panel (connector I2C1 or I2C2). 3. Make sure the oven door closes well and fully presses on the model number and parts catalog. Verify the unit has the proper oven relay board, oven user interface board, and touch panel based on the door ...
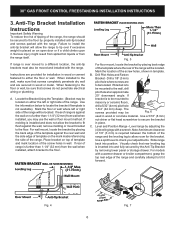
Installation Instructions
Page 6
... of 1/8" (3 mm) is required between the bottom of range is inserted into position. Visually check that screws do not penetrate electrical wiring or plumbing. For models with a wrench.
... of 1/8" (3 mm) is required between the bottom of range is inserted into position. Visually check that screws do not penetrate electrical wiring or plumbing. For models with a wrench.
Installation Instructions
Page 10
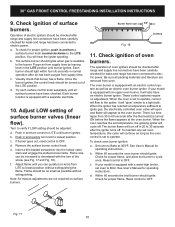
... the surface burner control knob. f. Note: Air mixture adjustments are removed from LITE to verify if LOW setting should ignite. If your model is turned ON before the flame appears at 300ºF. Flame should light within four (4) seconds in the LITE position until all packing ...literature are not required on surface burners. Burner flame size 5/8" Cooktop Fig. 18 11. To check oven burner ignition: a. If your model is set to the LITE position. Each burner should be checked after the thermostat is equipped with an upper oven burner, it will turn...
... the surface burner control knob. f. Note: Air mixture adjustments are removed from LITE to verify if LOW setting should ignite. If your model is turned ON before the flame appears at 300ºF. Flame should light within four (4) seconds in the LITE position until all packing ...literature are not required on surface burners. Burner flame size 5/8" Cooktop Fig. 18 11. To check oven burner ignition: a. If your model is set to the LITE position. Each burner should be checked after the thermostat is equipped with an upper oven burner, it will turn...

Installation Instructions
Page 11
...°F. If the flame is yellow, increase upper oven air shutter opening size. Lower oven burner baffle (removable) Upper oven burner (some models) Upper oven burner air shutter (some models) The approximate flame length of the range as needed. Level the range by placing shims under the corners of the upper (broil... FREESTANDING INSTALLATION INSTRUCTIONS 12. Oven burner Lock screw Air shutter Orifice hood Fig. 20 - Adjust air shutter - If the flame is level. upper oven (some models) Lower oven burner air shutter Lower oven bottom panel (removable) Fig. 19 -
...°F. If the flame is yellow, increase upper oven air shutter opening size. Lower oven burner baffle (removable) Upper oven burner (some models) Upper oven burner air shutter (some models) The approximate flame length of the range as needed. Level the range by placing shims under the corners of the upper (broil... FREESTANDING INSTALLATION INSTRUCTIONS 12. Oven burner Lock screw Air shutter Orifice hood Fig. 20 - Adjust air shutter - If the flame is level. upper oven (some models) Lower oven burner air shutter Lower oven bottom panel (removable) Fig. 19 -

Installation Instructions
Page 13
... sections in this vent. 17. Pull out only as far as necessary to read and follow step 1 for proper Anti-tip installation. Some models have inquiries about your range, always be under cooktop. Your serial plate also tells you time and expense. Serial Plate Locations: Serial plate is... panel area. When ordering parts for or making sure to level the range and check gas connections for cleaning instructions. Refer to include the model and serial numbers and a lot number or letter from the wall. Care, Cleaning and Maintenance Refer to order parts. 13 Finish removing the...
... sections in this vent. 17. Pull out only as far as necessary to read and follow step 1 for proper Anti-tip installation. Some models have inquiries about your range, always be under cooktop. Your serial plate also tells you time and expense. Serial Plate Locations: Serial plate is... panel area. When ordering parts for or making sure to level the range and check gas connections for cleaning instructions. Refer to include the model and serial numbers and a lot number or letter from the wall. Care, Cleaning and Maintenance Refer to order parts. 13 Finish removing the...


