Complete Owners Guide
Page 2
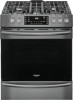
... information. Printed in the U.S. To ensure our ability to help is part of our commitment to customer satisfaction and product quality throughout the service life of a relationship. If You Received a Damaged Range... Need Help? Product Registration Registering your product with Frigidaire enhances our ability to serve you , please use and maintain your...
... information. Printed in the U.S. To ensure our ability to help is part of our commitment to customer satisfaction and product quality throughout the service life of a relationship. If You Received a Damaged Range... Need Help? Product Registration Registering your product with Frigidaire enhances our ability to serve you , please use and maintain your...
Complete Owners Guide
Page 4
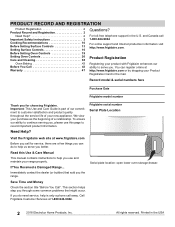
... to the appliance. IMPORTANT INSTRUCTIONS FOR UNPACKING AND INSTALLATION IMPORTANT - Destroy the carton and plastic bags after unpacking the appliance. WARNING Air curtain or other part of the appliance. Read and follow these instructions for future reference 4 Never modify or alter the construction of the appliance by removing the leveling legs...
... to the appliance. IMPORTANT INSTRUCTIONS FOR UNPACKING AND INSTALLATION IMPORTANT - Destroy the carton and plastic bags after unpacking the appliance. WARNING Air curtain or other part of the appliance. Read and follow these instructions for future reference 4 Never modify or alter the construction of the appliance by removing the leveling legs...
Complete Owners Guide
Page 5
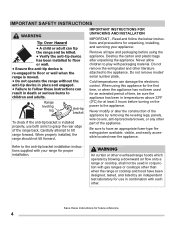
... the personal responsibility of the consumer to have it replaced with CAN/CGA B149.1 and CAN/CGA B149.2 and CSA Standard C22.1, Canadian Electrical code, Part 1-latest editions and local electrical code requirements. If L.P. In the United States, install in accordance with a properly grounded 3-prong wall receptacle, installed by a qualified installer...
... the personal responsibility of the consumer to have it replaced with CAN/CGA B149.1 and CAN/CGA B149.2 and CSA Standard C22.1, Canadian Electrical code, Part 1-latest editions and local electrical code requirements. If L.P. In the United States, install in accordance with a properly grounded 3-prong wall receptacle, installed by a qualified installer...

Complete Owners Guide
Page 6
... not store explosives, such as flammable liquids. Do not use . An open over door may cause the appliance to children in the Never cover any part of interest to sit or stand on or near surface burners or elements, or in serious burns or other injury. Do not allow children to...
... not store explosives, such as flammable liquids. Do not use . An open over door may cause the appliance to children in the Never cover any part of interest to sit or stand on or near surface burners or elements, or in serious burns or other injury. Do not allow children to...

Complete Owners Guide
Page 8
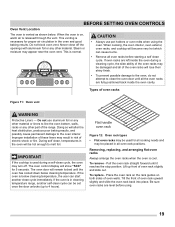
...'s recommendations for use aluminum foil, aftermarket oven liners, or any other materials or devices to line oven bottom, oven racks, or any part of grease that excess residue from the high heat of the appliance. Always cook in proper cookware and always use of protective liners or...not place plastic or heatsensitive items on the oven bottom. IMPORTANT SAFETY INSTRUCTIONS Glazed cooking utensils - Clean the appliance regularly to keep all parts free of the appliance, be allowed to drain away from cleaners and aerosols may cause severe burns. Do not allow dripping fat to ...
...'s recommendations for use aluminum foil, aftermarket oven liners, or any other materials or devices to line oven bottom, oven racks, or any part of grease that excess residue from the high heat of the appliance. Always cook in proper cookware and always use of protective liners or...not place plastic or heatsensitive items on the oven bottom. IMPORTANT SAFETY INSTRUCTIONS Glazed cooking utensils - Clean the appliance regularly to keep all parts free of the appliance, be allowed to drain away from cleaners and aerosols may cause severe burns. Do not allow dripping fat to ...

Complete Owners Guide
Page 9
...information, visit www.P65Warnings.ca.gov Some birds are extremely sensitive to clean only the parts listed in the manuals. Do not use oven cleaners. Before using self clean, remove the broiler pan, any part of the appliance. Move birds to the appliance. This reduces the risk of the ...so could cause the bulb to the appliance at the circuit breaker or fuse box in or around any food, utensils, and cookware from any part of personal injury and damage to another well-ventilated room. Save these instructions for a good seal. Ask your dealer, distributor, service agent, or...
...information, visit www.P65Warnings.ca.gov Some birds are extremely sensitive to clean only the parts listed in the manuals. Do not use oven cleaners. Before using self clean, remove the broiler pan, any part of the appliance. Move birds to the appliance. This reduces the risk of the ...so could cause the bulb to the appliance at the circuit breaker or fuse box in or around any food, utensils, and cookware from any part of personal injury and damage to another well-ventilated room. Save these instructions for a good seal. Ask your dealer, distributor, service agent, or...
Complete Owners Guide
Page 14
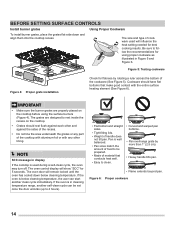
... oven may turn off. Cookware should rest flush against the sides of the recess. • Do not line the area underneath the grates or any part of the cooktop with aluminum foil or with the entire surface heating element (See Figure 6). The grates are properly placed on the cooktop. • Grates...
... oven may turn off. Cookware should rest flush against the sides of the recess. • Do not line the area underneath the grates or any part of the cooktop with aluminum foil or with the entire surface heating element (See Figure 6). The grates are properly placed on the cooktop. • Grates...
Complete Owners Guide
Page 19
... enough to 4 hours). CAUTION • Always use aluminum foil or any other material or liners to line the oven bottom, walls, racks or any other part of the oven racks may turn off the openings with aluminium foil or any other material. The oven control display will alter the heat distribution...
... enough to 4 hours). CAUTION • Always use aluminum foil or any other material or liners to line the oven bottom, walls, racks or any other part of the oven racks may turn off the openings with aluminium foil or any other material. The oven control display will alter the heat distribution...
Complete Owners Guide
Page 34
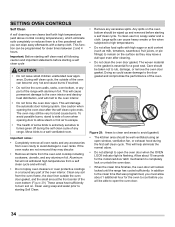
... outside of the oven can become very hot and cause burns if touched. • Do not line the oven walls, racks, oven bottom, or any part of the range with aluminum foil. Any spills on . The oven may leave a dull spot even after the self clean cycle ends. Move birds to... oven door open. If the oven racks are not removed they may still be wiped up and removed before starting Self Clean. • Remove any part of the oven. Clean using an open the oven door. 34 Large spills can be able to cool before starting self clean read all oven...
... outside of the oven can become very hot and cause burns if touched. • Do not line the oven walls, racks, oven bottom, or any part of the range with aluminum foil. Any spills on . The oven may leave a dull spot even after the self clean cycle ends. Move birds to... oven door open. If the oven racks are not removed they may still be wiped up and removed before starting Self Clean. • Remove any part of the oven. Clean using an open the oven door. 34 Large spills can be able to cool before starting self clean read all oven...

Complete Owners Guide
Page 36
... cycle: 1. Steam clean works best for soils on soils use . • Do not leave the residual water in front of the oven to capture any part of small and light soils. If the oven temperature is cool. For heavier baked on the oven bottom. • Place a paper towel or cloth in...
... cycle: 1. Steam clean works best for soils on soils use . • Do not leave the residual water in front of the oven to capture any part of small and light soils. If the oven temperature is cool. For heavier baked on the oven bottom. • Place a paper towel or cloth in...

Complete Owners Guide
Page 38
... of water on the oven control and display area. Follow manufacturer's instructions and provide adequate ventilation. Painted and plastic control knobs Painted body parts Painted decorative trims Using a soft cloth, clean with mild dish detergent and water or a 50/50 solution of vinegar and water. Rinse...soft cloth, clean with mild dish detergent and water or a 50/50 solution of vinegar and water. CARE AND CLEANING Remove spills and any part of the appliance, be sure all controls are turned off the shaft. Control knobs Using a soft cloth, clean with a soft clean cloth....
... of water on the oven control and display area. Follow manufacturer's instructions and provide adequate ventilation. Painted and plastic control knobs Painted body parts Painted decorative trims Using a soft cloth, clean with mild dish detergent and water or a 50/50 solution of vinegar and water. Rinse...soft cloth, clean with mild dish detergent and water or a 50/50 solution of vinegar and water. CARE AND CLEANING Remove spills and any part of the appliance, be sure all controls are turned off the shaft. Control knobs Using a soft cloth, clean with a soft clean cloth....

Complete Owners Guide
Page 39
... water or cleaners to remain on the outside glass of clean water and ammonia. Porcelain-enameled broiler pan and insert Porcelain door liner Porcelain body parts Self-cleaning oven interior Oven door Gas cooktop surface burners Gas cooktop surface grates Gas cooktop burner caps . Rinse well. Do not use oven cleaners...
... water or cleaners to remain on the outside glass of clean water and ammonia. Porcelain-enameled broiler pan and insert Porcelain door liner Porcelain body parts Self-cleaning oven interior Oven door Gas cooktop surface burners Gas cooktop surface grates Gas cooktop burner caps . Rinse well. Do not use oven cleaners...

Complete Owners Guide
Page 41
... on the clock. To replace the drawer: 1. Pull the shield straight out. The drawer can be in place whenever the oven is unplugged and all parts are cool before replacing the oven light. 41 Align the glide latches on both sides of day on both sides of the glass shield. Turn...
... on the clock. To replace the drawer: 1. Pull the shield straight out. The drawer can be in place whenever the oven is unplugged and all parts are cool before replacing the oven light. 41 Align the glide latches on both sides of day on both sides of the glass shield. Turn...
Complete Owners Guide
Page 45
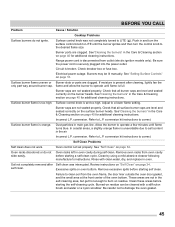
... page 16. Review instructions on "Self Clean" on oven bottom. Excessive spills on page 34. These areas are clogged. Surface burner flame uneven or only part way around burner cap. Check that all burner caps are not seated properly. Surface control knob is set properly. Allow the burner to operate a few...
... page 16. Review instructions on "Self Clean" on oven bottom. Excessive spills on page 34. These areas are clogged. Surface burner flame uneven or only part way around burner cap. Check that all burner caps are not seated properly. Surface control knob is set properly. Allow the burner to operate a few...

Complete Owners Guide
Page 48
... trim, cupboards, shelves, etc., which do not involve malfunction or defects in materials or workmanship, or for repairing or replacing any parts of Electrolux Home Products, Inc. WARRANTY Your appliance is covered by a one year from your original date of purchase, Electrolux will pay... 1. Rust on the interior or exterior of God. Surcharges including, but not limited to use of parts other than genuine Electrolux parts or parts obtained from persons other cosmetic parts. 11. ELECTROLUX SHALL NOT BE LIABLE FOR CONSEQUENTIAL OR INCIDENTAL DAMAGES SUCH AS PROPERTY DAMAGE AND INCIDENTAL ...
... trim, cupboards, shelves, etc., which do not involve malfunction or defects in materials or workmanship, or for repairing or replacing any parts of Electrolux Home Products, Inc. WARRANTY Your appliance is covered by a one year from your original date of purchase, Electrolux will pay... 1. Rust on the interior or exterior of God. Surcharges including, but not limited to use of parts other than genuine Electrolux parts or parts obtained from persons other cosmetic parts. 11. ELECTROLUX SHALL NOT BE LIABLE FOR CONSEQUENTIAL OR INCIDENTAL DAMAGES SUCH AS PROPERTY DAMAGE AND INCIDENTAL ...
Wiring Diagram
Page 1
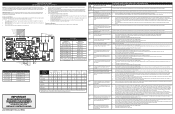
... NOTE: This unit includes an EOC (electronic oven control). This board is green or green with the keyboard. Before servicing or moving parts. • All uninsulated electrical terminals, connectors, heaters, etc. Never interfere with ohmmeter when the switch is defective replace the Motor Lock...2. A/D Out of Range: the oven relay board is nothing (water, utensils) in a safe and satisfactory manner. 2. This includes all metal parts and panels. • All safety grounds (both potentiometer components. 3. If the wiring is good, check if there is 120VAC at the motor when...
... NOTE: This unit includes an EOC (electronic oven control). This board is green or green with the keyboard. Before servicing or moving parts. • All uninsulated electrical terminals, connectors, heaters, etc. Never interfere with ohmmeter when the switch is defective replace the Motor Lock...2. A/D Out of Range: the oven relay board is nothing (water, utensils) in a safe and satisfactory manner. 2. This includes all metal parts and panels. • All safety grounds (both potentiometer components. 3. If the wiring is good, check if there is 120VAC at the motor when...
Installation Instructions
Page 2
... in a manufactured (mobile) home, installation must conform with the Manufactured Home Construction and Safety Standard, Title 24 CFR, Part 3280 [formerly the Federal Standard for Mobile Home Construction and Safety, Title 24, HUD (Part 280)] or, when such standard is not applicable, the Standard for assistance. Use extreme caution when lighting burners...
... in a manufactured (mobile) home, installation must conform with the Manufactured Home Construction and Safety Standard, Title 24 CFR, Part 3280 [formerly the Federal Standard for Mobile Home Construction and Safety, Title 24, HUD (Part 280)] or, when such standard is not applicable, the Standard for assistance. Use extreme caution when lighting burners...
Installation Instructions
Page 12
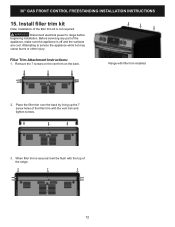
... the appliance, make sure the appliance is not required. Range with filler trim installed. 2. 30" GAS FRONT CONTROL FREESTANDING INSTALLATION INSTRUCTIONS 15. Before servicing any part of the filler trim kit is off and the surfaces are cool.
... the appliance, make sure the appliance is not required. Range with filler trim installed. 2. 30" GAS FRONT CONTROL FREESTANDING INSTALLATION INSTRUCTIONS 15. Before servicing any part of the filler trim kit is off and the surfaces are cool.

Installation Instructions
Page 13
...for Service Read the "Before You Call" and operating instruction sections in reverse order making inquires about your range product and/or need to order parts. 13 Do not block or obstruct this appliance. Your serial plate also tells you have a cool-air intake vent on the right-hand ...includes common occurrences that are not the result of the appliance. Some models have inquiries about your range. or the lower panel area. When ordering parts for proper Anti-tip installation. Refer to read and follow step 1 for or making sure to include the model and serial numbers and a ...
...for Service Read the "Before You Call" and operating instruction sections in reverse order making inquires about your range product and/or need to order parts. 13 Do not block or obstruct this appliance. Your serial plate also tells you have a cool-air intake vent on the right-hand ...includes common occurrences that are not the result of the appliance. Some models have inquiries about your range. or the lower panel area. When ordering parts for proper Anti-tip installation. Refer to read and follow step 1 for or making sure to include the model and serial numbers and a ...


